The shock sensor is part of the security alarm system used in cars. With its help, the car owner can find out that the vehicle has been hit.
The goals of people who hit cars vary. Sometimes this happens by accident. In some cases, we are talking about attempts to break into a car, steal and steal the contents of the interior.
In addition to protecting cars, these sensors are widely used in everyday life, for the protection of enterprises, institutions, office buildings, etc. Before installing and configuring sensors, you should know what they are used for and where they are mounted on cars.
Why do you need to change the sensitivity of the shock sensor?
The process is performed in the following cases:
- if the alarm is too sensitive (triggered by thunderstorms, passing cars and other interference);
- if she does not react in any way even to impacts on the car.
Before starting work, you need to determine what causes the car alarm to not work properly. There are several most likely reasons:
- components are poorly secured;
- The car alarm parameters are incorrectly adjusted.
Check that the sensors and electronic alarm control unit are securely installed. Perhaps the problem can be solved by simply returning them to their place.
What are they used for?
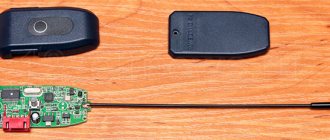
Structurally, the shock sensor is a small compact device. In most cases, the sensor is almost invisible. Install it on areas of the machine that are most likely to be subject to shock.
When a shock or sudden movement occurs, the sensor is triggered, activates the alarm, and sends a warning signal to the car owner via the control panel or directly to a smartphone.
The sensor will respond to any movements that cause the surface where the device is attached to vibrate. The reaction occurs in a matter of moments, and the driver receives the appropriate information.
The main task of the sensor is to prevent crime, among which it is worth highlighting car theft, hijacking, damage to property, unauthorized entry into the vehicle, etc.
Adjusting the sensitivity of the shock sensor
The general sequence of actions when setting the sensitivity of the shock sensor is given below:
- Disconnect the battery. Attention! The documentation for some car alarms prohibits this. In this case, remove the light fuse to prevent the battery from losing energy too quickly.
- Locate the installation location of the alarm sensor. In most cases it is located under the front panel, but different options are possible. Read the instructions for the vehicle. Look for the term VALET on it - this is the standard designation for a shock sensor.
- Before you start adjusting the parameters, disable the security mode. Switch the system to programming mode. The exact method of setting the shock sensor depends on the features of the installed car alarm. In older models, a screw is used for this; in new models, buttons are used.
- Pay attention to the alarm sensitivity scale. It indicates the available levels. Their number usually ranges from 0 to 10, where 0 is a complete lack of reaction to events, and 10 is the maximum possible sensitivity. In new cars the indicator is usually set to 5.
- It is not recommended to increase the sensitivity of the shock sensor too much. Most alarm models are designed for approximately 10 alarms per cycle, after which the car will have to be reset to security mode.
The choice of specific car alarm parameters depends on the characteristics of the car (its weight, method of installing security components) and the situation in the parking area. When choosing a suitable indicator, it is recommended to constantly check the stability of the sensor response. Select a specific number and lightly hit the body. If there is no reaction, hit a little harder. Determine the force at which the security alarm sounds.
To achieve maximum accuracy, put the car in security mode and wait about three minutes, then check the sensitivity of the alarm. After each check, wait a couple more minutes. In many protective systems, car alarms are switched to high sensitivity mode if the housing has just been subjected to mechanical stress.
Sometimes it is possible to set the alarm in semi-automatic mode. In this case, the sensor is switched to the “learning” mode, after which it is necessary to apply blows of varying strength to the body. However, remember that car alarms perceive mechanical loads on different parts of the car differently. For example, a blow to a wheel is “felt” weaker than a blow to the hood.
Installation locations
Now you should find out where to look for this same shock sensor in the car on the alarm and how to find the alarm sensors. In general, a car has several main points on which these devices are usually installed.
The first step is to look at the security system manufacturer's instructions. If the sensors are included in the kit, there is usually a list of points and zones where it is best to install a shock sensor for a specific alarm. Most often, installation is carried out in standard places where an impact is likely to occur. If it turns out that the motorist has installed the sensor incorrectly, it may work without objective reasons or may not turn on at those moments when it is really necessary.
Even the fact that an attacker may know where sensors are usually installed will not help him avoid being triggered if access to the car requires breaking glass or trying to break down a door.
When the sensor is in the correct locations and positioned in accordance with the manufacturer's recommendations, the vehicle's protection is greatly improved. Where installation of a shock sensor is not provided, some still install an auxiliary sensor. How useful it will be, or, on the contrary, create additional difficulties, depends on the specific situation.
There are several basic recommendations regarding the placement of sensors:
- It is better to mount the sensors on a metal part of the body from the inside of the car;
- It is desirable that the sensor is symmetrical relative to the axis of the car;
- the device cannot be mounted on the bottom of the car;
- It is not recommended to mount sensors on plastic elements, as this leads to a decrease in sensitivity;
- experts advise installing the sensor on a shield that separates the interior and engine compartment;
- Typically, sensors are mounted on all doors, the trunk door and the hood.
The final decision regarding the placement of shock sensors should be made based on the recommendations of the alarm manufacturer, advice from installation experts and the available number of sensors.
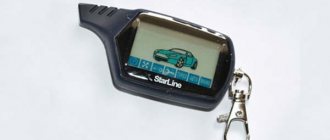
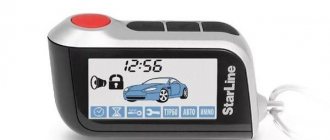
Setting up the Starline alarm shock sensor
Let's look at the regulation process using the example of the widely used Starline A61 car alarm.
The process is quite simple. The only tool you will need is a thin Phillips screwdriver. The main difficulty is finding an installed Starline device. The official instructions say that it should be placed at the base of the steering column. Service centers usually follow this instruction by placing the alarm component in the column next to the pedals.
The Starline shock sensor is equipped with subtle mechanisms for adjusting its parameters. A screwdriver is used to adjust the sensitivity. If you turn the mechanism to the left, the sensitivity of the car alarm decreases, if you turn it to the right, it increases.
During the process, it is recommended to periodically check the effectiveness of the work. The Starline A61 car alarm operates on the piezoelectric effect. When a car body is hit, a sound wave is generated, which propagates through the internal components and reaches the Starline impact sensor. Optimal performance is only guaranteed if the sensitive alarm component is securely fixed to metal.
To adjust the sensitivity of the car alarm, turn both zones down and add a warning zone (located next to the green LED). Set the car to security mode and wait about a minute. Now hit her body firmly. If the device sensitivity is too high, lower the setting. If the alarm doesn't work, increase it. In a similar way, you can configure the full alarm zone of the Starline car alarm.
How it works
The first step is to understand how shock sensors work on alarm systems installed on vehicles.
There are 2 main modes of operation of such a sensor. This largely allows us to understand how such a device works.
- Warning. This is the first mode, which is activated when there are minor impacts on the car body within the radius of the sensor. The alarm generates several short beeps. Some security systems additionally signal with headlights. This mode allows you to inform the attacker that the machine is under protection and surveillance. The advantage of this mode is that it does not provoke loud sounds. After all, the sensor can be triggered when something accidentally falls on the roof, a cat jumps on the car, or children accidentally hit the car with a ball. At the same time, the potential attacker understands that it will not be possible to open the car silently.
- Anxiety. This is the second mode, which is activated only if a strong blow is applied. As a result, the alarm sounds loud when triggered.
Inside the sensor there is a special microcircuit that allows you to adjust the response sensitivity and determines at what impact the warning or alarm mode will be activated.
The main difficulties when setting up
If, after adjustment, the Starline shock sensor continues to respond incorrectly, try resetting the parameters. Information on how to do this is provided in the instructions. If there is no information, it is better to go to a car service center - they know how to work with any type of alarm system.
The process of regulating the Starline car alarm is relatively simple. The main thing is to correctly check the result and set the desired level of sensitivity. Remember that if you have no experience in solving such issues or if you want to adjust the alarm as quickly and efficiently as possible, it is better to go to a service station.
If all else fails
It is not recommended to go into the settings system of a car that is under warranty. Otherwise, you risk being left without a free service. But even in a used car, adjusting sensors can lead to unexpected negative consequences.
It is possible that the shock sensor will continue to trigger for no particular reason. Then you will have to reset the settings to factory settings.
Use the universal method for any model:
- With the engine off, press the VALET button 9 times in a row.
- When you hear a short beep and the lights flash twice, you know that the alarm is disabled.
- Start the engine. The headlights will blink repeatedly and the siren will make 9 short sounds. This means that the device has reset all settings to their original settings.
- Press VALET until the siren sounds.
- Press the key with the speaker icon on the key fob. The remote control should also beep with a long sound.
- Turn off the ignition and wait until the protective system exits reset mode.
- When the signal light blinks the headlights several times and the remote control beeps, the work is completed and you can use the device again.
Before starting this delicate procedure, we strongly advise you to carefully study the instructions for your specific model. Some alarms are designed in such a way that in case of incorrect actions they block the car. So, in order to avoid troubles, you should act according to clear instructions.
Installation features
Installing the sensor is easy. It is important to study the installation features before it is carried out. They consist in choosing the installation location. There are many opinions on this matter. Some experts argue that it is necessary to carry out installation in some body parts rigidly attached to it. Other craftsmen are confident in the logic of installing sensors directly into the wiring using ordinary plastic clamps. They practice the installation method in the middle of the vehicle interior.
The first method is ineffective due to iron damping of the optimal amplitude response that appears during a collision. In this case, the sensor will be roughened. You can add sensitivity, but the device will work at the slightest touch. The installation method in the cabin can be considered, since the sensor will be equally sensitive to all influences. In this case, the fastening must be reliable.
In some cases, the sensor is placed on the alarm board. This option may be justified, but it is ineffective in practice.
Thus, before installation, you need to carefully think about the location so that intruders do not get to the board and the car.
How to connect a homemade alarm system
Let's look at some connection tips.
- When connecting the system to power, be sure to install a fuse in the circuit. You can choose its value by calculating the energy consumption of all elements.
- It is advisable to take the “plus” directly from the battery without loading the factory power circuits.
- You should not connect to each limit switch separately. Find the location where all the signal wires from the doors converge. For example, on the wires of a lighting lamp.
- It is better to connect the siren not directly from the alarm, but through a relay.
- Place the power switch in an inconspicuous but accessible place. If you hide it too much, you may find it awkward to use.
Homemade GSM signal from a mobile phone
Another option for a homemade alarm would be to assemble it based on a push-button mobile phone. The scheme will be similar to that discussed earlier. Limit switches will be used as intrusion sensors. But unlike a simple circuit, the signal will be sent not to the dial tone, but to the contacts of the phone button.
Reference! Your phone must have a shortcut function for calling your last contact. And this last contact should be your number.
The signal simulates pressing the call button on your phone and makes a call to you. Having received a call from a number in your car, you immediately realize that your property is in danger. And in addition to this, by picking up the phone you can listen to what is happening inside the car through the microphone built into the phone. You can also track a stolen car by phone via GSM protocols if it is within the coverage area of cellular towers.
The phone board must be connected to the charger and hidden in such a place that you can effectively listen to the area around the driver's seat.
In parallel with the telephone, you can also connect a horn and turn signals to the signal, and instead of open door sensors, use a motion sensor or magnetic reed switches.
How to make a GPS for a car
GPS is a global positioning system. Such a device for a car is called a GPS tracker. A tracker is a vehicle tracking device. It receives signals from the satellite, uses them to determine its coordinates, and then transmits them to the user.
These devices are used to be able to determine the location of the car in real time, as well as see the trajectory of its movement. Using the tracker, you can find out how fast the car was moving.
You can track your car using satellites in the following ways:
Satellite tracker for car. It is carried out in a compact case so that the device can be easily hidden. It can be bought in specialized stores or ordered from China.
Reference! When purchasing such a device, make sure that it is not prohibited by law (spy equipment).
Smartphone with a special application. By placing an Android device in your car with an application enabled (for example, Loki), you can track its movements through the website. And accordingly, the movement of the car. The main thing is to connect your phone to a charger. This method is often chosen by taxi companies.
Homemade tracker. It will work in the same way as a “purchased” one, except that creating it will cost you much less than buying a ready-made solution. Most often they are made on the basis of old push-button telephones, but this is no longer as easy to do as a simple alarm. In addition, a “home-made” tracker will be much larger and will not be so easy to place discreetly in a car.
Typically, trackers (and smartphones) are powered by 5 volts via a USB connector. The simplest solution would be to use an adapter for the cigarette lighter, but a constantly protruding wire will get in the way and there will be no question of any hidden installation.
A more correct solution would be to power the tracker through a step-down DC/DC converter, which can be purchased at any radio store or on Aliexpress. The converter is a small board that can be easily hidden in the dashboard area or other places.
Connect the board to the converter via a USB cable, and the converter itself to the car’s on-board network (find a permanent “plus”).
Features of connecting sensors in cars
Imagine that when you open a door, a certain button is activated, one of the contacts of which is connected to ground. When the door is open, the signal wire will be at ground, and the rest of the time it is not connected to anything.
There are several similar sensors in a car. These include: door unlock sensors, hood sensor, and so on. Let's say that a certain module must be controlled by the activation of any of the signal contacts (logical OR circuit). Then you need to use diodes.
Let's summarize what was said above. In any car circuit, “ground” control is always implemented. That is, the signal cable acquires “zero potential” at the moment of signal transmission. The maximum current transmitted through such a cable can be considered 300 milliamps. You cannot go beyond this limit!
Scheme for creating a homemade simple alarm system
Let's look at one of the simplest car alarms that you can do yourself.
The diagram shows an acoustic alarm, triggered by the closure of limit switches on the hood, trunk or doors, which in active mode blocks the engine from starting after the ignition is turned on. This circuit will work perfectly on cars with a classic contact ignition system (VAZ, Volga, Moskvich and foreign cars of the last century).
Operating rules
In order for the device to work for more than one year, it is important to follow the rules of its operation. Usually, when buying a security alarm with a shock sensor, there are instructions with operating rules. It is worth familiarizing yourself with them in order to make the correct adjustment of the equipment and not damage the device by careless actions. The operating rules are simple:
- No need to be lazy to turn on the alarm and forget the immobilizer in the car;
- Do not drop, deform or damage the device.
Also, do not rush to turn off the alarm, even if it begins to work intermittently. If the device malfunctions, you should use the warranty card and repair or replace the equipment. In cases where there is no understanding of the principles of installing a sensor in a car, it is better to go to a technical center to experienced technicians and entrust the procedure to them in order to avoid possible breakdowns and failure to start security work
In general, a shock sensor is one of the most useful inventions that should be in every foreign car model to protect its integrity and other life circumstances. Installation, as well as configuration, is carried out quickly, and the operating rules are easy to remember.