Print this article Font size 16
If the thermostat fails, the engine will take a very long time to heat up to the required operating temperature, and while driving, the engine temperature will drop sharply. This is especially felt in winter due to a poorly heating stove.
To quickly check the condition of the thermostat, it is not necessary to remove it. To do this, start the cold engine and touch the lower radiator hose. In the normal state of the element, it will first be cold for a short time, but then quickly begin to heat up. This indicates that the coolant is moving along a large contour.
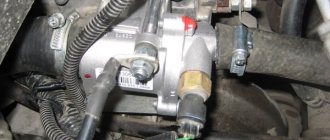
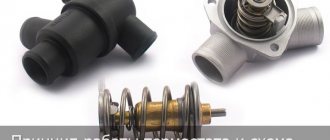
Appearance of the device
Features of removing and replacing the thermostat on VAZ 2108, 2109, 21099 cars
The service life of the thermostat for the engine cooling system of VAZ 2108, 2109, 21099 cars is 50-60 thousand kilometers. This is the best case scenario. It happens that it has to be changed much more often. Let's look at how to quickly and cost-effectively replace a thermostat.
Necessary spare parts, tools and accessories
— New thermostat
For the cooling system of engines 2108, 21081, 21083 (thermostat 2108-1306010-10 or 2112-1306010).
Thermostat 2108
— Four clamps for pipes
In case the old ones are no longer suitable or there are doubts about their ability to properly compress the pipes.
— Phillips screwdriver or 7 mm wrench
Preparatory work
On engines of VAZ 2108, 2109, 21099 cars, access to the thermostat for replacing it is quite good. The only problem is that it is necessary to drain the coolant, which is a labor-intensive task in the presence of engine mudguards and a sump protection sheet.
Therefore, we will drain the liquid from the Solex carburetor heating block.
We remove the long hose from it (by loosening the clamp) and drain the liquid into a container with a volume of at least four liters (or several plastic bottles). The coolant level in the engine cooling system will drop well below the thermostat and it can be quickly removed and replaced with a new one.
Replacing the thermostat of the engine cooling system of VAZ 2108, 2109, 21099 cars
— Loosen the four thermostat clamps
We do this using a Phillips screwdriver or a wrench.
— Remove the old thermostat
— Installing a new thermostat
Before installation, wipe the pipes going to the thermostat dry. If there is old sealant, carefully remove it. We install the new thermostat without sealant. Since its pieces that come off can clog the channels of the cooling system (and this impairs the coolant circulation and overheats the engine). If necessary, change the clamps on the pipes.
— Add coolant to normal level
We start the engine and expel any air pockets from the system, check the operation of the engine cooling system with a new thermostat (the first and second circles of the cooling system should gradually warm up in turn, and then the fan on the radiator should turn on).
Notes and additions
— Installing a new thermostat is a reason to simultaneously check the condition of the cooling system pipes, the cleanliness of the expansion tank plug, and the fastening of the clamps.
Lada 2115 2006, 76 l. With. - spare parts
Cars for sale
Lada 2115 Samara, 2005
Lada 2115 Samara, 2007
Lada 2115 Samara, 2006
Lada 2115 Samara, 2009
Comments 198
It feels like I opened a Davy Jones locker with thermostats))) I bought a Gates thermostat part from a Lada company store, I ask, is it good? Yes, yes, there have been no complaints yet, well, I think this is not the first time I’m buying, I’ll take my word for it. And as a result, 2 thousand km and the thermostat died on a large circle. I gave 450 rubles + 600 to change, it’s a shame to give the mower away for nothing. I don’t even know what to install, with such quality spare parts you’ll go broke or you’ll learn to fix it yourself. It’s like a company store and they also sell shit. P, S drove 60k on the old thermostat
help me please! VAZ 21099 the main pipe in front of the pump leaked. replaced it, decided to flush the coolant, poured in the flush, warmed up the car, cooled it down to a cold car, washed it with a hose. I rode on normal water for one day, filled it with antifreeze and then trouble began to boil on the road (it was gurgling loudly, air was coming out as if from the engine). I changed the thermostat, valve and temperature sensors, the car overheats anyway (like an envy of a car, after a while the temperature sensor creeps and creeps towards the red mark and Carlson is silent and the car boils). 15 sensors from different stores are of no use to trigger Carlson, I turn off the sensor and Carlson starts directly. The pump was blown up and the whole thing won't turn. There is no oil in the antifreeze, the oil does not foam, there is no steam or precipitation under the oil filler cap. The radiator has been clean for a year (removed and washed) the stove cooks normally. The cover with the extended barrel has been changed, now I drive on water. I force start Carlson after I start the car. When the thermostat opens, the radiator boils, the Carlson sensor gets burned, the TV is also hot, even in the evening you can fry eggs on the TV. On the highway and in traffic jams everything is the same! gases do not enter the coolant.
Greetings. The gasket under the head is broken along the way. Not much. Therefore, gases do not enter.
and Carlson is silent(((is there any point in flushing the system with lemon?
Source
Checking and replacing the thermostat of a VAZ-2109 car
If the engine overheats while running or is slow to reach operating temperature, you need to check the thermostat.
To check the thermostat on your car, start the engine and touch the lower radiator hose with your hand. It should be cold.
After the coolant temperature reaches 87–92 °C, the hose should begin to heat up. If this does not happen, you need to remove the thermostat and check its functionality.
Unscrew the bolts securing the crankcase protection and remove it.
Unscrew the expansion tank cap.
Place a container under the drain hole, unscrew the cylinder block drain plug and drain the coolant from the cylinder block.
Place a container under the drain hole, unscrew the radiator drain plug and drain the coolant from the radiator
Loosen the clamps
Disconnect the three hoses from the thermostat housing.
Loosen the clamp and remove the thermostat with the hose.
Then disconnect the short hose from the thermostat.
Lower the thermostat into water heated to 78–80°C.
Heat the water, stirring it constantly, to (87±2)°C.
At a temperature of (87±2)°C, the main thermostat valve should begin to open.
If this does not happen, replace the thermostat. Install the thermostat in the reverse order of removal.
Checking at home
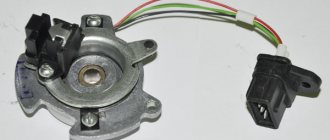
Sometimes the electric motor turns on too late, when the antifreeze temperature is already high. This may be caused by a malfunction of the valve in the radiator cap or abnormal parameters of the switch on sensor. You can check the device’s response temperature at home using a multimeter and thermometer.
After disconnecting the electrical connector, the sensor is unscrewed with a key. To avoid burns, remove the device only from a cold engine, after draining the antifreeze. When reinstalling, it is advisable to use a new sealing copper washer and not apply too much force when tightening.
The switching temperature is engraved on the end; it can be from 92 to 95 degrees. To check, you need to connect the multimeter in resistance measurement mode and immerse the threaded part in a container of water.
While heating the water and monitoring the readings of the multimeter, we use a thermometer to record the moment it turns on, and when it cools down, the temperature it turns off. Standardly, these are 92 and 87 degrees; with significant deviations, late operation is especially critical, the device requires replacement.
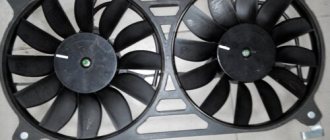
To improve cooling, it is possible to install a double fan from Niva. There are two modifications for placement: after the radiator or in front of it.
On the VAZ 2110, any of the options can be installed with minimal modifications to the fasteners on site. When electric motors are connected in parallel, the current consumption increases to 40 amperes, which requires replacement of the wiring.
Monitor the engine temperature. If you notice overheating too late, then in addition to boiling of the antifreeze and a forced stop, more serious consequences are possible: deformation of the cylinder head, jamming of the camshaft. If there are defects in the operation of the cooling system fan of the VAZ 2110, the faults can be diagnosed independently by checking the thermostat, electric motor, relay, and switch sensor.
Sources
- https://aveni-r.ru/datchik-temperatury-vaz-21083-skhema.html
- https://vazweb.ru/desyatka/ohlazhdenie/datchik-vklyucheniya-ventilyatora.html
Replacing the thermostat on a VAZ 2114 (2110, 2109, Kalina) 8 valves
Replacing the thermostat on VAZ 2114, Kalina, etc. cars, in my opinion, is an average, difficult job and can be done at home with your own hands. To make it easier for you to cope with it, I decided to fully describe the whole process using my own example with pictures.
When and in what cases should you change the thermostat?
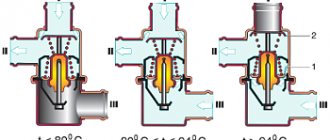
Basically, the thermostat needs to be changed when it stops performing its function (this is logical) - namely, it jams or just starts to jam in one of the positions. It has only 2 positions - open and closed. Initially, while the engine is still cold, the thermostat is in the closed position, i.e. The coolant circulates only in a small circle (cooling jacket of the engine block). Upon reaching a certain temperature (80-90 degrees), the thermostat opens and allows antifreeze (antifreeze) to circulate in a large circle (through the cooling radiator).
If the thermostat is stuck in the closed position, hot fluid will not enter the radiator and the engine will overheat. If it is open, on the contrary, the liquid will constantly circulate in a large circle and the engine will be very strong! It takes a long time to warm up, which is also not very good.
Based on this, we can conclude that a stuck thermostat needs to be replaced.
How to change the thermostat on a VAZ 2114
As you already understood, I will show replacing the thermostat using the example of a VAZ 2114, 2110, Kalina, etc. with 8 valve engines.
To make the work easier, you will need to remove the air filter and its corrugation.
The first thing to do is drain the antifreeze (antifreeze) from the engine block. To do this, there is a good way to quickly drain antifreeze (antifreeze). You need to remove one of the throttle valve heating pipes and direct its end into some container.
Next, you need to remove the overflow hose from the expansion tank and plug the holes on the hose itself and the tank fitting with something.
Now, in order to force the liquid to flow into the substituted container, you also need to clog the fitting of the removed hose from the throttle valve with something, for example, with your finger, and blow into the expansion tank with your mouth (you can use a compressor, but for this you need another tank cap with an embedded fitting for the compressor).
If everything is done correctly, the liquid will begin to flow. You need to drain until it stops leaking (in my case it came out to about 3.5 liters).
After draining the liquid, you can begin to remove the thermostat itself. The first thing you need to do is remove all the incoming and outgoing pipes and hoses (5 pieces in total). Also remove the terminal from the coolant temperature sensor.
The thermostat on the VAZ is secured with 2 nuts diagonally. It's time to unscrew them. The mass from the battery is also screwed to the top stud.
The thermostat installation site must be cleaned of dirt and adhered parts of the old gasket.
The VAZ 2114 (Kalina) thermostat itself consists of 2 parts. We will change the upper part, since this is where the valve is installed. It is secured with 3 hex bolts.
Please note that PRAMO thermostats cannot be installed instead of thermostats from AvtoVAZ, since the PRAMO thermostats have a crescent-shaped side that will prevent this from happening. But the side can be cut down and then everything is installed as expected.
Before replacing the thermostat, do not forget to install a new rubber O-ring, it should be included in the kit.
We connect the two halves of the thermostat together and tighten the bolts well. You need to connect in the same way (same side) as it was, since otherwise you will not be able to connect the pipes (the fittings will “look” in other directions).
Instead of the old gasket, naturally, you need to install a new one; it is better to choose a paranite gasket rather than a paper one. In my case, there will only be sealant, since I did not buy a gasket :( Therefore, I cleaned the surface of the thermostat and the surface of the thermostat mounting on the engine, applied a thin layer of white sealant - the gasket, waited 20 minutes (following the instructions) and installed the thermostat in place.
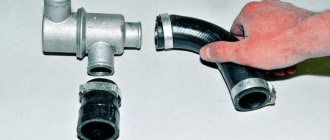
Dismantling
First, remove the old thermostat, exhaust pipe (part 2108-1303014-10) and 2 short intermediate hoses - all this will no longer be needed. Next you need to deal with the pump supply pipe. The 2108 has a pipe “with a hook”, and the 21082 thermostat requires a shorter pipe, “without a hook”. You can replace the standard pipe with a pipe from either a VAZ-2110 or a VAZ-2112 (part 1303055). It was not possible to find out exactly which model the pipe was needed from - there is a fair amount of confusion in stores. When purchasing, you should carefully look at the correspondence of the fasteners and pipes on the pipe, incl. long heater pipe on the right - their presence and direction may differ.
But there is another option: shorten the standard pipe without even removing it. To do this, you need to cut about 45 mm from the pipe. This can be done with a metal file (namely, a piece of a file, without a handle), without removing the pipe. This will be the most time-consuming operation, but quite feasible. To simplify this procedure, it is worth removing the expansion tank and adsorber. This is the option we will use. Looking ahead, I note that the option with a cut pipe works perfectly, including leaks. no in winter.
This completes the dismantling. You can clean the connections and check the hoses.
Removing and replacing the thermostat on VAZ 2108, 2109, 21099
Hello, from this article you will learn how to determine whether the thermostat is working and how to independently replace the thermostat on VAZ 2108, 2109, 21099 cars . The thermostat must open when the engine warms up, so that the coolant flows in the so-called “great circle” through the radiator, thereby better cooling the engine. The first sign of thermostat failure is the engine boiling. That is, if your antifreeze level in the expansion tank is normal, but the engine still heats up more than 90 degrees, then most likely the thermostat has failed. You can also feel the lower radiator hose; at first it should be cold, and then it should heat up sharply when the thermostat opens; if the hose does not heat up even when the engine is heated to operating temperature, then it is jammed and needs to be replaced. It is also possible that the thermostat is stuck in the open position, then the engine, on the contrary, will not heat up, or will do so very, very slowly. Before you start changing the thermostat, drain the coolant from the system. Now use a screwdriver to unscrew the clamps on the hoses that are connected to the thermostat (it is located to the left of the engine) and then remove all the hoses one by one
Next, remove the thermostat itself
We install a new thermostat, connect all the hoses to it, fill in coolant and check the functionality of the new thermostat. Also watch the video on removing and replacing the thermostat on a VAZ 2108, 2109, 21099:
Is it worth the bother?
Thermostat 21082 is a one-piece design, securely attached to the cylinder head. Fewer connections on clamps, no intermediate hoses - less chance of leaks.
In the future, replacing the thermoelement will require less manipulation - unscrew 3 bolts and disconnect 2 hoses. You can even get by by disconnecting one hose if you get creative. Replacing the thermoelement becomes much more convenient.
Another advantage is the reduced diameter of the bypass hole, which (as they say) affects the engine warm-up speed and increased flow through the heater, although logically the increase in flow is unlikely to be significant.
Well, the size of the thermostat frees up space in the area above the gearbox.
In addition, in the circuit with thermostat 21082, the expansion tank is included in a small circle, and not in a large one as in circuit 2108.
Replacing the thermostat on a VAZ 2109
To remove and install the thermostat on a VAZ 2109 with a carburetor engine, it is necessary to drain the coolant from the cooling system; the figure below shows how to drain the coolant:
1 — radiator drain plug, 2 — thermostat, 3 — hose to the pump inlet pipe, 4 — hose to the expansion tank, 5 — lower radiator hose (outlet)
Before removing the thermostat from the VAZ 2109, it should be checked - this is done if the engine overheats during operation or slowly warms up to operating temperature. To check the thermostat on a VAZ 2109 car, start the engine and touch the lower radiator hose with your hand. It should be cold. After the coolant temperature reaches 87–92 °C, the hose should begin to heat up. If this does not happen, you need to remove the thermostat and check its functionality.
Thermostat design VAZ 2109: 1 – inlet pipe from the radiator, 2 – rubber insert, 3 – solid heat-sensitive filler, 4 – bypass valve spring, 5 – inlet pipe from the engine, 6 – bypass valve, 7 – outlet pipe to the pump, 8 – main valve spring, 9 – main valve, 10 – pipe from the expansion tank, 11 – piston.
Replacing the thermostat VAZ 2109 with carburetor
Unscrew the bolts securing the crankcase protection and remove it
Unscrew the expansion tank cap
Unscrew the cylinder block drain plug and drain the coolant from the cylinder block
Unscrew the radiator drain plug and drain the coolant from the radiator
Loosen the clamps
Disconnect the three hoses from the thermostat housing
Loosen the clamp and remove the VAZ 2109 thermostat with the hose. Then disconnect the short hose from the thermostat
Lower the thermostat into water heated to 78–80 °C. Heat the water, stirring it constantly, to (87±2) °C
At a temperature of (87±2) °C, the main thermostat valve should begin to open. If this does not happen, replace the thermostat. Install the thermostat on a VAZ 2109 in the reverse order of removal. After installation, fill in coolant. This completes checking and replacing the thermostat.
LADA 110 and Priora
1 — heater radiator; 2 — coolant drain hose from the heater radiator; 3 — coolant supply hose to the heater radiator; 4 — coolant pump hose; 5 — expansion tank hose; 6 — steam removal hose of the heater radiator; 7 - expansion tank; 8 — liquid level sensor in the expansion tank; 9 — thermostat; 10 — coolant drain hose from the engine radiator; 11 liquid supply hose to the throttle assembly; 12 — steam exhaust hose of the engine radiator; 13 — hose for supplying fluid to the engine radiator; 14 — engine radiator; 15 — radiator drain plug; 16 — electric engine radiator fan; 17 — coolant pump; 18 — supply pipe to the coolant pump; 19 — coolant drain hose from the throttle body
On the old 110, a thermostat 2110-1306010 (“three-hole”) was installed.
The Priora and the new 110 use a thermostat 21082-1306010-10 (“six-hole”) with its classic circuit, similar to the Samara of the latest releases.
On newer models (FL), a system based on the 2190 thermostat is also installed.
There is an additional steam removal hose leading from the heater to the expansion tank.
How to check the thermostat of a VAZ 2109 injector
How to replace the thermostat on a VAZ-2109 with an 8 or 16 valve engine?
This operation should not cause difficulties, and any car owner should be able to handle it, regardless of his experience in the field of car repair. What actions need to be performed are described in this article. The thermostat is a mechanical unit; its operation is based on physical rules. Inside it is wax, which is sensitive to temperature changes. When the coolant is heated, the wax melts and a damper opens, allowing coolant to enter the system, where it is cooled.
Thermostat design VAZ 2109: 1 – inlet pipe from the radiator, 2 – rubber insert, 3 – solid heat-sensitive filler, 4 – bypass valve spring, 5 – inlet pipe from the engine, 6 – bypass valve, 7 – outlet pipe to the pump, 8 – main valve spring, 9 – main valve, 10 – pipe from the expansion tank, 11 – piston.
From the VAZ-2109 to the modern Granta model, thermostats perform their function adhering to one principle, and they are interchangeable with each other. The new unit is smaller in size than the old VAZ models; this fact will not interfere with installing the part from the old VAZ model.
To make the stove heat better, a thermostat from the new VAZ model is installed for this purpose.
What is better than a thermostat with “ten”?
Of course, we are not talking about the models that were included in the first “ten” releases. The VAZ-2109 thermostat (carburetor) is very similar to the one that was installed in the first “ten” models. But now we are talking about more modern models. Their main advantage is that the number of clamps is reduced to a minimum. But the thermostat is not attached to the engine block using a short pipe. The housing is screwed to the engine block using two studs. The temperature sensor is screwed into the thermostat, therefore, the second hole must be plugged.
In addition, when installing the thermostat from “ten” to “nine”, it becomes possible to save a little, because you can only change the sensitive element. Passive benefits include freeing up space under the hood. The thermostat housing becomes five centimeters shorter, which makes it possible to easily reach, for example, the adjusting nuts of the clutch cable.
Symptoms of a thermostat malfunction on a VAZ 2109
The correct operation of the thermostat is indicated by:
- the need for a long period of time for the engine to operate at the desired operating temperature;
- rapid engine overheating;
- to increased coolant temperature.
Due to exceeding temperature standards, it is usually necessary to repair the internal combustion engine. To avoid this factor, you should replace the thermostat as soon as possible.
Thermostat diagnostics
It should be clarified that on a VAZ-2109 with any engine modification, when checking, it is not necessary to drain the coolant from the cooling system. This operation is performed according to the following algorithm:
- the engine starts;
- The temperature is checked at the lower pipe that comes out of the radiator.
LADA Samara
2108 (carburetor)
1 – expansion tank plug; 2 – expansion tank; 3 – radiator supply hose; 4 – hose from the radiator to the expansion tank; 5 – radiator outlet hose; 6 – left radiator tank; 7 – aluminum radiator tubes; 8 – sensor for turning on the electric fan; 9 – right radiator tank; 10 – drain plug; 11 – radiator core; 12 – electric fan casing; 13 – electric fan impeller; 14 – electric motor; 15 – pump gear pulley; 16 – pump impeller; 17 – camshaft drive toothed belt; 18 – heater radiator outlet pipe; 19 – pump supply tube; 20 – hose for draining fluid from the heating of the inlet pipe to the carburetor heating block; 21 – carburetor heating block; 22 – exhaust pipe; 23 – heater supply pipe; 24 – hose for draining fluid from the heating of the inlet pipe and the carburetor heating unit; 25 – thermostat; 26 – hose from expansion tank to thermostat
2114, 2115 (injector, thermostat from 110)
1 – expansion tank plug; 2–expansion tank; 3–coolant drain hose from the throttle pipe; 4–hose from the radiator to the expansion tank; 5–radiator outlet hose; 6–left radiator tank; 7–aluminum radiator tubes; 8–plug; 9–right radiator tank; 10–drain plug; 11 – radiator core; 12–electric fan casing; 13–electric fan impeller; 14–electric motor; 15-tooth pump pulley; 16–pump impeller; 17-tooth camshaft drive belt; 18–engine cylinder block; 19–pump supply tube; 20–radiator supply hose; 21–heater radiator outlet hose; 22–coolant supply hose to the throttle pipe; 23–exhaust pipe; 24–filling hose; 25–heater radiator supply hose; 26–thermostat; 27–engine management system coolant temperature sensor
How to check the VAZ-2109 thermostat? Replacing the VAZ-2109 thermostat
What is a VAZ-2109 thermostat, when is it necessary to replace it, what are the main signs of failure, we will tell you in this article. Our publication also contains a detailed description of how to install a more advanced thermostat from a model 2110 car. Its advantages will be discussed a little below. And it’s worth starting with theory; you need to understand what kind of device the thermostat has, what functions it performs in the cooling system of an internal combustion engine.
- What is a thermostat?
- Signs of breakdown
- Preparing for replacement
- Replacing the thermostat
- What is better than a thermostat with “ten”?
- Is it possible to install a thermostat 2110 on “nine”?
- Refilling the cooling system
- Conclusion
What is a thermostat?
As the name of the device suggests, it does something with temperature. More specifically, it helps switch fluid flows in the cooling system. Moreover, the thermostat, carburetor or injector are at the heart of the gasoline injection system and have the same composition and housing design. When operating any engine, it is necessary to ensure heating of the throttle assembly. And it is present in any injection system: both in the carburetor and in the injector.
The basis of any thermostat is a special plate, which is made of a material called bimetal. It reacts to temperature changes and is capable of deformation because of this. The switching of air flows is based on this effect: the plate moves the valve, which is fixed by springs. Having overcome their force, the plate moves the valve, opening the path for liquid flow to the main radiator to ensure effective cooling.
Signs of breakdown
What could be the first sign that the VAZ-2109 thermostat is faulty? Of course, the engine overheats even when driving at a high constant speed. The reason is that the liquid continues to circulate in a small circle, not a drop gets into the radiator. And even turning on the electric fan won’t help, because doing so is simply useless. The only thing that can slightly correct the situation is opening the heater tap and turning on the interior airflow at maximum speed.
But such an action will not bring comfort in hot weather. The most common thermostat breakdown is the sensing element jamming in its original position (the liquid moves in a small circle). If this suddenly happens, then you need to try all methods of elimination. Even a few light blows to the body can open the valve. If such an emergency occurs on the road, you will have to drain the liquid and break all the insides of the thermostat so that the liquid circulates only in a large circle. But it won’t boil, and you can get to the repair site.
Preparing for replacement
In order for the car to be completely ready to replace the thermostat, you need to wait until the engine cools down to at least 40-50 degrees. It is extremely dangerous to work while it is hot; you can get burned. The thermostat on a VAZ-2109 is replaced quite quickly; the most difficult and tedious procedure is emptying the system. To do this, you need to use two drain holes, which are located in the lower part of the radiator (the plug is unscrewed by hand) and in the engine block (head bolt 13).
But what should you do if the system is filled with antifreeze, which is quite expensive? We must try to preserve it so that it is not expensive to repair the car. To do this, first of all, by opening the stove tap, unscrew the clamp on the pipe that goes to the throttle valve. It is necessary to drain the maximum possible amount of antifreeze through it. Yes, this procedure is slow, but it will save almost all the liquid. Only after this can you unscrew the plug on the radiator and on the engine block. And don’t forget to unscrew the cap on the expansion tank to increase the pressure.
Replacing the thermostat
Remove the old one, install a new one in its place - this is the entire replacement procedure. But you need to carefully inspect all the pipes of the system. The VAZ-2109 thermostat is connected. The injector or carburetor in the injection system does not matter.
When carrying out work, pay special attention to the clamps. It is highly undesirable to use old ones; it is better to install new ones. Moreover, reliability is an important criterion. Worm-type clamps are very delicate: as soon as you apply a little more force, it breaks. And the possibility of damaging the pipe is very high. If you tighten the clamp too much, you can puncture the rubber. But, of course, you can’t tighten it loosely, as liquid leaks will appear. In other words, this is a double-edged sword. And a little advice: before installation, it is advisable to apply a thin layer of sealant to the surface of the thermostat that will be in contact with the pipe.
What is better than a thermostat with “ten”?
Of course, we are not talking about the models that were included in the first “ten” releases. The VAZ-2109 thermostat (carburetor) is very similar to the one that was installed in the first “ten” models. But now we are talking about more modern models. Their main advantage is that the number of clamps is reduced to a minimum. But the thermostat is not attached to the engine block using a short pipe. The housing is screwed to the engine block using two studs. The temperature sensor is screwed into the thermostat, therefore, the second hole must be plugged.
In addition, when installing the thermostat from “ten” to “nine”, it becomes possible to save a little, because you can only change the sensitive element. Passive benefits include freeing up space under the hood. The thermostat housing becomes five centimeters shorter, which makes it possible to easily reach, for example, the adjusting nuts of the clutch cable.
Is it possible to install a thermostat 2110 on “nine”?
This question was partly answered in the previous paragraph. Yes, you can install a VAZ-2110 thermostat on a 2109, and it doesn’t matter at all whether the “nine” is carburetor or injection. In fact, starting from the “eight”, the engines are used the same. What can we say, even modern “Grants” are equipped with an engine that has been used on “eights” and “nines” since the 80s. Progress, to say the least. Of course, instead of a carburetor there is now a more modern injection system, which by European standards was outdated 5-10 years ago. And almost all components are interchangeable. There are minor differences and improvements, but this does not change the overall picture.
Refilling the cooling system
It will take you a few minutes to add fluid and bleed the cooling system. First of all, check that all pipes are securely installed and that all clamps are tightened. Then look to see if the engine block and radiator plugs are in place. If not, then install them. Now you can open the stove tap and pour liquid into the expansion tank. The gurgling stopped - they closed the plug and started the engine. Wait until it warms up to operating temperature - about 90 degrees. If necessary, add fluid to the reservoir. It is necessary that its level is between the lower and upper marks.
Conclusion
There is not a lot of work with the thermostat, but you know very well how to check the thermostat of the VAZ-2109. Place it in boiling water, if the valve opens, then the element is working. It cannot be repaired; only a complete replacement will help. If you want to improve the performance of your engine, then, of course, it makes more sense to mount a thermostat from the “tens”. True, minor difficulties may arise, for example, the motor will not gain temperature. In this case, it is worth reconsidering the connection of system elements. Otherwise, thanks to this modernization, heat transfer only improves.
vote
Article rating