July 19, 2020 Lada.Online 16,037 3
Rear suspension with coil springs, double-acting telescopic hydraulic shock absorbers and trailing arms elastically connected by a transverse beam and a stabilizer bar. The following are instructions on how to change the rear shock absorbers and springs on a Lada Granta, Kalina 2 and Priora yourself.
The replacement process is shown on a Lada Granta car. For other models everything is done similarly.
Replacing Lada Granta struts and supports - several important features
If the rear suspension is more or less clear, then the front suspension always hides more mysteries. It is the front struts and supports that most often fail. Unless you constantly pull a trailer or tow careless friends. The load on the front of the car is always increased, so you often have to work with the front suspension parts. Changing the front struts on a Grant is not so easy:
- first you need to completely remove the rack and disassemble the lower parts of the chassis for subsequent installation on a new mechanism for damping road irregularities;
- if the rack is installed as a new assembly, then there will be much fewer problems, you just need to install a new one in place of the old mechanism and reassemble it in the reverse order;
- if only the liner is changed, it is worth completely disassembling the strut, removing the spring and taking out the shock absorber, checking the degree of wear of all parts and the need to replace them;
- Next, you should replace the strut liner, carry out technical checks right at the assembly site and reassemble the shock absorber to its original position;
- Next will be the installation of the rack in place, assembly and rough diagnostics of all the components that you repaired, this will give complete confidence in the quality of the work.
You need to acquire tools such as a set of wrenches and sockets, a spring puller, a pry bar, pliers, screwdrivers and other available tools. Otherwise, you will not be able to completely disassemble the part and carry out its normal restoration. Of course, there are certain difficulties in carrying out this process, so it is better to take your Lada Granta for service and complete all the work in just over an hour. We invite you to watch the video of the process of replacing the strut on front-wheel drive VAZ vehicles:
Self-diagnosis method
For self-diagnosis, you will need the help of another person.
Having chosen a flat surface, put the car on the handbrake and remove the protective covers from the glasses.
Have an assistant rock the car to set the shock absorbers in motion, and observe the behavior of the bearing yourself. The malfunction of the unit can be judged by:
- by the presence of backlash;
- when knocking or other sounds appear in the bearing area.
Make similar observations when your partner rotates the steering wheel, and then repeat the manipulations with the second pillar.
Replacing a strut bearing requires special tools and some plumbing skills. The best option would be to entrust the work to specialists, but if you are used to doing everything yourself, then you can do it yourself, but this is a topic for another article.
In any passenger car, regardless of design, the suspension must provide a smooth ride, good handling, each element of the chassis plays its role, and there are no unnecessary spare parts. The support bearing is a part of the front suspension, without which it is impossible to imagine a front-wheel drive car; if it were not there, the steering wheel would turn very tightly, with a terrible squeak, and it would be impossible to drive the car.
Lada Granta ♪♫Lady♪♫29Vzaimna › Logbook › Replacement of Granta rear shock absorbers and springs
Over the three and a half years of owning the car, the rear springs sagged, working in a taxi with a full cabin of passengers, the car turned into a lowered bolide))) I have the feeling that even without sawing the springs, I would have been accepted into the BPAN movement))) I recently already changed the front springs , one of which broke. Today was the time to replace the rear shock absorbers and springs. There’s basically nothing complicated here, I went to the store, bought rear shock absorbers, springs, casings, compression stroke buffers, shock absorber cushions, insulating gaskets, I remember a set of 1200 springs, 1300 shock absorbers, the rest was consumables, it took 4800 for everything, and then a friend I brought the lower shock absorber mounting bolt, which I couldn’t unscrew; I had to cut it off. On the driver’s side everything went smoothly, the bottom bolt gave way immediately, but on the passenger side I couldn’t unscrew it, I had to cut it down... I suffered for about 4 hours, after all, the rear suspension was never touched, the old struts were used for almost 170 thousand, They were working, one shock absorber casing on the driver's side (boot) was torn, the springs had sagged further over time, the rest of the consumables were like new, but once I got in there, I replaced everything with new ones. My advice to everyone is not to bother with the lower bolts and cut them off right away, you will save a lot of time)))
Overview of the main shock absorber manufacturers
By default, hydraulic ones from SAAZ (Skopovsky Automobile Plant) are installed from the factory. They are not particularly distinguished by their quality, but with moderate use they can last up to 60,000 km.
- Kayaba : Japanese, characterized by high quality, reliability, and long service life. When purchasing, be careful, as some of the products are made in China.
- ASOMI: domestic manufacturer for GAZ, VAZ, LADA models. One year warranty from the date of installation. Judge the quality for yourself.
- SS (SS): also a domestic manufacturer of racks for VAZs. Quality guarantee for two years, according to the owners' reviews, they are not bad, a little harsh.
Article number and approximate price for original front shock absorber struts
The right and left original front shock absorber struts on the Grant are structurally different. They are not interchangeable and have different part numbers. On the left side, units with catalog numbers are used:
- 2190290500205;
- 21928290103110;
- 219002905402;
- 219002905403;
The original shock absorber struts for the right side come with article numbers:
- 21900290103010;
- 21928290103010;
- 21900290103000;
Regardless of the side on which the unit is intended to be mounted, new original racks have a similar cost. The price varies from 6,000 to 9,000 rubles. When purchasing used spare parts from car dismantling yards, the owner can save money.
A supported node costs 1000-2500 rubles. The disadvantage of such a purchase is the inability to accurately determine the remaining life, as a result of which the spare part may fail almost immediately after installation.
Required tools for DIY replacement
In order for the replacement of the front shock absorber strut with your own hands on a Grant to be successful, it is recommended to first prepare the list of tools below.
Table - Tools required to replace the front strut
| Name | Note |
| Puller | For spring tie |
| Jack | For hanging the front of a car |
| prop | A piece of wood or a removed wheel |
| Penetrating lubricant | For example, WD-40 |
| Balloon wrench | For loosening and tightening wheel mounts |
| Key | “at 9”, “at 13”, “at 17”, “at 19”, “at 22” |
| Pliers | Can be replaced with pliers |
| Mount | To detach the stand |
| Punch | Metal |
| Hammer | Medium or large sizes |
| Rags and wire brush | To clean dirt |
Analogs of rear shock absorbers on VAZ 2190 and 2191
The original rear ones are also slightly more expensive than the average price of replacements. Because of this, analogues are also in high demand. The best option would be to purchase rear shock absorber struts in packaging specifically from the manufacturer SAAZ (red box), and not the standard VAZ one (blue), which is true, analogues offer substitutes with slightly better rigidity characteristics and service life.
Which shock absorbers for Lada Granta should I choose? Many foreign analogues for the Lada Granta - VAZ 2190/2191 are superior to standard racks in a number of indicators, such as: rigidity, noise level, anti-corrosion coating, and the presence of reinforced mounting of silent blocks. But not all stands have such characteristics, especially if we are talking about a Chinese counterfeit.
The most popular manufacturer of racks among grant providers is SS20. The company specializes in producing racks specifically for Lada cars, including Grants. Therefore, there are no problems with installation, plus their price and quality are more acceptable, except in those rare cases when there are design flaws.
Of course, you can try to purchase Monroe or other spare parts made in Germany or France. But this will be too expensive an option.
Advertisements on NN.RU – Auto
A specialized production enterprise for the conversion of trucks invites you to: 1. Lengthen the frame, re-extend it.
Manufacturing of a broken-type platform with retractable ramps on the GAZ-33023 Gazelle-farmer chassis. Technical characteristics of the tow truck.
Wide selection of hydraulic pumps and hydraulic motors of all series. Axial piston hydraulic motor. Splined shaft, reverse rotation. Analogs - (many. Price: 1,000 rub.
Re-equip, lengthen the frame, truck: Valdai Gas 33104, 33106; Valdai farmer 331043, 331063; Lawn Gas 3307, 3309;.
Imagine, you wake up in the morning, open the curtains, bright sunlight bursts into your apartment, and outside the window is a stunningly beautiful landscape.
The eternal joke that truly useful things are not taught in schools is not such a joke: figuring out how to return taxes, for what.
We previously wrote about the crossing on Betancourt Street on Meshchera: at first, local residents demanded its return (the “zebra crossing” was removed because...
Today is August 2, which means today is Airborne Forces Day. These men (and women too, by the way) are exemplary.
Characteristics in the rating
| 1 | DELPHI | Toughest oil rack |
| 2 | Fenox | Best price |
| 3 | MONROE | The optimum ratio of price and quality |
| 4 | SAAZ | The best domestic gas strut |
| 1 | Kayaba | High quality and reliability |
| 2 | BelMag | Best hydraulic strut |
| 3 | Boge | High quality build. Buyer's choice |
| 4 | Tokiko | The most reliable racks |
| 1 | FINWHALE | The most versatile stand |
| 2 | SACHS | Long service life. Manufacturer's warranty |
| 3 | KONI | Buyer's Best Choice |
| 4 | Bilstein | Excellent performance |
Shock absorbers in a car provide controllability and comfortable movement, smoothing out the impact of the suspension on uneven roads. There are a lot of products on the market from a variety of manufacturers of racks that can be installed on domestic VAZ models.
Lada Granta frisky lynx › Logbook › Replacing rear shock absorbers with SS20 comfort
Hello fellow machine engineers!
Congratulate me on my debut. This time I changed something in my car myself. And this unit had SS20 cofort rear shock absorbers. I now have a full set of SS20 suspension.
To go with them, I bought anthers from a VAZ 2108, rubber sound insulators for the springs, cups, and bump stops. I left the springs at the factory. By the way, Stepan Kutuzov gave them to me absolutely free. The supports (in common parlance, donuts) came complete with shock absorbers
Changing rear shock absorbers is not difficult. You will need a 19mm wrench (two pieces) and a puller for the rear shock absorbers. Instead of a puller, you can use a 17 Z-shaped wrench and a 6 wrench to hold the shock absorber rod.
First of all, recline the back of the rear seat and remove the plastic lid of the glass.
We take a puller and install it on the nut and shock absorber rod. Using wrenches 27 and 17 and a puller, unscrew the nut.
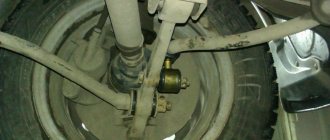
Next, remove the rear wheel. You don’t have to remove it, but you’ll have a hard time getting into the nut and bolt that secures the shock absorber to the rear arm (the rear beam of the car). Using two 19mm wrenches, unscrew the nut and pull out the bolt.
We remove the shock absorber by jacking up the car. If the bolt is stuck, you can use a hammer and some soft spacer to knock it out by lightly tapping it. I didn't have any problems with the bolts. In order to completely remove the shock absorber, I needed a lever in the form of a wooden stick, which was inserted into the rear lever and bent down. The shock absorber easily falls out on its own.
We take new shock absorbers, pump it (we recess the rod into the body and pull it out completely) and assemble it. Here it is assembled, but without the spring.
Next, I used two tricks: 1. I took a rubber tube and pulled it onto the shock absorber rod. This way it is more convenient to insert the rod into the glass and if it sinks into the body, you can pull it back.2. I screwed the sound insulators to the spring using electrical tape so that they wouldn’t accidentally fly off when installing the shock absorbers. Although it was already sitting tightly on the spring, since the rubber bands were new.
here is the rubber hose
We install the shock absorber in place, while pulling out the rod to its full length. We place it in such a way that the lower end of the spring faces the wheel (I don’t understand why to do this, maybe someone can tell me). Install the bolt and nut, but do not tighten it completely. Before this, I lubricated the bolt with lithol, so that after a few years I could pull it out without problems. We lower the car gradually and make sure that the rod gets into the hole in the body cup. Here it is advisable to have an assistant: one monitors the rod, the second adjusts the shock absorber and lowers the car. Getting the rod into the hole, I think, is the most difficult stage of installing this unit, at this moment you will understand how good it is to have a stretched rubber tube (hose) with you. As soon as the rod gets into the hole, install the upper donut, washer and tighten the nut onto the rod. The washer has a spherical surface. Which surface to install upwards (convex or concave, I don’t know). We had a dispute about this question. I installed it with the convex side up, although I think it should have been the other way around. Here is the installed rack.
Tighten all the nuts until the end. put the wheel back and rejoice in happiness.
What changed after the replacement? The rear has become a little stiffer, now it seems that the front has become soft. Now, when driving over speed bumps “without shoulder straps with stars”, the backside does not swing up and down. The car has become more stable. For anyone who likes a smooth, comfortable ride, I don’t recommend these shock absorbers. If you like to drive, bet this will give you an increase in power to your car, but only for drivers who suffer from Placebo. That’s all for me. See you in the next journal entry. Costs: shock absorbers SS20 comfort - 3700 rubles, bump stops SS20 standard - 300 rubles. Dusters VAZ 2108 - 220 rubles. per pair. Sound insulators - 150 rubles. Cups - 70 rubles. Puller - 145 rubles. Liter of Lukoil oil - 250 rubles. Gift for helper. :-)))))
Cover granta var2.indd
We check the chassis and transmission every 15 thousand kilometers.
We carry out the work on an inspection ditch or overpass.
The parts of the chassis (wheels, suspension arms, anti-roll bar, rear suspension beam, shock absorbers and suspension springs) and transmission (front wheel drive shafts) must be free of deformations, cracks and other mechanical damage that affect the shape and strength of the parts.
Hanging the front wheels one by one (while the car must be securely fixed on the support stand), we check the condition of the wheel hub bearings.
Use only factory-made support stands.
The wheel should rotate evenly by hand, without jamming or knocking.
Operations for removing the rear pillar of a Lada Granta
Work can be carried out on a level area; an inspection hole or a lift is not required. You also don't need a spring remover.
1. Fold down the rear seatback.
2. Use a screwdriver to pry off the rubber plug3. ...and remove it.
4. Unscrew the nut of the upper fastening of the shock absorber strut.
5. Place chocks (“shoes”) under the front wheels. Raise the rear of the car as high as possible so that the beam bends as much as possible. The beam can also be bent by hand in order to remove or install the stand. In this position, the beam has limited rigidity and you will be able to rotate it a few more centimeters. 6. Unscrew the nut of the shock absorber strut lower mounting bolt and remove the bolt from the hole.
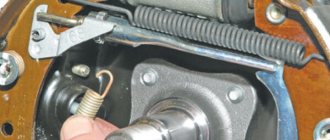
7. Remove the lower end of the shock absorber strut from the bracket and remove the shock absorber strut with the spring.
Often, even after you have removed the strut from the car, the buffer rubber cushion remains stuck inside the rear strut mudguard body cup. In this case, reach in with your hand and pull it out.
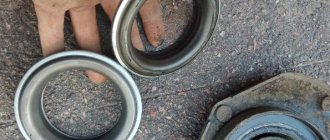
8. Remove the spring from the shock absorber strut.9. Remove the bushing and lower cushion from the shock absorber rod.10. Remove the casing from the shock absorber.
11. ...and remove the compression stroke buffer from the housing.12. Replace the spring if cracks are found or the coils are deformed. It is recommended to replace both rear suspension springs, and they must be of the same group.13. Install the insulating gasket onto the spring so that the end of the spring rests against the protrusion of the gasket. Secure the spacer to the spring with duct tape or thin wire to prevent it from coming off when installing the spring.
14. Install the spring on the shock absorber strut so that its end rests against the protrusion of the lower cup.
15. Install the rear suspension shock absorber strut in the reverse order of removal. The lower end of the spring should be facing the wheel. When installing a shock absorber, it can be very difficult to get the elongated rod of the shock absorber into the car body (into the hole in the cup). To facilitate this installation procedure, it will help to use a rubber piece of gas hose placed on the shock absorber rod (10-15 cm long), which is easily directed into the body hole due to its flexibility, even if the rod is displaced relative to the hole, and subsequently, when the body is lowered, the rod follows the hose falls into its normal place.
16. Lower the vehicle to the ground. Rock it hard a few times. Finally tighten the nuts of the upper and lower shock absorber mountings.17. After 100 km, check and, if necessary, tighten these threaded connections to the required torques.
Installation
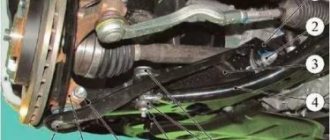
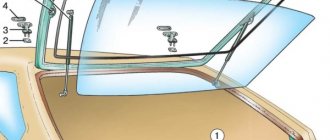
Figure 10-4 — Orientation of the rear suspension shock absorber: 1 — lower spring support cup; 2 — rear suspension shock absorber; 3 — rear suspension arms; 4 - wheel; A - top point of the support cup
Install the shock absorbers into the eyelets of the levers, insert the bolts and tighten the nuts without tightening (spanner 19, interchangeable head 19, wrench).
Attention!
Orient the shock absorber so that the highest point “A”, Figure 10-4, on the lower spring support cup faces the wheel.
Lada Granta › Logbook › Replacing rear struts in 2 steps
ICE to all))) It seems like I found a little time to write about how I decided to change the rear struts. The relatives were still alive but had already started to leak, so I decided to change them one weekend. And I’ll probably divide this operation into 2 stages. Stage one. I picked up some goodies in the form of sound insulators, donuts, pads, struts, anthers and went to my brother’s service so that the two of us could quickly change everything. The procedure for disassembling and replacing is simple and there is nothing painful to describe.
I collected everything on the ground and installed the pads and did not change them. They are even more alive than all the living ones. By the way, I forgot to say that I bought KYB oil struts. I lowered them from the lift and drove them for testing. The springs stopped clicking and creaking, and the ass became more collected, BUT some kind of tiny knock appeared. It was barely audible on small bumps. Well, I think, okay, one of these days I’ll stop by and stretch it all out and it will disappear, but I was wrong. With each trip I became stronger and stronger , and by the end of the week it was just a terrible roar. And I sent this Koyaba to hell... Stage two. I ordered new racks from the guys, Acomi Kit Active, only now they are gas. Although it will be tough, it will be stable in corners and on the highway. I took off these Spanish ones, but I put the new ones on the car and went to test it... Finally, it’s fire, my ass is rooted to the spot. But damn, of course it’s become stiff, but it goes into turns like it’s on rails. Now I’m thinking about the same Stick the racks onto the muzzle. And I will never contact Koyaba again. Junk!
This is where I will end my story. I don't encourage anyone to do anything, this is just my opinion. and I expressed it. That's all. I've been driving the Acomi for about a month now and everything is fine. I like it. But I repeat once again, it's a bit harsh. Therefore, decide for yourself what to install and how to ride. Good luck to everyone, bye)))
Rear shock absorbers on Lada Granta
The manufacturer of all original rear struts is the same as the front struts. Therefore, they are also similar in characteristics. When selecting a shock absorber for the rear strut of a Lada Granta, you should take into account that they are symmetrical and fit both left and right, and do not differ from what engine modification is installed on the car.
Below is all the information in tabular form about the main parameters of shock absorbers:
| Dimensions of rear shock absorbers on Lada Granta | ||||
| vendor code | Rod diameter, mm | Case diameter, mm | Volume, cubic cm | Weight, kg |
| 21900291500400 | 12.5 | 42 | 5582,08 | 1.97 |
Lada Granta rear shock absorbers are suitable for Lada Kalina (VAZ 2194, 2192) and Priora (VAZ 2171, 2172, 2170).
Subtleties when installing a suspension element
- We begin to assemble the suspension element using the reverse dismantling process algorithm.
- Before direct installation, we recommend checking the shock absorber. To do this, you need to press the rod all the way and observe its behavior. If the pressing force is high, and the rod subsequently slowly (without delay) returns to the extended position. This indicates the serviceability of the element.
- A special mark, which the manufacturer kindly applied to the surface of the product, will help you install the front struts correctly. The direction of the mark should be oriented along the direction of the Lada Granta car.
- Having reached the correct location of the marks, feel free to assemble the shock-absorbing unit, following the well-known sequence of actions.
Let's sum it up
There are a number of features of operating the Lada Granta on Russian roads. For some reason, a domestic car is not very suitable for our roads; it crashes and fails instantly. Sometimes you come across a well-built car that doesn’t show any character after 100,000 kilometers. But in most cases, the Garnet justifies the title of the cheapest car in the Lada line. And when it comes to racks, the manufacturer saves a lot on these elements. The installation of low-quality suspension elements leads to the fact that more and more people, after purchasing Grants, repair it under warranty.
However, sometimes it is better to cancel the warranty and install normal racks, supports and other parts. In this case, you will ensure the normal service of your car’s suspension and will be able to establish normal operation of each unit. This will take a certain budget, but can provide you with comfortable movement without any particular difficulties or problems. Of course, even the best quality rack will eventually fail. But it can travel far beyond 100 thousand kilometers. What brands of spare parts do you choose to repair the suspension of your Lada Granta?
Why is pumping done?
Not everyone understands why pumping is done and whether it is necessary at all. Some clarity should be provided on this score in order to finally understand the meaning of pumping and the urgent need for such a procedure.
The working mechanisms of shock absorbers include special sleeves in their design. If air gets inside them, then the device will not be able to return to its original position. Moreover, before installation, air must be removed from new and old parts if you suddenly bought used shock absorbers because their price turned out to be lower. It cannot be ruled out that during the suspension repair process or during troubleshooting, air penetrated inside the mechanism.
During storage and transportation, the oil included in the shock absorber penetrates the outer cylinder of the structure, which is why the gas ends up inside the system. This phenomenon leads to the fact that after installing even a new part, a knock is heard.
By performing special actions, excess air is removed from the cylinder. This is done immediately before installation.
And it is still relevant to ask why this is being done. Everything is extremely simple. To ensure correct, efficient and long-term operation of new shock absorbers installed as part of a dependent or independent suspension.