Many believe that replacing the input shaft bearing requires complete disassembly of the gearbox and prefer to entrust this operation to specialists at a service station. But practice has shown that complete disassembly of the gearbox is not required. You can change the input shaft bearing yourself without seriously disassembling the gearbox, and the operation does not require the highest qualifications or special devices and tools.
Signs of a malfunction of the input shaft bearing of the VAZ 2107 gearbox
There are several signs that indicate a bearing is faulty:
- When the engine is running at neutral speed, extraneous noise is heard, which changes with increasing speed.
- The gearbox periodically taps while the car is moving. And the knock is present in any gear.
- Gears switch on or off spontaneously.
- The clutch does not engage due to a stuck bearing.
The problem cannot be ignored: misalignment of a faulty bearing will lead to breakage of the clutch basket. And even if misalignment does not occur, a worn part will cause rapid failure of the gearbox and/or clutch.
Bearing replacement can only be done on a removed gearbox. This is where the work begins.
Causes of breakdowns
Many different factors can influence an element to wear out and break down. Often the culprit is poor quality parts. When purchasing a product, you should not give preference to the cheapest options, but rather purchase a quality product. It is necessary to carefully inspect the unit and make sure that it is reliable and made of strong materials. Also one of the possible reasons is the way you drive the car. If the driver uses an overly aggressive style, literally pulling out the shift lever, then this does not add service life to the bearing, but seriously reduces its service life.
The conditions in which the car is operated are also important. If the car is constantly stored in a garage, if there are no overloads, then all this will have the best effect on the resource of each unit. And finally, the most popular reason why the VAZ input shaft bearing fails is ignoring the maintenance of the vehicle’s mechanisms and components. Owners of inexpensive cars who use them for work, as well as novice drivers who are just learning, can ignore maintenance.
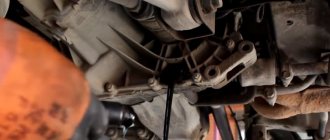
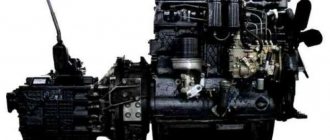
Removing the VAZ 2107 gearbox
To remove the gearbox you will need a pit or a lift. The procedure is as follows:
- Disconnect (better remove) the battery.
- Engage neutral gear, disengage the handbrake, raise and hang the rear axle.
- Unscrew the bolts securing the cardan and the gearbox flange, and disconnect the cardan.
- Remove the exhaust manifold pipe by unscrewing the bolts.
- Disconnect the oxygen sensor.
- Remove the starter.
- Inside the car, remove the console and gearshift knob.
- Remove the gearbox protection.
- Unscrew the clamp connecting the catalyst to the exhaust pipe.
- Remove the clutch slave cylinder.
- Unscrew the speedometer cable, remove the boot and the reverse speed sensor wire.
- Remove the driveshaft.
- Unscrew the traverse while holding the gearbox.
- Unscrew and pull out the gearbox.
Content
- Simply forgetting about the problem means providing yourself with a huge headache and significant expenses in the near future.
A skewed bearing is quite capable of contributing to the destruction of the clutch disc. But even without misalignment, a worn part will quickly lead to the need to repair the entire clutch or gearbox.
The manual describes the process in such a way that even the most big-headed comrade, well acquainted with the insides of VAZs, is unlikely to understand what is meant. We present our vision of the issue.
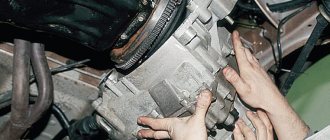
- The gearbox itself is pulled out, the 6 bolts that secure the clutch basket to the flywheel are removed - and you can begin the planned actions.
When the box is dismantled, the bell and retaining rings are removed. You won't have to disassemble anything else.
- A hammer strikes the end of the primary. In this case, the shaft must be rotated between blows. Depending on how closely the bearing has bonded with the input shaft, it will come off in 5-30 minutes.
The new bearing is pressed in by gently hitting its inner ring with a small and light hammer. During the process, the shaft must be pulled forward. In this case, there is no need to tinker with the insides of the gearbox, risking upsetting their balance. And replacing the input shaft bearing of a VAZ 2107 gearbox using the described algorithm takes much less time than using the traditional one. You will save at least 3 thousand rubles. (and most auto repair shops ask for more). Sources used:
- https://semerkavaz.ru/transmissiya/zamena-podshipnika-pervichnogo-vala-vaz-2107/
- https://podshipnikru.com/obzori/remont-podshipnikov/menjaem-podshipnik-pervichnogo-vala-mkpp-na-avtomobile-vaz-2107
- https://autoflit.ru/1417-zamena-podshipnika-pervichnogo-vala-kpp-vaz-2107-kak-imenno-eto-sdelat.html
Replacing the bearing of the input shaft of the VAZ 2107 gearbox
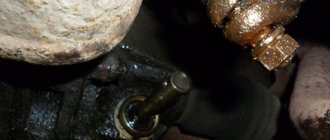
Remove the bell and retaining rings from the dismantled box. No further disassembly is required. The procedure is as follows:
- Using a powerful screwdriver, pick up the bearing of the input shaft of the VAZ 2107 gearbox by the annular groove . Serious efforts will be required, so you need to choose a screwdriver that is as strong as possible so that it does not break or bend.
- Push the transmission input shaft forward using the shaft bearing as a support.
- Slowly pull the bearing off the input shaft by tapping it with a hammer. Between hammer blows, the shaft must be rotated slightly to avoid bearing misalignment.
Knocking out a bearing takes from 5 minutes to half an hour. It all depends on the skill of the mechanic and on how closely the bearing is “affined” with the shaft.
The new bearing is pressed onto the shaft using a light hammer. The blows must be applied to the inner ring of the bearing. This should be done carefully and evenly, pulling the input shaft forward.
The advantage of this method is that there is no need to sort through the insides of the box, risking unbalancing it. Also, replacing a bearing without disassembling the entire gearbox significantly saves time.
After replacing the bearing, all that remains is to install the gearbox in place. Given its weight, it is advisable to carry out the work together. The operations are carried out in the reverse order of removing the box and do not cause any difficulties.
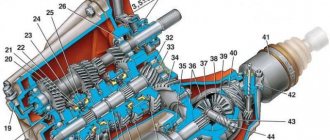
Device
Needle bearings are mainly used to support the shaft. The use of thin and long rollers allows the thickness of the ring to be minimized while maintaining high load resistance.
Fastening the part has its own characteristics. During operation, the element wears out its installation location. Due to increasing play and vibrations, the part is gradually destroyed, and then it is necessary to replace it.
Bearing installation
The reverse operation of pressing the bearing does not require the same amount of effort that the technician makes when removing the rolling support. It is enough to use a head of a suitable size and a hammer as a mandrel. The main nuances of bearing installation are:
- the seat should be cleaned of remaining materials, especially after removal with bread crumbs or soap;
- the lubricant must be reliably protected by a cover; if it gets on the clutch, the quality of rotation transmission will decrease, and the disc will begin to slip inside the basket.
Bearing installation
Since the bearing is pressed into the flywheel, which sits on the crankshaft, and the gearbox shaft enters inside it, the coaxial rotation of these assembly units is necessary. Otherwise, imbalance of the input shaft will cause the replacement of all other gears.
Thus, if the flywheel of a particular engine has a needle bearing installed on a conveyor, it should be maintained and replaced with an original spare part or an equivalent permitted in the machine’s operating instructions.
If you have any questions, leave them in the comments below the article. We or our visitors will be happy to answer them
Dismantling in different ways
On the one hand, to reduce the repair budget, ideally the rolling bearing is replaced without dismantling the flywheel. At the same time, the main problem of repairing on your own arises - how to remove the bearing without special tools and devices. This manual traditionally presents techniques according to the principle from simple to complex.
Soap or bread
The flywheel is installed at the end of the crankshaft close to a seat specially designed for this purpose. Fixed with 5 – 8 bolts according to various fastening schemes. The bearing is installed in the flywheel body with a slight interference fit and can be removed quite easily, but access to it is limited.
The simplest “folk” method of removing a flywheel bearing is to fill the space of the inner race with thick plastic material. Most often, bread crumb or soap rolled out into plasticine is used according to the following scheme:
- the bread is stuffed inside the cage by hand flush with the outer plane of the bearing;
- a drift is selected, the outer size is equal to the inner diameter of the holder;
- light blows of the hammer on the punch crush the bread inside the bearing;
- by analogy with a liquid or plastic medium, the force from the pressure of the punch is redistributed throughout the entire volume of soap or bread crumb;
- the working medium penetrates under the rear surface of the bearing and pushes it out.
Dismantling with bread crumb
Soap or bread crumb is added inside after several light and precise blows of the hammer. The volume of these substances must be at least 1/3 of the volume of the rolling support. After the bearing body is pushed out halfway, the bearing is pryed up with a drift or hook and pulled out completely without much effort.
The technique has been tested on different machines, does not fail, and takes 10 minutes maximum.
Reverse hammer
There is a homemade and factory version of the device, the design of which differs from each other:
- a homemade reverse hammer - an analogue of a kit for installing the last row of laminate flooring near the walls;
- An industrially manufactured reverse hammer tool is a rod with a weight that moves freely along it, a collet clamp on the working surface, and a stop on the reverse side.
Reverse hammer in the form of a staple
Reverse hammer for removing bearings
To remove the bearing with a homemade device, one curved edge of the plate is inserted under the rolling support body from behind. The second hook is struck with a hammer, the force is transferred to the lower part of the tool, pulling the “consumable” out of its seat.
The factory version of the reverse hammer is much more convenient:
- the collet is clamped by the thread inside the holder;
- the weight hits the back of the tool;
- kinetic energy is transferred to the lower unit of the device;
- the bearing is pulled out of its seat with jerks.
A tool with 4 collet adapters for different diameters costs from 7,000 rubles. A homemade device is made in a quarter of an hour from scrap metal cutting.
An analogue of the factory reverse hammer can be made from a brass anchor of a suitable diameter. For example, for UAZ 3159 it is M12 16 x 50 mm, which costs about 50 rubles in Household Goods. You can weld the device from a rod and two metal washers:
- they limit the stroke of the weighting material placed on the rod;
- A piece of rod with a rounded end should be placed under the collet (bullet configuration).
Reverse anchor hammer
First, the device is driven inside the bearing race. The “bullet” enters the collet and expands it until the inner surface of the clip is completely compressed. Then, with light blows of the weighting agent in the direction from the flywheel, the bearing is pulled out.
Removed bearing on the return hammer sleeve
Two-bolt device
It is possible to make an improvised puller in a few minutes if you have two bolts and a crown or a steel cup. To do this you need to follow these steps:
- the head of the long bolt is inserted under the back of the bearing;
- a short bolt is used to wedge the previous fastener inside the holder;
- A crown with a hole in the center is put on the threaded part of the long bolt, resting its sides against the body of the flywheel.
Two bolt puller
When the nut is tightened, the head of the long bearing moves upward along the threads, pulling the bearing outward.
Screw puller
There are classic screw pullers with 3 sliding jaws for bearings. In this case, an internal puller is required for the rolling support unit:
- the paws are placed inside the clip;
- are hooked with the outer edges onto the bearing from the rear side;
- the working screw rests against the crankshaft body exactly in the center;
- when the screw is screwed in, the entire structure, together with the rolling unit, rises upward.
Screw Internal Bearing Puller
This tool costs 2 - 3 thousand rubles, but is suitable for different diameters of the holder, so it will be in demand in the garage of a mechanic who prefers to repair cars on his own.
Collet puller
Typically this device is sold complete with a reverse hammer and has the following design:
- a working screw is screwed into the center of the horseshoe stop;
- removable, collet screw tip.
Collet puller
The puller works on the principle of a screw device, but the clip is clamped with a collet along the inner diameter, and is not pryed off with paws from below, as in the classic version.
Which wheel bearing to choose for replacement
The front wheel bearing is of both domestic and foreign production. As they say, there will be something to find for such a car. But it’s better not to buy Chinese spare parts to replace the front wheel bearing on a VAZ 2114. They are inexpensive, but hence the quality is not very good, and you won’t go far with them.
Which wheel bearing to choose for replacement
It is better to pay attention to imported spare parts, especially from Europe. Although they are more expensive, their quality speaks for itself. When purchasing, be careful not to confuse them with Chinese counterfeits, there are many of them now.
It is also worth looking at domestic manufacturers, such as those from Vologda or Samara. Excellent quality at a reasonable price. They also include instructions for installing the bearing, which makes the task even easier.
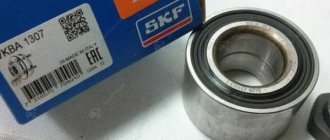
How to buy original bearings
In order to distinguish an original bearing from a fake, look at the box; it must have proper presentation. The rotation of the bearing is tight, but the fake bearing rotates very easily, no effort is required. The inner holder of the original has all the necessary numbers and inscriptions. But on fakes they are located both inside and outside. The differences between them are minimal, there may be a different brightness of color on the bearing, or a slight difference in shape.
- Wheel bolt wrench;
- Two jacks;
- Car stands;
- Power wrench;
- Thirteen two head;
- Wheel chocks;
- Open-end wrench for ten, seventeen (2 pieces), nineteen;
- Ratchet driver;
- Socket head for eight, thirteen, fifteen, seventeen, nineteen;
- Head with E12 profile;
- Extension;
- Phillips and slotted screwdrivers;
- Penetrating lubricant;
- Hammer;
- Extension;
- Oil collection container;
- Lithium grease.
- Place wheel chocks and loosen the wheel nuts on the right and left. Thirty-two head nuts.
- Loosen the wheel bolts, jack up and remove the front wheels. After removing the wheels, place stands under the sills and lower the car on them.
- Loosen the fastening nut and remove the negative terminal of the battery.
- Remove the air filter housing. To remove, unscrew the two bolts securing the front panel, disconnect the power connector for the mass air flow sensor and loosen the clamp securing the pipe to the body. Next, remove the pipe fitting to the filter housing and then lift the housing and disconnect the air intake pipe. After completing the procedures described above, the case no longer holds anything, remove it. The mounting bolts are for a thirteen head, and the clamp is for a Phillips screwdriver.
Apply penetrating lubricant, loosen the clutch cable to the box and remove it from the bracket. In order to loosen you need two seventeen keys.
Remove the clutch cable from the fork and place it to the side.
Remove the small terminal from the starter and unscrew the nut securing the positive wire. Head nut for thirteen.
Unscrew the ignition coil bracket mounting bolt. Thirteen head bolt.
Unscrew the upper starter mounting nut. Fifteen head nut.
Unscrew the two upper bolts securing the box to the engine. Nineteen head bolts. The location of the first bolt is in the photo below, and the second bolt is located under the thermostat.