01/25/2022 1,435 Electrical
Author: Victor
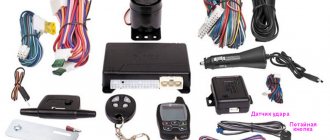
A car siren is an additional element of alarm systems, which is designed not so much to protect the car, but to scare away potential car thieves. Such devices are simple and self-contained and can reproduce sound, the volume of which varies from 90 to 120 decibels.
[Hide]
Installing a siren with diagrams and step-by-step instructions
The procedure and features of connecting the device depend on the type of its design, as well as on the type of alarm system with which it is planned to be used.
Regardless of this, there are general rules for installing sirens:
- Make sure that the installation location is least accessible to intruders.
- Work is carried out with the negative terminal disconnected from the battery.
- Before installing the device, you must make sure that there are no heated engine parts near it (ignition system wires, exhaust manifold). Failure to do this will result in overheating and melting of the plastic housing or insulation of electrical connections. The optimal temperature regime of the internal circuitry of the device will be disrupted.
- The siren is installed in the horn-down position. This prevents moisture accumulated in the engine compartment from entering the device.
- To connect the negative wire of the device, use any part of the wiring that has contact with the electrical ground of the engine. This could also be a bolt or nut on the car body that has been thoroughly cleaned of rust.
- Contact of wires with moving or vibrating parts of the body can lead to both chafing of their sheath and damage to the main current-carrying part. This can be avoided by carefully strengthening such places with an additional layer of insulation. Tight, sagging-free laying of wires on the housing will also protect them from mechanical damage.
- Using self-tapping screws, you should make sure that there are no other important parts of the car structure under the installation site of the sound emitter. These may include wiring elements, plastic or rubber parts.
Installing a siren in a securely protected car engine compartment will provide:
- safety of the device;
- stability of its work;
- inaccessibility to unauthorized persons.
Connecting a self-powered device
Connecting a self-powered device is done step by step as follows:
- After installing the device, lay the connection wires and connect them in accordance with the diagram.
- Connect the red wire to a constant +12 V power supply from the main source.
- Connect the black wire directly to the car body (-12 V).
- The white conductor receives a positive control signal from the alarm unit. In the diagrams this wire is designated as “positive trigger”.
- The fourth blue wire (“negative trigger”) is designed to control the siren using a negative signal. It is cut off or carefully rolled up and placed on the base of the siren.
- Turn the key to the position with the green dot. In this mode, the siren will automatically go into alarm state after the voltage from the main battery is lost.
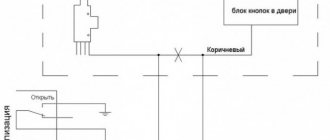
Wiring diagram for a self-powered siren
To avoid device failure as a result of a short circuit or current exceeding its rated value for other reasons, a fuse is included in the power circuit. This should not be done if the positive wire of the siren is connected to an already protected positive of the alarm.
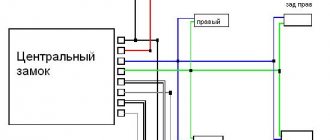
How to connect a non-autonomous siren with an alarm system
To connect a non-autonomous siren with an alarm, two standard wires are used: red (in rare cases white) (+) and black (-).
If the device is controlled using positive polarity, the black wire connects to the ground of the vehicle's on-board network. Then the red braided cord is attached to the positive terminal of the alarm.
The second connection option (ground control) consists of connecting the red, positive wire to the battery positive. The circuit is protected by including a fuse in its composition.
Connection diagrams with positive and negative control
Installing a talking siren
With its use it becomes possible to:
- each individual event (activation of a shock sensor, engagement of reverse gear, etc.) is assigned a separate sound, different from others;
- accurately identify the sound of your alarm among others;
- play a music signal from other sources, bypassing the main channel.
Having basic skills and a minimal set of tools, the siren can be connected according to the diagram shown in the photo:
Connecting a talking siren
Popular models
The most popular serenade models among users are:
- Starline 203. Refers to single-tone sirens with powerful sound. The body is made of durable plastic, insensitive to moisture and mechanical damage. The sound pressure is 112 dB. The device is reliably protected from dust and dirt.
- Pandora DS 261. A single-tone sound emitter can be connected to the on-board network of the car. The device is equipped with a high-capacity battery that ensures long-term uninterrupted operation. The small size of the sound emitter allows it to be placed in places inconspicuous to criminals.
- Falcon AR 165. In offline mode, the device can emit sound signals for 30 minutes. A control lock with encrypted codes protects the alarm element from unauthorized shutdown. The device is powered from the car's network and consumes no more than 1.5 A of current.
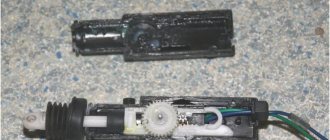
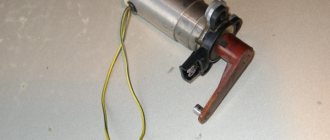
Reworking and setting up devices
Changing the sound character of a standard car siren at the request of users in some cases requires a complete reconstruction or replacement of its main parts. To do this, you will only need basic knowledge of circuit design, as well as skills in creating printed circuit boards.
You can assemble a circuit of a two- or multi-tone car siren operating on 12 or 15 volts according to the following plan:
- Create a sketch of a printed circuit board on paper or using a computer program.
- Using a carbon copy or using a printer, transfer the drawing onto polished paper.
- Cut out the template.
- Process the single-sided PCB workpiece using fine-grained sandpaper.
- After degreasing the surface of the future board using an iron or a homemade device, stick a template on it.
- Remove it by soaking it in warm water.
- Etch the textolite plate in a solution consisting of 1 part ferric chloride and 3 parts distilled water.
- Using a thin drill, drill holes for the legs of the board elements.
- Solder the radio components according to the diagram.
- Install the generator inside the siren housing.
- Install the sounder at the location where it is installed on the vehicle.
Photo gallery
Schematic diagram
PCB design
Etched board
Track diagram on paper
Placing elements
Board in the siren housing
Multi-tone siren
Multi-tone siren - from the variants of the sound annunciator with a changing tone, is assembled on the basis of the 561LN2 microcircuit, with:
- The operating frequency of generator G2, which is responsible for the sound tone of the siren, is determined by the state of transistor VT1.
- The parameters of its operation are controlled by adjusting the resistance of the variable resistor R1.
- The sound generator G1 is responsible for the frequency of the produced signal. Its changes are achieved by adjusting the resistance R2.
To obtain a fixed sound tone, potentiometers R1 - R2 can be replaced with constant resistances with a nominal value of 33 KOhm.
Schematic diagram of a multi-tone siren
Two-tone
A two-tone siren, assembled according to this circuit, is connected to the security alarm input and the volume of the emitted signal is not inferior to industrial designs. At the same time, it consumes significantly less energy and has its own, easily recognizable sound.
The pulses generated at the output of the multivibrator D1.3, D1.4 enter the output stage assembled on the basis of the transistor VT1. By influencing them with a signal with a frequency of 2 Hz, generated by the multivibrator D1.1, D1.2, a two-tone siren sound is achieved.
Two-tone siren circuit
Siren 12 Volt
Using only two transistors and a dynamic head with an induction coil resistance of 16 Ohms (2 x 8 Ohms), they assemble a simple siren circuit with a supply voltage of up to 12 V.
Siren circuit powered by 12V
Siren up to 15 volts
To work in conjunction with a car alarm, a siren assembled using the UMS-8-08 generator is suitable. The increased power of the device requires its connection through a special relay RES-10 (indicated in the diagram as P1).
Siren with supply voltage up to 15 Volts
The microcircuit memory stores 8 melodies, for which buttons are provided for selection:
- S1 (start);
- S2 (stop);
- S3 (selection).
A sound signal at the output of the device is generated when the relay contacts close.
The microcircuit is powered through resistor R3 and diode VD1. Here the voltage drops to 3.3 Volts. The signal from the collector of transistor VT1 through inverter D2.1 goes to the input of microcircuit D2.3. It is directly fed to the D2.2 chip. Due to the phase mismatch of the signals coming from D.2.2 and D.2.3 to bridge VT2/3/4/5, the current in the BA1 speaker circuit flows either in one direction or in the opposite direction. It is amplified due to the coincidence of the positive and negative half-cycles of both signals.
The circuit is powered from a network with a voltage of up to 15V.
Siren based on a cell phone chip
A failed siren can be modified in accordance with the KA2410 microcircuit from a cell phone call.
The signal is amplified by a transistor and sent to the speaker. A protective diode VD1 is installed at the input, protecting the circuit from incorrect connection (supplying negative voltage to the positive input).
Device based on a chip from a mobile phone
How to connect your phone to a security alarm with auto start?
First of all, you need to download and install the application for your alarm model on your smartphone. StarLine and Pandora have their own programs. For Sherkhan, look for the “Mobicar” application in Google Play or App Store
Further, all manipulations must be carried out in the immediate vicinity of the car, since the phone is connected to the alarm via a Bluetooth signal. First you need to unlock the car's central lock. Then enter the alarm with auto start into pairing mode.
- Press and hold the “4” button on the key fob for 2 seconds
- Next, press the “1 + 4” buttons simultaneously for 2 seconds
- Finally, press the “3” key also for a couple of seconds
Now you can turn on Bluetooth on your smartphone and launch the Sher-Khan Mobicar application. On the start screen, click on “Start connection”
After a short search, the page will display the number of the alarm installed in the car. Click on “Connect”
To connect your phone to the alarm system, you will need to enter a six-digit code, which must be taken from the key fob display. Only the first 4 digits are visible on it. The last 2 will be displayed after briefly pressing the “2” button. Enter this code into the text field in the mobile application.
After successful connection, click on “Start using”
How to control a car siren
The car siren is controlled in several ways:
- An "external" alarm siren can be controlled by a low-current negative output. To do this, the Negative Trigger wire is connected to the control output, and the second “trigger” is isolated. It is recommended to connect the second control cord to ground.
- To control the positive polarity, a cord in white insulation is located inside the siren loop. It must be connected to the output of the main unit. As soon as voltage appears on it, an alarm will sound.
- A high-frequency radio channel can also be used to transmit the control signal.
- The operating mode of the autonomous siren is selected by turning the lock located on the rear surface of its body. Depending on the position of the key, the device will work either autonomously or from the vehicle’s on-board network.
- Non-autonomous sirens are controlled using power wires.
Removing the terminals from the battery is useless
The main car alarm unit is always equipped with a built-in battery. It, that is, the battery, is charged from the on-board network. If this principle were not used, then the security mode could be easily turned off by simply disconnecting the terminal from the main battery contact. In a similar way, you can organize power supply for any electronic unit by installing a built-in, that is, autonomous battery. But then the power consumed by the unit cannot be made too high. An autonomous siren, equipped with a small battery, also cannot produce a loud signal for a long time. But this is the only drawback of such devices.
Typical autonomous siren module
The problem is partially solved by using lithium batteries, but it is clear that this changes the price. However, the owner will make the choice. Now let’s ask another question: what will happen if the device discussed here is completely de-energized, that is, the external power is turned off. The speaker will start beeping, the battery will be discharged, but complete discharge will occur in 20-40 minutes. By the way, when all the wires are disconnected at once, the same thing happens.
Video
Piezoelectric siren. Review, comparison, test. Filmed by the Alarmtrade channel.
Do you have any questions? Specialists and readers of the AUTODVIG website will help you ask a question
Was this article helpful?
Thank you for your opinion!
The article was useful. Please share the information with your friends.
Yes (100.00%)
No
X
Please write what is wrong and leave recommendations on the article
Cancel reply
Rate this article: ( 2 votes, average: 5.00 out of 5)
Discuss the article:
Installing a car alarm with your own hands
Cars regularly become victims of car thieves, but the price of an “alarm” with installation can reach several hundred dollars. You can save up to half the amount if you install a security system yourself
Working with electrical equipment among drivers is considered a kind of magical act, and when it comes to electronics, for most it is real space. But in vain.
Before you start connecting a car alarm yourself, you need to imagine where each element of the kit should be connected
If you have good step-by-step instructions, it is quite possible to install a security system on your car on your own. However, let us say right away that this is not entirely simple, and it is not always possible to do it the way a professional would do it.
Why the bell alarm doesn't work
The howler siren can sometimes fail for some reasons:
- The power was turned off while installing the wired system.
- The entire system was connected incorrectly.
- The batteries in the wireless device are dead.
- The alarm was installed on the street.
- Manufacturing defect.
- The attackers found a way to disable the siren.
- Water, dust, dirt got into the device and shorted the contacts.
When choosing any type of siren-howler alarm, you must carefully read the instructions in order to correctly install and configure the system. Otherwise, your home will not be reliably protected, and unforeseen situations may occur, for example, frequent false alarms. Thanks to the sound warning system, you can be sure that strangers will not enter the territory of your country house or cottage.
Wired or wireless
Communication between the sensors and the control unit can be achieved either using electrical wires or wirelessly (these technologies are so widespread today that they will not surprise anyone). Both methods have both advantages and disadvantages. The advantages of wireless communication include the absence of the need to lay a cable to each sensor. The rest is full of shortcomings. Any wireless sensor must be equipped with a battery. A dead battery can cause false operation of the system, and this is unpleasant. In addition, if the alarm operates in winter, the battery life at subzero temperatures will be significantly less. Thus, it is better if the “howler” siren at the dacha is equipped with wired sensors.
Methods for intruders to enter the garage
A thief is able to get into the garage using the following methods.
- Cutting off the hinges or the padlock itself. The popularity of this method is due to the fact that it is the least noisy and as simple as possible. You can not only cut the padlock, but also use large wire cutters, a sledgehammer or a classic crowbar.
- Undermining is extremely rare, but is still used, so attackers need to block the passage by concreting the floor and fixing the walls so that they cannot be lifted with a jack.
- Creating a hole is allowed if the garage is metal. In this case, the principle of opening a tin can applies, and among the tools used are a classic grinder, hydraulic shears or an autogen. Sometimes the metal structure can simply be bent.
- Using master keys or paper clips to open a lock, selecting keys. To be on the safe side, it is best to avoid installing a rack and pinion lock as it is too simple. There should be two locks.
- Penetration through the roof is possible if it is jacked up or broken, especially if there is a corresponding projection above the walls. Car theft in this case is doubtful, but you may lose valuable property.
- Brickwork break. The speed of hacking in this case will depend on the quality of the bricks. In some cases, a small scrap will be enough. This method is often used to break into a neighboring garage if nothing worthwhile was stolen from the first one.
You may also be interested in material that is devoted to installing such a device as a car anti-theft security device.
Be sure to read our expert’s article on anti-theft mechanical devices for cars.
In fact, there are even more possible methods of hacking, so installing an alarm system is a mandatory measure. Comprehensive protection, involving the installation of floor, wall, roof, and vibration sensors, is an ideal option. It would not be superfluous to install warning sensors about the opening of gates or doors, or movement inside the garage.
Despite the abundance of ready-made models on the modern security systems market, an alarm system for a garage can be made independently. To do this, you need to know what requirements the finished device must meet.