Good day! In general, my rack rattled. I start tightening the nut, there is a little less noise, but the EUR no longer returns to zero after turning. I think it's a disc spring. I removed and disassembled the rack, changed the bushings, installed an ss20 plate, and lubricated everything generously. After installing the rack in place, I adjusted the nut so that the rack did not rattle. Started up and the steering wheel turns easily. Joyfully, I leave the garage and realize that while driving I have to manually return the steering wheel to zero. I went out onto the highway, and in order to steer, you need to overcome a certain force (you can feel the EUR torsion bar springing). I loosened it a little, no result. I weakened it even more, the roar was already wild, but there was a very bad feedback from the road. On the highway, more or less. The torsion bar is no longer so springy, but it still sucks. I suspect that the Makhachkala EUR is to blame. I tried pulling the fuse. THIS IS HARD... The steering wheel is made of oak and does not return to zero. It gets worse. I’m thinking of remaking the EUR for conventional mechanics: 1) Either break the worm and weld the torsion bar (budget) 2) or buy an assembled shaft and a mounting plate from a regular viburnum (expensive for me). If I choose the first option, will it be easier to turn the steering wheel than just pulling the fuse? Will there be a difference in steering effort between the first and second options? Maybe someone has a shaft from an ordinary viburnum lying around? or who will give it for inexpensively? I'm in Voronezh)
The process of adjusting the sensitivity of the EUR Makhachkala is described here. He turns the tuning resistor there. What do you think about this?
Share your thoughts and experiences! I will be grateful!
Electric power steering for modern cars has already become an integral part of them. On the Russian market it was first installed on the Lada Kalina ( VAZ 1118 ). The electric booster added both a lot of positive emotions and a lot of negative ones. Failure of this unit occurs quite often on the first samples. Our guest today was no exception – a car from the Lada “Kalina” family (Fig. 1).
The situation is quite typical: the client complains that sometimes the electric power steering turns off and the electric power steering warning light comes on, but after driving along some hole or rails, the electromechanical power steering (EMUR or EPS) resumes its operation.
This situation is very annoying, because not only the owner uses the car, but also his wife. It is much more problematic for a woman to turn the steering wheel without electric power assistance.
We start the car, and the electric power steering fault light actually lights up and it becomes quite difficult to turn the steering wheel. It is imperative to deal with this problem.
We connect the diagnostic scanner and connect to the EMUR control unit.
On the monitor screen we see the following error: C1044 – incorrect sequence of the rotor position sensor. What is a rotor position sensor and where is it located?
Let's take a break from our malfunction for a moment and touch on a little theory. Let's understand the EMUR device and what main parts it consists of. Let's consider all its parts separately.
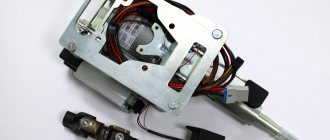
Design EMUR Kalina 11186-3450008-00
- Steering shaft
- Electric motor
- Electronic control unit
- Torque sensor
- Rotor position sensor
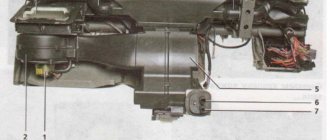
We remove the EMUR. On the nameplate (Fig. 7) there is article number 11186-3450008-00 manufactured by Aviaagregat, Makhachkala.
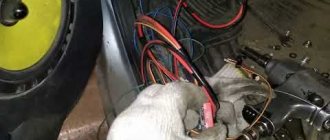
Remove the steering wheel, steering column switches and ignition switch. To get to the torque sensor , you must first remove the electric motor. We unscrew the bracket with 4 bolts, the cardan shaft, the lock nut and the 3 bolts securing the electric motor.
This is what we got (Fig. 12)
Next we pull out the shaft.
We take out the torque sensor (Fig. 17), having previously unsoldered the wires from the board (Fig. 16).
Design of an inductive torque sensor.
The inductive sensor consists of two concentric cylinders with holes (perforation slots), which are fixed to the shaft and rotate with it. And two concentric coils with primary and secondary windings, fixedly inserted into the EMUR housing. We will not go into various terminology, but let’s put it simply: an alternating current with a frequency of 20 kHz is supplied to the primary winding, and if we apply force to the shaft (that is, we begin to rotate the steering wheel), then a voltage “+” or “-” appears on the secondary winding depending on the direction of rotation, and the magnitude of this voltage is directly proportional to the applied torque (force). Thus, the electronic control unit (ECU) determines with what force you rotate the steering wheel in one direction or another.
So, we’ve dealt with the torque sensor, let’s move on to the next one, namely the rotor position sensor (Fig. 20), which is located on the back cover of the electric motor.
The EMUR of the Lada "Kalina" uses a 3-phase switched inductor (brushless) motor. In order for it to start rotating in one direction or another, the electronics must understand what position the rotor is currently in and, after determining the position, apply voltage to certain stator windings at the right moments. To determine the position, a rotor position sensor (RPS) is used.
Causes of EUR failure
Why does the electric power steering on the Lada Kalina not work, turns off and refuses to work, what are the signs of a steering wheel with power steering knocking, jamming, biting or squeaking? To repair the system yourself, you need to know how diagnostics are carried out and what causes precede the breakdown. Most often, the failure of the amplifier is caused by a breakdown of the unit itself and the amplifier fails. Problems of this type are resolved by thoroughly checking the system to identify the exact problem.
As practice shows, often the inoperability of the electric amplifier (failure) is associated with a breakdown of the speed controller.
- the steering wheel is jammed,
- jams
- becomes tight
- and others
Because the speed controller sensor ensures activation and deactivation of the electric power steering under different driving modes. The amplifier on Kalina works if the car is moving at low speed. When the speed begins to increase, the booster automatically turns off, allowing for safer machine control when driving at high speeds.
So, briefly about the reasons for the inoperability of the EUR:
- The speed controller has failed or the control unit does not receive or disappears a signal from it. In this case, the reason may lie in either a breakdown of the sensor, damaged wiring, or poor contact of the controller with the on-board network.
- The voltage in the vehicle's electrical network has decreased. The reasons can be different, ranging from a dead battery and an inoperative generator to the use of inappropriate electrical equipment in the car.
- The permissible crankshaft speed has been exceeded.
- Incorrect operation or failure of the control module. Depending on the cause, the control unit may need to be repaired; more detailed diagnostics need to be done.
What a driver needs to know about EMUR
Electric power steering on Kalina serves to increase driver comfort. With its help, you can easily turn the steering wheel with one finger, even in a stationary car. This is convenient and practical, since parking with such a system turns out to be much easier and safer. The electric amplifier device includes:
- brushless electric motor;
- gearbox;
- Control block.
The electric motor is located under the steering wheel. A worm is installed on its shaft, which meshes with a plastic gear. The electronic unit controls the operation of the entire system using data that provides:
- torque sensor;
- speed sensor;
- crankshaft speed sensor.
After collecting data, the control unit regulates the supply voltage that is supplied to the electric motor. The lower the vehicle speed, the more voltage is supplied to the electric motor.
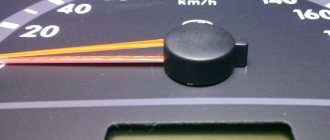
The lamp indicating a malfunction of the electric booster on Kalina lights up as soon as the ignition is turned on. After starting the engine it goes out. This is normal operation of the system, but if it breaks down, even after starting the engine, the lamp continues to light.
Reasons for failure of the electric amplifier.
- There is no signal from the speed sensor.
- Critically low voltage in the on-board network.
- The permissible engine speed has been exceeded.
- Control unit malfunction.
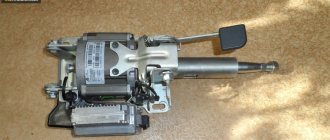
To repair the power steering, the steering wheel and part of the torpedo are removed
In the first three cases, failure of the EUR on Kalina can be eliminated quite simply. You need to either tighten the alternator belt or apply less force when pressing the accelerator pedal.
A malfunction of the control unit is a reason to visit a diagnostician who will conduct a quality inspection and identify the breakdown. Moreover, some problems can be fixed by an electrician, but some turn out to be fatal, and only replacing the entire unit will help.
Electric power steering is a component used to provide more comfortable driving. Not so long ago, domestically produced cars began to be equipped with EUR, in particular, in this article we will talk about Lada Kalinas. What malfunctions can occur with the Kalina EUR and what troubleshooting methods are there? Find answers to these and other questions below.
Diagnostics
To check the amplifier in a car, you need to remove the plastic trim on the steering column; to do this, unscrew the bolts securing it from the bottom.
Then you will need to get to the 8-pin plug, its pinout is as follows:
- The blue contact is connected to the ignition switch, this is 12 volt power;
- the red-brown contact is the connection cable to the tachometer;
- the gray contact goes to the car speed controller;
- white and pink wire - amplifier control indicator;
- black-yellow contact is a diagnostic line;
- the next contact is empty, the wire is not connected to it;
- brown contact is ground;
- empty.
More accurate results will be obtained by checking the amplifier using a scanner. But since such equipment can usually only be found at service stations, you can try to check the operation of the system with a paper clip.
To check you need to do the following:
- First the ignition is turned off.
- Then, using a paper clip, you need to close contacts numbered 6 and 7 of this plug, while the plug itself does not need to be removed.
- Next, the ignition must be turned on.
- After completing these steps, the EUR failure indicator located in the dashboard will begin to blink; by the number of blinks, you can determine whether the system is broken (the author of the video is Gosha Vakhromeev).
- one long signal and one short signal - the electric amplifier is working;
- one long and two short - no engine speed signal;
- one long and three short - the torque controller is out of order or there is no power supply;
- one long and four short blinks—problems in the operation of the electric power steering motor;
- one long and five short - the steering shaft position controller has failed;
- one long and six short - the motor rotor position controller has failed;
- one long and seven short - problems with the electrical network - the voltage is either too high or very low;
- one long and eight short - the control module of the electric amplifier has failed;
- one long and nine short - the speed controller is broken.
Error codes
c1044 - incorrect sequence of the rotor position sensor (RPS)
c1621 - incorrect voltage 5V
c1622 - speed signal circuit failure
c1011 - car engine speed signal circuit, no signal - the signal from the idle sensor (or the standard tachometer through a voltage limiter) is divided by 4 and applied to the tachometer input,
c1022 - error, voltage of the main output of the torque sensor - it is possible that the shaft cover has rubbed the insulation and the middle, green wire shorts to ground
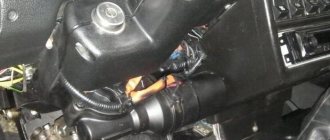
Dismantling and disassembling the electric amplifier
Before removing the amplifier, you need to remove all the steering column switches. Remove the steering rack cover and dismantle the devices, remembering to disconnect the connectors from the power supply.
How to remove the EUR with your own hands:
- After removing the switches, you will need to dismantle the lower cross member of the dashboard. To do this, you need to press the fasteners that secure the connector with wires, and then disconnect the wiring from the control module. Once these steps are completed, you can disconnect the connector from the switches.
- The system bracket is secured with nuts; you will need to unscrew them with a wrench.
- After this, the steering rack will need to be carefully lowered down. To do this, you will need to find the bolt that secures the driveshaft to the booster shaft. This bolt must be unscrewed, but when unscrewing, you will need to fix the nut, this will prevent it from turning. When the bolt is removed, the fastening will need to be loosened, after which the intermediate shaft will be carefully removed. At this stage, we recommend marking the position of the shaft and gears; you can use a marker for this. This step is very important because doing it will prevent possible installation problems in the future. If the marks on the shafts do not match, this may cause problems with the amplifier. When dismantling, be careful not to damage the wiring, as this will also lead to the inoperability of the ESD.
- When the unit is dismantled, it will need to be disassembled and the failed elements replaced. Further editing is done in reverse order (the author of the video is Murzik Bely).
Fuse box
The weak link of the electric power steering on Kalina is the fuse box; if something doesn’t work, it’s worth checking them. To get to them, you need to open the dashboard, to the left of the steering wheel. To do this, pull the top part towards you and the latch will open.
Check if the fuse is working, if it fails, replace it. It is very easy to check, check the integrity of the thread inside the fuse. Changing a 50 amp relay to a 30 amp one will also help.
Newer versions of Kalina are equipped with electric amplifiers from Hyundai, which has a positive effect on its reliability. However, there are still thousands of cars with the domestic version, which malfunctions and breaks down from time to time. Now it will be easier for you to repair the electric power steering on Kalina yourself. The main thing to remember is that not every amplifier shutdown is a breakdown. And you can find the problem yourself and fix it, but somewhere you will have to go to a service center.
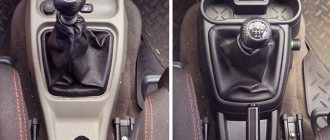
How to tighten the electric power steering rack?
The appearance of a knocking sound in the operation of the electric power steering is associated with the need to tighten the steering rack.
How to do it right:
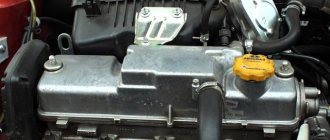
- First you need to disconnect the battery; to do this, disconnect the terminals from it. Unscrew the battery mount; to do this, you need to unscrew two more nuts located at the edges. After this, the battery is removed and put aside.
- Then you need to lift the plastic stand, there are four more screws under it, they can also be unscrewed.
- Having done this, it is necessary to move this stand forward until the platform is disconnected from the air filter housing retainer pad. After this, the trim can be moved back, this will provide freer access to the rail itself.
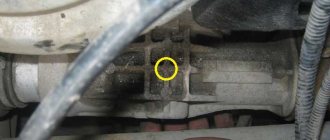
- At the next stage, you will need to crawl your hand under the rail. Directly below it, as shown in the photo, there is a rubberized cap; it will need to be removed, this will allow the key to access the adjusting nut.
- To perform adjustment work, you will need a special wrench to tighten the rack; without it, the adjustment procedure will not be possible. Using this wrench, you need to crawl under the car rail to install the tool in the required hole.
- When adjusting, be careful not to overtighten the rack. If its tightening is very strong, then when cornering the rack will bite, and this, in turn, may affect the safety of movement. The angle of adjustment is always different, it depends on how much the nut is loose, but usually when performing such work the nut is tightened by approximately 30 degrees. This should be enough to get everything right. After the adjustment is completed, it will be necessary to check that this task was performed correctly. That is, you will need to make sure that the steering wheel turns normally to any position all the way and there is no knocking. If the knock remains, then the adjustment continues.
Photo gallery “Adjusting the steering rack”
LADA Kalina Cross in the “Unique Outback” (introductory post)
We didn’t wait for the “war paint” and the official start; it’s time to talk about the behavior of the car and its characteristics.
03. Here's how this car differs from the first version of Kalina (9 photos are clickable, friends):
05. What does the manufacturer offer in terms of comfort: - sound insulation (excellent, no complaints so far) - electric heated exterior mirrors - electric power steering (although the first Kalina is easier to control) - height adjustment of the front seat belts - climate system - heated front seats - electric windows of the front doors - light tinting of the windows - height-adjustable steering column - audio system (FM, USB, SD card, Bluetooth, Hands free), external antenna, 4 speakers - central locking with remote control - cabin air filter (photo on the left - mirror Kalina Cross, on the right - just Kalina)
07. The salon has changed significantly (visually, friends, visually), the hand of chief designer Steve Mattin is felt. What's in the interior: - Fabric seat upholstery - Split rear seat (40/60 layout) - On-board computer - Glove compartment lighting - Driver's tool: jack, combination wheel wrench (strange, but we don't have this) - Luggage compartment lighting - Temperature sensor outside air (also not identified by us)
13. In terms of safety, the LADA Kalina Cross has been well improved. What we have: - Indication that the driver's seat belt is not fastened (it already seems to me that we will never become friends - we will have to buckle up :) - Security alarm - Electric headlight range control - Rear seat headrests - Daytime running lights (a very useful thing during the day, no need to turn toggle switch when you start/stop the car) - Driver airbag - Anti-lock braking system with brake assist (ABS+BAS) - Immobilizer - Electronic brake force distribution (EBD)
17. Under the hood is the best VAZ 127 unit for today (in my opinion). We didn’t drive it hard; the car is still being run-in. By the way, this engine is also installed on LADA Sport (after increasing the power): Characteristics of engine 21127: - displacement - 1596 cc - number of cylinders - 4 pcs. - maximum power - 78/5800 kW/rpm - maximum torque torque - 148/4000 Nm/rpm - maximum engine power - 106 hp - combined cycle consumption - 6.7 L/100 km (as we have now:) - engine life - 200 thousand km.
18. Trunk volume - 355 liters. With the rear seats folded down - 670 liters. In the fall we will try it with potatoes, on the advice of Vladimir Putin.
20. The ground clearance of Kalina Cross is increased by 23 mm compared to its sisters. The car has good cross-country ability:
24. Older cars won’t risk such experiments; they have a shorter seating position:
26. And a few more photos from our expedition. In comparison and without (photos are clickable):
34. True, on the way back, when serious rain caught me on the dirt road, I had to be a little nervous on the hills. In some places I drove very slowly so as not to slip into a skid.
In general, the impressions are only positive. LADA Kalina Cross is a practical and dynamic car. Comfortable seats, spacious interior, air conditioning. As I already noted, the car is powerful and at the same time economical (our computer shows 6.7 liters per 100 km). Friends, I will give answers to all the questions that I received in the near future. 36. If you have any questions, you can send them in a personal message or leave them in the comments. If there are a lot of questions, I will devote separate posts to this. All the best, friends!
PS. Let me remind you that we report our news and expeditions in our groups on social networks: Vkontakte, FB, Odnoklassniki, Flicr, Tumblr. Our Instagramm. Stay with us!
How can I lubricate and adjust the EUR?
How and with what to lubricate the amplifier?
Litol can be used as a lubricant; the procedure is performed as follows:
- First you need to remove the plastic casing; to do this, unscrew the bolts that secure it. To unscrew, use a Phillips head screwdriver. It is also advisable to remove the lower cross member of the instrument panel, located under the steering wheel.
- Next, unscrew the two bolts that secure the amplifier itself; for this you will need a 13mm wrench. After this, the column can be released down.
- Unscrew another bolt, after which you can do the actual lubrication.
- First, the steering wheel is turned to the left until it stops. The lubricant is poured into a 10 cc syringe, which needs to be sprayed into the hole formed. You need to throw out all 10 cubes.
- Then the steering wheel is turned to the right until it stops - the syringe is again directed into the hole, all the lubricant is sprayed out.
- After this, the steering wheel should be turned to the middle position and again sprinkled with lubricant into the hole.
- Next, the steering wheel must be turned in different directions until it stops several times. The lubrication operation is repeated again.
- Then all the components are assembled in reverse order.
vendor code
Standard Electric power steering VAZ 1118 (Kalina), Granta, Datsun On-Do (Mi-Do), Priora 11186-3450008-02, 1117-3450008-02
Manufacturer: Autoelectronics, Kaluga, Russia
Price 20,500 rubles