The cylinder head is a cover designed to enclose the cylinder block. It is also indispensable for some other functions that are no less important in the operation of the car’s power plant.
While the engine is running, a gas-air mixture is supplied to the head itself, and thanks to the exhaust manifold, exhaust gases are removed.
Removing the cylinder head on a VAZ 2114 to replace the gasket with your own hands - part 1
As is already clear from the title, we will talk about removing the cylinder head.
In the previous entry I wrote that I had a blown cylinder head gasket. I started looking for solutions from the experts. But the price tag really upset me. Replacing the gasket (just a replacement, without grinding!) the price starts from 100 American rubles and this is not at a company service, but in the garage of Uncle Vasya (Petya, etc.) who do not provide a guarantee. After surfing the Internet, I found a good video on how to replace it yourself: 4. Remove the terminal from the sensor on the air filter:
And completely remove the air filter (two clamps and two mounting bolts on the front trim) 5. Drain the coolant:
How to quickly drain antifreeze is described in article 6. Remove the throttle cable (unscrew the two fastening bolts and remove the clamp):
7. Remove two plugs from the sensors near the thermostat:
8. Disconnect the connector to the injectors:
9. Remove the clamps and disconnect the pipe to the thermostat:
10. Unscrew the ground from the engine (key 13) 11. Unscrew the clamps and remove the pipes to the radiator and heater 12. Remove the terminal under the thermostat (single):
13. Remove the vacuum pipe:
14. Remove 2 plugs from the throttle:
15. Remove the single terminal in the area of the injectors:
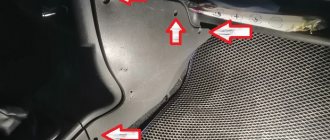
16. Unscrew the two head mounting levers on the sides:
17. Unscrew the thing near the pants to make it easier to get to the bolts securing the pants:
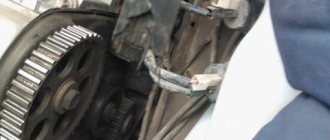
18.Remove the timing case (3 bolts x 10):
19. Unscrew the timing roller with a 17 key and remove the timing belt 20. Unscrew the pulley (with a 17 key) and remove the pulley, the main thing is not to lose the veneer (in the form of a semicircle):
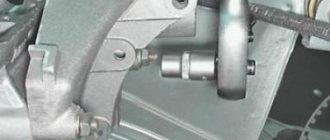
21. Unscrew the nut on the protection with a 10mm wrench (in the previous photo where the key is placed to secure the pulley from turning) and bend the protection 22. Unscrew the two fuel hoses (be sure to remember where one is so as not to get confused during assembly) 23. Unscrew the 2 pipes near the filler oil filler necks. 24. Remove the valve cover with a 10 wrench and two nuts:
Source
Work process
- Disconnect the negative terminals from the battery.
- The piston of the first cylinder is set to the top dead center position.
- All coolant is drained.
- Fuel pressure decreases.
- The intake pipe of the exhaust system is disconnected from the manifold.
- The cylinder head cover is being dismantled.
- All pipes, electrical wires and hoses are removed. But before you do this, you need to remember or note what was originally connected and where. This is done in order to avoid possible confusion during re-installation.
- There are three bolts on the camshaft belt cover that need to be unscrewed and the cover itself removed.
- The timing belt is removed and completely removed.
- The shafts must be secured against possible rotation.
- The pulley is attached to the camshaft using bolts that must be unscrewed and then the pulley removed.
- The nut securing the rear camshaft cover is unscrewed.
- Unscrew the remaining bolts and remove the cover completely.
- Slightly loosen the tension of the dozen bolts holding the head.
- Then each individual bolt is unscrewed one by one and removed along with the washers.
- The head is released and removed.
- If the head is attached directly to the gasket, a screwdriver or any other long tool should be inserted under the manifold. Next, you need to use this tool as a lever in order to slightly lift the head, and then remove it completely.
- Very carefully, so as not to scratch the surface of the head, it is necessary to remove the remnants of the old gasket. It is best to use a special liquid for this matter.
- We put the new gasket in place.
- We make sure that the shafts are in the top dead center position and all valves on the first cylinder are completely closed.
- We put the bolts back.
- Using a torque wrench, we begin to tighten the bolts one by one.
- We reinstall all removed equipment.
- We adjust the clearances in the valve drive and tension the camshaft belt.
As you can see, repairing the cylinder head on a VAZ-2114, which has 8 valves, is a fairly simple, albeit slightly labor-intensive task, which means that every person who has at least a slight understanding of this unit can handle it.
Source
Removing the cylinder head on a VAZ 2114 to replace the gasket with your own hands - part 2
Continued... The first part is here And so, after all the manipulations, we only have a few steps left to do to remove the cylinder head: 1. Unscrew 10 bolts with the E14 head of the cylinder head itself:
2. Unscrew the 4 bolts securing the pants. But here (like the author from the video) I had a problem in the form of soured nuts (((It’s good that I already saw a solution to this problem. Instead of point 2. Unscrew the two bolts connecting the pants with the muffler from the bottom of the car and remove the terminal (like a lambda) . And we try to take out the cylinder head along with the pants. To be honest, taking it out took me a lot of time, because I have to manage to twist the head so that the pants come out. It’s not very convenient to do this alone. But I won it))) 3. We remove cylinder head:
Indeed, the gasket was broken on the right side in front near the timing belt. It was not in vain that I filmed it. And this is happiness:
In this form it is easier to unscrew the nuts of the pants:
And then, without sparing the VD, we try to unscrew them. I managed to unscrew 2 nuts with a 13mm socket. One nut only thanks to a 12mm socket (I just hammered it onto the licked nut with a hammer). The fourth one was the one I had to tinker with the most. They didn’t take either a 13 or 12 head. I tried it with a chisel, nothing (((. And then I remembered my gas key))). A couple of manipulations and the last nut fell)))
Source
Symptoms of a problem
So, when all the points have been considered, it remains to list the signs of cylinder head gasket failure:
- A large amount of white smoke comes out of the muffler.
White smoke from the muffler is a sign of a faulty cylinder head gasket
Sufficient amount of emulsion on the filler cap.
Emulsion on the filler cap
- Antifreeze has an oil effect.
- The oil level in the pan has increased.
- The smell of antifreeze or exhaust gases can be traced in gasoline.
This is interesting: Replacing a Daewoo Nexia headlight: instructions, photos, videos, process
Replacing the cylinder head gasket
Well, I assembled my Super-Automatic 16-button trough.) I assembled it on Thursday, but at first there was no particular joy, and there was no time to write here.) The repair, in general, was not as complicated as it seemed to me before its beginning.