Quite a lot of people have been faced with the question of how to turn off the Pioneer radio.
Owners of standard radios especially often face this need. In this case, when you turn off the radio, you will see a transition to the “clock” mode. In this case, the button backlight will work. Drivers usually blame this on the incompetent technicians who connected the device. But, in fact, the reason here is different. This is a technical feature of many radios of this brand. This problem can be solved quite simply. You just need to know how to do it. In fact, this is not the biggest problem, and there is no point in going to the dealership to fix it. How to turn off the Pioneer radio? This question can be heard quite often in places where car enthusiasts gather. The thing is that the instruction manual does not cover this issue. If you read it, you might think that this behavior of the stereo head unit is quite normal. But then bad thoughts pop up. The main one is the possibility of battery discharge during long-term parking. Therefore, you still need to learn how to turn off the radio.
Pioneer car radio how to disable demo mode
Everything for the client, everything for the user. We installed the radio on the car, made the first settings, turned it off, but information messages continue to run on the display, the backlight is shining, and the radio is in a hurry to brag about all its abilities, except the ability to disable this Demo mode. Let's take an example of how to turn off a Pioneer radio yourself.
A modern Pioneer car radio is often a full-fledged multimedia center with a large number of options and various features, for a complete study of which you can create a separate course of lectures for teaching at a driving school. But sometimes half an hour is not enough to study the instruction manual. What to do if the leadership is completely lost? Or if you disabled the Demo mode on your Pioneer or JVC radio, but it starts up again.
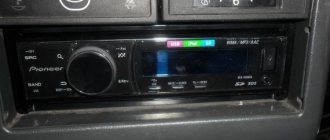
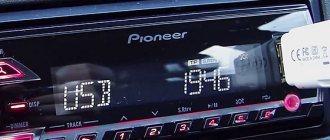
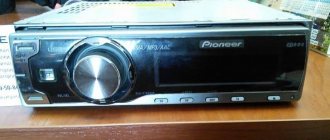
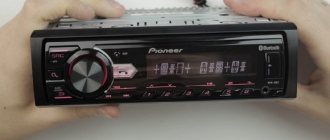
Pioneer car radio
Clicking noises when the engine is running
Many owners of standard radios are faced with the appearance of periodic clicks when the motor is running. To begin with, you need to understand the reason for the appearance of such a not entirely pleasant phenomenon. It's all about the car's energy system. When the power unit operates, small voltage surges regularly occur. This results in interference.
Read more: Daewoo Matiz changing the timing belt
In principle, the radio tape recorder has protection against this. But the standard noise suppressor does not always cope with the problem. Sometimes this happens due to its failure, which is not a rare occurrence. You can fix the problem by simply connecting power to the radio through a noise filter. This is guaranteed to save you from clicking acoustics.
Speaker wheezing
Some drivers encountered a situation where the speakers began to wheeze. At the same time, this does not happen all the time, but only from time to time. Of course, the problem could be a faulty speaker. But, often the reason turns out to be unsuccessful configuration of the system itself. Therefore, troubleshooting should begin by viewing the settings. You are interested in the balance menu. Here you can evaluate how the sound is distributed between the speakers
Pay attention to the uniformity of its distribution. Most often, wheezing is caused by unbalanced low frequencies.
If everything is correct in the settings, then it makes sense to pay attention to the wire connections. There may be a bad connection somewhere
That is why the speaker wheezes. This may be indirectly indicated by the irregularity of wheezing. Especially if the speakers are in the doors. When you open the door, you move the wire, one time the contact may be normal, another time, not so much. The cause of wheezing may be a broken capacitor. In this case, you need to check it.
Take a radio component with the same capacity. You need to connect it in parallel with the standard one. After that, turn on the radio and check the result. The absence of wheezing indicates a problem with the capacitor. In this case, the current passed through the additionally installed part. Unsolder the faulty air conditioner and install a new one in its place.
Subwoofer doesn't work
In standard installed stereo systems with a Pioneer head unit, the sound from the subwoofer sometimes disappears. The problem is an unsuccessful output to the low-frequency speaker. The problem is treated in 2 ways. If the radio is new and under warranty, you can try to exchange it. But this does not always happen; more often it is repaired and returned.
Another option is to re-solder the output yourself. Perhaps the second option is the most optimal. Self-made repairs are much more reliable than warranty repairs. Moreover, no difficulties should arise there.
Conclusion
. Acoustics in a car often require quite a lot of attention. It needs to be configured correctly, this will allow you to make the most of its technical characteristics. How to turn off a Pioneer radio is a question often asked by owners of such equipment. In fact, this is done so simply that the manufacturers didn’t even mention it in the instructions.
Typical faults
Pioneer car radio error
Before we talk about the car radio connection diagram, let's look at the main malfunctions that can occur during its operation:
- The system does not turn on. If such a problem occurs after installation, then first of all the circuit of the Pioneer car radio is checked; it is possible that errors were made during the connection. Also, the reason may be due to a lack of power; you need to check the quality of the connection of the device to the vehicle’s on-board network. If you are using a remote control for a Pioneer radio, it may be using dead batteries or the remote control may simply be out of order. If the power is activated by pressing a button, then there is a possibility that it is the button that is inoperative.
- From time to time, the sound in the speakers disappears and then appears again; in such cases, the reason may be an error in the amplifier. In this case, a characteristic error message may appear on the device display. Typically, the cause is a short circuit or regular operation of the system at maximum volume. A short circuit can occur not only in the wires of the radio connection circuit, but also on the contacts going to the speakers or on the speakers themselves. It is possible that the short circuit is caused by damaged wiring. In this case, it is necessary to measure the voltage at the output of the amplifier, try to connect the speakers bypassing the amplifier, and diagnose the connectors, as well as the safety elements.
- One or more speakers have stopped working. In this case, the Pioneer car radio circuit is also checked; there is a possibility that errors were made when connecting the radio connector. But most likely, the reason should be sought on the speakers themselves, either the speakers are faulty or there is poor contact on them.
- The system does not respond to the remote control. Most likely, the reason lies in a non-functional remote control; this is a common problem for many audio systems.
- Incorrect configuration of the Pioneer radio can lead to incorrect operation of the audio system as a whole, so before operation the device must be configured correctly (author of the video channel Radioblogful. Video blog of a soldering specialist).
Video: “deep” settings menu + disabling DEMO mode + disabling time
Turn off the demo
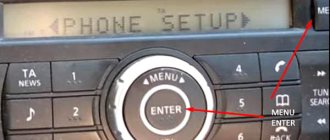
To disable the demo mode, turn off the car radio, and then turn it on again by long pressing the SRC button (maybe the SOURCE button), after which we get to the start settings menu, where using the joystick or the right-left buttons we find the DEMO ON sub-item, and then change it parameter to OFF.
How to adjust the bass
To adjust the bass level, you need to switch the rear speakers to subwoofer mode, which is described in detail in subparagraph 1. Also, to obtain richer bass, correct adjustment of low frequencies through the equalizer, as well as activation of the BASS BOOST function, which is disabled by default, can help. To do this, turn off and then turn on the radio using the SRC (SOURCE) button, and go to the preset menu, where we look for the BASS BOOST sub-item, after which we activate it.
Depending on the Pioneer audio recorder used in the car, there may be other parameters, which you can familiarize yourself with by carefully reading the instructions for the device, which is included in the kit or can be downloaded via the Internet.
Joystick positions
First, let's characterize all possible movements of the joystick. The positions of its handle can be as follows:
- up;
- down;
- left;
- right;
- recessed position.
So, let's begin. We set the volume to about 30 units, not paying attention to possible wheezing during playback. After that, press down the joystick and go to the list of settings.
You'll see a lot of options here, but don't let that scare you: for now you'll only need one setting. Start turning the joystick to the left or right until you find the “Audio” item. Found it? Now you need to press the joystick again and enter “Audio”, and there you will look for the item where the balance and fader are indicated. It looks like this: FADER / BALANCE.
Press the joystick again so that the words FAD 0, BAL 0 are displayed. If instead of zeros there are other numbers, it’s okay. It just means that adjustments have already been made here before.
How to connect correctly
To correctly connect the Pioneer car radio, you need to familiarize yourself with the diagram attached to the documentation. The cables are routed under decorative plastic body panels that protect the insulation from physical damage. For correct operation, it is necessary to ensure a continuous supply of positive power that supports the device’s memory. For switching, a yellow cable is used, which is led directly to the vehicle battery.
Wire marking
The Pioneer radio is connected using 2 ISO standard plugs, in which wires of different colors are mounted:
- red - to supply positive power after turning on the ignition;
- blue - supplying positive voltage to the amplifier and motor drive of the antenna;
- yellow - positive signal to support the memory block (does not depend on the position of the key in the lock);
- black - connection with the car body (negative signal);
- purple and purple with a black stripe - for connecting the speaker installed in the rear right door;
- gray and gray with a black stripe - for the loudspeaker located on the front right;
- white and white with black - for switching the loudspeaker in the left front door;
- green and green with black - to send a signal to the rear speaker on the left side.
On some of the radios there are additional cables designed to connect the steering wheel control panel or additional components of the multimedia system. When using component car speakers or amplifiers, the speaker cords are connected to the additional equipment.
Connection diagram
The connection diagram for the Pioneer car radio is given in the operating instructions. The cables are connected in accordance with the color of the insulation; cables coming from the battery and the ignition switch are used to connect power. If you connect the red wire directly to the battery, the head unit will discharge the power supply. To ensure reliable contact between the cords, soldering with tin-lead solders or crimping the joint with a metal tube is used, followed by wrapping with insulating tape.
Additional outputs for the subwoofer or steering wheel controls are connected in the same way. The pinout of the connector complies with ISO standards; a positive signal cable and a negative cord are used to connect the speakers. It is prohibited to twist the negative terminals into a single busbar that is connected to the car body. Acoustic cables from the loudspeakers are laid inside the passenger compartment and doors along the standard electrical wiring harnesses.
How to disable Demo mode on the radio
(2 3.00 out of 5) Loading…
Everything for the client, everything for the user. We installed the radio on the car, made the first settings, turned it off, but information messages continue to run on the display, the backlight is shining, and the radio is in a hurry to brag about all its abilities, except the ability to disable this Demo mode. Let's take an example of how to turn off a Pioneer radio yourself.
A modern Pioneer car radio is often a full-fledged multimedia center with a large number of options and various features, for a complete study of which you can create a separate course of lectures for teaching at a driving school. But sometimes half an hour is not enough to study the instruction manual. What to do if the leadership is completely lost? Or if you disabled the Demo mode on your Pioneer or JVC radio, but it starts up again.
Pioneer car radio
How to complete the demo
When supplied by the Pioneer manufacturer, the device is set to DEMO ON
Immediately after purchasing and connecting the car radio, it is important to understand and disable the demonstration, designed to advertise the device when selling. It is possible to use the Pioneer car radio in this state, but it does not seem comfortable, since when the device is turned off, the backlight does not go out and the creeping line does not go away from the display
Disabling Demo on the Pioneer radio is very simple:
- If long pressing on mute does not help, then you need to turn off the Pioneer radio, go to the engineering menu and long press the SRC (Source) key.
- In the settings, turn the wheel to reach the DEMO line.
- Switch from ON to OFF indication.
- Close the settings by pressing BAND.
Pioneer car radio engineering menu
Important: if the red wire (ACC) of the Pioneer radio is not connected to the contact that turns the ignition on/off, the car’s battery will be discharged. https://www.youtube.com/embed/man-gffWHnM
Thus, after purchasing a modern Pioneer car radio, setting up the device is quite accessible for independent actions.
Demo mode disabled
Demonstration on JVC car radio
The Japanese from JVC have a demo that turns on automatically if there is no sound playback for several minutes. But disabling the Demo is simple:
- Press the SEL (select) key and hold it until one of the setting items is displayed on the monitor.
- By going through the menu items, select the DEMO OFF item. On some models, select the DEMO ON item and press the button to switch to DEMO OFF.
JVC car radio
Please note: do not open the device case. There is a risk of exposure to laser radiation or damage to the player
There is nothing inside the case intended for user manipulation; servicing must be performed by a qualified technician.
Disabling demo mode
Demonstration on a Sony car radio
To disable the Demo, which starts after turning off the Sony radio, you must follow the following sequence:
- Press and hold the Select key. The Setup Monitor appears.
- Turn the tuning dial until “DEMO” appears, then press the tuning dial.
- Turn the dial to select “DEMO-OFF” and press the dial again. The setup is complete.
- Press the (BACK) key. The monitor will return to normal music/video playback status.
It is important to know: if there is no ACC position in the ignition switch of the car, you need to make sure that the Auto Off mode is selected. When you turn off the car radio, its power supply will be automatically canceled after a while, which will protect the battery charge
If automatic cancellation (Auto Off) is not selected, then whenever the ignition is turned off, you must press and hold the (SOURCE/OFF) key until the monitor turns off.
By the way, many car enthusiasts complain about independently switching the player to another radio wave. The AF (alternative frequency) function is responsible for this. It is responsible for switching to a more powerful radio signal if the selected frequency, in the opinion of the device, is not strong enough.
It’s easy to disable it, for example, for a Pioneer DEH car radio, the procedure is as follows:
- Press the “TA” button and do not release it until the “AF” function turns on. The “AF” indicator will appear on the display.
- Press the “TA” button and do not release it until the “AF” function turns off.
In players of other brands, disabling the demonstration is carried out in a similar way:
- go to the engineering menu;
- by searching through the parameters, find the line DEMO and change OFF to ON;
- exit the menu.
Everything is elementary, the backlight will no longer disturb the driver and passengers, the battery will become more protected from discharge, and music on the road will be pure pleasure.
How to disable demo mode on a pioneer radio
Pioneer radios stand out for their high-quality sound and a large number of functionality. But when “communicating” with them, users may encounter various difficulties. The radio's settings are wide, but this is not a plus for it. Often, owners of cars with standard or installed Pioneer radios are faced with the problem that they simply cannot turn it off. When turned off, the radio goes into clock mode, and at the same time the key backlight works. We will look at how to solve this and other problems related to Pioneer radios in this article.
How to turn off your Pioneer radio
A feature of a number of Pioneer radios is that they switch to “standby mode” instead of turning off, which causes several inconveniences:
- In a parked car, the clock on the radio display lights up, and the buttons are also illuminated, which increases the likelihood of the device being stolen;
- When driving at night with the radio turned off, the driver may be distracted by the backlight of the buttons;
- Turning off the radio not completely leads to increased battery power consumption.
The instructions for using the Pioneer radio do not tell you how to turn it off completely so that the clock does not light up on the screen and the keys are not backlit. Here is a typical procedure that is suitable for almost all Pioneer radio models that have a similar problem:
- Press button “2” on the radio and go to the menu;
- Select System from the list of partitions;
- Next, click PW Save;
- Turn off the radio using the OFF button;
- After these actions, it will go back into “sleep mode”. Press button “1” to turn off the radio;
- The clock display appears. Press button "4" to turn it off completely.
Such complex manipulations will only need to be carried out once to turn off the Pioneer radio, after which it can be completely turned off by pressing the “1” button.
Please note: If the radio settings are reset, for example, when disconnecting the device from the battery, you will need to repeat all the instructions described above again
What to do if the Pioneer radio clicks when the engine is running
Another common problem faced by owners of Pioneer radios is clicking noises when the engine is running. That is, if the engine is not running, the radio operates without problems or interference. When the engine starts and runs, the sound is distorted by constant clicks.
This problem occurs due to a failure or complete absence of an interference absorber in the radio. The interference itself inevitably appears, since when the engine is running, small voltage surges constantly occur, which will “result” in clicks. To fix this problem, you need to supply power to the radio through a noise filter.
Speakers wheeze when Pioneer radio is running
The next problem that owners of Pioneer radios face, especially if the settings were made in automatic mode, is the wheezing of the speakers. In some cases, the problem arises directly from the speakers themselves, but this is also possible for a number of other reasons:
Incorrect radio settings
You need to go to the system options and pay attention to the sound balance setting. Make sure the sound is evenly distributed between the speakers
If everything is in order with this setting, then also check that the settings are not set to excessively low frequencies; Problems with capacitors. Wheezing may occur due to broken capacitors, make sure that everything is in order with them; Bad contacts. The next reason why the speakers may wheeze when the Pioneer radio is working is directly due to a poor connection of wires and contacts. Make sure that all wires leading to the speakers are well insulated and securely fastened.
Subwoofer does not work with Pioneer radio
If your car is equipped with a standard Pioneer radio, some drivers may experience problems with the subwoofer not working. This problem occurs due to a poorly soldered output to the low-frequency speaker. Unfortunately, this is a standard “disease” of Pioneer radios, which can be solved in two ways:
- Try to exchange (or repair) the radio under warranty;
- Soldering the connector yourself is more reliable.
Step-by-step instruction
To find out how to disable demo mode, follow these steps:
- press the Mute button and hold it for several seconds;
- if the demo program does not turn off, it is recommended to turn off the player, open the service menu and hold down the SRC key for a few seconds;
- turn the volume control wheel until the cursor selects Demo;
- turn off demo mode by selecting Off instead of On;
- close the settings menu by pressing the Band button.
Please note that if the red AAC cable from the player is not connected to the terminal that turns on the ignition, the car's battery may be discharged.
Read also: Design of the power steering pump ZIL 130
Radio in the car
Stations in the radio can be tuned in three ways. Depending on the model, 18 or more stations can be memorized.
For convenience, we assume that the receiver is already turned on - switching to it is done by pressing the Band button once.
Method one is the easiest
- Knowing the frequency of the station, briefly press the left and right buttons to dial it on the display.
- Then hold one of the six buttons (1–6) below the display. The dialed station will be stored in memory, and a corresponding indication will appear on the screen in the form of a number repeating the button number.
- Dial the next frequency and press the next free button.
- Wait for indication on the display.
This is repeated 6 times - for six different stations.
Stations 7 to 12 and 13 to 18 are stored in the following memory banks. Switching between them is done by pressing Band once.
Method two
- While in receiver mode, hold down the right button for one second.
- The radio will begin searching for a station.
- Having found the first one, it will go into playback mode.
- If you are satisfied with the station, save it by pressing the buttons below the display.
- Then repeat steps 1–4 to select further stations
Storing the station and selecting banks is the same as in the first option.
Method three
- From the main menu you go to the functions menu.
- Scrolling through it, you find the BSM parameter.
- Select by pressing the up or right arrow.
- They wait for a while.
- The radio will check the entire range, find stations and arrange them according to signal strength.
- Then it will play the first one.
- You can save stations in the same way as in other methods. You can scroll through the selected ones by single short presses of the buttons under the display.
There is one thing about this method - not all domestic radio stations are included in the list of those found for various reasons. If you have gone through the entire list, but have not found the desired station, you can proceed as follows:
How to disable demo mode on a Pioneer radio: turn off
If the car radio continues to light up after connecting, it means it is in demo mode. It may work in this form, but it will be inconvenient to use the device. To disable the demo mode on the Pioneer radio, you need to perform simple manipulations in the settings.
What is demo mode?
Demo mode is designed to get acquainted with the car radio.
It starts automatically after the first connection.
This format does not provide for turning off the radio display. It will remain on even after all initial settings have been made. This is necessary so that it constantly displays all the capabilities of the radio on display. The only thing that the radio does not report while working in demo mode is how to disable this state of the device.
Which radio do you recommend buying?
- 4742 votes - 50% of all
- 1371 votes - 14% of all
- Kenwood 11%, 1046 1046 — 11% of all
- 814 - 9% of all
- 640 - 7% of all
- 371 votes - 4% of all
- 152 votes - 2% of all
- 2%, 148 148 - 2% of all
- 141 votes - 1% of all
- 93 votes - 1% of all
How to turn it on
The user manual describes in detail how to turn off the demo mode on the Pioneer radio, but there is not a word about how to turn it on again. The demo state is activated automatically when connected to the on-board system. If there is a need to enable demo mode after it has been disabled, you can do this as follows:
- activate the boot (engineering) menu by holding the SCR button for 3-4 seconds;
- press and hold the SCR button again until Set up appears on the radio screen;
- turn the volume control to go to demo settings;
- click on the volume control to activate the Demo on state (in some models, to perform this action you need to click on one of the arrows on the sides of the volume control);
- Click on the Band button with an arrow located at the bottom left of the panel to leave the settings.
Are you a car driver?! Then you can take this simple test and find out... Go to the test »
Once all steps have been completed, the display will remain on continuously. A list of all available functions will be constantly displayed on the screen. It is not recommended to leave the device in this format for a long time, because... it can lead to a complete discharge of the car battery.
How to turn off
To turn off the demo format of the Pioneer car radio, you need to hold down the Mute button for a few seconds. If this does not help, you need to take a more complicated route and sequentially carry out all the steps described above to enable demo mode. Pressing the volume control will activate the Demo off state.
After turning off the demo mode, you can start the required format of the radio by pressing the SCR button once. Through the engineering menu, you can disable the demo state for other car radios - this is a universal method. Disablement options can be found using a simple search of settings.
After turning off the demo mode, the backlight and ticker will no longer be activated and distract the driver and passengers. It must be remembered that the battery will not discharge after stopping the engine only if the red ACC wire is connected to the contact responsible for turning on the ignition.
The demo mode will turn on again and again if, during installation, the device is connected through the ignition circuit and not through the on-board network. In this case, it does not receive power from the battery after the engine is stopped. In such a system, none of the settings set during the previous startup will be saved.
The advantage of connecting via the ignition circuit is that the radio screen goes out after stopping the engine, but the disadvantage is that the date, time, and preset radio stations will need to be configured again each time. Therefore, it is recommended to still connect the radio directly, disabling the demo mode from the device menu, so that it does not drain the battery while the engine is stopped.
You can change the connection type of the car radio at a service station using the services of a master electrician.
You may also like
Subwoofer doesn't work
In standard installed stereo systems with a Pioneer head unit, the sound from the subwoofer sometimes disappears. The problem is an unsuccessful output to the low-frequency speaker. The problem is treated in 2 ways. If the radio is new and under warranty, you can try to exchange it. But this does not always happen; more often it is repaired and returned.
Another option is to re-solder the output yourself. Perhaps the second option is the most optimal. Self-made repairs are much more reliable than warranty repairs. Moreover, no difficulties should arise there.
Conclusion
. Acoustics in a car often require quite a lot of attention. It needs to be configured correctly, this will allow you to make the most of its technical characteristics. How to turn off a Pioneer radio is a question often asked by owners of such equipment. In fact, this is done so simply that the manufacturers didn’t even mention it in the instructions.
I'm not a music fan, but I love listening to music on the road. When I drive in the city, I listen to the radio more, and when I’m on the highway, I listen to music from a flash drive. This determines the choice of radio. Therefore, having bought a new car, I also bought a radio, the simplest Pioneer MVH-150UB.
Everything would be fine, but the radio tape recorder connected to the dealership did not want to turn off. Everything in the car turns off after you take out the ignition key, but the radio did not want to do this. If we follow the manual, the most we could achieve was to switch it to the clock display mode, but the button backlight was on. So it won’t take long for the battery to sit down... I had to unclip the panel. And today I fixed this “jamb.” I’m sharing it with everyone, because I think there are those who also bought themselves a Pioneer MVH-150UB radio.
So, to turn off the Pioneer MVH-150UB radio (if it does not turn itself off when you remove the ignition key after 3 minutes) without disconnecting the front panel, the action algorithm is as follows:
1. Turn off the energy saving mode by pressing button 2 - open MENU - select SISTEM - select PW SAVE - turn off by selecting OFF.2. Turn off the radio using button 1 (the clock indication and button illumination will appear)3. Press button 4 (display), after which the display goes out.
(The numbering of the buttons is according to the manual. By the way, the procedure described above is not in the manual, that’s why people are struggling...) After this, you can turn the radio on and off with button 1 whenever and under any circumstances.
When asked about the leader in the production of audio equipment, most readers will answer without hesitation - of course, Pioneer. The name of this brand has long become a household name to designate good, high-quality equipment, and not only in the audio segment. But on auto forums the name of this company is often heard in the form of how to set up a Pioneer radio in a car. Despite the variety of brands, all such devices are configured almost the same. Here are some configuration examples.
Audio
Front speakers
Having configured the radio receiver, as well as connecting sound sources, you can focus on sound quality.
The recommended volume for proper settings is no more than 30 units.
- After adjusting the volume, press the knob to get to the settings menu.
- Here they look for the “Audio” item.
- By pressing the handle, you enter this menu.
- After looking through it, they find the Fader instruction.
Very often it is combined with the balance menu, then the desired menu will sound like Fader/Balance
In the factory setting, these indicators are zero.
It has been empirically proven that here you can bet 100 - 125.
Rear speakers
The front speakers work cleanly, now it’s time to switch the rear speakers on the shelf into subwoofer mode - fortunately Pioneer can do this too.
- Turn off the radio.
- Press and hold the power button (as if you were going to set up the “demo” mode).
- Once in the menu, look for the inscription in the form of SW Kontrol.
- By pushing down the handle, you enter this menu.
- By rotating it, the parameter is set to SW.
- Confirm by pressing the handle again.
- Press the power button to save parameters and exit the menu.
- Then they return to the “Audio” menu (press the volume knob and rotate to select).
- By pressing the handle, you enter the menu.
- Here they look for the inscription SW SETTING1. Click on the handle to enter.
- Of the three options presented in the menu, you need to choose one of two - Normal or Rev.
In most cars, it is the second mode that will give the best sound.
The optimal solution would be to set 50 HZ.
Before moving on to the next settings, check at different volumes how the selected settings work. If you don’t like something, repeat the steps described, trying other values.
Loudness compensation
This option is hidden in the same “Audio” menu.
- Enter the menu, find the Loudness parameter.
- Select by pressing the knob.
- There are three values available here - High, Middle, Low (respectively high, medium, low).
- This parameter is responsible for adjusting frequencies at low volume levels. It is also impossible to give optimal settings here - they are set experimentally.
- Swing the knob to the left to go to “Audio” or from settings by pressing Band.
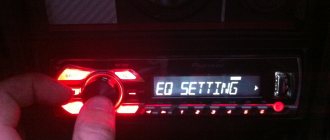
Equalizer settings
For advanced music lovers, here are a few more equalizer settings. They are hidden in the same “Audio” menu.
- Once in the menu, rotate the knob to select the EQ SETTING parameter.
- Enter this menu (depending on the model, you may need to enter another menu here). The three parameters offered in this menu are responsible separately for the settings of the low, mid, and high frequencies.
- Set according to your preferences. On some models, you can select several preset settings here. Depending on the speakers and your own preferences, adjust these parameters.
The settings here are no different from others - select by pressing, change by rotating, going to a higher level by swinging the knob to the left.
How to turn off your Pioneer radio
A feature of a number of Pioneer radios is that they switch to “standby mode” instead of turning off, which causes several inconveniences:
- In a parked car, the clock on the radio display lights up, and the buttons are also illuminated, which increases the likelihood of the device being stolen;
- When driving at night with the radio turned off, the driver may be distracted by the backlight of the buttons;
- Turning off the radio not completely leads to increased battery power consumption.
The instructions for using the Pioneer radio do not tell you how to turn it off completely so that the clock does not light up on the screen and the keys are not backlit. Here is a typical procedure that is suitable for almost all Pioneer radio models that have a similar problem:
- Press button “2” on the radio and go to the menu;
- Select System from the list of partitions;
- Next, click PW Save;
- Turn off the radio using the OFF button;
- After these actions, it will go back into “sleep mode”. Press button “1” to turn off the radio;
- The clock display appears. Press button "4" to turn it off completely.
Such complex manipulations will only need to be carried out once to turn off the Pioneer radio, after which it can be completely turned off by pressing the “1” button.
Please note: If the radio settings are reset, for example, when disconnecting the device from the battery, you will need to repeat all the instructions described above again
What is demo mode?
Demo mode is designed to get acquainted with the car radio.
It starts automatically after the first connection.
This format does not provide for turning off the radio display. It will remain on even after all initial settings have been made. This is necessary so that it constantly displays all the capabilities of the radio on display. The only thing that the radio does not report while working in demo mode is how to disable this state of the device.
Settings for basic functions on Pioneer
Disable "Demo"
Before making changes to the radio settings, turn off the “Demo” mode. The Pioneer radio and a number of other modern car audio systems have a functionality demonstration mode. Until it is turned off, any setting will be saved exactly until it is turned off. If you don’t want to set your preferences again every time you turn it on, you need to turn off the mode.
The main control knob on Pioneer radios with the signatures of the main control buttons
This is done as follows:
- Turn off the radio (press and hold the SRC key until the display goes out).
- Press the same key again and hold it until the start menu appears.
- Use the volume control to select the “System” option in the menu, and then “Demo”. The On position will be indicated to the right of it.
- Any of the arrows on the sides of the volume knob switches the position to Off.
- To save the settings, press the Band key. The mode is off, saved in memory, the radio turns off. You can move on to other settings.
The volume knob in the technology of this brand also functions as a joystick - in addition to rotation, it can be depressed and moved up and down or left and right to make certain settings.
Setting the time
- Repeat points 1–2 from the instructions described above.
- Then, by rotating the knob in the menu, select the “System” section.
- Press the knob and select the clock setting in the new menu.
- Use the right arrow to enter settings.
- Rotate “Volume” counterclockwise/clockwise to set the value.
- Click on it once to confirm.
- Use the left arrow to exit the settings.
Language and calendar
Like the clock, these options are located in the System menu. The setting principle completely repeats the clock setting. Like a clock, the calendar can be set individually - day, month, year.