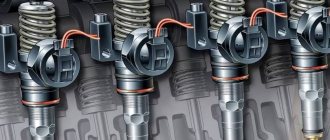
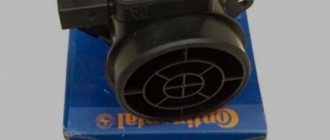
Almost all types of injectors that the VAZ 2114/2115 are equipped with at the factory can be considered interchangeable. Depending on the year of manufacture, injectors manufactured by Bosch and Siemens of different markings were installed on the car.
- Model 0280 158 022. The product is compatible only with a 16-valve 1.6-liter engine. The nozzle is black and is designed to operate at an optimal pressure of 3.8 atmospheres.
- Model 0280 158 017. An injector with this marking is installed on 8-valve engines with a volume of 1.6 liters. The body is also black.
- Modification 0280 158 996 is considered obsolete, since injectors with this marking were installed on cars until 2006. The model was intended for 8-valve power units.
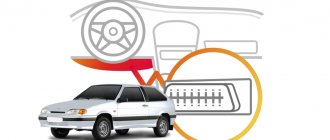
Standard equipment of VAZ 2114/2115 injection engines
- VAZ20734 is made in an orange case. The model can be installed on a VAZ 2114/2115 of any year of manufacture, but the modification is paired with an 8-valve engine.
- Model VAZ20735 is intended for a 16-valve engine. In terms of its characteristics, it is practically no different from the previous model. The nozzle has a blue marking.
Depending on the marking, it can be used on different types of engines
There are several options for cleaning injectors.
Contact the professionals
In a car service, this procedure is called a little differently: cleaning the injector. But the point is that this is more of a marketing ploy, and a desire to rip off more money from you, because... the “injector” itself does not exist as a separate part/unit. There are individual elements of the injection system, such as: fuel pump, fuel pressure regulator, injector ramp, etc.
Therefore, know that if at a car service they tell you: “you need to clean the injector,” then we are talking directly about cleaning the injectors.
The service can offer two types of cleaning services: regular cleaning and ultrasonic cleaning. Normal cleaning is intended for injectors that are in satisfactory condition. Cleaning with ultrasonic waves – for injectors that are in a neglected state. The cost of cleaning injectors at a service center can reach up to 2 thousand rubles, depending on the type of cleaning and the materials used.
Self-cleaning injectors at home
Is it possible to clean the injectors yourself? If it comes to costs, then you can clean the injectors yourself, using a budget of 300 rubles + available means. But know that there is always a risk that while cleaning the injectors, you will stupidly ruin them, and then you will have to buy new ones. And you, unlike servicemen, will do everything much better, due to your interest.
Depending on the degree of contamination of your injectors, the result after cleaning may be very noticeable or not noticeable at all.
The simplest and most affordable way is to use additives and impurities. The essence of this cleaning is that a special cleaning agent is poured into the fuel tank. The car should run on the resulting mixture of gasoline and cleaner for some time. But a positive result can only be expected when your injectors have a very small degree of contamination. The other side of this technique is that today few people risk using this method, and reviews of this method are very mixed.
The car engine is connected to a special stand
The stand is the same tank with a cleaner, thanks to which your tank and fuel filter remain clean.
Analysis of cars selling fuel rail for VAZ (Lada) 2114 in Moscow
- Audirazbor Rating: 5.0
/5 – 4 ratings - Mytishchi district, Dmitrovskoe highway, Gribki settlement, uch. 15A.19
- +7
- Rating: 4.6
/5 – 10 ratings
- Rating: 3.9
/5 – 11 ratings
- Rating: 4.4
/5 – 8 ratings
- Rating: 4.0
/5 – 11 ratings
- Rating: 4.4
/5 – 8 ratings
- Rating: 4.2
/5 – 10 ratings
- Rating: 4.1
/5 – 8 ratings
- Rating: 4.6
/5 – 7 ratings
- Rating: 4.5
/5 – 6 ratings
- Rating: 4.5
/5 – 4 ratings
- Rating: 4.5
/5 – 6 ratings
123…34
Popular companies
- Best Auto Parts 4.4
/5 – 8 ratings - Butyrskaya street, 86Bs7
- +7,,
- 4.1
/5 – 8 ratings
Methods for cleaning injectors
Injector flushing additives
There are a huge number of different additives for flushing the injector. Such additives are poured into the car tank and mixed with fuel. The mixture of fuel and additives enters the main elements of the fuel system and flushes them, including the injectors. But, as a rule, such washings do not bring much results, since all the dirt that was washed away to the injectors gets and settles on them, which can only aggravate the situation. Using this method is not recommended.
Malfunctions that injectors may have
Injectors are a fairly precise mechanism; they can open and close several times per second, while providing:
- lightning-fast opening;
- good fuel flow;
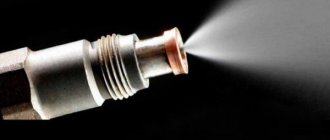
- fine atomization of gasoline for better mixing with air;
- tight and fast closing.
The life of injectors is highly dependent on the quality of gasoline and the frequency of replacement of fuel filters. Any, even the smallest debris can prevent them from fulfilling their purpose. Over time, the injectors become clogged with deposits and the following problems may occur:
- The injectors do not open immediately when a signal is given, or if they do not open at all, they become jammed.
- Less gasoline may pass through a clogged hole than the ECU calculated, this will lead to a lean mixture.
- Debris can also interfere with the atomization of fuel, causing it to flow in a stream and not mix enough with the air.
- A loose closure means that more gasoline than necessary will enter the combustion chamber.
Such malfunctions in the fuel system can, in turn, lead to the following problems with the operation of the engine as a whole:
- misfires at idle;
- significant loss of power;
- unstable engine operation;
- increased fuel consumption;
- Difficulty starting the engine.
The reason for such changes in operation may be dirty or failed injectors. They very rarely become completely unusable and you can always try cleaning them before replacing VAZ 2114 injectors.
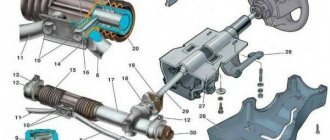
Repair of injectors VAZ 2114/2115
Repairing injectors involves carrying out a number of works at once:
replacement of rubber seals.
After the products have been removed from the fuel rail, you need to take a good look at each of the four nozzles. If there are visible signs of leakage on the body, repair will not be practical. You will have to immediately replace the nozzle with a new one. The differences in flushing and cleaning procedures for 8-valve and 16-valve engines are not significant. Therefore, you can be guided by the same scheme.
Video: the easiest way
If the body is clean and there are no deformations or cracks on it, then repair work is allowed . To do this, you will need to remove the seal from the body and the sprayer. It is recommended to leave these parts in acetone or solvent for 1.5–2 hours. While the parts are being washed, you can use a vacuum cleaner to clean the fuel rail. Next, you need to carefully clean the place where the injectors fit into the ramp using a toothpick or a needle.
After this, you can start purging the nozzle from the inside. You will need a roll of electrical tape, an aerosol can for cleaning carburetors and a syringe. An aerosol cleaning liquid is supplied through a thin syringe into the nozzle cavity. It is better to wrap the joint between the syringe and the tube of the canister for sealing with electrical tape. It is recommended to repeat washing the nozzle from the inside three times. Afterwards the product must dry. As soon as the body itself, as well as the seal and sprayer dry after washing, you can assemble the nozzle and install it on the ramp.
A cheap product will perfectly remove dirt and deposits from the nozzle
Before installation, each nozzle is tested for resistance . The tester readings should be in the range of 11–15 ohms.
Replacing injectors yourself
VAZ 2114–2115 car engines differ in power and number of valves.
The first VAZ models were equipped with engines with 8 valves
There are engines with 8 and 16 valves.
16-valve engine offers more power and efficiency
The procedure for replacing injectors does not depend on the number of valves. However, on engines with 16 valves, access to the injectors requires the removal of a number of additional elements.
Signs of injector failure
The main symptoms of injector malfunction are:
- the engine is difficult to start and runs unstably;
- the engine stalls at idle;
- the engine slowly picks up speed;
- dips appear while driving;
- fuel consumption increases;
- the toxicity of exhaust gases increases.
Video: identifying an injector malfunction
Diagnostics of injectors without dismantling
The engine injection system consists of many components. Therefore, malfunctions are identified only after a thorough check of all its components. Diagnostics must be carried out for each individual element.
Thus, the reason for the drop in engine power may be injectors, fuel pump, fuel filters, etc. A clogged injector can cause engine failure, make it difficult to start, and increase fuel consumption.
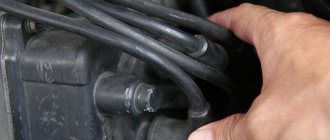
If these signs appear, the injectors can be checked without dismantling. To do this, start the engine and disconnect the connector wires from each injector one by one.
The engine starts and the connector wires from each injector are disconnected
If the engine operates differently when the injector is turned off, then the injector is working properly. If no changes occur, the nozzle should be repaired or replaced with a new one.
Required Tools
To carry out the work you will need the following tools:
- hex wrench 5;
- open-end wrenches for 10, 17 and 24;
- flat and Phillips screwdrivers;
To replace injectors you will need a minimum list of tools
To measure the resistance of the injector and determine its serviceability, a multimeter is required
Procedure for replacing injectors
Replacement of injectors is carried out in the following sequence:
- The car is put on the parking brake.
- The fuel system is depressurized.
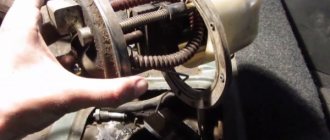
- The rear seat cushion is removed.
The fuel pump hatch is located under the rear seat.
The hatch is opened using a shaped screwdriver
If the wires are disconnected, the pump will stop working.
The cover must be removed to gain access to other parts.
For further work it is necessary to remove the air filter
When replacing injectors, the intake manifold must be removed
The hose is removed from the pressure regulating device in the power system complex
The crankcase ventilation hose is disconnected from the valve cover
The oil level dipstick tube is removed from the engine crankcase
To gain access to the injectors, you must disconnect the connector
The connector is removed from the idle air control device
The connector block is disconnected from the injector wiring harness
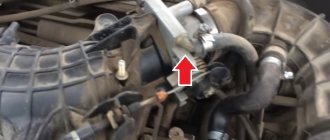
Using two wrenches, the fuel supply pipes are disconnected
The fuel rail is unscrewed using a hexagon
The fuel rail can be removed without much effort
By squeezing the clamp with the spring, the electrical wiring is removed from each nozzle
A metal bracket holds the injector in the fuel rail
The injector is removed from the fuel rail
Injector cleaner is often used when self-repairing a car's fuel system.
Video: replacing injectors on a 16-valve engine
The algorithm for replacing injectors on VAZ 2114/15 cars practically does not depend on the number of valves on the engine.
Video: replacing injectors on an 8-valve engine
Diagnostics of injectors with dismantling
The performance of injectors removed from the engine is checked as follows:
- The negative terminal of the battery is connected.
- The dismantled ramp is connected to the fuel supply pipe and power supply block.
- The ramp is fixed in such a way that it is possible to place identical containers under each of the nozzles.
Identical containers are placed under each of the nozzles
Fuel atomization and the degree of filling of containers are studied
The nozzle is replaced along with the seals
When diagnosing injectors, the integrity of the electrical block is checked
It is recommended to check the injectors for the external shape of the fuel sprays formed by the sprayers and for tightness at a service station. Self-diagnosis in this case is extremely fire hazardous.
The procedure for checking the power supply to the injectors is as follows:
- All power supplies are disconnected from the injectors.
- Two wires are connected to a reliably working block, the other ends connected to the conditionally faulty injector.
- The ignition turns on. If the injector works, then the block is faulty. Otherwise, only the nozzle itself should be replaced.
Troubleshooting an injector using a multimeter consists of the following steps:
- To carry out diagnostics of the injector windings, the negative terminal from the battery is disconnected.
- All pads are disconnected from the injectors.
- The multimeter probes are connected to the injector contacts. In this way its resistance is measured.
The multimeter readings reliably indicate the serviceability of the injector
Cleaning the injector: how to do it
If there are noticeable malfunctions in the operation of the injector, you need to know how to clean the VAZ 2114 injectors. This cleaning can be done in two ways:
- cleaning of injectors with removal;
- cleaning the injector without removing it;
The most correct method is to wash the injectors on a special stand. The stand allows you to evaluate the performance of the nozzle, effectively remove contaminants and then check the quality of the spray. If the result is unsatisfactory, problems with spraying and opening/closing are eliminated using the ultrasonic cleaning method of nozzles.
As for the second method, cleaning the injectors on a machine without removing it is considered more of a preventive measure and does not remove stubborn dirt. For such cleaning, it is necessary to pour a special cleaner into the gas tank or supply a similar cleaner directly to the injectors, bypassing the fuel supply system (this is done using a special installation).
Do-it-yourself injector cleaning
During operation of the VAZ 2114, the injectors must be periodically washed. This can be done either with special equipment or independently. After removing the injectors from the car, you can begin cleaning them yourself.
To do this you will need:
- remove the sealing rings from the injectors;
- soak the injectors in acetone or gasoline;
- remove the injectors and carefully clean the nozzles with a thin needle;
- wash the inside of the nozzles by supplying cleaner;
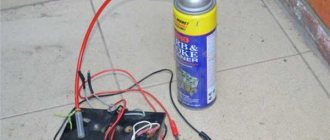
As part of cleaning, the nozzle is connected to the battery through a button with wiring. You need to draw liquid into the syringe and connect it through a tube to the nozzle. Then the pressure is created by the syringe and the button is pressed, the liquid is sprayed. The procedure is repeated several times.
Direct instructions on how to clean the injectors
The operating principle of this “homemade” device is as follows:
You press the button on the can, liquid for cleaning is filled in the chamber of the syringe, pressure arises, you press the breaker button - the nozzle opens and the liquid passes through the channels of the nozzle, cleaning them from various contaminants. If a stream flows from the nozzle, it is clogged, so continue washing the nozzles. A nozzle is considered cleaned if it sprays cleaning liquid in a thick cloud (torch).
Now that you know how to wash the injectors on a VAZ 2115 with your own hands, follow the steps described above for each injector. Upon completion, everything must be assembled in reverse order. Do not forget about the O-rings; during assembly, be extremely careful so as not to nullify all your efforts.
Before the first start, do not forget about the fuse; if you pulled it out, turn the starter a little so that the pump pumps up the required pressure. Then start it and listen to how the engine works, to see if there are any interruptions in its operation. At first the idle speed may fluctuate, but after a few minutes the engine should start running smoothly without interruptions. Try driving it, personally, my car began to accelerate better, and fuel consumption, although slightly, has dropped.
That's all for me, thank you for your attention, I hope everything works out for you. See you again at Auto Benefit.
Recommendations and tips
An indicator of normal operation of the nozzle is a high-quality spray of liquid. Also, after washing the injectors, it is recommended to replace the fuel filters; if necessary, the fuel pump mesh filter is additionally cleaned. This is necessary to prevent dirt from the fuel system from re-clogging the injectors.
We also recommend reading the article on how to clean injectors with ultrasound. From this article you will learn about the advantages and disadvantages of this method, as well as the features of such cleaning.
Please note that the cleaning method by washing only removes surface deposits. If the injectors on a 2114 or VAZ 2115 have persistent and heavy contamination, it is necessary to perform deep cleaning of the injectors with ultrasound or washing on a bench. In difficult cases, ultrasonic cleaning of injectors is combined with washing to obtain better results.
Diagnostics of removed injectors
- Activate the battery by connecting the negative terminal.
- Connect the fuel supply pipe and power supply block to the removed ramp.
- Install the ramp in such a way that equal containers can be placed under each nozzle.
- An assistant is needed to turn the starter. The containers will be filled with fuel and poorly functioning injectors or those that are completely out of order will be revealed as the containers are filled.
- It is better to immediately replace a nozzle that is not working with a new one; washing the old one will not eliminate the problem for a long time. The same goes for sealing gaskets and power supply terminals.
- If the block is faulty, the injector will not function.
When diagnosing yourself, do not forget about fire safety!
Procedure for removing injectors
The rack and nozzles must be completely dismantled before work can begin. The following manipulations are expected:
- The car is completely cleaned. It is assumed that the negative terminal is disconnected from the battery.
- All work is carried out if the engine has completely cooled down. Otherwise, the risk of injury increases.
- The upper part gets rid of the casing that covers it.
- Removing air filters.
- The pipeline is unscrewed from the injectors and pumps. Maintaining high pressure in the system assumes that the remaining mixtures are released before this. The pipelines are supported by brackets.
- The injector is unscrewed with a spanner.
- The puck is also removed, the main thing is not to lose it.
- The plug and clamp near the ramp are completely disconnected. Most of the parts are left behind.
The same principles apply when removing the remaining injectors. Next comes flushing the VAZ 2114 injector.
How to remove
The procedure for dismantling and installing injectors is not particularly difficult, but it does take a lot of time. You need to prepare a set of tools in advance:
screwdriver with a flat thin blade;
Before removing the injectors for replacement, it is necessary to relieve the pressure in the vehicle's fuel system. This is a necessary measure to ensure safe work and eliminate the possibility of injury.
To relieve fuel pressure, you must turn off the fuel pump. It is located in VAZ 2114/2115 cars in the fuel tank. The easiest way to get to the pump is through the hatch located under the rear seat cushion. For this:
Find a small hatch under the rug.
Unscrew the screws securing the hatch.
Main features
So, signs of clogged injector nozzles:
- misfires at idle,
- the engine is unstable,
- fuel consumption increased sharply,
- slow acceleration of the car when the gas pedal is fully pressed.
Why is it important to identify this malfunction? The injector supplies fuel to the system and is its main element, therefore, extending its service life is of great importance for the operation of the entire engine.
The quality of the fuel has a huge impact on the safety of the injectors. Since gasoline in Russia does not meet European standards, the injector nozzles do not serve the stated 100-120 thousand km. mileage When the mileage reaches more than 80-100 thousand km. injectors need to be changed. If a decision is made to change, then the question immediately arises: “What is the cost of injectors for a VAZ 2114?” If you buy “native” VAZ cars, then their cost in 2014 started from 500 rubles. for one piece. Many drivers believe that it is better to purchase imported ones. Injectors produced abroad are several times more expensive than domestic ones, but their service life also increases.
Restoring the functionality of injectors
An inoperative nozzle can be replaced with a new one or properly cleaned. Repairing injectors is ineffective due to their design features.
The reason for incorrect operation of the injectors may be the presence of impurities in the fuel. The accumulation of deposits in the injector occurs especially intensively when the engine is stopped.
During operation, the injector heats up, and the fuel is not able to cool it. Heavy fractions accumulate in the atomizer, thereby reducing the cross-sectional diameter of its channel. Thus, deposits of 5 microns in size can reduce throughput by 25%. The quality of the fuel-air mixture will decrease with all the ensuing consequences.
Domestic gasoline is not always of high quality. Therefore, the injectors lose their functionality after less than 100 thousand kilometers.
Extending injector life
There are practically no differences in the procedures for cleaning and flushing injectors in 8- and 16-valve engines.
There are several ways to extend the life of sprayers:
- With low mileage, it is possible to regularly add various additives to the fuel.
- You can clean the injectors at a service station using ultrasound every 40 thousand km.
- Solvent cleaning is carried out at specialized service stations and is a very expensive procedure.
Self-cleaning injectors
To clean the injectors yourself you will need:
- A set of keys and tools for dismantling injectors.
- Three cans of special cleaner for carburetors or injectors.
Injectors can be cleaned using special products
The metal clamp ensures a tight connection of the hoses
To clean the injectors you will need a 12V light bulb.
To temporarily close the electrical circuit, a two-contact button without fixation is used
For high-quality electrical contact, special terminals are used
Self-cleaning of injectors is carried out in the following order:
- The injectors are being dismantled.
- The injectors are carefully inspected. If there are signs of leakage, the injectors are replaced.
- The O-rings are removed from the body and nozzle.
Rubber rings must be replaced
VAZ-2114 and VAZ-2115
Let's give a short description of another representative of this line of cars: VAZ-2114 (injection).
Brakes are a modern part of the “filling” of the VAZ-2114 and VAZ-2115. During the modernization process, the dashboard softened and the sharp corners disappeared. Electric windows appeared. There is an improved glove compartment. The salons have a new heating system.
Despite the fact that the VAZ-2115 is on par with foreign-made cars, the necessary elements, such as air conditioning and power steering, began to be installed not so long ago.
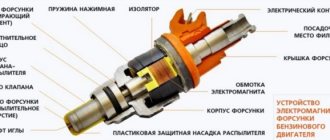
Since 2000, in VAZs, fuel is supplied to the combustion chamber by an injector. An injector is a complex system that is controlled by special electronics. It processes data from sensors and then regulates the fuel supply to the engine. By imagining how a VAZ engine works, you can understand the cause of the malfunction and fix it yourself at home.
How to clean injectors?
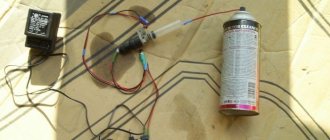
For cleaning, use ABRO CARB & CHOKE CLEANER cleaning solution (carburetor cleaner). Many sites describe cleaning methods using all kinds of adapters, hoses, etc., everything is much simpler.
- Remove the top of the carburetor cleaner can.
- Insert the valve-spray system of the can into the nozzle.
- Connect the two contacts of our circuit to the injector contacts. Press down on the nozzle installed on the can. For one or two seconds, use the switch to activate the circuit so that the nozzle starts working (it is not recommended to hold it for more than two seconds at a time).
Important: Be sure to follow safety precautions. Spray strictly away from yourself, take care of your eyes, use protection! For more information on cleaning injectors, watch the video.
For more information on cleaning injectors, watch the video.
- www.drive2.ru
- etlib.ru
- portalvaz.ru
- 24techno-guide.ru
see also
Additive for diesel injectors
- 25 6 48k
Injector cleaners
- 46 2 113k
How to clean injectors yourself
- 37 0 32k
Checking pump injectors: software diagnostics and measurement with a multimeter
- 87 0 37k
How to check an injector nozzle
- 41 0 85k
Injector performance calculator
Online injector performance calculator
Every car owner of an injection car sooner or later encounters problems in the fuel system and begins to think about cleaning the fuel injectors.
The task of the injector is to maintain the pressure created by the fuel pump and only at the right moment to open for a fraction of a second to allow the required amount of fuel to pass through.
There are a lot of different additives in the fuel, which during engine operation stick to the seat of the injector locking needle. As a result, the injector begins to spray fuel incorrectly or leak fuel when it should be closed. In such cases, it is necessary to clean the injectors or replace them.
The recommended period for cleaning injectors is 25,000 km - 30,000 km . Failure to properly maintain fuel injectors can lead to their complete failure, and then only replacement will be necessary.
Injector installation
Before installing new injectors, you must first remove the old ones. The work itself is not particularly difficult, but it will still take up the car owner’s time. So, how to properly disassemble the fuel system? Let's look at the step-by-step instructions.
- First of all, you need to disconnect the negative terminal from the battery. This is a basic safety requirement.
- The next step is to release the pressure in the system. It is necessary to twist the fuel hose fittings. To do this, use open-end wrenches size 17.
- Then you need to disconnect the injector wiring harness from the fuel rail.
- The fuel supply pipes are mounted on a special bracket secured with a single screw. Let's use a Phillips screwdriver to remove this bracket.
- Next, we will need a 5mm hex wrench, which will be used to remove the screws holding the fuel rail in place. The ramp is then moved towards the injector axis, after which it is removed towards the left wing. We take out the injectors.
- The injectors are held in place by a special spring clip that will need to be removed. Device wires are disconnected. The bracket is removed by lightly pressing it.
- The injector lock should be moved along the ramp and then removed.
That's all, actually. The injectors have been removed and are ready for replacement. It is advisable to remove the O-rings from non-working devices, which you may need for a spare. If you are making a complete replacement, the functioning elements of the fuel system should also be placed in the glove compartment. It is recommended to clean them first. If you follow the cleaning procedure, even old injectors will last for another tens of thousands of kilometers. Installation of the fuel system is carried out in the reverse order. Before starting work, check the resistance of the injection devices; it should be at the level of 11-15 Ohms. If any points remain unclear, check out the video instructions on our website.
Causes of clogging
Before you begin choosing a liquid for flushing the injector, you need to know why the system becomes dirty. So, the injectors act as a spray of fuel into the engine, after which it immediately burns. Due to the fact that the quality of gasoline is far from the best, it often contains small particles, which cause clogging of the injector channels. Also, as a result of the combustion of low-quality fuel, a coating of tar appears on the injectors. As a result, the following additional problems arise:
- detonation begins to appear;
- the motor loses its power;
- difficulty starting is noticed;
- unstable idle.
Stages of clogging
Experts say that at different stages of nozzle clogging, you should act differently. There are three main stages:
Initial - at this stage the engine operates with virtually no visible changes
The only thing you can pay attention to is a slight increase in fuel consumption. The performance of injectors here is reduced by 10%
Slight increase in fuel consumption
- Medium - here gasoline consumption increases, and a pungent odor is released during operation. The driver may also notice instability of the engine at idle and slower acceleration of the car. The performance of the injectors here is reduced by 20%.
- At the last stage, the performance of the injectors may drop to 50%. Here the engine constantly “twitches”; when you press the gas pedal, sharp sounds will be heard.
Professionals recommend flushing the injectors at the first occurrence of any of these problems. Most often this happens at the middle stage. Do not neglect the equipment and bring it to a critical stage.
The main causes of injector contamination.
The main, but far from the only reason for clogging of injection engine nozzles, is undoubtedly the quality of the fuel. In Western Europe, almost no one cleans injectors; manufacturers only recommend changing them after 120-150 thousand kilometers.
But the injectors of cars that are operated in the territory of the former USSR have to be cleaned every 15 - 30 thousand kilometers. There is only one reason for the poor quality of fuel - the desire to receive excess profits from the sale of fuel and lubricants. As a result:
- Insufficient capacity for the production of A-92 and A-95 gasoline, but A-98 at domestic gas stations is in most cases a myth and a cunning marketing ploy - nothing more;
- Violation of fuel storage conditions. Often, the same tanks are used to store gasoline A-76, A-80, A-92, A-95, A-98, in which various tar deposits accumulate over the years of operation, dissolved by fuel with a higher octane number. As a result, tar deposits are washed into the tanks of our cars, leading to failure of the fuel system;
- The use of manganese-containing additives in the production of fuel, which increase anti-knock resistance. These are so-called anti-knock agents, which allow you to turn low-octane gasoline into high-octane gasoline with a slight movement of the hand. For example, an A-80 can “by magic” become an A-95, and there will be no detonation and its consequences as such. The additives, in turn, cause increased wear of the spark plugs and accelerated contamination of the fuel filter with fine brick-colored particles.