When should you clean your carburetor?
Before you clean the VAZ 2106 carburetor, you should study its design and become familiar with the main signs of failures that arise specifically because of this unit. After all, the car also has valves and a fuel pump; defects in them can also affect the stability of the internal combustion engine.
The main symptoms of a malfunction include:
- There is no idle, that is, the engine runs at high speeds of more than 800 rpm.
- The engine only runs when the gas pedal is pressed, and when released it stalls.
- The internal combustion engine operates unstably, jerkily, and vibrates strongly.
- The car will not start, although there is fuel in the pump and there is a spark.
- The smoke changed from white to black.
- Loud popping noises are heard during operation.
- Fuel consumption has increased (here is a summary table of fuel consumption for carburetor cars)
If any of the above is found on your car, then you should not put off repairing the VAZ 2106 carburetor until later. It is entirely possible to do it yourself; you just need to have the service manual in front of you when disassembling the unit.
All of the above symptoms may be the result of clogging and coating of its parts with soot, especially in front of the intake manifold. When contaminated with carbon deposits, the air damper may not close or open completely, which is why jerking occurs or the engine stalls.
In order to return the car to its previous performance characteristics, the carburetor must be thoroughly cleaned of carbon deposits and rinsed from small debris that got in with the fuel or through a clogged air filter; I reviewed the cleaning products here.
Good to know: There are several ways to repair a carburetor, but each of them involves a different level of maintenance, which can be performed in different situations. If the engine runs normally, but there are slight jerks, then cleaning is not necessary. Can be washed without disassembly. But if the internal combustion engine vibrates strongly and there is no idle speed at all, then repairs are required with disassembly and replacement of carburetor parts from a repair kit consisting of gaskets and jets.
When to clean the carburetor
Unfortunately, the fuel we put into the tanks of our cars is not always of high quality. Dirt, corrosion products and water are essential components of any gasoline purchased at our gas stations. They are the cause of contamination of the unit.
Signs of a blockage
Symptoms indicating that the carburetor is clogged include:
- difficult starting of the power unit;
- failures when sharply pressing the gas pedal;
- malfunction of the engine in idle mode;
- increased fuel consumption.
But here it is necessary to take into account that the listed signs may indicate other malfunctions, both in the fuel system and in the ignition system. However, if the unit has not been serviced for more than a year, cleaning it will not be unnecessary. Additionally, before starting work, it is recommended to replace the fuel filter in order to be sure that after servicing the device will receive purified gasoline.
Rinse or blow out: which is better?
A carburetor is a complex and precise device consisting of many parts. To remove contaminants inside some of them, washing alone will not be enough. Yes, the body and lid can and should be washed, and if necessary, also cleaned.
With small details things are a little different. Let's take, for example, jets with their channels with a diameter of no more than 2 mm. You are unlikely to be able to wash away the dirt from there at home. The best option here would be to blow out the channels with a stream of compressed air. But it’s better to do this after these parts have soaked a little in one of the liquids that helps dissolve the dirt. It is also recommended to soak large items before washing and cleaning.
Types of carburetors
The technology for flushing and adjustment after repair depends on the design. Therefore, the first thing you need to do is determine which model of device is installed on your car.
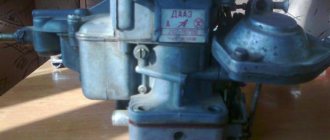
Throughout the history of the existence and production of the VAZ 2106 and VAZ 2107, 3 types of carburetors were used:
| Carburetor photo | Name and description |
| DAAZ Weber - Dimitrovgrad plant produced a carburetor under license from Weber. They provided high speed, but consumed too much fuel. More than 10 per 100 km. | |
| DAAZ model “Ozone” is a second generation carburetor. It is more economical, environmentally friendly, but also complex in design, as it is equipped with a second combustion chamber. It uses a pneumatic valve, which can block the operation of the unit if it is dirty or incorrectly adjusted. Provided consumption of less than 10 liters per 100 km. | |
| DAAZ is the third modification of 21053. The device was produced under a Solex license. It is even more complex in design, since in addition to the second camera it also has feedback, which made it even more economical. But they were capricious about the quality of the fuel, because of which the jets quickly became clogged. |
Good to know: Regardless of the model, the carburetors used on the VAZ 2106 are two-chamber and consist of 3 main parts: the device cover (protects the fuel fittings from dirt), the housing (it contains chambers, diffusers, from which the mixture is transferred to the engine), lower part (the float chamber and throttle valves are located).
It is the small parts of the carburetor that play a very important role. Thanks to them, fuel enters the cylinders in certain proportions and is correctly mixed with air to form a high-quality fuel mixture.
But during operation, due to contamination with small particles or dirt, especially with regard to the accelerator pump and jets, the operating modes of the carburetor are disrupted, which leads to malfunctions and failures when pressing the gas or “sneezing” of the carburetor. Flushing consists of removing dirt from all channels and jets, thereby ensuring their stable operation.
Signs of a carburetor malfunction
As you use a car with a carburetor, certain problems may arise that require cleaning, adjusting the unit, or replacing any of its parts. Let's look at the most common problems with the mechanism and methods for eliminating them.
Stalls at idle
One of the most common malfunctions of carburetors of the VAZ 2106 and other “classics” is problems with idle speed. In this situation, the following happens: when you press the gas pedal, the engine normally picks up speed, and when you release it, the engine stalls, i.e., when the transition to idle mode (idle) occurs. There may be several reasons for this phenomenon:
- clogged jets and channels of the XX system;
- solenoid valve malfunction;
- problems with the forced stroke economizer;
- failure of the quality screw seal;
- the need to adjust the unit.
One of the common causes of a stalled engine at idle is clogged carburetor jets.
The design of the carburetor is made with a combination of the XX system and the primary chamber. As a result, problems may occur that lead not only to failures, but also to a complete stop of the motor. The solution to these problems is quite simple: replacing faulty elements, if necessary, cleaning and blowing the channels with compressed air.
Dips during acceleration
When accelerating a car, dips may appear, which represent a drop in acceleration or a complete stop of the car.
Dips can vary in duration - from 2 to 10 seconds; jerking, twitching, and swaying are also possible.
The main cause of this problem is a lean or rich fuel mixture entering the cylinders of the power unit when the gas pedal is pressed.
First of all, it is worth noting that failures can be caused not only by carburetor problems, but also by clogging or malfunction of the fuel system, as well as the ignition system. Therefore, you first need to check them and only after that start repairing the carburetor. The most likely cause of VAZ 2106 failures may be a clogged hole in the main fuel jet (GFJ). When the engine operates under low loads or in idle mode, a small amount of fuel is consumed. When you press the gas pedal, high loads occur, resulting in a sharp increase in fuel consumption. If the GTZ is clogged, the passage hole will become smaller, which will lead to a lack of fuel and failures in engine operation. In this case, the nozzle must be cleaned.
The appearance of dips can also be caused by clogged fuel filters or loose fuel pump valves. If there is an air leak in the power system, then the problem in question is also quite likely. If the filters become clogged, they can simply be replaced or cleaned (the mesh at the inlet to the carburetor). If the problem is caused by the fuel pump, the mechanism will need to be repaired or replaced with a new one.
One of the reasons for failures when pressing the gas pedal is a clogged fuel filter.
As for air leaks, this usually happens through the intake manifold. It is necessary to check the tightness of the connection between the carburetor and the manifold. To do this, with the engine running, spray WD-40 on the connections between the manifold, gaskets and carburetor on all sides. If the fluid leaves too quickly, it means there is a leak in that place. Next, you need to remove the carburetor and eliminate the malfunction (align it under a press or resort to improvised means).
Video: eliminating air leaks
Pouring candles
The problem with flooded spark plugs is familiar to almost every owner of a car with a carburetor engine. In this situation, starting the unit is quite difficult. When you turn the spark plug out, you can see that the part is wet, that is, it is filled with fuel. This indicates that the carburetor supplies a rich fuel mixture at the time of start-up. In such a situation, it is impossible for a normal spark to appear.
The problem with flooded spark plugs can occur both during a cold and hot start of the engine.
There are many reasons that lead to flooded spark plugs, but they all prevent normal spark formation
Since there may be several reasons for this phenomenon, it is worth considering them in more detail:
- Starting the engine with the choke pulled out. If you close the air damper on a warm engine, an over-enriched mixture will be supplied to the cylinders, which will lead to flooding of the spark plugs.
- The starter is faulty or needs adjustment. The problem in this case usually manifests itself when it is cold. In order for the starting device to be properly adjusted, the starting gaps must be set properly. The trigger device itself must have a complete diaphragm and a sealed housing. Otherwise, when starting a cold unit, the air damper will not open slightly to the required angle, thereby depleting the fuel mixture by mixing in air. If there is no such opening, the mixture will become enriched when starting cold. As a result, the candles will be wet.
- Faulty spark plugs. If the spark plug has black soot, an incorrectly set gap between the electrodes, or is completely broken, then the part will not be able to ignite the fuel-air mixture and will be flooded with gasoline when the engine starts. This indicates the need to have a set of spark plugs in stock so that replacement can be carried out if necessary. With such a malfunction, the part will be wet both cold and hot.
- Needle valve malfunction. If the carburetor needle valve in the float chamber has lost its tightness and allows more fuel to pass through than it should, the fuel mixture becomes rich during start-up mode. If this part fails, the problem can occur during cold and hot starts. Valve leakage can often be determined by the smell of gasoline in the engine compartment, as well as by fuel leaks on the carburetor. In this case, the needle must be checked and, if necessary, replaced.
- The fuel pump is overfilling. If the fuel pump drive is not adjusted correctly, the pump itself may pump fuel. As a result, excess gasoline pressure is created on the needle valve, which leads to an increase in fuel in the float chamber and an enrichment of the fuel mixture. To fix the problem, you need to adjust the drive.
- Clogged air jets of the main dosing system (GDS). GDS air jets are necessary to supply air to the fuel mixture so that it has the necessary proportions of gasoline and air for normal engine starting. Lack of air or its complete absence due to clogged nozzles leads to the preparation of an enriched combustible mixture and flooding of the candles.
Smell of gasoline in the cabin
Owners of the VAZ 2106 and other “classics” sometimes encounter such a nuisance as the appearance of the smell of gasoline in the cabin. The situation requires urgent search and elimination of the problem, since fuel vapors are harmful to human health and are explosive. There may be several reasons for this smell. One of them is damage to the fuel tank, for example due to a crack. Therefore, the container must be checked for leaks and, if a damaged area is detected, repairs must be made.
Due to incorrect adjustment of the fuel pump rod, fuel may overflow and the smell of gasoline may appear in the cabin.
The smell of gasoline can also be caused by fuel leaking from the fuel line (hoses, tubes), which could simply become unusable over time. Attention should also be paid to the fuel pump: if the membrane is damaged, gasoline may leak and smell may enter the cabin. Over time, the fuel pump rod wears out, which requires adjustment work. If the procedure is performed incorrectly, fuel will overflow and an unpleasant odor will appear in the cabin.
Stalls when you press the gas
There are many reasons why the engine stalls when you press the gas pedal. These could be:
- clogged accelerator pump nozzles;
- incorrect adjustment of XX;
- blockage of the transition system.
In addition, the reason may be in the distributor itself, for example, due to poor contact. As for the carburetor, you need to clean and blow out all the holes in it, check the jet markings with the table for a specific modification and, if necessary, install the appropriate part. Then the ignition is adjusted, having previously set the gap on the distributor cams, and the carburetor is also adjusted (fuel quality and quantity).
Video: fixing the stalling engine problem
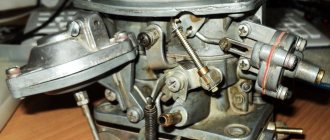
How is a carburetor repaired and flushed?
Many problems can be eliminated by flushing the carburetor, but for it to be effective, the unit must be removed from the car. After which you will need to disassemble it to the required level so that you can gain access to absolutely all elements of the mechanism.
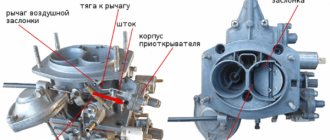
Parts of the carburetor body 2107-1107010 in the diagram: 1 - rod of the pneumatic drive of the second throttle valve; 2 — pneumatic drive housing; 3 - diaphragm; 4 — pneumatic drive cover; 5 — fuel jet of the transition system of the second chamber; 6 — fuel nozzle body; 7 — small diffuser of the second chamber; 8 — accelerator pump nozzle; 9 — screw valve of the accelerator pump; 10 — main air jet of the second chamber; 11 — emulsion tube of the second chamber; 12 — main air jet of the first chamber; 13 — emulsion tube of the first chamber; 14 — main fuel jet of the second chamber; 15 — main fuel jet of the first chamber; 16 — accelerator pump adjusting screw; 17 — fuel jet of the idle system; 18 — fuel nozzle body; 19 — return spring of the accelerator pump; 20 — accelerator pump diaphragm; 21 — accelerator pump cover; 22 — small diffuser of the first chamber; 23 — lever return spring; 24 — three-arm air damper control lever; 25 — connection rod with the throttle valve; 26 — throttle valve return spring bracket
Repair consists of the following steps:
- Dismantling the device.
- Flushing, which includes cleaning and purging of carbon deposits and adhering dirt.
- Replacement of faulty parts.
Important: You need to remove the carburetor if you are 100% sure that the problem is in the carburetor, because the problem in other components of the car’s fuel system is also possible.
Where does carburetor repair on a VAZ 2106 car begin?
Do-it-yourself repair of a VAZ 2106 carburetor begins with its removal. To do this, you will need to remove the air filter, which will still have to be replaced with a new one, and dismantle its housing.
It is recommended to first seal the openings in the chambers with rags to prevent small objects from getting into them. After this, the hose going to the brake vacuum is removed from the pneumatic valve, the choke installation cable is unscrewed and the rod is removed from the gas pedal lever that controls the throttle valve.
If you have the latest Solex carburetor, then the wires from the throttle valve, air damper and economizer are disconnected, providing forced idle.
Next, remove the fuel supply and return hoses and the ventilation pipe. After disconnecting all suitable and supply elements, you can begin to remove the block itself. To do this, you need to unscrew the 4 fastening nuts and carefully remove the device from the studs. It is highly recommended to plug the hole in the collector with a soft rag.
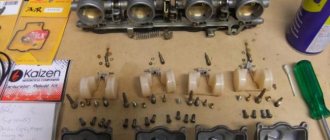
Step-by-step instructions for removing the carburetor
For your convenience, I have compiled detailed step-by-step instructions for removing the carburetor from the photo:
Important to remember: Be sure to replace the gasket under the carburetor with a new one. To avoid air leaks.
What is included in the repair kit for carburetor VAZ 2106, 21061, 2121
Spare parts included in the carburetor repair kit for the VAZ 2106:
- Trigger diaphragm
- Jet body
- Idle jet - 2 pcs.
- Main air jet - 2 pcs.
- Main fuel jet - 2 pcs.
- Needle valve assembly
- Accelerator pump diaphragm
- Filter element
- Carburetor cover gasket
- Starter gasket
- Return spring
- Accelerator pump diaphragm spring
- Idle speed screw (adjustment needle)
- Ring sealing
- For R/K 2105-10, 2105-20, 2106, 2107-10, 2107-20:
- Acceleration pump nozzle
- Spray Valve
- Sprayer gasket - 2 pcs.
- Screw M5x0.8x20
- Screw M4x0.7x15
Engine stalls at idle
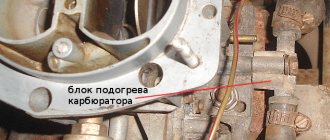
When the engine is running in XX mode, the throttle valves of both chambers are closed. Under them there is sufficient vacuum for fuel to flow. The engine will run unstably due to a carburetor malfunction. In this case, depressurization or air leakage is possible, as a result of which the fuel mixture will be excessively lean. The settings of the screws that regulate the amount and composition of the mixture may fail. Insufficient amount of gasoline in the float chamber is another reason for a lean mixture.
In this case, adjusting the VAZ-2106 carburetor yourself should be done as follows. Check the tightness of all bolt holes. Replace the rubber ring on the quality screw and the solenoid valve from the repair kit. They also check the hose going to the UOZ vacuum regulator.
Next, set the fuel level in the float chamber by bending the float tongue. It should be in the middle of the inclined wall - this has been proven by experience. Next, using the quality screw, the movement of the mixture through the XX system is regulated. The quantity screw is used to adjust how much mixture will be supplied to the engine cylinders. When the quality screw is rotated, the size of the channel changes, thereby regulating the flow of the emulsion.
If you disassemble the carburetor to service it, you may notice a dark brown tarry coating on its internal parts, do not be alarmed. This plaque is a natural formation. It is formed as a result of the operation of forced crankcase ventilation.
And the older the engine, it has more wear, and as a result, the amount of these gases that rise in the cavity of the air filter increases, while more contamination of carburetor parts occurs. This is the relationship.
Plaque on carburetor parts and the walls that are located near them must be cleaned. But it is not necessary to clean the deposits on the walls of the neck, the walls of the dampers, and diffusers, since this deposit does not significantly affect the overall operation of the carburetor.
So don't waste your time. Although if you are a pedantic person and you have time, you can clean the carburetor to perfect cleanliness, in any case it won’t make it worse and in the future it will have a better effect on the adjustment of the VAZ 2107 carburetor.
Due to the fact that the secondary chamber of the carburetor is in operation for a short time, its secondary jet and the main air jet do not become very dirty. However, it is still necessary to check the degree of contamination.
It is recommended to do this every time you remove the carburetor cover.
It is recommended to clean the jets with either gasoline or solvent. You can use a thin wire for this.
To ensure that you do not encounter any troubles related to the operation of the carburetor along the way, every 50 - 80 thousand kilometers, check the condition of the mesh filter, which is located in the float chamber of the carburetor at the inlet.
The fact is that thanks to the effective operation of the fuel purification system of the VAZ 2107, this filter rarely becomes clogged. However, if you do not change the fine fuel filter in a timely manner, then there may be problems along the way, since this mesh filter will quickly become clogged.
All parts and cavities of the carburetor must be washed carefully. Let's say the float chamber, where there are resin deposits, it is advisable to wash it with a solvent or other effective means.
But, for example, you should only wash the diaphragms themselves and gaskets with pure gasoline, since all solvents can seriously damage them, and for this they must be washed separately.
How to clean a VAZ 2106 carburetor without removing it
The first cleaning method is to do it without disassembling the mechanism. The fact is that not every car enthusiast is able to disassemble and reassemble the unit. A special technique was developed for its washing. For this purpose, a special aerosol product in cans is used. Common cleaners include “ABRO”, “Mannol”, here I made an overview table of carburetor cleaners, perhaps it will be useful to you when choosing.
To clean, you will need to perform the following steps sequentially:
- Warm up the engine and turn it off.
- Remove the filter and its housing.
- To effectively flush, remove the solenoid valve by unscrewing it from the housing.
- Special nozzles are sold with the cans, which effectively distribute a powerful stream of product. All visible parts are treated with the substance.
- Afterwards, process the external parts of the device.
- Next, you need to wait from 5 to 8 minutes, which depends on the manufacturer. During this time, the product dissolves carbon deposits, after which it is easily washed out with gasoline and the dirt burns in the cylinders along with the fuel.
Cleaning a VAZ 2106 carburetor is usually accompanied by replacing the gasket, which is located between the carburetor body and the manifold. The manufacturer produced several types of gaskets made of paronite, metal and heat-resistant special cardboard. If you are not sure about modifying your carburetor, then take it to the market with a real material example.
To replace the gasket, the seating area should be thoroughly cleaned of dirt and wiped with a rag. Lay the new one in the same way as the old one was laid, install the mechanism on it and tighten the fastening nuts.
How to clean the carburetor on a VAZ 2106 using a solvent
One of the most accessible ways to flush the carburetor on a VAZ 2106 is to flush the carburetor with a solvent. The washing process is clearly shown in this video:
How to quickly blow out a carburetor with your own hands
If you do not have a compressor or any other specialized equipment for purging, you will need a regular car compressor, which can be bought in a store for pennies. How to blow through a carburetor on a VAZ 2106 with a car compressor in this video:
Removing the carburetor from the car
If you are completely sure that the carburetor adjustment has been carried out in full accordance with the requirements and recommendations of the manufacturer, but the symptoms of the malfunction do not disappear, you will need to remove the device and disassemble it. The latter is carried out in several main stages:
- Remove the carburetor cover with extreme caution so as not to damage the sealing element and float. It is better to immediately place the fasteners in a place where you cannot accidentally touch and scatter them;
- turn the telescopic rod until the groove of the lever hole coincides with the protrusion on the part itself and remove it;
- unscrew the fuel filter cap;
- remove the filter, then completely remove the carburetor trigger;
- We completely dismantle the starting device, removing the diaphragm, spring and adjusting screw from it;
- remove the float axis. To perform this action you will need to use a bit. The float is pulled out with some effort, but try not to damage it during the dismantling process;
- remove the carburetor gasket;
- unscrew the fuel valve;
- remove the air damper. This operation should only be carried out if you are completely sure that the part is faulty. Otherwise, it is better to refrain from dismantling it, as there is a high risk of damaging the thread;
- remove the pneumatic drive;
- take out the solenoid valve and fuel nozzle;
- Let's start disassembling such a part as the accelerator pump. To do this, it is necessary to remove the special valve-screw responsible for the fuel supply, as well as the atomizer, two sealing washers and the air nozzle;
- we disassemble both chambers of the carburetor, removing the emulsion tubes and jets. All work should be carried out with extreme caution. If the parts do not give way due to severe contamination, it is better to use a self-tapping screw that is screwed into the tubes;
- take out the diffuser of the first chamber. First, you need to move it a little to the side to loosen the clamps;
- repeat the same procedure for the second diffuser;
- We continue disassembling the accelerator pump - remove its cover, which is held on by several screws, after which we remove the spring, drive lever, diaphragm and adjusting screw, which allows you to control the amount of mixture in the idle system;
- remove the last two adjusting screws and the O-ring;
- This completes the disassembly of the main components of the carburetor, however, if necessary, you can also remove the throttle valve. This is a very difficult task, since in addition to unscrewing the fasteners, it is also necessary to remove the heat-insulating seal and disconnect the special spring from the lever.
Such serious disassembly is only necessary if all adjustments are made correctly. To eliminate malfunctions, worn and failed parts are replaced with new ones, and installation is performed in the reverse order. Otherwise, it is better to first adjust the carburetor, based on the recommendations given below.
Carburetor settings
After flushing and disassembling the VAZ 2106 carburetor, you will need to adjust the engine performance characteristics.
There are several points for this:
- Float mechanism tongue - when the float stroke is less than 8 mm, consumption and toxicity increase, power decreases.
- Quality screw – allows you to adjust the amount of incoming air to prepare the mixture.
- Quantity screw – adjusts the amount of the finished mixture.
These two screws adjust the idle speed according to the manual. But initially they are both screwed all the way and unscrewed 3 turns.
To adjust the thrust, you will need to set the thrust; there should be a distance of 80 mm between the guides. With these settings, the throttle should open fully when the gas pedal is pressed to the floor. If this does not happen, then the throttle assembly must be cleaned.
Carburetor Basics
Contrary to popular belief, the suction of fuel from the carburetor does not occur due to the internal operating thrust of the engine. To perform this function, the device is equipped with a diffuser.
This element is not a separate element, but a narrowed part of the carburetor neck. When an air flow passes through it, due to the difference in width, a vacuum occurs, a drop in pressure. Near this place there is a small hole for supplying gasoline. Thanks to the resulting vacuum, atmospheric pressure acts on gasoline by displacing it from the float chamber through a special passage into the carburetor neck. In it, fuel is mixed with air and enters the engine cylinders through the intake manifold. The VAZ-2105 or 2106 engine, like any other automotive power unit, is capable of operating in several modes, each of which requires the appropriate type of air-fuel mixture.
The main stages of adjusting the carburetor on a VAZ-2106
The entire adjustment process takes an experienced car owner only a few minutes and is performed in the following sequence:
- first, using the screw that regulates the amount of mixture, the required speed is set. For a VAZ-2106 car this is 850 rpm;
- then, using a screw that controls the quality of the mixture, the position at which the speed will be maximum is determined;
- if the resulting value is more than 850 rpm, we return to the quantity screw and reduce it to the desired level;
- as soon as the number of revolutions reaches the required value, tighten the high-quality screw, and then move it about a third or a quarter forward and back.