A car may not operate correctly for a number of reasons - today we will talk about a dirty injector and nozzles, since this problem is extremely popular when identifying improper engine operation.
Most owners of cars with injection engines begin to worry if the car behaves suspiciously. The first alarm bells are the engine shaking strangely at idle. Popping noises are heard and the tachometer needle may jerk up and down randomly. Then you feel that when driving the car no longer accelerates so quickly, and the fuel from the tank seems to evaporate. Many continue to drive and put up with the unsatisfactory condition of the car. It’s worse when the engine shakes so much that vibrations go through the car body. Such a malfunction is difficult not to notice. But experienced motorists know that flushing the injector would quickly eliminate the problems and also bring the engine into a healthy state.
The cause of engine malfunctions is contamination of the fuel supply system. Dust, sand, and water that enter the tank are easily retained by the fuel filter. But after replacing it, the situation may not change. Then we can confidently diagnose contamination of the injectors and intake manifold.
Injector system design
This system includes:
- Computer. Serves to select the optimal operating mode and the quality of the supplied mixture based on the performance of all sensors of the machine. In addition, the computer detects possible problems in the injector elements themselves.
- Sensors They provide the computer with all the information about the state of the engine at a particular moment. We are talking about a fuel flow sensor, an air flow sensor, a lambda probe, a knock sensor, and so on.
- Injection system. Modern engines are distinguished by two types of injection. First of all, mono-injection is when one nozzle works on all cylinders, and the prepared fuel mixture has the same characteristics. This type of injection is becoming less and less popular today, as it is ineffective. In a distributed fuel injection system, unlike the first, a separate injector is installed on each cylinder, and it is responsible for regulating the amount of fuel supplied.
- Injectors. They can be called the “workhorses” of the injection system, because they are responsible for the main work of mixing air and fuel, and supplying it to the combustion chamber.
The injectors, in addition, turn off the supply of the fuel mixture, say, during a descent from a mountain with the gear engaged.
This part of the injector system is specifically subject to the greatest wear, primarily due to microparticles of dirt that can wear out the injector channels and the locking mechanism.
Due to wear, the injector will begin to supply more fuel to the chamber than required. This affects the stability of the engine and power is lost.
Repair of injectors VAZ 2114/2115
Repairing injectors involves carrying out a number of works at once:
replacement of rubber seals.
After the products have been removed from the fuel rail, you need to take a good look at each of the four nozzles. If there are visible signs of leakage on the body, repair will not be practical. You will have to immediately replace the nozzle with a new one. The differences in flushing and cleaning procedures for 8-valve and 16-valve engines are not significant. Therefore, you can be guided by the same scheme.
If the body is clean and there are no deformations or cracks on it, then repair work is allowed. To do this, you will need to remove the seal from the body and the sprayer. It is recommended to leave these parts in acetone or solvent for 1.5–2 hours. While the parts are being washed, you can use a vacuum cleaner to clean the fuel rail. Next, you need to carefully clean the place where the injectors fit into the ramp using a toothpick or a needle.
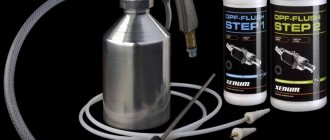
After this, you can start purging the nozzle from the inside. You will need a roll of electrical tape, an aerosol can for cleaning carburetors and a syringe. An aerosol cleaning liquid is supplied through a thin syringe into the nozzle cavity. It is better to wrap the joint between the syringe and the tube of the canister for sealing with electrical tape. It is recommended to repeat washing the nozzle from the inside three times. Afterwards the product must dry. As soon as the body itself, as well as the seal and sprayer dry after washing, you can assemble the nozzle and install it on the ramp.
A cheap product will perfectly remove dirt and deposits from the nozzle
Before installation, each nozzle is tested for resistance. The tester readings should be in the range of 11–15 ohms.
There is also a simple way to clean the injectors, without dismantling the fuel rail. However, it is only appropriate in cases where the injectors have not yet exhausted their entire service life (120–150 thousand kilometers). The use of cleaning additives in gasoline is allowed. In this case, all elements of the fuel system will be cleaned, but its closed nature does not allow removing dirt and sediment from low-quality gasoline.
The liquid is poured into the gas tank and, together with fuel, cleans all elements of the system
Replacing rubber rings and seals on injectors
Usually, when washing or repairing injectors, car enthusiasts immediately change all rubber elements. This is due to high wear rates. The cost of rings and seals is very low, but after replacement you can immediately observe the stability of the motor.
Rings and seals can be removed with one movement of the hand. However, installing new ones will require care, as it is easy to damage the rubber. The plastic element is first lubricated with gasoline, and then pulled in place of the old seal.
Spare parts for VAZ injectors can be purchased at a minimal price
Almost every driver can clean or replace the injectors on VAZ 2114/2115 cars on their own. Difficulties can arise only in the process of unscrewing the fuel rail or reconnecting the wires to the injector contacts. However, if each stage of work is carefully carried out, even a beginner can independently maintain this element of the fuel system.
Check Engine Error
When such signs appear, the “Check Engine” indicator lights up on the instrument panel.
Your first action in this case is to contact a service center where they can carry out diagnostics.
If it is determined that any of the injectors is not working correctly, the question of replacing it will arise.
In order not to bring the injectors to a state of wear when it becomes necessary to replace them, it is necessary to carry out their preventive maintenance at a certain time. Preventive measures include the fact that the injectors need to be washed in some way.
Comprehensive diagnostics of the operation of injectors on the ramp
For such a check, the fuel rail will need to be removed from the engine along with the injectors attached to it. After this, you need to connect all electrical contacts to the ramp and injectors if they were disconnected before removal. It is also necessary to return the negative terminal of the battery to its place.
- The ramp must be placed in the engine compartment so that a measuring container with a scale can be placed under each of the injectors.
- It is necessary to connect the fuel supply pipes to the ramp and additionally check the reliability of their fastening.
- The next step is to turn on the ignition, after which you need to crank the engine a little with the starter. This operation is best performed with an assistant.
- While an assistant rotates the engine, check the efficiency of all injectors. The fuel supply must be the same on all injectors.
- The final step will be to turn off the ignition and check the fuel level in the containers. The specified level must be equal in each container.
In addition to self-checking, you can use the injector diagnostic service at a car service center. This operation is performed on a special testing stand. Testing an injector on a bench allows you to accurately determine not only the efficiency of fuel supply, but also the shape of the torch during fuel spraying.
Why do injector nozzles become clogged?
The main element of the injector is the nozzles, which supply fuel to the engine cylinders.
Thanks to these devices, fuel is dispensed and atomized. If the nozzles are clogged, the injector efficiency will be reduced. What is the reason?
Today, there is an increasingly common opinion that the injector becomes dirty due to the use of low-quality gasoline, which contains foreign elements or even sand. In practice this is not entirely true.
The car's fuel system is well thought out. It provides several degrees of fuel purification, which prevents dirt from getting to the injectors, so the risk of injector contamination for this reason is minimal.
The system filters foreign elements, ranging from large fragments to small contaminants.
What causes the pollution? The main culprits are heavy fuel fractions that remain on the walls of the nozzles (nozzles).
Most often this happens after the ignition is turned off, when the body of the product heats up from the engine, and the cooling system no longer performs its functions.
At high temperatures, light fractions evaporate, but heavy fractions remain in the nozzle channels, gradually contaminating them.
Over time, the thickness of the deposits increases, which leads to a decrease in the cross-section of the nozzle and a deterioration in its performance. As a result, engine performance decreases.
The presence of heavy fractions in the fuel composition is a situation that is typical for low-quality fuel.
Such gasoline is obtained through direct distillation and performance improvement using high-octane additives.
Errors in fuel storage also lead to an increase in the volume of heavy fractions. The result is contamination of the injectors, and the car owner inevitably faces the question of how to clean them.
Self-washing
As a last resort (for example, if there are no service centers nearby that you trust), you can use auto chemicals from the store. There are many cleaning products, the technique is simple - just pour the contents of the bottle into a container. However, the effectiveness of such liquids is low compared to a professional car wash: even if the engine starts to work better, this is no longer a fact. It is dangerous to use such auto chemicals on cars with high mileage. Usually their fuel system is very dirty, and adding a fuel additive can only worsen the situation: the contaminants in it will not dissolve, but will begin to travel along the route in the solid fraction and get directly to the injectors. Therefore, we recommend not to settle for “half measures”, but to contact the specialists of the group’s dealer centers.
It should be noted that flushing the fuel system of a gasoline engine does not always pay off. For some cheap car models, the cost of ultrasonic cleaning is up to 80% of the cost of new parts - in such cases we offer replacement of injectors. Our experts will always help you assess the economic feasibility of the operation.
How often should you clean the injector, and is it necessary to do it?
Against the background of the above, the conclusion suggests itself about the need to periodically check the condition and efficiency of the injector. The question is in what time frame this work is required.
Let us highlight the following trends:
- 30000 km . If the car owner fills the car with low-quality fuel during the initial period of operation, the injectors gradually become clogged with tarry deposits, which leads to deterioration in engine performance. In such a situation, it is worth figuring out how to clean the injector, and when it needs to be done for preventive purposes.
- 30-50000 km . In the absence of action on the part of the owner, the efficiency of the sprayers decreases by 5-7%, and the “gluttony” of the vehicle increases (on average by 2-3 liters). To eliminate existing contaminants, you cannot do without cleaning the injector.
- 50-80000 km . Further the situation worsens. After this period, the performance of the sprayers decreases by 12-15%, and the power unit itself begins to operate unevenly. Over time, the plunger damages the seat, causing the nozzle diameter to become larger. At the same time, contamination of the system occurs. How to clean the injector in this case? The only solution is considered to be a full-fledged flushing, but due to the increase in the diameter of the nozzles, this is not worth doing. And in general, replacing the part should be preferred over cleaning.
- 80,000 km or more . In this case, the efficiency of the nozzles decreases and the sprayers operate unevenly (deviations reach 30-50%). The issue of cleaning the injector becomes irrelevant, and the optimal solution is to install new parts, regardless of the condition of the latter.
It is worth noting that the nozzle is a consumable item, so you should not be afraid of replacing it. Each product has its own resource, after which a new element must be installed.
Manufacturers of many cars recommend replacing them at intervals of 100-120 thousand kilometers. This is true even with apparently normal operation of the products.
Do injectors need to be cleaned? Given the use of low quality fuel, the sulfur content of which is tens of times higher than EU standards, this is necessary.
The main thing is not to delay this process and do the work from the perspective of prevention, not “treatment.”
Experts recommend performing this work once every 25-30 thousand kilometers, but to get results it is important to understand how to clean the injector, what methods exist, and what their features are.
How to prepare injectors for cleaning
Before flushing, the fuel injectors must be removed. They are not attached to the power unit, but are pressed against the intake manifold using a fuel rail.
Nuts are used to secure the rail to the manifold. They need to be unscrewed and the fuel rail with injectors removed, carefully removing them from the mounting holes in the manifold. After this, the injectors are removed one by one from their mounting sockets.
Before removing the fuel rail, it is necessary to remove the attachments that interfere with its removal. The fuel line is disconnected from the injector connectors.
In most cases, the fuel pressure regulator is mounted on the fuel rail. It is necessary to either remove it from the rack, or dismantle the vacuum hose and “return”.
Areas where fuel leakage is likely (for example, the junction of the fuel rail and line) should be covered with a rag. It is better to start cleaning fuel injectors when the car has been standing for several hours, in this case the pressure in the system will decrease, minimizing the risk of fuel leakage.
Main signs of malfunction: when to clean injectors?
Many car owners skip the period when it is necessary to flush the injector. In fact, there are several signs by which it is easy to recognize the problem:
- Increasing the “gluttony” of the vehicle. If previously the car consumed 8-9 liters in mixed mode, and now this figure has increased to 11-12 liters, this is a signal to action - the injector needs to be cleaned.
- Reduced engine power, as well as jumps in speed when operating at idle. Depending on the neglect of the situation, fluctuations in the range of 700-1400 rpm are possible.
Additional signs of malfunction include failure of the accelerator pedal, deterioration in dynamics and the appearance of jerking during acceleration, premature failure of the lambda probe and catalyst.
In addition, problems with injectors are often indicated by difficulties starting the engine and an increase in exhaust volume (excessive smokiness of exhaust gases).
It is worth noting that the problems listed above may occur against the background of other malfunctions. It is possible to find out the exact answer after a complete diagnosis of the system and restoration (replacement) of the injectors.
Car owners' opinions on cleaning fuel injectors
- Cleaning the injectors will not be superfluous “The injectors need to be cleaned. However, until they are completely out of order, you may not know about the need for cleaning. But then we’ll have to remove them and take them for ultrasonic treatment.”
- Prevention is the best remedy for problems
“Every 30–40 thousand km you should use Wynns cleaning agent. There is no need to remove the injectors, but at the same time the combustion chambers are cleaned. Wynns burns at a higher temperature than gasoline, so some of the carbon will burn off. The product is poured into the tank at the rate of 1 liter per full volume. You just need to drive until the entire tank is used up. Liquid cannot be left in the tank for a long time, and it is better not to drive short distances.” - Pour the “chemistry” and you will be happy
“An acquaintance who drives a Volvo 240 station wagon uses LAVR to flush the fuel system twice a year.” While the carbon deposits are leaving the injectors, he pours it into the cylinders for decarbonization. The engine runs normally, without interruptions, consumption has decreased, now on the highway at a speed of 100–130 km/h it consumes about 6-7 liters of gasoline.” - We need an integrated approach
“In my free time I do diagnostics, I made a stand for cleaning fuel injectors. For washing I used solvent “P12”. Serviced four Lacetti, four Volkswagen B, one Kia. I also washed the chokes with it. In one Lacetti, gasoline consumption in the city decreased from 12-14 liters to 9-10 liters, and the dynamics improved. Kia's consumption on the highway decreased from 10 liters to 7-8 liters, the automatic transmission began to work normally, and acceleration improved. On another Lacetti, flushing the throttle improved the operation of the automatic transmission (I did not flush the injectors). In other cars from this manufacturer, traction increased slightly, but consumption remained at the same level.We recommend
“Cleaning fuel system injectors: choosing products for gasoline and diesel” More details
For the Passat “B” everything remains unchanged. I think you need to look at the throttle, assess its condition, and possibly wash it. You can wash the injectors, but it is not necessary. If he thinks for a noticeably long time or the consumption is very high, then you should definitely try cleaning the injectors.” - Purifier is our everything
“It is better not to use ultrasonic cleaning; it has a bad effect on the injectors. On my 940 I did this cleaning twice, both times one injector failed. The stand is the only advantage of ultrasonic cleaning, since it allows you to evaluate the operation of all injectors, whether they work simultaneously and how they do it.In general, I use LIQUI MOLY for cleaning, in their line of cleaners there are products for three stages of pollution. The third one should not be used, it is very aggressive. But the liquid for the second stage needs to be poured a couple of times, and there will be an effect.
So far I have only used an additive for cleaning fuel injectors for the first stage, pouring it twice into each of my three cars. There was always a result - at least the float in the tank began to work, obviously, the dirt was removed from the coil and the indicator showed normally. The injectors were probably also cleaned, but without a stand I don’t know, it’s not clear. If there was a stand, I would appreciate the work before and after cleaning.”
Basic methods for cleaning an injector
Today, there are several options for cleaning the injector with and without removing the injectors, they differ in their operating principle and efficiency:
- Application of automotive chemicals (special products). This method is good because it is accessible, because car stores are stocked with many types of fluids for restoring injectors. How to clean the injector this way? It is enough to select the appropriate option, add the product to the fuel tank (taking into account the manufacturer’s instructions), refuel and continue to operate the car. What are the features, pros and cons of the method, we will consider below.
- Using the capabilities of ultrasound. This option is more advanced and high-tech, and therefore gives better results. The difficulty is that the work is carried out using expensive equipment that is available only in specialized workshops. The operating principle is based on the use of ultrasound. When compared with other methods of cleaning the injector, this technique is the safest and most effective.
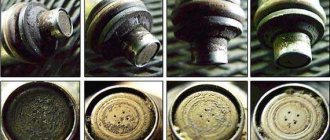
- Chemical method (washing). This cleaning option is good because it covers the injectors and the fuel system as a whole. Here a special washing stand is used, which is connected to the fuel system of the machine. Before performing work, the fuel tank is turned off. As a result, the flushing fluid cleans the pressure regulator, intake valves, injectors and even the fuel rail. PHOTO 6 But there are many ways to clean the injector (nozzles) using a chemical method at home.
Some options for self-washing the injector offered by drivers.
Cleaning methods
There are three main ways that will allow you to clean your injectors. Decide for yourself which one to use.
| Way | Peculiarities |
| Automotive chemistry | Quite effective, but financially expensive. Plus, working with chemicals is risky because it is very dangerous to your health. Cleaning is carried out only in full compliance with safety regulations |
| Service station services | Car services will now do everything for your money. But you'll have to pay a lot. Don’t forget that finding a really good, responsible and inexpensive service station is something out of the realm of fantasy. Therefore, either questionable quality of work, or impressive money for effective cleaning |
| Do-it-yourself cleaning | The most economically profitable way to save money and complete the task efficiently. You should choose this option only if you have an idea about the design of the motor, the location and functions of the injectors |
Do not carry out cleaning yourself if you have never climbed into the engine compartment yourself to replace or repair engine components. Trust trusted specialists, do not take risks.
Before and after cleaning
Injector cleaning options and basic tools
Now let's take a closer look at how to clean the injector, and what tools can be used to solve such a problem.
Automotive chemistry
As noted above, the simplest option is to use a special additive, which is added to the fuel tank, mixed with fuel, passed through the system and cleans the injectors. This product is recommended to be used as a preventive measure, once every 5000 km. In addition, it should be used in “young” cars with low mileage.
What is the reason for such a requirement? If the vehicle's fuel system has not been cleaned for a long time, a large number of deposits accumulate in it.
If the car owner decides to clean the injector using additives, the latter cause the dirt to fall away from the walls, after which the main elements of the system become clogged. The first thing that gets dirty is the fuel pump.
The main representatives of auto chemical products include:
Liqui Moly (Liqui Moly) Injection Reiniger High Performance series.
According to the manufacturer, this product can help out even with serious contamination.
Its use eliminates the consequences of using low-quality fuel. After cleaning, engine power increases, fuel consumption decreases and the volume of harmful emissions into the atmosphere decreases.
How to clean an injector using Injection Reiniger High Performance? The packaging contains instructions according to which it is recommended to add 300 ml of liquid to a full tank of fuel from time to time.
Regular use of the product helps to avoid contamination, keep the system clean, and increase the efficiency of intake valves and injectors.
The use of the composition is recommended in case of problems with starting, a decrease in engine power, deterioration of exhaust gases, as well as in the event of other malfunctions associated with contamination of the injector.
Liqui Moly (Liqui Moly) series Langzeit Injection Reiniger.
The product also fights existing stains and prevents the formation of new deposits. Used to clean injectors, intake valves and other elements of the fuel system.
Regular use of the product allows you to maintain engine power, reduce the risk of failures in its operation and extend the service life of the catalyst.
To clean the injector, just add 10 ml of liquid per 10 liters of fuel. The additive mixes itself with gasoline and performs a cleaning function.
Liqui Moly (Liqui Moly) series Injection-Reiniger.
Another modern product that provides quick cleaning of injectors and other elements of the fuel system.
The use of the additive guarantees the removal of carbon deposits and deposits that appear on fuel lines, intake valves, dispensers and other components.
Periodic use of the fluid ensures smooth running, engine response, better combustion of the combustible mixture, reduction of harmful emissions, and reliable protection against rust.
Features of the product include compatibility with catalysts, as well as the possibility of use on all types of gasoline engines with an injection system.
According to the manufacturer, the anti-corrosion characteristics of the additive are maintained for 2000 km.
To clean the injector using this product, just stir it in a ratio of 1 to 230.
So, 200 ml of additive is enough to prepare 70 liters of fuel. The tank should be 75% full when adding.
Liqui Moly (Liqui Moly) Injection Reiniger Light series.
This is a mild cleaner that is suitable for gasoline engines with various injection systems. Used as preventive maintenance and periodic cleaning of the fuel system.
The manufacturer claims that the cleaner does not lift dirt from the fuel tank and does not clog fuel lines. Existing contaminants are dissolved and removed from the system.
If you clean the injector in a timely manner using Injection Reiniger Light, engine starting is improved, the volume of harmful emissions is reduced, and reliable protection against corrosion is provided.
The peculiarity of the additive is that it has no negative effect on the catalyst.
To clean the injector, you need to add 0.25 liters of additive to a full tank of fuel. The volume of gasoline should be no more than 70 liters.
Liqui Moly (Liqui Moly) Injection Reiniger Effectiv series.
This composition is suitable for cleaning injection power systems in the presence of obvious symptoms of contamination - engine problems, engine failures, and others.
The best option is to use the product every 2000 km. The additive is especially useful when low quality fuel is poured into the car.
To clean the injector, 300 ml of additive per full tank of fuel is enough. The product is mixed with gasoline, cleans the fuel system, protects it from corrosion and deposits in the future.
JET 100 ULTRA XADO.
Universal cleaner for injector and carburetor.
Its advantages include high efficiency, as well as the ability to remove all types of contaminants (dust, deposits, gasoline films, varnishes and others).
The use of the additive helps restore the factory characteristics of the injector, remove existing dirt from the fuel system, as well as the line through which the air flow is supplied.
The advantages include safety for catalysts, reduced fuel consumption, and restoration of the previous engine power.
Before cleaning the injector, it is recommended to start the engine and spray the mixture onto the throttle valve.
After this, the engine should run at high speeds for 4-5 minutes.
You can clean the injector in another way - spray the composition directly into the fuel tank. In this case, 20 liters of fuel requires spraying for 12-15 seconds.
The advantage of this method is the possibility of comprehensive cleaning of the system - intake valves, fuel tank, gas lines, injectors and other elements.
XADO MaxiFlush.
Concentrated additive containing highly effective elements. Purpose: cleaning the fuel system of gasoline engines.
The result of using the additive is to normalize engine operation, eliminate problems with idling, and reduce the volume of harmful emissions in the vehicle exhaust. Used in injector cleaning installations.
The advantages include quick removal of contaminants, cleaning of the combustion chamber, fuel nozzles and other elements.
If you clean the injector using XADO MaxiFlush, you can reduce fuel consumption, restore the spray pattern and optimize the fuel combustion process.
Regular use of the additive helps to increase the reliability of the system and increase the efficiency of injectors by 3-4 times.
To completely clean the system, 300-350 ml of product is required. If the composition is used in professional installations, mixing is carried out in the ratio of 300 ml of additive per 700 ml of gasoline.
If you need to clean the injector without additional equipment, you should add the product to the tank at the rate of 300 ml of additive per 40-80 liters of gasoline.
Features of the composition include a mild effect on catalysts and lambda probes. Cleaning frequency is every 15-20,000 km for prevention.
EGR Verylube XADO.
A modern product for cleaning the recirculation system valve, as well as the injector flap. Can be used for carburetor engines.
The use of an additive helps restore factory parameters. To clean the injector valve, it is recommended to heat the engine and spray the mixture onto the throttle valve, after which the engine should run at high speed for 4-5 minutes.
XADO VERYLUBE.
A universal composition designed for cleaning carburetor and injection engines. Its advantages include high speed of action and increased efficiency.
As a result of application, it is possible to clean the injector, remove carbon deposits, films and deposits from the elements of the fuel system.
The use of the composition as a preventive measure helps maintain engine performance and injector efficiency throughout the entire service life of the vehicle.
As a result of use, the volume of harmful emissions into the atmosphere is reduced. The product has a loyal effect on oxygen sensors and catalysts.
To clean the injector using this additive, you need to warm up the engine and spray the composition onto the car's throttle valve. The engine should run for another 4-5 minutes at high speeds.
An option with complex cleaning is possible, when XADO VERYLUBE is added directly to the car tank. In this case, the intake valves, pipelines, spark plugs and other elements are cleaned.
To achieve the result, it is enough to spray the additive into a tank with 20 liters of fuel for 12-15 seconds.
Ultrasonic cleaning, its features and disadvantages
An excellent option is to clean the injector using ultrasound. In this case, the injectors are removed from the engine, after which they are diagnosed on a special stand, and then, if necessary, placed in a bath with a special liquid.
After this, the part is exposed to ultrasonic waves. The ultrasound source is located at the bottom of the container into which the sprayers are lowered.
The following happens: under the influence of ultrasonic waves, the water in which the nozzles are located begins to vibrate. But since the liquid cannot vibrate at a frequency equal to the frequency of the ultrasound acting on it, microbubbles are formed and explode.
During microexplosions, water under high pressure acts on the nozzles, clearing them of contaminants.
As a result of such manipulations, the nozzles and the outer part of the nozzles are cleaned of contaminants.
It is worth noting that removing contaminants from the inside of the nozzles is only possible by opening and closing the nozzles directly in the bath. Otherwise, you will only be able to clean the outer part of the part.
In general, the use of ultrasound is most effective, because even the most persistent contaminants are eliminated. The disadvantage of this method is that it costs a pretty penny for the car owner.
The principle of ultrasonic cleaning is simple. First, the injectors are removed from the machine, they are inspected and installed in a special stand.
At the initial stage, the quality of the spray is checked, after which the sprayers are cleaned in an ultrasonic bath in a gentle mode. Once this work is completed, the check is performed again. If the result cannot be achieved, cleaning is carried out a second time.
If required, a new filter and o-rings are installed. Then the injectors return to their place.
According to experts, it is possible to clean the injector using ultrasound even after 100 thousand kilometers. But here everything depends on the degree of contamination of the part.
As for the disadvantages of this method, there are two of them - high price, as well as risks for nozzles, which may fail during the cleaning process.
There is a danger that the car owner will spend a lot of money on cleaning, but there will be no result.
Chemical method (liquid washing)
Another way to clean the injector is to use special chemical compounds.
The bottom line is that cleaning equipment is connected to the injector using adapters. In this case, it is not fuel that is supplied to the injectors, but a flushing composition (for example, Liquid Moly, Carbom Clean, Vince). The washing mixture is supplied using tubes.
Thanks to the use of a fitting, the fuel pump, filter, tank and fuel line are not involved in cleaning.
The mixture of gasoline and cleaner is supplied under pressure, which is set taking into account the manufacturer’s recommendations. As a result, contaminants are broken down and released through the nozzle holes, after which the residues are burned in the cylinders. The procedure takes 30-50 minutes.
Despite its apparent effectiveness, this method does not always guarantee results. It is rarely possible to clean the injector 100%, because a small amount of the flushing compound remains in the injectors and oil system. Therefore, immediately after completing the work, it is recommended to drive 12-15 km in forced mode, and then change the oil and filter.
The disadvantage of this method is its high time and financial costs. The method is suitable for cars that have traveled a short distance, and dismantling the sprayers is associated with great difficulties.
Let's look at liquids that can be used to clean injectors:
- WYNNS is a German product designed for cleaning injectors. It is versatile and suitable for all types of gasoline engines (with direct injection and carburetor). As a result of the application, it is possible to clean the fuel system, reduce the volume of harmful emissions and improve the characteristics of the injector. There is no need to change spark plugs after cleaning is completed. The frequency of application is once every 20-30 thousand kilometers.
- Runway — flushing liquid for injector, sold in 0.3 l container. Its action is aimed at flushing the injector, maintaining and normalizing the injection quality. The composition lubricates the system and protects fuel injectors from contamination. Regular use guarantees improved vehicle response, reduced emissions, and reduced fuel consumption. The advantages include the absence of soot and deposits after use. To clean the system, just pour the liquid from the bottle into a tank with 50-60 liters of fuel. The frequency of manipulations is once every 3-5000 km.
- WYNNS Injection System Purge is a flushing fluid for removing deposits and contaminants in injection engines. Using the product, it is possible to clean the combustion chamber, valves and their stems, injectors and other elements of the injection system. The result is restoration of injector efficiency, normalization of engine operation, improvement of compression ratio and other parameters. The cleaning liquid is safe for catalysts and spark plugs. Used once every 20-30 thousand kilometers.
- KENT is a powerful carburetor and injector cleaner. Available in 0.5 liter bottles. This is a fast-acting composition that has the following advantages - versatility, high drying speed, safety for catalysts, removal of various contaminants (varnish, glue, grease), as well as ensuring uninterrupted operation of the engine.
- Toyota D-4 Fuel Injector Cleaner - a composition with which it is possible to clean various types of fuel systems from the accumulation of carbon deposits. The use of the composition helps remove moisture, provides protection against corrosion and the appearance of ice “plugs”. Use for preventive purposes ensures cleanliness and maximum efficiency of injectors. Recommended for use on Toyota vehicles.
The use of a cleaner is important when fuel consumption increases, engine malfunctions at idle, and “dips” appear during the acceleration process. It is not recommended to use the composition on carburetor engines. The optimal time to clean the injector is during the oil change period. To do this, just add Toyota D-4 Fuel Injector Cleaner to a half-empty tank. Immediately after mixing, fuel must be topped up to 100%. One bottle of the composition is enough for 70 liters of gasoline.
How much does it cost to flush an injector in our workshop?
Scroll to block The cost of washing an injector in our auto repair shop depends on the engine size of the car and, as a consequence, the amount of solvent consumed. The price list below shows the total cost and already includes:
- Flushing fluid LAVR ML101.
- The washing service itself.
At the client's request, we can wash it with a detergent composition. Cost of washing the injector and nozzles without removal
| Car model and engine size in liters | Cost of injector flushing in rubles |
| Foreign cars, VAZ- Less than 1.8 | 1800 |
| Foreign cars, VAZ from 1.9 to 2.5 | 2200 |
| Foreign cars, VAZ from 2.6 to 3.5 | 2600 |
| Foreign cars, VAZ from 3.5 to 4.5 | 3200 |
| Foreign cars, VAZ over 4.5 | 4000 |
All prices are in our price list.
In addition to the low cost of this service in our workshop, washing the injector using GX-100 and Laurel ML101 will help:
|
How to clean the injector yourself: the best ways
Now let's look at methods for cleaning injectors that can be used in a garage and will give the expected result.
The first method of cleaning injectors (using the example of a VAZ-2110)
The work is performed according to the following algorithm:
- Start the engine, then remove the fuel pump power fuse. This is necessary to reduce the pressure in the fuel supply line. The engine will stall on its own;
- Discard the terminals from the sprayers, as well as the two hoses (cordless and reversible);
- Unscrew the tablet with nozzles and remove the sealing rings.
Now you can clean the injector. To complete the work, you will need carburetor flushing fluid and a device that allows you to blow the composition through a nozzle under pressure.
As an option, it is possible to use a plastic bottle combined with the hole at the nozzle inlet, as well as a container filled with cleaning liquid. Now connect a pair of wires from the battery to the terminals of the injector nozzle.
Next, open and close the circuit to achieve the closing and opening of the injector, respectively. At this moment, flushing liquid passes through the nozzle under high pressure. According to car owners, after 3-6 passes it is possible to achieve optimal spray. If it was not possible to clean the injector, it must be replaced.
Second method (using the example of Mazda 5)
The appearance of soot on the spark plugs, soot on the valves and piston crowns, as well as a decrease in engine power indicates the need to flush the system.
To do this you will need:
- WYNNS fluid, which allows you to clean the fuel system and not change the spark plugs after that;
- Hoses and clamps;
- Crocodiles for fixation.
The following is the algorithm:
- Assemble the cleaning unit. In this case, the tube from the pump to the ramp should be 28 cm shorter than the return. This is a necessary condition, because the tubes used are two-layer, so they are difficult to bend.
- After preparing the system, it is necessary to remove the fuel pump relay (located in the safety box in the engine compartment).
- To find an approach to the return pipe, you will need to dismantle the fastening of the electro-pneumatic valve strip. Move the part back a little and remove the original Mazda hose. Next, put on the clamp.
- To remove the supply tube, remove the rubber corrugation that connects the throttle valve unit and the air filter.
- Remove the electro-pneumatic valve of the exhaust gas recirculation system.
- Press the lock on the left and right and remove the supply hose. Next, put on the supply tube from the prepared device.
- Return it to its place and tighten the corrugation. Next, pour 0.5 liters of liquid into the jar, turn on the electric pump, start the engine and let it work out all the available composition at idle. This takes 10-15 minutes. To speed up the process, remove power from the ignition coils and crank the starter, forcing fluid into the cylinders.
- All that remains is to clean the knots after soaking. To do this, you need to fill in 0.5 liters of clean liquid and let the engine run under different loads.
- Collect everything using the reverse algorithm. Pay careful attention to the quality of the hose connections (there should be no leaks).
How to clean injectors by removing them (method No. 3)
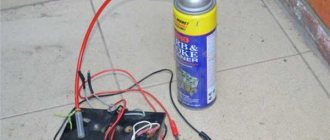
To complete the work, you will need carburetor cleaning fluid, a non-latching button, a 5 cc syringe, wires with four terminals and a charging power supply.
To clean the injector, proceed as follows:
- Insert a thin tube into the outlet of the syringe (make a seal so that it holds tightly);
- Place the nozzle on the other side of the syringe;
- Assemble the diagram. Embed the button that was prepared before starting work into one of the power supply wires;
- Connect the terminals to the injector and turn on the charger power to the outlet. Press the button several times and make sure that the nozzle opens when power is applied;
- Connect the bottle cap to the other side of the thin tube coming out of the “nozzle” of the syringe. The place of twisting can be sealed with something;
- Press the spray button several times, then press the button 2-3 times. First place a transparent container under the nozzle outlet to be able to analyze the spray quality.
- Repeat the procedure as many times as necessary.
We make a device
The injector cleaning device consists of two parts. The first will supply the cleaning agent. To do this, take the brake hose and cut off the metal threaded end on one side.
The nozzle will be attached to this end of the pipe, since the inner diameter of the hose is perfect for this.
At the other end, where the metal tip remains, we supply liquid.
To do this, take a plastic tube that comes with a can of cleaning agent (if you don’t have such a tube, you can take one from WD-40). We insert this tube into the metal tip.
To ensure a tight seal, you can cut a strip from a wine cork, roll it into a tube and insert it into the tip; it will act as a sealing spacer.
Then insert the tube from the can into this spacer; it should fit tightly. And then wrap it all tightly on top with electrical tape.
You should get a hose with a transition to a plastic tube for connecting a cylinder with cleaning liquid at one end, and a free second for connecting a nozzle.
At this point, the feeding part of the device is ready.
Let's move on to the electrical part.
To do this, you need two wires that will supply power to the nozzle during cleaning. Everything will be powered from the battery.
But in order not to apply increased voltage in the process and not to burn the coil winding of the element, it is necessary to embed an incandescent lamp into the wire that will supply the positive pole.
A toggle switch or button is embedded in the negative pole wire.
This is necessary for the convenience of work, so that you do not have to simultaneously supply the product to the nozzle and at the same time press the wires to the battery so that the nozzle works.
About prevention
Here I would like to talk about a cleaning method in which special additives are added to the gas tank. Unlike others, this method has not been scientifically proven. In addition, an additive that is suitable for a certain type of engine may not be suitable for another.
The additive is added to the gas tank, so its chemical elements will affect the entire fuel system.
If anyone decides to use the additive as a means of prevention, carefully study the reviews, as well as the manufacturer’s recommendations. The main thing is not to harm the engine.
And the most reliable and inexpensive way to prevent the fuel system is, oddly enough, to fill in with high-quality fuel, use the same fuel filter and change it in a timely manner.
Checking the injectors
How can you check the injectors without removing them from the engine? The easiest way to check is to analyze the operation of the motor and the extraneous sounds it makes. Problems with idle speed, acceleration, and increased fuel consumption are the main symptoms of dirty injectors.
A malfunction is audibly determined by high-frequency extraneous noise. However, a simple car enthusiast may not be able to identify it. Therefore, be guided by the signs listed above.
Results
As you can see from the article, you can clean the injector in several ways - at a service station or at home. The main thing is not to start this process and begin prevention after 5-7 thousand kilometers.
If the fuel system has not been cleaned for a long time, there is no need to rush - you should undergo diagnostics at a service station and listen to the recommendations of specialists. Otherwise, serious consequences are possible.
You can clean the injector of a new car using auto chemicals (special additives). They are recommended to be used at intervals of 5 thousand kilometers. If the car has traveled 100-110 thousand kilometers, it is advisable to use professional washing methods on a special stand or using ultrasound.
If the car has driven more than 150,000 km, it is useless to clean the injectors. In such cases, the part is so dirty that replacement is the only solution.
Soaking in dimexide
Dimexide has the property of cleaning objects from hydrocarbons and oils, and the drug is purchased at the pharmacy. The implementation of this option is quite simple: you need to remove the ramp with the injectors, then disassemble it into parts.
Dimexide is poured into a wide-necked canister or other container. Now you need to lower all the ramp parts into the canister and leave them there for ten or twenty minutes.
The process is completed by wiping the elements with dry towels and installing the spare parts in place.
Dismantling
Before replacing or cleaning the injectors, they will need to be removed from the fuel rail. To achieve this, the following activities are carried out:
- Make sure the engine has cooled down properly. It is not safe to work on a hot engine;
- Disconnect the power wires from the fuel pump to de-energize the device;
- Try to reduce the pressure in the engine power system as much as possible. To do this, the engine starts, and then you need to wait until it stalls at idle speed;
- Repeat this procedure several times until the car simply stops responding to turns of the ignition key;
- That's it, now our goal is the fuel rail. To remove it, you must first remove the terminals from the battery, turn off the power to the ramp itself, disconnect the fuel supply hoses, and also disconnect all electrical appliances going to it. These are pressure, idle, throttle position sensors;
- If you have an 8-valve engine, then you do not need to remove the receiver. This step is relevant for engines with 16 valves;
- Experts do not recommend removing the intake manifold without dismantling the throttle valve and the hose going to it. It is better to unscrew and disconnect everything at once, which will allow you to continue working more conveniently;
- Cover the exhaust manifold openings with something to protect them from foreign objects;
- Using a hex wrench, you can unscrew a couple of bolts and remove the fuel rail along with the injectors;
- Make sure that there are no distortions when removing the ramp, otherwise problems may arise with the dismantling processes;
- We remove the injectors. To do this, remove the mounting brackets that hold the electrical connector. You also need to remove the bracket that holds the injector in its seat.
After dismantling the elements, be sure to close the seats to prevent debris and other objects from getting in, and place the nozzles themselves on a table or floor, after laying down a dry rag.
Here you can decide whether to change or clean the elements of the fuel system. If replacement is required, install new injectors in place of the old ones and follow the assembly procedure.
Cleaning
Here proceed as follows.
- Remove the rubber rings from the injectors, and when cleaning is finished, replace them with new seals.
- The cleaning process should begin with the nozzles, on which various deposits form as the car is used.
- Be sure to thoroughly clean the funnel-shaped surfaces where tar deposits accumulate.
- The next step is the fuel mixture supply channels.
- To open the solenoid valve to supply fuel, you will have to trick the device with a 5-7 V power supply.
- Some use stabilized voltage sources, phone chargers, or even a car battery. If using a battery, the voltage should be supplied through the light bulb. It will play the role of a current damper. Otherwise you risk burning the winding.
- Electricity is supplied through two wires, in the gap of one of which a button is installed. It will close and open the network. This creates an imitation of the operation of an injector in an engine due to the influence of a pulsed electric charge.
- You can supply the cleaning liquid to clean the injectors through a can of carburetor cleaner. Inexpensive and effective, even better than specialized chemicals.
- Be sure to tightly connect the cylinder and nozzle with a rubber tube, clamps and any other means.
- All is ready? You can then apply electricity to open the injector. At the same time, press the button on the cleaning agent canister.
- Soon the torch of the liquid jet, which will exit through the fuel atomizer of the injector, will change its “clumsy” direction and will begin to uniformly exit the nozzle. This indicates that you have removed all carbon deposits.
Homemade cleaning device Before putting the cleaned nozzle back in place, check its actual condition.
Examination
To check you need:
- Measure the injector resistance using a multimeter. If the readings are within 10-15 ohms, the injector is working;
- If you deviate from these limits, cleaning is pointless. You only need to change the injectors;
- Check devices for leaks;
- To do this, when cleaning, do not turn on the electrical pulse so that the nozzle does not open;
- Under pressure, a device with a broken seal will begin to show signs of leakage. Therefore, the element must be replaced.
Removing and washing injectors
In this article I will describe the process of removing injectors on a VAZ-2107 car. The owner complained about tripping and rough operation of the engine when running on gasoline. After diagnostics, it was discovered that the injectors were clogged. The car is additionally equipped with 2nd generation gas equipment, the so-called “cracker”. In this regard, the view in the photographs may differ slightly from yours (presence of a firecracker, injector emulator, etc.). In Fig. Figure 1 shows the appearance of the engine compartment of the vehicle being serviced.
Let's get started. We unscrew the clamps securing the air pipe using a Phillips screwdriver or a 7 mm socket.
We remove the pipe.
Remove the throttle cable clamp using a “flat” screwdriver, carefully prying it up.
Open the throttle valve and remove the throttle cable.
We unscrew the fastening of the throttle cable using a 10 mm “head”.
We unscrew the fuel lines with two 17 mm open-end wrenches. We unscrew the fastening of the tubes with a Phillips screwdriver.
Remove the vacuum hose from the fuel pressure regulator.
Remove the brake booster hose by unscrewing the clamp with a flat-head screwdriver.
We unscrew the two nuts securing the throttle assembly using a 13 mm “head”. We remove it, holding the washers on the studs, and move it to the side.
Unscrew the intake manifold mounting nuts using a 13 mm “head”. We remove the washers.
Removing the fuel line fasteners
Remove the intake manifold and put it aside.
Unscrew the fuel rail mounting bolts with a 5 mm hexagon.
Remove the injector harness connector by slightly pulling the lock towards you.
We take out the ramp along with the injectors. If the injectors fit tightly on the rings, then you can carefully pry off the ramp with a pry bar.
Remove the injector harness by pressing the latches on the connectors.
Remove the injector clamps by sliding them to the side along the fuel rail.
We take out the injectors. To do this, we stagger and pull them towards ourselves.
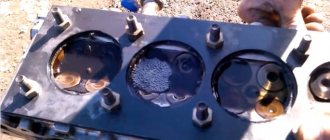
We see rust both in the injectors themselves and in the fuel rail. Somewhere a man was filled with gasoline and water.
If you are installing new injectors, you can skip the next few steps. Otherwise, wash the dirt on the injectors with a brush in gasoline. We wash them in an ultrasonic bath. We check injectors for performance and leakage in a test bench.
We install new sealing rings on the injectors, having first removed the old ones, prying them off with a screwdriver.
It is better to put a brown rubber ring on the bottom of the nozzle; it is more heat-resistant and will last much longer. If the condition of the old rings is good, then it is better to leave them, since the quality of the new ones leaves much to be desired.
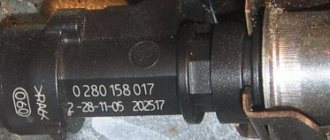
If necessary, replace the injectors with new ones. You need to buy according to the number on the nozzle. In our case, Bosh 0 280 158 502.
We wash the fuel rail with gasoline or Abro carburetor cleaner and blow it with compressed air.
Before installing the injectors into the fuel rail, the rings on the injectors must be lubricated with something, for example WD-40. This helps to avoid damaging the rings during installation.
We install the injector clamps in place. Please note that the fourth injector is installed with the connector in the opposite direction.
We put on the injector harness. We install the nozzles in place, also lubricating the rings with WD-40.
Before disassembling, we noticed that the clapper and the throttle valve were very dirty.
Now is the time to wash the throttle assembly, idle air control (IAC) and gas firecracker.
Next, we collect everything in reverse order, but take into account some points. Don't forget to put the hose on the fuel pressure regulator.
We look at the condition of the throttle assembly gasket and, if necessary, replace it with a new one.
We install new sealing rings for the gas lines.
Be sure to change the fuel filter. For VAZ cars there are filters of the old (with “screws”) and new (with “snaps”) models. In our case, an old-style filter is installed.
To remove the fuel filter, first unscrew the fuel lines using a 17 mm open-end wrench, holding the filter housing with a 19 mm open-end wrench. Then unscrew the filter itself with a 10 mm head.
This is what came out of the filter in our case.
We install a new fuel filter and gas line O-rings. Do not forget to take into account the direction indicated by the arrow on the fuel filter housing.
We tighten the fuel lines without overdoing it and hold them, excluding cutting the fuel rings.
Let's check if we have any extra spare parts left ;). We start the engine and check for fuel leaks and air leaks.