Lada Priora cannot be called a miracle of engineering in terms of technical equipment. For the most part, this model inherited the components and assemblies of its predecessors. The cooling system was no exception. On the Lada Priora it is combined: liquid with partial natural and forced air cooling. In this case, the type of engine does not matter: for the 8-valve and 16-valve power units it is almost identical.
Signs that indicate the need to replace a part
Experts believe that the main factors that indicate a faulty water pump are:
- coolant leaking from the housing in the oil seal area;
- wear of the built-in bearing, which is determined by increased noise, humming during operation, or jamming;
- insufficient circulation of the coolant used;
- excessive increase in the temperature of the power unit;
- reducing the level of coolant poured into the system;
- the presence of cracks, chips, chipping of the material of the pulley, housing or impeller of the water pump.
The water pump, as a rule, is a non-repairable component due to its design features
Therefore, experts recommend a complete replacement of this important part.
The water pump for the Lada Priora is completely replaced if it malfunctions
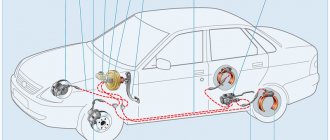
Cooling system Priora
1 - Heater radiator; 2,3,4,5,6,10,11,12,13,19 — Cooling system pipes; 7 - Expander cover; 8 - Expander; 9 - Thermostat; 14 — Cooling radiator; 15 — Coolant drain plug; 16 - Fan; 17 - Pump; 18 — Supply tube;
Principle of operation
Coolant is poured into the expansion tank (8) and then begins to circulate in a small circle through the engine block and heater radiator (1) under the action of a centrifugal water pump (17) . Liquid circulation in a small circle occurs up to 85⁰C, at this temperature the thermostat (9) begins to open and liquid circulation flows in a large circle through the cooling radiator (14) .
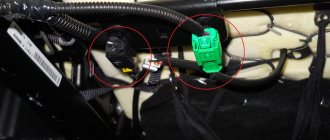
Installation instructions for an additional electric pump
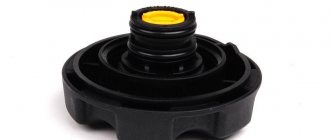
Communities Lada Priora Lada Priora Club Blog Micro FAQ 2. Checking the functionality of the expansion tank cap
Installing an additional water pump on any car (including the Lada Priora has 16 valves) is basically no different. It is necessary to place the electric pump in the section of the pipe, which is the input or output to the car’s stove and provide its power supply.
Step-by-step instructions for installing this additional component are as follows:
- Provide access to the heater pipes under the hood of the car by removing components that interfere with operation.
- Compress one of the rubber pipes that comes out of the heater (stove), which is done to prevent coolant from leaking out, or drain antifreeze (antifreeze) from the entire system.
- Cut part of this pipe to the length of the corresponding pump being installed.
- The length of the fittings is not taken into account due to the fact that they fit into the pipes.
- It is necessary to select the diameter of the fittings on the electric pump in advance to obtain a high-quality connection.
- Secure the rubber pipes to the pump fittings using metal clamps.
- Attach the additional electric pump to a pre-selected location under the hood of the car (indicated above) using special fasteners.
- Connect the power supply to the pump by selecting the options listed above, or install a separate switch.
- Start the engine and check the tightness of the connections, as well as the functionality of the electric pump.
- Install all parts that were removed before installing the pump.
Air Conditioner Installation Guide
Before you complete this task, you need to decide which option you will use. There are quite a lot of manufacturers of air conditioning units on the market today, so the purchased unit must meet the requirements and characteristics of the car. The device must have a long service life, resistant to vibrations that are typical for cars used to drive on our roads. It's no secret that our car enthusiasts are more inclined to trust Conder cars and products in general from foreign manufacturers.
How to connect an air conditioner to a Priora with power steering
If we talk about foreign installations, here you can choose Panasonic, Halla or any other system. As for domestic manufacturers, according to reviews, the August air conditioner has proven itself well.
The installation kit should include:
- cooling radiator or air conditioning radiator;
- the installation itself, which includes the Priora air conditioning compressor;
- tension roller bracket;
- highways.
Heating device for Hull installation
If we talk about the domestic product, then in this case the only drawback can be called the evaporator housing, since it is plastic, which raises some doubts. There is a possibility that the compressor will fail before other elements. In any case, you need to choose a manufacturer in accordance with the reviews that our car enthusiasts leave online.
Installing an air conditioning system involves removing the heating system, which first requires dismantling the air filter housing and draining the coolant. Next, the front bumper is dismantled. After removing the components, you can begin to remove the generator. The kit for the installed air conditioner must include a separate generator designed for a specific car. So you need to install the device instead of the old one.
First of all, you need to install supports on which the unit’s compressor, as well as the generator, will be mounted. Next, you should fix the tension roller installation bracket. To mount the roller bracket, you may need to drill a hole in the strap cover, after which the oven housings and the evaporation device are connected to each other. Next, on a Priora with air conditioning, you should install a compressor, radiator, and fan. After installing the components, including the roller, all elements must be included in the wiring diagram.
When to replace
Communities Lada Priora Lada Priora Club Blog what affects the clutch release limit switch
The frequency of fluid replacement in Priora models that were released after 2011 is approximately seventy-five thousand kilometers. After this period, antifreeze loses its functional properties. This is only true for the product provided by the original manufacturer. If you use Antifreeze, it will last half as long.
The need to replace the coolant can be determined by the following symptoms:
- the appearance of dirt, uncharacteristic marks, lumps of thickened liquid;
- antifreeze has begun to leak out - it can be replenished, but if you do not know the exact brand, it is recommended to replace it;
- there are deposits and dirty traces in the container, which indicates the need for an urgent replacement of the fluid, which has lost its performance properties;
- under the hood foam appears in the reservoir intended for storing fluid;
- reduction in the quality of operation of the air heating stove;
- The motor heats up at a high speed.
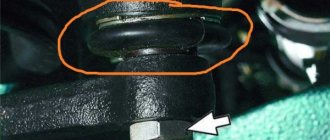
Refinement of SOD from airing
Owners of LADA Kalina (1.6l, 8kl) cars are offering a simple modification that will solve the problem of constant airing of the engine cooling system. If the antifreeze leaves, then you should look for a leak. If the antifreeze stands still and an air lock appears periodically, you should extend the hose from the radiator so that its end is immersed in the coolant in the expansion tank:
If this modification does not help and airing of the cooling system occurs periodically, then the car’s cooling system is not sealed. Check the connections of all system hoses for leaks, as well as the expansion tank cap.
Source
Possibility of installing an additional water pump on the Lada-Priora
One of the disadvantages of the heater on the Lada Priora car is its low efficiency when the engine operates at low speeds in the cold season, due to insufficient coolant circulation. Therefore, the car interior warms up slowly and insufficiently, which causes some discomfort for the driver and passengers.
There are some requirements that must be met to obtain a high-quality result after installing an additional electric pump.
These include the following points:
- the installed product should not create excess pressure in the heater radiator during operation in order to avoid damage to the pipes or the formation of cracks;
- It makes sense to replace the thermostat and install this component with an increased opening temperature (90–95 degrees Celsius) due to the fact that as the speed in the coolant circulation increases, the engine parts will warm up more slowly, increasing wear on the power unit.
To solve this problem, you can install an additional water pump in the cooling system of the power unit, which will qualitatively improve the heating of the car interior even when the engine is idling. This technology is not new. Engineers have been using it for a long time. Examples include German cars BMW or Mercedes Benz.
Device selection
As a rule, devices from various manufacturers are suitable as an additional water pump for the Lada-Priora car.
These, for example, could be brands from:
- Bosch company;
- ;
- .
Video: positive effect of installing an additional electric pump on the Lada Priora
However, most often the Lada Priora is equipped with an electric water pump, which is installed on Gazelle cars. This may be an old or new design, but the principle of operation is the same for both: due to the vacuum at the inlet during operation of the product, a pumping force arises, which drives the coolant through the system. In fact, the pump from the Gazelle car is a classic centrifugal pump.
The design of the new pump version is much more successful and causes fewer complaints from car enthusiasts. And it is also less noisy during operation. The main problem that motorists encounter when using such an electric pump is its leakage.
Installation and connection of an additional electric pump
To equip a car with an additional electric water pump, you will also need a regular relay that has normally open contacts (this can be an ignition or starter relay from a VAZ 2105, VAZ 2108). It is necessary to close contacts No. o86 and No. o30. And you will also need a reinforced hose and clamps for clamping the pipes.
An additional pump can be installed in any of the gaps in the supply or outlet pipes of the car’s heating stove.
Installation of an additional electric pump is quite simple, and the efficiency of the heater increases significantly
The pump is fixed in the Lada Priora in the following places:
- stud for fastening the washer reservoir;
- studs located next to the battery;
- on the engine shield.
The device can be connected to a wide variety of systems.
It could be:
- recirculation button;
- SAUO stove block;
- heated mirrors;
- other convenient places.
Installation of foreign-made climate systems
Lada Priora air conditioner "August" is one of the most inexpensive options. If you want to buy a higher quality device, then you can opt for the Hull, Panasonic or Frost systems. In practice, the latest model is characterized by good compatibility with the Priora heating system, due to which the air flow filtration will be of better quality. As for the installation scheme, it is practically no different (the author of the video is Auto World).
But Frost also has its drawbacks: it happens that the installation gets very hot, does not cool the air well, and generally does not cope well with its assigned functions. But even if the unit works well, it will take longer to cool the interior. This is because the compressor itself is not particularly powerful. But despite the disadvantages, Frost also has advantages. When the air conditioning is turned on, it will generally not affect the functionality of the vehicle.
It should also be noted that the air conditioning units of this manufacturer were tested in African countries, and this says a lot. In particular, during testing, the installation cooled the interior well, while the engine of cars of various brands did not overheat. On sale you can find several variants of Frost condensers, which differ from each other only in the installation method. When installing the device, you will need to remove the heating system damper, but this will allow you to install an air filter, which is no less important.
In any case, when purchasing, you should focus on your preferences, as well as your budget. If the device gets very hot, you need to pay attention to diagnosing all its components and components. As a rule, this problem is caused by the need to replace the radiator. In addition, during operation, one should not forget about refueling the system, as well as its periodic cleaning. We have already written in more detail about how to clean the air conditioner on your own using improvised means; you will find information about this here.
Temperature sensor malfunction
The reason that the liquid in the cooling system, which serves as an air conditioner for the car's power plant, does not heat up or overheats is due to the failure of the temperature sensor.
Often signs of such a malfunction are:
- Stopping the flow of warm air into the car interior, which occurs due to the cessation of fluid flow into the heater.
- Dark, almost black smoke comes out of the exhaust pipe. This indicates engine detonation, which was a result of overheating.
- Engine power drops sharply.
Many drivers quickly stop the car when it overheats and turn off the engine. In fact, an immediate stop of the machine is required only if the tightness of the system is broken and liquid pours out of it. In other situations, the driver must perform the following actions:
- turn on the heating to maximum so that the fluid temperature drops and the engine cools down quickly;
- drive smoothly to the side of the road;
- Let the engine idle for 2-3 minutes with the heating system on.
After this, the engine must be turned off and allowed to cool for 20 minutes. After this, you need to measure the fluid level in the cooling system and add it if necessary. Immediately after the engine is turned off, you cannot open the radiator cap, as you can get burned from contact with the liquid. If the fluid level is normal, then the cause of overheating must be determined by diagnostics. To do this you will have to visit a car service center.
Airlock
An air lock in the SOD is the formation of air in the system, which does not allow it to function properly. A plug is a cavity of air that forms in the heater radiator and most often negatively affects the operation of the interior heater.
How to remove a traffic jam?
The SOD device in Priora does not imply air pockets; during operation, they are independently removed by the system without any intervention. All you have to do is run the car for a few tens of minutes and the traffic jam will go away.
There is also a way to remove the plug much faster. You need to drive your car up a hill so that the front of the car is slightly higher than the rear, open the expansion tank cap and keep the engine speed around 2000-2500 rpm. The air lock will come out.
How to choose a coolant
Answering the question of what antifreeze to use in Priora, the manufacturer did not provide a large assortment to its users. It is best to use the Felix-40 cooler. You can use other brands, but this is not recommended. The engine system may wear out in a shorter period of time. As a result, you will have to contact the service for global repairs and replacement of parts.
If you are using antifreeze from another manufacturer, it is recommended to study its characteristics. It must meet international quality standards.
How to check the fluid level and how much will be enough?
To determine how many liters of coolant are needed to fill the tank, carefully read the vehicle's owner's manual. You will need approximately 7.8 liters. Some car owners prefer to fill a little less - 6 liters.
You can check the antifreeze level in the tank even on a cold engine. To do this, lift the hood lid. You will see a tank. There are two marks on it with a maximum and a minimum value. The fluid level must be within these marks.
How to expel air, with method No. 2
- Warm up the engine until pressure builds up in the engine cooling system.
- Stop the engine and remove the hose from the throttle body heating. We do not open the expansion tank cap.
- As soon as antifreeze runs out of the hose, quickly put it back on and tighten it with a clamp.
Attention! Antifreeze can be very hot, be careful.
Operating temperature of the Lada Priora engine 8 and 16 valves characteristics
A car engine is equipped with a cooling system that contains liquid. The temperature of this liquid is measured by a sensor. This value that it records is the engine operating temperature (ERT). The data recorded by the sensor is displayed on the dashboard. The average operating temperature of a Priora car engine is 95 degrees. This indicator is optimal when the car is moving at a speed of approximately 70-80 km/h and provided that the ambient temperature is not higher than +20 degrees. When the liquid heats up to 100 degrees, the fan turns on, which is designed for additional cooling. With such indicators, it is time to say that the power plant of the machine is functioning without failures. In winter and summer, the RTD may be different. Which RTD is considered optimal for this car? The average is 85-90 degrees.
If the fan does not turn on
If the RTD has risen to 100 degrees and the indicator needle has entered the red part of the scale, this indicates overheating. Perhaps this phenomenon occurred due to the fact that the fan did not work. If you find that when it overheats, the fan does not start working and the temperature does not drop, you need to check the serviceability of the fan itself. It is necessary to determine whether the switch-on sensor is triggered when the normal RTD is exceeded? First, start the engine and disconnect the wires from the temperature sensor that is installed on the engine. When the wires are disconnected, forced cooling should work. If this does not happen, most likely the fault lies in the electric motor of the device. How to check the operation of the fan, watch the video.
If the fan turns on after disconnecting the wires, it means there is a problem with the fan switch sensor. Perhaps it incorrectly perceives data about the RTD and therefore does not operate at the right time.
This malfunction is quite easy to fix: you just need to replace the sensor. After replacing it, check if the fan turns on. To do this, start the engine. When the RTD reaches normal levels, do not turn off the engine until the temperature exceeds the norm. As soon as this happens, the fan should be activated. If the fan operates at a temperature above 97 degrees, but less than 100 degrees, then the system is functioning properly.
Temperature sensor malfunction
The reason that the liquid in the cooling system, which serves as an air conditioner for the car's power plant, does not heat up or overheats is due to the failure of the temperature sensor.
Often signs of such a malfunction are:
- Stopping the flow of warm air into the car interior, which occurs due to the cessation of fluid flow into the heater.
- Dark, almost black smoke comes out of the exhaust pipe. This indicates engine detonation, which was a result of overheating.
- Engine power drops sharply.
Many drivers quickly stop the car when it overheats and turn off the engine. In fact, an immediate stop of the machine is required only if the tightness of the system is broken and liquid pours out of it. In other situations, the driver must perform the following actions:
- turn on the heating to maximum so that the fluid temperature drops and the engine cools down quickly;
- drive smoothly to the side of the road;
- Let the engine idle for 2-3 minutes with the heating system on.
After this, the engine must be turned off and allowed to cool for 20 minutes. After this, you need to measure the fluid level in the cooling system and add it if necessary. Immediately after the engine is turned off, you cannot open the radiator cap, as you can get burned from contact with the liquid. If the fluid level is normal, then the cause of overheating must be determined by diagnostics. To do this you will have to visit a car service center.
Device and features
The cooling system of the Priora internal combustion engine has a standard set of main components:
- radiator;
- thermostat;
- electric fan;
- water pump;
- heater;
- engine jacket;
- connecting hoses;
- expansion tank.
By circulating through the large and small circuits, the coolant prevents the engine from overheating, maintaining the desired temperature. Structurally, the cooling system of the Priora is simple and no different from other internal combustion engines with an injector, with the exception of small parts.
Radiator and forced cooling fan
They mainly serve to bring the working fluid to the optimal temperature for the functioning of the engine (the operating temperature of the Priora engine with 16 valves is 90–95 degrees). The predecessor of the Priora VAZ 2110 often installed a cooler made of copper alloys, but due to cheaper prices, designers switched to aluminum analogues.
The operation of the fan depends on the engine control unit.
It receives information from the DTOZH (this is a sensor that reads temperature readings) located in the water jacket of the power unit. If the permissible temperature values are exceeded, the control unit connects an electric fan to improve cooling efficiency. A faulty fan or clogged radiator can lead to a constant increase in optimal engine temperatures, which shortens the service life and can cause costly repairs.
Thermostat
Its task is to promptly open coolant access to a large circle of the engine cooling system (engine cooling system) after the engine reaches the optimal temperature. In simple terms, the thermostat allows you to quickly warm up the engine and regulates the operation of the entire system. During warming up, the thermostat valve is in the closed position, antifreeze does not flow through the large circuit (the radiator is not activated). As it warms up, the valve opens slightly under the influence of rising temperature, and antifreeze begins to move through the radiator along a larger circuit.
A thermostat malfunction can result in overheating of the power unit (if the valve is stuck closed) or, conversely, the operating temperature rises very slowly (when the valve is stuck in the open position). Overheating is much more dangerous. Beginners can identify this malfunction if the engine heats up all the time and the fan on the Priora is constantly running.
Pump (water pump) and heater
Without the first part, the coolant circulation circuit in the system is impossible. If the water pump is faulty, at best there will be a coolant leak from the system. In the worst case, the pump may jam, which will lead to a broken timing belt and subsequent problems, the solution of which will result in expensive repairs.
The heater, or simply the stove, consists of a radiator, pipes and a fan. Can additionally cool the antifreeze in the system. An indispensable unit in winter. Provides the interior with warm air.
Connecting elements and expansion tank
It serves as a receiving compartment where gases and vapors are discharged when the coolant is heated. Also, the expansion tank is the level for the entire cooling system. One of the main elements in the tank is the valve cover through which air is forced out. There is antifreeze, it begins to boil when the engine temperature rises critically.
The connecting hoses serve as a pipeline for the circulation of coolant and connecting elements of all structural units, thus creating a single looped and sealed circuit.
The design of the cooling system also includes an engine temperature sensor on the Priora and an engine jacket. The sensor constantly reads information about the current antifreeze temperature and transmits it to the ECU. The location of the power plant jacket is structurally assumed in the cylinder block housing; it serves to remove heat through the coolant.
Preparatory stage
Before you start, you should do the following:
- choose and buy a suitable cooler;
- stock up on a new cover mount in case the old one is damaged;
- take the wrench;
- find a container where you will send the waste liquid;
- buy rags.
Algorithm of actions
To replace antifreeze in Priora, follow the instructions:
- Send the car to a garage with plenty of free space to work on. Cool down the engine. All actions must be performed on a cold engine system.
- Get rid of high blood pressure. Open the cap of the reservoir containing the antifreeze. If the engine is hot, fluid may splash out. Use a cloth and gloves for protection.
- Remove the protection that is installed on the propulsion system. Unscrew the bolts on the mount. The latches do not need to be removed. They will not interfere with the process.
- If a transmission with cables is installed, it must be removed. To do this, disconnect power from the battery. Remove the protective coating with a wrench.
- Now you need to drain the entire volume of liquid. To do this, unscrew the fixing cap. Place a container below where the waste material will be drained. Wait until all the refrigerant has left the tank. Assess the condition of the latch. If signs of wear are noticeable, replacement is recommended.
- If there are any cloudy traces in the coolant, it is recommended to flush all the channels in the car. To do this, add purified water. Add citric acid or vinegar to remove any remaining dirt. Flush the system until the water runs clear. Only after this can you fill the coolant into the tank.
- Assess the condition of the hoses. If they are worn out, replace them.
- Using a hose, pour new fluid into the container. Avoid high internal pressure.
- Refrigerant is added until the tank is filled to the optimum level.
- All disassembled parts are reassembled in reverse order.
- Start the engine and take it for a test drive. After this, check if all systems are normal.
How to replace a stove radiator yourself without an air conditioner
What will be needed for replacement? First of all, the following tools:
- Screwdrivers, figured and flat.
- Wrenches for 8 and 10. (preferably heads with a wrench.)
- Thin pliers for removing clamps.
And, of course, some materials and devices:
- Container for coolant from the system.
- New radiator.
- Foam rubber adhesive strips for the radiator of the Priora stove.
- 2 liters of coolant. (same brand as in the system.)
- Rags.
Having prepared such an arsenal, you can begin this interesting operation of replacing the heat exchanger.
Process description
Place the car level. This is necessary to completely drain the coolant from the radiator of the Priora stove. Place a container for liquid under the bottom of the car. It must be installed in the area of the radiator drain hole of the cooling system. On the right side (along the direction of the car, or on the left, if you stand near the hood). Next you need:
- Unscrew the screw cap and allow the liquid to drain. When the pressure weakens, open the cap of the expansion tank. Wait for the drain to drain and tighten the plug. Disconnect the negative battery terminal. You can begin dismantling the protection. It's called frill.
- First, the windshield wipers are removed. Using a 13mm wrench, unscrew the fastening nuts and remove the brush holders. After this, remove the rubber seal.
- Unscrew the fastening screws. There are 6 of them on top and 7 along the bottom edge. Now remove both halves of the plastic frill. After unscrewing the fasteners, remove the fabric protection of the glass niche in which the stove is installed.
Now comes the most crucial moment. Most craftsmen, when replacing this part, immediately disconnect the pipes going to the radiator of the Priora stove. However, there is a risk of dousing the heater parts with coolant. There is a more interesting and safer option.
Removing the stove
Now that the frill and protection have been removed, access to the heater is completely open. First of all, you need to disconnect the electrical connectors:
- Micromotor gearbox for damper drive. 2 connectors.
- Electric fan. 1 connector.
- Resistor. 1 connector.
Now unscrew the fastening of the heater body to the car body. One 10mm nut secures the eye on the stove body to the right wing. 8 secures the top to the stud at the top. And two nuts at the bottom.
Once the fasteners are removed, the fun begins. Using a flat screwdriver, remove the 3 screws securing the radiator to the body
You need to act carefully so as not to break off the side, thin pressure relief pipe. After that, remove the screws holding the 2 parts of the heater housing. Move the left part with the fan motor a little to the left, disconnecting them, and pull it out
Move the left part with the fan motor a little to the left, disconnecting them, and pull it out.
After this, you can begin to remove the second half with the radiator. Hold the pipes with your hand and begin to remove the body to the left. When it comes off, set it aside. After releasing the clamps from the pipes, remove them from the radiator.
Necessarily! Place a rag under the radiator, as there is always some liquid left and you should not pour it on the engine compartment.
Installation (replacement) of a new radiator
There are two options here. You can simply replace it by putting the part in place of the old one, before installing the housing. But it is better to install the radiator in the removed half before attaching the pipes.
Important! Be sure to cover the radiator with foam tape! This creates a safety cushion for the part. Having decorated the heat exchanger of the stove with foam, install it in the niche of the housing and secure it with screws. Place the half in place and secure all 3 pipes in place
Tighten the clamps
Place the half in place and secure all 3 pipes in place. Tighten the clamps
Having decorated the heat exchanger of the stove with foam, install it in the niche of the housing and secure it with screws. Place the half in place and secure all 3 pipes in place. Tighten the clamps.
Carefully reassemble the heater in reverse order. Add coolant to normal level. Start the engine and wait for the cooling fan to operate. Press the accelerator pedal and hold the speed at about 2,000 rpm for a couple of minutes. This is necessary to eliminate a possible air lock. Turn on the heater and check its operation in all modes. All! Well, the necessary work has been done.
Video on the topic of replacing the heater radiator on a Priora without air conditioning.
- Removing the CV joint
- How to determine a CV joint failure
- Computer diagnostics of the Priora heater control unit
- How to fix the stove in a Lada Priora car
Description
A complete set of pipes for the 21126 Priora engine solves the problem of selecting and finding the necessary pipes for replacement.
Material: reinforced rubber (2-layer).
Size: wall thickness 4 mm.
Advantages: reliability and aesthetic appearance.
1.2170-1303025-10A-sport = Radiator inlet pipe = 1 piece;
2.2112-1014056A-sport = Breather pipe = 1 piece;
3.2170-1303010-10A-sport = Radiator outlet pipe = 1 piece;
4.2112-1148035A-sport = Air filter pipe = 1 piece;
5.2112-1014058A-sport = Breather pipe (analogue 21124) = 1 piece;
6.2170-1303080A-sport = Expansion tank pipe = 1 piece;
7.2170-8101200A-sport = Heater supply pipe = 1 piece;
8.2170-8101208A-sport = Heater outlet pipe = 1 piece;
9.2112-1008658A-sport = Red plate bushing = 4 pcs
You can pay for your purchase in any convenient way:
- VISA, MasterCard (no commission)
- Receipt for payment
- Sberbank Online
We deliver goods throughout Russia and Kazakhstan
We can send your purchase to you by transport company:
Lower breather hose for VAZ 2110-2112, Lada Priora, Kalina, Granta
Blue silicone radiator pipes for Lada Priora
Red reinforced rubber radiator pipes for Lada Priora
Blue silicone hose 1 meter diameter 20 mm
Heater pipes reinforced rubber red for Lada Priora
Blue silicone heater pipes for Lada Priora
Blue silicone hose 1 meter diameter 8 mm
Thermostat pipe injector corner for VAZ 2108-21099, 2110-2112, 2113-2115, Priora
Filling pipe for the cooling system of the expansion tank on Lada Priora
Air intake of OAT air filter for Lada Priora
Small outlet pipe for the heater in the passenger compartment on Lada Priora
Lower radiator outlet hose (pipe) for 16 cells VAZ 2110-2112, Lada Priora
Heater supply pipe (to the engine compartment, long) on Lada Priora
Cold air intake pipe for Lada Priora with air conditioning
Water pump supply pipe for VAZ 2110-2115, Lada Priora, Vesta, X-Ray
Upper radiator hose (pipe) supplying 16 cells VAZ 2110-2112, Lada Priora
Lower radiator outlet pipe for Lada Priora with air conditioning
Upper radiator supply pipe for Lada Priora with air conditioning
Upper crankcase exhaust ventilation hose (pipe) Forward Automatic spare part for VAZ 2110-2112, Lada Priora sedan
Set of engine pipes silicone blue cs20 profi for Lada Priora
Expansion tank hose to thermostat Forward Auto spare part for Lada Priora sedan
Radiator pipes for Lada Priora
Pneumatic drive system hose (long) for Lada Priora, Kalina 2, Granta, Vesta
Lower crankcase ventilation hose a-sport for Lada Priora, Kalina 2, Granta, Vesta
Set of heater pipes for Lada Priora
Water pump supply pipe for Lada Kalina, Priora sedan, Granta sedan, Vesta, X-Ray, Datsun
Breather pipe (hose) Forward Auto spare part for VAZ 2110, Lada Priora sedan
Lower radiator outlet hose (pipe) Forward Auto spare part for Lada Priora
Radiator upper supply pipe Forward Auto spare part for Lada Priora
The internal structure of a car is a very complex combination of functions and devices, the functionality of which is ensured by various systems. One of these is the cooling system (SOD), which regulates the temperature both under the hood and inside the car during hot periods.
And, of course, over time or when overloaded, some parts of this system fail, leading to serious consequences, and this is partly true for everyone’s favorite Lada Priora. Therefore, if you notice poor performance of the stove or overheating of the engine, the first thing you need to do is check the ODS.
Often the problem lies in the hoses or pipes of the system, which could “come off” or become leaky. This is not the worst problem, which can be solved by simply purchasing new (ideally silicone) parts and installing them. It is these hoses and pipes, as well as those made of reinforced rubber, that you will find on this page of our store and can be purchased with the necessary help from our consultants.
SOD components
The cooling system includes many different parts that are responsible for the correct operation of the system. To understand the purpose of these parts, you need to take a closer look at them.
Cooling radiator
This part is designed to cool antifreeze while the car is moving. As coolant circulates through the radiator it cools and therefore cools the engine block. Inside, the radiator consists of many tubes connected to each other by a snake.
Possible breakdowns:
- Antifreeze leaking from radiator joints;
- Radiator clogged with oxidation products;
Water pump (Pump)
The pump is a pump that circulates liquid through the cooling system. Circulation is ensured by the pump impeller based on the principle of centrifugal force. The pump rotates using the crankshaft through the timing belt.
Possible breakdowns:
- Coolant leaks through the oil seal;
- Wear of ball bearings;
- Impeller failure;
Thermostat
The thermostat is one of the main elements of the Priora engine cooling system. Inside the thermostat housing there is a valve with a thermoelement, which is responsible for opening and closing a large circle. When the coolant is heated to a temperature of 85⁰C, the thermostat valve opens and the liquid begins to pass through the cooling radiator, thereby cooling down and preventing the engine from overheating.
Possible breakdowns:
- Valve jamming in one of the positions;
Expansion tank
The expansion tank is designed to compensate for the expansion of the liquid during heating, as well as the contraction during cooling. It is for these reasons that the amount of liquid in the tank is at an average level.
Possible breakdowns:
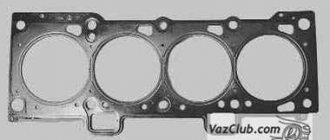
- Tank rupture due to a breakdown of the cylinder head gasket;
- Cracks in the tank due to old age;
Expansion tank cap
The main task of the tank cap is not only to close the opening of the coolant tank, but also to relieve excess pressure in the system. It is in the lid that a valve is installed that operates in two positions: pressure release and vacuum release (vacuum). If there were no valve, the pressure in the system would inflate the hoses and rupture the expansion tanks.
Possible breakdowns:
- Valve jamming;
- Loss of tightness;
Cooling Fan
Designed to cool the engine in a traffic jam or when the car is stationary. As you know, the radiator effectively cools the car when there is a headwind, that is, when driving. When stuck in a traffic jam, the cooling of the car is reduced to zero, so a fan is used as an artificial wind, which turns on at a certain temperature and cools the liquid.
Possible breakdowns:
- Fan motor malfunction;
Heater radiator
The heater radiator and the cooling radiator have a similar design, but differ in size and purpose. The purpose of the heater radiator is to heat the vehicle interior. It is installed in the stove body in the engine compartment and has two input and output fittings.
Possible breakdowns:
Pipes
The pipes are responsible for the circulation of fluid from one part to another throughout the system. They are made of rubber that is resistant to temperature loads; inside each pipe there is a reinforced thread that does not allow the pipe to swell due to pressure in the system.
Possible breakdowns:
- Cracks;
- Drying of rubber over time;
Source
Engine operating temperature
We have learned the resource, now we move on to another important indicator. The optimal operating temperature is 90-95°C
After 97°C, engine number 126 with 16 valves will “slow down” a little, but according to the rules, temperatures up to 100°C are considered normal. If the Lada unit is operated with this indicator, then you need to be sure that the radiator fan is running at this time. When you see an indicator below +90°C on the dashboard, you need to assume that this is underheating. Of course, in cold weather the power plant needs more time for the temperature to reach normal levels.
Remember:
- Operating temperature – 90-95°C.
- Normal temperature (engine runs worse) is 97-110°C.
- Reduced temperature – 90°C and below.
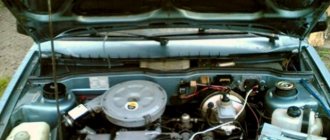
Priora engine compartment photo
The small class car VAZ-2170 Lada Priora with a four-door sedan body (class C according to the international classification) is designed for operation at ambient temperatures from -40 to +50 °C on public roads with hard surfaces.
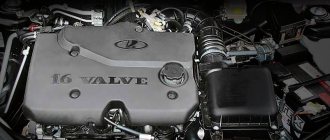
The Lada Priora is equipped with an injection 16-valve engine mod. located across the engine compartment. VAZ-21126-00 with a working volume of 1.6 liters. The engine is equipped with a distributed fuel injection system and an exhaust gas catalytic converter, structurally made in a single block with the exhaust manifold (catcollector).
The body is load-bearing, all-metal, of welded construction, with hinged doors, front fenders, hood and trunk lid.
The driver's seat of the Lada Priora is equipped as standard with an airbag, and in an optional version - with a front passenger airbag, as well as front seat belts with pretensioners and load limiters, which significantly reduces the likelihood and severity of head and chest injuries in a traffic accident.
The airbag only deploys when there is a strong impact to the front of the vehicle. In minor frontal impacts, vehicle rollovers, rear or side impacts, seat belts are the primary means of protection.
The transmission is made according to a front-wheel drive design with drive wheels of different lengths.
The front suspension is independent, spring, with anti-roll bar, with hydraulic shock absorber struts. The rear suspension is semi-independent, lever-spring, with hydraulic shock absorbers.
The front wheel brakes are disc brakes with a floating caliper, the rear wheels are drum brakes.
In a variant version, Lada Priora cars are equipped with an anti-lock brake system, which prevents wheel locking during braking and maintains controllability and directional stability.
The steering is injury-proof, with a rack-and-pinion steering mechanism, with an electromechanical booster that changes the transmitted torque depending on the speed of the vehicle.
Lada Priora cars are equipped with a remote control system for locking or unlocking door locks (in an optional version and locking the trunk lid lock) with simultaneous activation or deactivation of the vehicle security mode. In addition, remote activation of the alarm system in case of violation of vehicle security zones and blocking of all doors by pressing a button from inside the vehicle are provided.
This system also includes an electronic engine locking system (immobilizer), which provides additional protection against unauthorized engine starting.
The overall dimensions of the car are shown in Fig. 1.4, technical characteristics are given in table.
Elements of the engine compartment of the VAZ-2170 Lada Priora are shown in Fig. 1.5, the location of the main components and assemblies is shown in Fig. 1.6 and 1.7.
Figure 1.4. Overall dimensions of the Lada Priora car (mm)
Figure 1.5. Engine compartment of the car:
1 - engine; 2, 14 — power unit supports; 3 — steering mechanism; 4 - throttle assembly; 5 — reservoir of the main brake cylinder; 6 — expansion tank of the engine cooling system; 7 — main fuse block; 8 — washer reservoir; 9 - battery; 10 — air filter; 11 — mass air flow sensor; 12 - alarm signal; 13 - generator; 15 — hood stop
Figure 1.3. Location of the main components of the vehicle components (bottom front view, engine splash guard removed): 1, 3, 13 — power unit supports; 2 - generator; 4 — radiator of the engine cooling system; 5 — electric fan of the engine cooling system; 6 - starter; 7 — cross member of the front suspension; 8 — front suspension extension bracket; 9 — front suspension stretch; 10 — shock absorber strut of the front suspension; 11 — stabilizer strut; 12 — left front wheel drive; 14 — gearbox; 15 — exhaust pipe of an additional muffler; 16 — engine oil sump; 17 — catalytic collector; 18 — right front wheel drive; 19 — anti-roll bar; 20 — front suspension arm; 21 — front wheel brake mechanism
Benefits of modernization
Replacing a standard thermostat with a device from Lada Granta does not take much time and can be done on your own without contacting a service center. Modernization has a number of advantages:
- The power unit warms up faster.
- The car interior begins to warm up when the temperature reaches 50 degrees.
- After 70 degrees, hot air flow begins.
- The engine does not overheat at idle.
- The problem of depressurization of the cooling system completely disappears.
Now the heating radiator does not depend on the pressure of the water pump and the opening of the bypass valve. The circulation of antifreeze in a small circle occurs consistently, without the influence of temperature and pressure.