Every modern car must have a cooling system.
Buying a car becomes one of the most cherished desires for many; many take years to achieve their goal, others cope with it much faster. This process depends on how well your requests match the available capabilities. So, for example, if, with a very impressive income, you intend to purchase a used car from a domestic manufacturer, then no special difficulties should arise in solving the tasks at hand.
It’s another matter when a person with an average income dreams of purchasing some foreign, rare car. Here you will have to try much harder and some will even need to draw up a business plan that will allow you to optimally approach the process of implementing your plan. However, even when you are close to your goal, there are some obstacles that prevent you from enjoying your achievement. One of the most common such obstacles is problems with the vehicle equipment. Moreover, this applies not only to those models that are purchased second-hand, but also to cars from showrooms.
Some technical data sheets do not reflect everything necessary for the correct choice of car, so some buyers consider themselves to be somewhat deceived. So, for example, some people don’t have enough spare parts, or the company refuses to fix some problems during the current warranty. All this forces the driver to cope with the current situation on his own. For some, this can be done very easily, while others (for a variety of reasons) must undergo several trainings and master classes in advance on correcting errors in the operation of the mechanism or improving a particular system.
Installing a car air conditioner
For a professional, installing an air conditioner in a car, although it does not pose a serious technical problem, still takes some time.
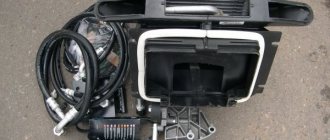
In addition, the complexity of the work depends on whether the device is original, additional or universal. Installing a car air conditioner usually requires disassembling the front part of the car, the instrument panel, in some cases, the seats, and the roof trim. The installed equipment includes a compressor, evaporator, condenser, and fans for additional airflow. Drainage and electrical wiring for the car air conditioner are also installed.
Lada Vesta instruction manual
After purchasing a car, before operating it, it is recommended to study the manual (popularly “Murzilka”) provided by the manufacturer. In the presented instructions you can find a lot of useful information that will give a complete picture of the car.
For any vehicle configuration, AVTOVAZ provides a book “operating manual for the Lada Vesta car and its modifications,” which consists of 116 pages. Content:
GETTING TO KNOW THE CAR
- Car keys
- Remote control system
- Electronic engine immobilizer system (immobilizer)
- Locking and unlocking doors manually
- Light switch
- Wiper switch
- Pedal area
- SEATS
- Front seats
- Headrests
- Rear seats
- PASSIVE SAFETY SYSTEM
- Seat belts
- Airbags
- Installation of child restraints
- Dashboard
- Controls and instruments
- Display and indicators
- On-board computer
- Steering wheel
- Rear view mirrors
- Fuel tank
- Basics of safe car operation
- Operating a new car
- Preparing the car for movement
- Starting the engine
- Car driving
- Traffic in winter
- Driving in mountainous areas
- Braking and parking
- Parking brake
- Driving correction and assistance system
- Electronic Stability Control
- Cruise control and speed limiter system
- Safe parking system
- Features of operation and operation of SBP
- Rear View Camera
- HEATING, VENTILATION AND AIR CONDITIONING. CLIMATE SYSTEM CONTROL
- Climate system "Classic" without air conditioning
- Climate system "Comfort" (with air conditioning, with manual control)
- Climate system “Lux” (with air conditioning, with automatic climate control)
- INTERIOR LIGHTING
- Emergency call system
- Socket for connecting additional electrical equipment
- Cigarette lighter
- RADIO RECEIVER AND SOUND FILE PLAYER AND MULTIMEDIA NAVIGATION EQUIPMENT
- Short description
- Multimedia navigation equipment
CAR CARE
- Hood
- Engine lubrication system
- TRANSMISSION
- Manual Transmission
- Instructions for using an automated transmission (AMT)
- Automated transmission
- Gear shift lever of an automated transmission
- ENGINE COOLING SYSTEM
- BRAKE SYSTEM
- Fluid level in the windshield and rear window washer reservoir
- Accumulator battery
- Replacing the remote control battery
- Replacing lamps
- Block lights
- Tail lights
- Rear fog light
- Side turn signal in the rear view mirror
- Additional brake signal
- License plate light
- Anti-fog headlight
- Tires and wheels
- Replacing wheels
- Towing a car
- Load securing net
- Towbar
- Body
- Car storage
VEHICLE SPECIFICATIONS
- Vehicle identification plate
- General technical characteristics of the car
Multimedia system:
Vehicle Operation Manual:
Let us remind you that more detailed instructions and recommendations for operating the Lada Vesta car can be found in this category.
Source
Air conditioner installation steps
When installing air conditioners, it is necessary to dismantle the front part of the car and disassemble the interior, sometimes including the ceiling. This requires special skills and knowledge of the design features of a specific machine model. In this case, standard actions are carried out:
- after preparing the site for the cooling system, a compressor is installed;
- then an evaporator, a condenser and a fan are installed to blow the interior;
- At the last stage, before assembling the disassembled car parts, drainage and electrical wiring are installed.
Examples of our work
How much does it cost to install air conditioning on a LADA car?
Not all LADA vehicle configurations are equipped with air conditioning. It often happens that a car without an air conditioner is operated in the south, so the owners of these regions often wonder whether it is possible to modify the design and install an air conditioner on the LADA with their own hands. We decided to find out how much such retrofitting would cost.
Article on the topic: Oriflame eyelash strengthening conditioner how to use
Review of the Lada Vesta St operating manual
The manual begins with getting to know the car. The first part of the book is called that. It describes in as much detail as possible about all kinds of functions, adjustments, instrument panel indicators, key assignments, etc.
The buyer is first offered an overview of the car, such as information about the car's keys, control of the original alarm system, location of the pedal assembly, and turning the warning lights on and off.
This chapter describes in great detail about car seats - how to adjust them, how to properly use seat belts and install a child seat.
The cheapest way to install an air conditioner
Want to save money? Buy the necessary air conditioning components for your car model at a disassembly site, and do the installation and connection yourself. Reserve plenty of time, look for standard connection diagrams, instructions for disassembling the car and installing an air conditioner (pay attention to the Technological Instructions, which can be downloaded on our website).
1.
An example of self-installation of an air conditioner on a Lada Vesta from Denis21reg:
- I had to do the wiring myself.
- There is no need to flash anything.
- Installation time: 3 days.
- The price of the air conditioner upon disassembly is 29,000 rubles.
2.
An example of self-installation of an air conditioner on a Lada Granta from kuul:
- The price of the air conditioner upon disassembly is 18,430 rubles.
Total: from 18,430 rubles
What didn't customers like?
The main complaint against the developers is that cheap plastic was used to complete the machine. And this is noted by everyone, even those who were generally satisfied with Lada. An unpleasant synthetic smell in the cabin is a consequence of this deficiency. And the car has very poor sound insulation. The driver and passengers of the Lada must have strong nerves in order to calmly endure the terrible street noise that they will hear inside the car.
The front windows of the Lada Granta with air conditioning do not go all the way down, and this is not always convenient.
The lack of a sensor that measures the engine temperature also hinders. After some time, noises appear in the gearbox. Other little things bother people to varying degrees. But more often than not, these dissatisfactions are more like minor quibbles. And if you handle the machine correctly and carefully, you can avoid many breakdowns. There are many examples of how this machine serves its owners well. The service life that people indicate in their reviews speaks for itself. For example, one buyer wrote that his driving experience with this car was 4 years of active use.
There are more positive reviews on the Internet about the Lada Granta liftback car than negative ones. This does not indicate the ideal quality of the car, but it still makes you think about buying it. For the price category to which this Lada car model belongs, the quality is quite decent.
But in any case, everyone decides for themselves whether to buy a Lada or save up for a more expensive car.
As a rule, all Lada Granta cars are equipped with compression air conditioners. We will try to consider their design, possible malfunctions and methods for checking their effectiveness in this article.
Popular way to install an air conditioner
Most often, car owners decide to buy an air conditioning installation kit, which includes everything necessary. Manufacturers of air conditioners for LADA are: August air conditioning plant, Frost LLC, etc.
Required
:
- buy a car air conditioning kit (from 30,000 rubles);
- service for installing an air conditioner at a service station (from 8,000 to 20,000 rubles, depending on the service station) or install it yourself (installation example on a Lada 4×4).
Total: 30,000 rubles
(for self-installation) or
38,000 - 50,000 rubles
(turnkey).
Which option for installing a car air conditioner would you choose?
Air conditioning FROST for VAZ 2113, 2114, 2115
what do we have? Send us a link, we will take a look and offer the same, and possibly lower, price.
Enter your number
and we will call you back:
The climate system is a combination of a heater and air conditioner that have a common air distribution and intake system with a unified control and is designed to maintain a comfortable temperature at any time of the year in the range of up to +40°C and +50°C in a tropical version.
Cooling is carried out by means of freon refrigeration equipment (air conditioner), built into the vehicle heating system (climate system heater) and connected to the vehicle components and parts by mounting and electrical elements (installation kit).
The heater can be either standard or original. The climate system operates in three main modes: cooling, heating, air drying.
The latter mode provides for the operation of the air conditioner and heater simultaneously and allows, at high humidity in cool weather (0°C...+10°C), to get rid of fogging of the windows, while maintaining the set temperature in the cabin.
When operating in maximum load mode, the air conditioner provides a decrease in the temperature in the cabin by 5°C...12°C relative to the outside air temperature, depending on the intensity of solar radiation, air humidity and the number of people in the cabin.
The air conditioner is a freon refrigeration machine driven by a car engine.
from a car engine
Mechanical power consumption, kW
(at compressor rotation speed 3000 rpm)
Article on the topic: How long does it take for an air conditioner to break down?
| Name | Designation | Image |
| Compressor 5N11 | FROST-8110010-10 | |
| Condenser assembly with fan and receiver | 2115F-8112010-40 | |
| Evaporator block assembly | 2115F-8116008-10 | |
| Tension roller | 2112-1006120 | |
| Compressor bracket | 2115F-8111501-01 | |
| High pressure pipe No. 1 | 2347F-8120171-40 | |
| High pressure pipe No. 2 with pressure sensor | 2347F-8120172-40 FROST-8127312 | |
| High pressure pipe No. 3 | 2347F-8120173-40 | |
| Discharge pipeline | 2115F-8120310-01 | |
| Low pressure pipeline | 2115F-8120020-40 | |
| Wiring harness with button and thermostat assembly | 2115F-8127300 FROST-8127102 2114-3710010 | |
| Tensioner pulley mounting bracket | 2115F-1041084-11 | |
| Air conditioner hardware kit | 2115F-M40 | |
| Generator bracket | 2115F-1041034 | |
| Air conditioner passport | 2115F | |
| Belt 4PK1135 | FROST-401135 |
Attention! Prepayment is required for this product
Filter
Before using climate control in your car in winter, carefully read the car's operating instructions. In it you will probably find recommendations for replacing the cabin filter. This air purification element plays a very important role for the operation of the air conditioning system. If the filter is clogged with dust, then heating and drying will be ineffective - the windows will fog up, and the interior will heat up more slowly. Manufacturers offer three options for filter elements:
- paper - the easiest and cheapest cleaning method;
- coal - act much more efficiently;
- antibacterial - prevent the proliferation of pathogenic organisms in the air ducts of the car's air conditioning system.
It is recommended to replace the cabin filter twice a year. In some cases, the procedure will have to be performed more often - for example, when driving on dirt roads.
1200 rub. for the photo report
We pay for photo reports on car repairs. Earnings from 10,000 rubles/month.
The climate control system in the car provides comfort and convenience for the driver and passengers. Its main difference from an air conditioner is that it constantly maintains the specified climatic conditions. The system can be single- or multi-zone. Due to its complexity during operation, car owners may have a number of questions, in particular: “How to use the climate control? What to do if the climate control does not turn on ? How to clean climate control ? We will try to talk about this and much more in detail.
How does a car air conditioner work?
Almost all modern air conditioners use freon as a refrigerant. The principle of operation of an air conditioner is to ensure the circulation of refrigerant in a closed system. There is a heat exchanger located inside the car. Freon, passing through its honeycombs, takes away excess heat from this device.
Article on the topic: What is an air conditioner
At the same time, the air temperature in the cabin decreases (as does its humidity), and the liquid freon, leaving the heat exchanger, turns into a gaseous state and enters the ventilated radiator. There the refrigerant cools and becomes liquid again. Due to the pressure created by the compressor, freon is again supplied through the piping system to the heat exchanger, where it is heated again, taking heat and moisture from the passenger compartment.
Is it possible to install an air conditioner?
Yes, installing an air conditioner in a VAZ 2114 is possible. Currently, there are several companies specializing in the production of air conditioners for the “fourteenth” VAZ models. When installing these devices, the driver will not need to make any significant changes to the design of the car. Air is supplied to the cabin through standard ventilation openings. Therefore, there is no need to cut anything new on the dashboard or under it. Consequently, the car owner will not have any problems with the law.
Sauku device
The automatic climate control system (AUC) includes:
- SAUKU control panel;
- SAUKU controller;
- air flow distribution gearmotor (AIRD);
- air mixing damper gearmotor (MZVS);
- air recirculation damper gearmotor (ARRV);
- rotation speed controller (RFV);
- Evaporator temperature sensor (DTI);
- cabin air temperature sensor (CAT);
- outside air temperature sensor (ETNV).
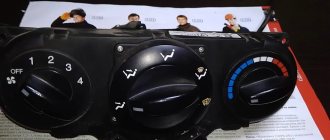
Figure 1-1 – Climate control panel: 1 – panel; 2 – air conditioner switch; 3 – recirculation switch; 6 – supply air temperature control handle; 7 – air flow control handle; 8 – air flow direction mode switch “On glass”;
The panel, Figure 1-1, of the ACS control panel is located in the instrument panel console.
The SAUKU controller is located behind the glove box on the instrument panel cross member bracket.
The SAUKU controller receives signals from the SAUKU, DTI, DTVS control panel, as well as information about the outside air temperature via the CAN bus.
The SAUKU controller uses the received signals when issuing a request to turn on the air conditioning compressor to the ECM controller and when controlling the system actuators: electric heater fan and air flow distribution gearmotors, air mixing damper, air recirculation damper.
The SAUKU controller issues a request to turn on the air conditioning compressor under the following conditions:
- outside air temperature not lower than 5 °C;
- evaporator temperature is above 5 °C;
- The electric heater fan is turned on.
The SAUKU controller turns off the air conditioning compressor when the evaporator temperature is below 0 °C to prevent the evaporator from freezing, which can damage the compressor.
About choosing a car air conditioner
We list the main parameters that the owner of a VAZ 2114 should focus on when choosing an air conditioner:
- operating voltage - 12 volts;
- temperature of the air supplied - from 7 to 18°C;
- power consumption - from 2 kilowatts;
- type of refrigerant used - R134a;
- lubricating fluid - SP15.
All of the above parameters correspond to air conditioners manufactured (model 2115F-8100046–41);
They are installed by almost all VAZ 2114 owners.
Installing air conditioners from other cars is extremely rare, since a lot of problems arise with them. In particular, the piping system in such an air conditioner may be either too short or too long. Therefore, it will have to either be built up with something or cut off.
Article on the topic: Refnets for air conditioners, what are they?
The fastening and sealing system of the “non-original” air conditioner will also have to be seriously modified, and it is far from certain that the modification will be successful and the resulting system will retain its tightness. New ventilation holes will likely have to be cut into the dashboard, which will inevitably raise questions when passing the next inspection. All these points make installing air conditioners from other cars impractical, especially if stores have ready-made solutions specifically for the VAZ 2114.
Version of Vesta before the latest upgrade in 2022
Until September 2022, none of the Lada Vesta trim levels received climate control, which is especially annoying for the luxury version. The comfortable atmosphere inside the cabin had to be maintained manually. In the basic classic model, this had to be done, armed only with the functions of heating and ventilation, and the comfort and luxury trim levels could already boast of the presence of an additional interior cooling system.
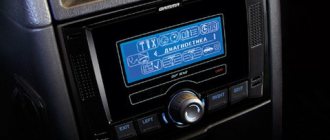
The power supply in Vesta is visually similar in both cases: an information display plus a block of control buttons with hint icons. The option with air conditioning is supplemented with only a few functions, which are reflected on the control panel. But in any case, the menu is quite simple and can be mastered in minutes even by a beginner.
The Lada Vesta air conditioner offers the following features.
- Adjusting the intensity of the supplied air.
- Air temperature adjustment.
- Selecting the area to be blown (face, legs, windshield or side windows, etc.), and with multiple selections, the information panel display displays this fact by illuminating the corresponding buttons.
- The bright backlight of the information display does its job perfectly and displays the enabled operating modes even on the brightest sunny day.
By adjusting the intensity of the airflow and the temperature of the supplied air, you can, in general, recreate “manual climate control”. However, the air conditioner could not solve all the needs in the Lada Vesta. Vesta's owners wanted a smarter approach.
There was no doubt that this idea would come to life. However, the release date of this addition remained unknown for a long time.
General rules for connecting an air conditioner
The connection diagram for the air conditioner to the on-board network may vary depending on the selected device model, so it is not possible to write out a single “recipe” for connection. You will have to check the device instructions for details. Nevertheless, there are several rules that are common to all air conditioners.
- The evaporator unit is always connected first. Power is supplied to it either from the cigarette lighter or from the ignition unit.
- There must be a fuse in the above section of the circuit (and in the case of “August” air conditioners, a relay included with the device is also installed there).
- The air conditioner “ground” is always connected directly to the car body.
- Next, a capacitor is connected to the network. A fuse is also required in this area.
- After this, the condenser and evaporator are connected to a button installed on the dashboard. By pressing it, the driver should hear the noise of the fans in the evaporator and condenser. If the fans are working, the circuit is assembled correctly.
Version of Vesta before the latest upgrade in 2022
Until September 2022, none of the Lada Vesta trim levels received climate control, which is especially annoying for the luxury version. The comfortable atmosphere inside the cabin had to be maintained manually. In the basic classic model, this had to be done, armed only with the functions of heating and ventilation, and the comfort and luxury trim levels could already boast of the presence of an additional interior cooling system.
The power supply in Vesta is visually similar in both cases: an information display plus a block of control buttons with hint icons. The option with air conditioning is supplemented with only a few functions, which are reflected on the control panel. But in any case, the menu is quite simple and can be mastered in minutes even by a beginner.
The Lada Vesta air conditioner offers the following features.
- Adjusting the intensity of the supplied air.
- Air temperature adjustment.
- Selecting the area to be blown (face, legs, windshield or side windows, etc.), and with multiple selections, the information panel display displays this fact by illuminating the corresponding buttons.
- The bright backlight of the information display does its job perfectly and displays the enabled operating modes even on the brightest sunny day.
You may be interested in: Comparison of colleagues in the segment: Lada Vesta or Kia Rio By adjusting the intensity of the airflow and the temperature of the supplied air, you can, in general, recreate “manual climate control”. However, the air conditioner could not solve all the needs in the Lada Vesta. Vesta's owners wanted a smarter approach.
About refilling the air conditioner
After installation, the air conditioner must be recharged. In addition, this device will have to be refilled at least once every 3 years, since up to 10% of freon can leave the system within a year, even if the circuit has never been depressurized. Freon R-134a is now used everywhere as a refrigerant.
And to pump it into the air conditioner you will need special equipment, for which you will have to go to a spare parts store.
And you need to buy the following there:
- set of couplings and adapters;
- hose kit;
- R-134a freon cylinder;
- pressure gauge
Refueling sequence
Let us list the main stages of pumping freon into the system.
- There is a plastic cap on the low pressure line in the air conditioner. It is carefully cleaned of dust and opened.
- The fitting located under the cap is connected to the hose on the cylinder using the adapter included in the kit.
- The car engine starts and idles. The crankshaft rotation speed should not exceed 1400 rpm.
- The air conditioner turns on maximum air circulation throughout the cabin.
- The freon cylinder is turned upside down, the tap on the low pressure adapter slowly opens.
- The filling process is constantly monitored using a pressure gauge.
- When cold air begins to flow into the car interior and the hose near the adapter begins to become covered with frost, the refueling procedure ends.
Video: refilling the air conditioner yourself
Lada Vesta has acquired a package of winter options
Igor Vladimirsky
Vesta’s range of trim levels now includes a new Comfort Winter position, that is, the most popular Comfort version (52% of sales) with an additional “winter package”. It does not involve fundamentally new options, but includes a set of equipment that was previously installed only on cars in the more expensive Luxe and Exclusive versions.
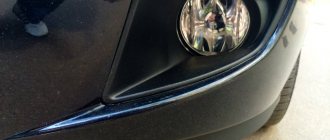
The Winter package includes electric heating of the windshield and steering wheel (the steering wheel itself is leather-wrapped), three-stage heated front seats (in the Comfort package it is single-stage), fog lights and 16-inch alloy wheels instead of “stampings”.
The surcharge for this kit for the “regular” sedan and station wagon is 36 thousand rubles, and for the Cross versions it is 21 thousand, because they have light-alloy wheels by default. A sedan with the Winter package costs at least 734 thousand rubles, for a station wagon they ask from 771 thousand, and Cross versions are estimated at 798 and 835 thousand rubles, respectively.
In addition, sedans in the Comfort Multimedia configuration with a touch screen instead of a conventional audio system now also have a leather-wrapped and heated steering wheel, although they are not entitled to other “winter” options. For such a Vesta they ask for a minimum of 742 thousand rubles, but this equipment is not offered for station wagons and Cross versions.
Source
About installing climate control
In short, installing climate control on the VAZ 2114 is for enthusiasts. Ordinary owners of “fourteenth” models do such things extremely rarely, limiting themselves to a simple air conditioner, the installation sequence of which is given above. The reason is simple: installing climate control on a car that is not the newest is not economically feasible.
To do this, you will need to purchase electronic heating system control units. One or two (depending on how many control zones are planned to be installed). Then they will need to be connected to the on-board network, which will require major changes to be made to it. Not every driver can do this task. Therefore, you will need a specialist whose services are very expensive. Taking all this into account, the owner of a VAZ 2114 should think: does he really need climate control?
So, it is quite possible to install an air conditioner on a VAZ 2114 on your own. All you need to do is buy a ready-made device at any auto parts store and carefully study the installation instructions. Difficulties can arise only at the stage of refilling the air conditioner. Therefore, you should only refill this device yourself as a last resort. If possible, it is better to entrust refueling to professionals with the appropriate equipment.
General questions about working with the Grant generator
Let's consider general questions: everything except replacement.
Tension check
There are two approaches: visual assessment and physical.
Visual assessment of condition:
- the car is on a flat surface, the gear is in neutral, the handbrake is off, the hood is open;
- We don’t start the car - we put it in 5th gear;
- We opened the hood and found a generator: we push the car back, resting against the bumper;
- We inspect the required part along its entire length: are there any breaks or cracks? It needs to be changed.
Poor quality will lead to unexpected problems on the way.
Physical assessment :
- if you have a tool that measures pressure force: press the belt with a force of 10 kg*s - the deflection should be no more than 10 mm;
- there is no special tool: we try to turn it across - it should turn no more than 90 degrees.
How to tighten the alternator belt on a Grant
This section applies only to machines with a tensioner. No - change the part or see above how to install it.
Subsequence:
- we use ring wrenches 8, 19;
- Throw key 19 onto the lead screw;
- wrench 8 for locknut;
- we touch;
- Now you can turn the lead screw: clockwise to loosen, counterclockwise to tighten;
- got the desired result - tighten the locknut.
It is better to take ring wrenches, since a head with a ratchet or a wrench will not work.
When to change: technical regulations for replacing a VAZ 2190 belt
AvtoVAZ requires checking the condition of this part every 15,000 kilometers .