Until 2008, Volkswagen Polo cars, regardless of body modification, had an old-style steering wheel installed. Without navigation equipment to control the audio system, standard display, and receive incoming calls.
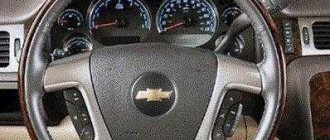
Starting from the fourth generation, including the restyled sedan, all modifications were equipped with a multifunction steering wheel. But there were some surprises here too. There was no innovation in the ComfortLine version, only for Beats and Highline.
The diameter of the standard Volkswagen Polo steering wheel is 39.0 cm. The dimensions of the multifunction steering wheel are similar.
Installation of the Polo Sedan multifunction steering wheel (Polo Sedan)
Attention! This is an informational article, results are not guaranteed. The Site administration is not responsible for your actions.
In general, so that people have fewer questions, I decided to make a report on installing the multifunction steering wheel. I would like to immediately apologize for using photos of other forum participants and say thank you to them, it’s just that when I performed this operation myself I was guided by this material. I’ll get ahead of myself and say that for ease of operation and not to get confused in the connection, it is better to use wires of 2 colors (one is the Lin bus, the other is 12V power supply)
For installation we will need: - the multifunction steering wheel itself; — wire 000 979 009 E (2 pcs.), or the pins themselves N 907 647 01 (3 pcs.) (the pins will have to be crimped/soldered to the wire yourself, but it will be much cheaper) These wires/pins are used to connect the line bus to the block comfort and to the connector of the steering column switches; — wire 000 979 135 E (1 pc.), or pin N 907 326 03 (1 pc.). Fuse 3A. (this item is needed if you take power from the fuse block. I did exactly that.) - as well as the diagram.
Multifunction steering wheel diagram.jpg [ 265.76 KB | ]
1. Connecting wires to the connector of the steering column switches.
First you need to remove the terminal from the battery (it is enough to remove the negative one):
Next, turn the steering wheel 90°:
There are airbag mounting latches behind the steering wheel:
We insert a flat-head screwdriver (not very small so as not to break it) into the recess and, moving upward, unclip the pillow mount. If the pillow does not snap off on its own, you need to pull its edge while working with a screwdriver:
Then we turn the steering wheel 180° and do the same with the second airbag mount.
Next, remove the pillow and unfasten its connector (yellow) from the spiral cable:
Then unscrew the nut securing the steering wheel (for this you need to use a 12-sided star, size 12):
Having unscrewed the nut, we see that for the correct alignment of the steering wheel and steering shaft, there are special marks on them. We need to pay attention to this when we install the new steering wheel:
To prevent the spiral cable from spinning, you can secure it with electrical tape:
Further. Unfasten part of the steering column cover (under the dashboard) by pulling towards you:
Take a flathead screwdriver or something similar. From the end of the steering column casing we pry up its upper part and release 2 latches (on both sides of the rotating ring):
Lift this part up and remove:
Take a screwdriver (TORX T20) and unscrew 2 screws on both sides of the ring:
then remove the lower part of the casing.
For the convenience of further work, it is advisable to remove the “dragonfly”. To do this, loosen the screw securing the steering column switch (in the red oval) and pull it towards you from the steering column. Next, pull the connector lock up (in the direction of the green arrow), and unfasten the connector itself from the switch:
Now we need to remove the casing from the connector. To do this, you need to release 2 latches (green arrows) and tighten the casing (in the direction of the red arrow):
Having removed the casing, we see empty spaces 9 and 10 contacts in the connector. This is where you need to connect 2 wires with pins: No. 10 - Lin-bus (will go to the electronics unit) and No. 9 - 12V (power supply for the buttons):
It should look like this:
After connecting these 2 wires, we assemble everything in the reverse order. When installing a new steering wheel, do not forget to put it according to the marks:
Replacing a conventional steering wheel with a multi-function steering wheel
Since the cost of the Beats and Highline trim levels with a pre-installed multifunction steering wheel is significantly higher than the ComfortLine, owners install the navigation buttons themselves. Various colors of inserts for the multifunction steering wheel are available for sale. The cost varies depending on the place of purchase.
Preparatory stage: steering wheel of a new modification, electrical wire, Pins (Lin-bus), central 12V voltage supply cable, 3A fuse if the old one is no longer suitable for use.
- to avoid a short circuit, disconnect both battery terminals;
- turn the steering wheel 90°;
- On the rear side there are two latches for the standard airbag. Insert a flat-tip screwdriver and remove the cushion latches. Gently pull the edge of the plastic insert;
- We repeat a similar procedure by turning the steering wheel 180°;
- remove the pillow, disconnect the standard electrical power connector - the yellow cable;
- Using a “star” to “12”, unscrew the central nut that secures the steering wheel to the axle shaft. There is no need to mark the places of coincidences; the manufacturer took care of this in advance and applied the markings to the products. When assembling, it is enough to align the marks at the same level;
- To prevent the central power cable from twisting, it is fixed with tape or insulation;
- partially dismantle the casing of the lower casing of the steering column, slightly tilting it “towards you”;
- By analogy, we disconnect the upper part of the casing;
- Unscrew the screw securing the contact board. Among motorists it is called “dragonfly”;
- on the contact connector there is a free cell No. 9, 10. This is where we connect the ends of the electrical cable: one for 12V power, the other for the Lin bus;
- final stage: assembly and installation in reverse order.
- We follow the marks mentioned earlier.
But, even after successful installation and starting the engine, navigation on the steering wheel will not work properly, since it must be correctly connected to the central electronics unit. It is located on the driver's side, where the brake and accelerator pedals are.
To ensure maximum access to the unit, we remove the front driver's seat. There are two connectors inside the block: black and white, we need the latter. We find contact No. 17 (extreme position), insert our wire into it. Ready.
The final stage: connecting power to the buttons. We connect the second end of the wire of the steering column switch to contact No. 9. Now we enter data about the multifunction steering wheel into the electronic control unit of the Volkswagen Polo sedan. We enjoy the full operation of the multifunction steering wheel.
Connecting the wire to the central electronics unit
The block itself is located under the dashboard, on the driver's side, in the area of the clutch/brake pedal. A flashlight may be required for ease of use.
This work is carried out in a “not very comfortable body position.” It is necessary to position yourself so that your head lies on the floor near the pedals.
Personally, for the convenience of work, I removed the driver’s seat (the work took 10-15 minutes, but in the end, due to more convenient work, it took much less time) and lay down on the floor, with my head in the pedals.
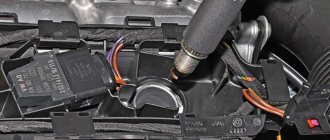
So. We stick our head under the dashboard and see two large connectors, white and black (these are exactly the connectors of the electronics unit). We need white. Move the connector lock in the direction of the arrow:
and disconnect it from the block:
The tourniquet is very short and cannot be pulled out much. You will have to work in such conditions, wriggling like a snake
Now we need to remove the protective casing from it. To do this, release the latches (green arrow) and pull the casing off the connector (in the direction of the red arrow):
Next, we disconnect the connector into 2 halves and find contact No. 17 (it is the outermost, but all contacts are labeled, you can figure it out). We insert into it the second end of the wire with the pin (which was connected to pin 10 of the steering column switch). It should look like this:
That's it, when the wire is connected, we assemble everything in the reverse order.
Power connection for buttons (12V)
It remains to connect the second wire (the other end of the wire, which was connected to pin 9 of the steering column switch). We need to supply it with 12V. This can be done in different ways: take 12V from the radio power supply; take contact No. 15 from the light switch; as well as from the fuse block (unused socket). That's exactly what I did.
Let's consider this option.
I have comfort and fuses 49-52 (constant 12V) and 28-32 (appear during ignition) are not used, and if you look closely (circled in green), they have contacts:
I decided to use socket No. 49, but you can also use the top row of fuses (12V appears when ignition). Here you need to look at each specific case, because the circuit has changed and the location of the fuses has changed accordingly. Schemes can be found here
To connect, you need to remove the fuse box.
Remove the fuse cover (on the dashboard under the steering wheel), climb under the dashboard (with your head near the pedals). We unscrew one self-tapping screw of the air duct (everything is intuitive there) and remove the air duct itself. Next, unscrew the 2 screws (from the fuse side) securing the block and take it to the pedals. We move the protective cover to the side on the back side of the fuse box and we have access to the contacts:
12V is already connected to row B. In row A we find the contact socket that we will use and insert into it the second end of the wire that was connected to pin 9 of the steering column switch (you must first attach pin N 907 326 03 to it or connect it to wire 000 979 135 E). Next, insert a 3 A fuse and assemble everything in the reverse order.
All is ready. All that remains is to register the multifunction steering wheel in the electronics unit.
1. Before removing the negative terminal, it is advisable to turn on the ignition so that the airbag malfunction lamp does not light up. 2. There are already punched marks on the steering wheel and shaft, so you can safely sim and not worry about correct installation in the future. 3. When turning the steering wheel, it is advisable to leave the key in the ignition switch so as not to break the steering wheel lock (as written in the ElsaWin instructions) 4. After removing the steering wheel, if suddenly the return spring turns to an unknown number of revolutions, then before installing the steering wheel you need to make sure that it is in the middle position (the wheels are turned straight along the axis of movement), then we turn the return spring to the extreme position to the left until it stops, and then turn it to the right 2.5 turns. This will be its correct position. 5. Power to the Lin bus must be taken, as already mentioned, from any source, but it is desirable that power appears on that source only when the ignition is on, since this is exactly the case according to the scheme. Otherwise, a small current leak may occur while the machine is not in use. 6. On high-end vehicles without a premium package and without a multi-steering wheel, the Lin bus can be connected to the driver's door block (16 pins, purple-white wire), which is much more convenient and faster.
Steering wheel
1. Open the hood, loosen the fastening nut...
... and disconnect the wire from the negative terminal of the battery.
2. We wait 15 minutes and, having unlocked the mechanism for adjusting the position of the steering column, ...
... we pull the steering column as far into the interior as possible and lower the steering wheel as low as possible. Then we block the steering column adjustment.
3. Turn the steering wheel to the left by 90° (the steering wheel spokes should be in a vertical position).
4. On the back of the steering wheel, use a flat screwdriver to unclip the airbag module fastening.
5. Turn the steering wheel to the right 180° and...
... unclip the second airbag mount on the opposite side. The airbag module should move away from the steering wheel.
6. Turn the steering wheel to the middle position (the wheels are straight). If this condition is not met, the airbag system may fail in the future!
Note
: Removal and installation of the steering wheel must be carried out in its middle position (the front wheels are in a position corresponding to straight-line movement).
7. Remove the driver's airbag module from the steering wheel.
Attention
: Before touching pyrotechnic components (for example, before disconnecting a connector), you must remove your “electrostatic charge”. To do this, you can briefly touch, for example, an unpainted metal part of the door lock.
8. Using a screwdriver, pry up the latch and disconnect the electrical connector of the airbag module. We finally remove the airbag module and place it to the side with the elastic padding facing up.
9. Take a key with a 12-sided star for 12...
... and loosen the steering wheel bolt (hold the steering wheel from turning with your second hand).
10. Check whether there is an installation mark on the steering column at the height of the marking. If it is not there, you need to mark on the steering column the position of the steering wheel relative to the column.
11. Using both hands, pull the steering wheel toward you to pull it out of its seat on the steering column.
12. After the steering wheel is pulled off, finally unscrew the fastening bolt and remove the steering wheel.
13. Installation is carried out in reverse order, and the following must be observed:
- Before installing the steering wheel, make sure that the front wheels of the vehicle are in a straight-ahead position.
- When installing a removed steering wheel: check that the marks on the steering column and steering wheel match.
- When installing a new steering wheel (without marks): the steering wheel should be put on in the middle position (the steering wheel spokes should be horizontal and the front wheels should be in a straight-ahead position).
- The airbag module electrical connector must be inserted all the way and click into place. Avoid pinching wires.
- Place the driver's airbag in the steering wheel and press it with both hands along the edges until it clicks into place.
- The battery must be connected with the ignition on. If pyrotechnic components (e.g. airbags, seat belt pretensioners) are not properly repaired after connecting the cable to the battery terminal, they may trigger spontaneously. Before connecting the battery, make sure that there are no people inside the vehicle.
- If, after installation, the airbag warning lamp indicates an error, you must interrogate the event recorder, reset it, and then interrogate it again.
14. After installing the steering wheel, take a test drive. If the steering wheel is not level, it must be removed again and rearranged on the splines of the steering shaft.
Converting a standard steering wheel into a multifunctional one (with buttons)
FAQ VW Audi Skoda Seat
The information applies to the following cars: VW Golf 5, Jetta 5, Golf Plus, Passat B6, Touran, Tiguan, Caddy 2 Skoda Octavia A5, Yeti SEAT Leon 2, Altea, Toledo
The entire installation process can be divided into 2 stages.
1. Embedding button blocks into the standard 3-spoke steering wheel, which did not have this. If you have a complete set of multi-steering wheel that you want to install, then you don’t need to read this paragraph.
2. Disassembling the steering wheel and replacing the HIGHLINE steering control unit, which supports the multi-function steering wheel and cruise control. You can also replace the left steering column switch with the cruise control function at the same time.
First stage.
First, we find out the unit numbers on our car and check them for compatibility with the multifunction steering wheel: There are 2 types of buttons on the steering wheel, before 2005 and after. In the photo at the top there is a type II button, and at the bottom I. Accordingly, compatibility of the type of buttons, the number of the airbag ring and the steering column unit of the Highline version is required.
The ring number can be found out in two ways known to me. 1. disassemble the steering column and find the sticker with the number on the ring itself. (you can see the sticker in the photo below) 2. Using computer diagnostics, find out the number of the steering column unit and find in the description below which ring it is compatible with. In my case, option 2 worked, the original block was with the letter F and the ring turned out to be with the letter C.
Steering Column Control Module
There are 3 types of steering column control modules, each of them has 3 variants. The type is depending on the installed slip ring, either use the part number of the currently installed module or the part number of the slip ring to determine the correct module for the vehicle in question. If a part number is not listed, contact us and ask for help with this topic.
* Type I (Compatible to Slip Ring: 1K0-959-653, 1K0-959-653-A) o Lowline + Part Numbers: 1K0-953-549 o Supported Features: None o Midline + Part Numbers: 1K0-953-549 -A + Supported Features: Cruise Control, Trip Computer o Highline + Part Numbers: 1K0-953-549-B, 1K0-953-549-D, 1K0-953-549-AD, 1K0-953-549-AM + Supported Features: Cruise Control, Trip Computer, Multi-Function Steering Wheel
* Type II (Compatible to Slip Ring: 1K0-959-653-C, 1K0-959-653-D) o Lowline + Part Numbers: 1K0-953-549-E, 1K0-953-549-AE, 1K0-953 -549-BM o Supported Features: None o Midline + Part Numbers: 1K0-953-549-F, 1K0-953-549-AF, 1K0-953-549-AH, 1K0-953-549-AP, 1K0-953 -549-BC, 1K0-953-549-BF, 1K0-953-549-BN, 1K0-953-549-CA + Supported Features: Cruise Control, Trip Computer o Highline + Part Numbers: 1K0-953-549-G , 1K0-953-549-AG, 1K0-953-549-AK, 1K0-953-549-AL, 1K0-953-549-AQ, 1K0-953-549-BD, 1K0-953-549-BK, 1K0 -953-549-CC + Supported Features: Cruise Control, Trip Computer, Multi-Function Steering Wheel
Note: 1K0-953-549-BC may have a Bug which doesn't allow Cruise Control Retrofitting, in such a Case you need to replace the Module.
For example, I had an airbag ring with the number 1K0 959 653C, which is suitable for type II buttons, and I changed the steering column unit from 1K0 953 549F to 1K0 953 549BK, or an older version of AK.
You will also have to change the cable for the airbag in the steering wheel. Its number is 1K0 971 584 C for an aigbag with one connector. There are American women who have a double connector on the squib itself. Therefore, this issue is clarified first. The number of such cable is 1K0 971 584 L.
In the photo, the new cable with a single connector to the squib is already connected to the steering wheel pad.
With double connector on squib:
Before starting work, I strongly recommend disconnecting the negative terminal from the battery!!!
Now let's start installing the button blocks on the steering wheel. To do this, use a sharp knife to slowly cut off the rubber. The photo shows the finished space for the left button on the steering wheel. On the right side of the hole we cut an M4 thread for attaching buttons.
When finally installing the buttons, I recommend placing them on sealant so that the button block wobbles less due to an uneven fit to the steering wheel.
The next step is to cut out a place to install the button control module in the third spoke. The photo is how it was made in a standard steering wheel, and the next one is how it was cut out for me...
For final installation I used sealant to secure the block. Now all that remains is to glue two flat cables onto double tape and the work of installing the buttons is completed.
The second stage of replacing the steering column unit.
We put the position of the nut at risk and unscrew the steering wheel nut with a CR12 star. Before removing the steering wheel, note its position. Now, to remove the upper lining of the steering mechanism, insert a screwdriver as shown in the photo and pull up.
We unscrew 3 screws, 2 are visible, and the third is located under the steering column adjustment lever. Remove the bottom cover. In front of us is the airbag ring, and below is the steering column unit, which needs to be replaced.
We unscrew the small screw opposite and insert a piece of wire, a drill or a file to bend the latch.
In details:
In the background there is the same latch, which I bent with my fingers and pulled the module down, as shown in the photo.
After this, disconnect the connectors from the old unit and connect to the new one
If nothing else needs to be changed, then everything can be reassembled in reverse order.
If there is a need to replace the airbag ring and the steering column, then with the steering column unit removed, first remove the ring as shown in the photo by bending the two latches with a screwdriver. It is important not to twist this ring, so for reliability it is better to secure it from rotation with tape.
After this there is access to the steering column switch to remove it. To do this, it moves towards itself, while similar latches bend, like on a ring.
After that, we assemble everything in reverse order and begin programming the functions. There is nothing complicated there.
Control Module Coding
The following is the label file for 16 – Steering Wheel which needs to be rejiggered.
* 0?xxxxx: Vehicle Type o 0 = Normal o 1 = Special Purpose (eg, Taxi) * 0x?xxxx: Transmission o 0 = Manual Transmission o 1 = Automatic Transmission * 0xx?xxx: Steering Wheel o 0 = Steering Wheel without Multifunction o 1 = 3-Spoke Steering Wheel without Multifunction o 2 = 3/4-Spoke Steering Wheel with Multifunction without Cruise Control o 3 = 3/4-Spoke Steering Wheel with Multifunction with Cruise Control * 0xxx?xx: Additional Equipment o + 1 = Tiptronic (Shift Paddles) * 0xxxx?x: Board Computer / Cruise Control System (CCS) o 0 = w/o Board Computer and w/o Cruise Control System (CCS) o 1 = with Board Computer and w/o Cruise Control System (CCS) o 2 = w/o Board Computer and with Cruise Control System (CCS) o 4 = with Board Computer and with Cruise Control System (CCS) * 0xxxxx?: Rear Wiper o 1 = Rear Wiper not installed o 2 = Rear Wiper installed
The original soft code on my car was as follows:
00xxxxx = normal vehicle type 0x1xxxx = automatic transmission 0xx0xxx = steering wheel w/o multifunction 0xxx0xx = no shift paddles 0xxxx2x = w/o MFD and w/ cruise control 0xxxxx1 = no rear wiper
0010021 = old soft code
The revised code was as follows:
00xxxxx = normal vehicle type 0x1xxxx = automatic transmission 0xx2xxx = 3-spoke steering wheel w/ multifunction 0xxx0xx = no shift paddles 0xxxx2x = w/o MFD and w/ cruise control 0xxxxx1 = no rear wiper
0012021 = new soft code (note that 0013021 might also work)
After this, I am 100% sure that two errors will appear in the adaptation of the G85 sensor in the power steering unit and in the ABS unit.
G85 adaptation is carried out in the following sequence:
Sensor for Steering Angle (G85)
Prerequisites:
* Start the vehicle. * Turn the steering wheel one turn to the right and one turn to the left. * Drive in a short distance straight line on a level surface at a speed not higher than 20 km/h. * If the steering wheel is straight during the test drive then stop the vehicle with the wheels pointed straight. * Ensure that the steering wheel is not moved again. * Keep the engine running and do not switch off the ignition. * System voltage at least 12.0 V.
[Select] [03 - Brake Electronics] [Coding-II - 11] OR (if Coding-II is not available) Enter 40168, to enable the basic setting. Group 060 [Go!] Activate the Basic Setting. [ON/OFF/Next] After a successful basic setting, field 2 should say “OK”. [Done, Go Back] To make sure the basic setting was succesful, check the sensor again. Group 004 [Go!] Check field 1, the value has to be between -1.5 and +1.5 °. [Done, Go Back]
Note: After successful basic setting, the Steering Limit Stop needs to be adapted too.
If adaptation is carried out correctly, you should have the following picture on your computer screen:
After this, the ABS error should disappear and the light will go out. Now you need to adapt the power steering. To do this, with the car running, turn the steering wheel from one extreme position to another, holding the stops for 1-2 seconds. After this procedure, the power steering should turn on and the error light should go out.
The job is done.
Link to information on Multifunction
Continuation and all discussions of the report here
Thanks: ten70
How can I find the information I need here?
Decoding the factory equipment of the car (English) Decoding the factory equipment of VAG in Russian! Diagnostics of
Volkswagen, Audi, Skoda, Seat, error codes.
If you have not found information on your car, look at the cars built on the platform of your car. Most likely, the information on repair and maintenance will be suitable for your car.
Removing the steering wheel of a Volkswagen Polo sedan
The automobile steering wheel has come a long way through history. It all started with an ordinary cast iron handle. To turn left or right, you had to spin this slow, heavy thing around its axis. The work was not easy. Therefore, at the end of the 19th century, they developed a mechanism that became the ancestor of the very modern steering wheel that we are used to seeing in the car. It was much more convenient to use and, given the gradual increase in vehicle power, became a real technological breakthrough in the automotive industry.
The steering wheel is the part of the control system with which the driver interacts. Steering wheel movements affect other steering components.
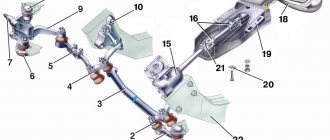
On the Volkswagen Polo sedan, the list of system elements, in addition to the steering wheel itself, includes a steering column with electric power, a steering mechanism, a pair of rods with ends that are connected by hinges to the steering knuckles of the front suspension. In general, the scheme is quite standard for a modern car.
The steering wheel of the Polo sedan is equipped with an airbag and a horn switch. In addition, happy owners of expensive car trim levels can enjoy convenient control of the multimedia system using buttons on the left spoke of the steering wheel. There is also a button on the “steering wheel” that allows you to use your smartphone hands-free.
Checking the steering operation
The steering system on the Polo sedan, like on any other car, is subject to the influence of external factors. The steering mechanism, as well as the steering rods, tend to wear out. In the steering wheel itself, free play may gradually increase, which will negatively affect the operation of the entire system. Therefore, it is necessary to periodically check the condition of the steering.
Both knitting needles at the edges of the steering wheel should be positioned symmetrically. There should be no jamming when turning the steering wheel. The device must be held firmly on the axis.
If the car reacts late to the driver's actions when turning the steering wheel, then this is a clear sign of play. An increased stroke may be caused by loosening of the mechanism fastenings, rods, or wear of individual elements of the system.
The procedure for checking play on a Polo sedan is an important step that guarantees safe driving and increased service life of steering components. The test should be carried out on a flat, non-slip road. The maximum mark that the indicator should not exceed is 5 degrees.
How to remove the steering wheel on a Volkswagen Polo sedan
At the same time, the steering wheel must be secured from turning, holding it by the rim - connect the contact connector of the airbag with the contact connector under the steering wheel - place the cover under the steering column.
Installation and encoding of the multifunction steering wheel on vw
There should be no jamming when turning the steering wheel. Please help me remove the driver's airbag from the steering wheel of the Polo. Home Cars - Volkswagen Volkswagen Polo sedan year of manufacture engine 1.
REMOVAL AND INSTALLATION OF STEERING WHEEL — Volkswagen Polo Sedan + year. 3. Remove the airbag module...
Removing the steering column cover for Volkswagen Polo Sedan.
How to remove the radio of a Volkswagen Polo sedan Volkswagen polo sedan torx T The steering wheel is in the lowest position. We climb into the fuse box located on the right side behind the glove box.
During the installation of the alarm I encountered the need to remove the steering wheel.
And the dancing with tambourines began. Turn the steering wheel 90 degrees. There are latches on the back of the steering wheel that need to be pressed and the airbag should snap off. No matter how it is! After suffering for some time, I decided to ask the Drayvovites for help. I thank everyone who responded, shared advice and photos of the process.
braid size for Polo steering wheel — search on DRIVE2
Leather braid for Lada Vesta steering wheel – AS-INTER
Hi all! Photo of steering wheel
, installation
of the braid on
which was described in the instructions Material - genuine Estoril Nappa leather Sincerely, Inter AutoStudio Team Phone 8-903-372-13-54 www.as-inter.ru We are on Instagram We are on VKontakte.
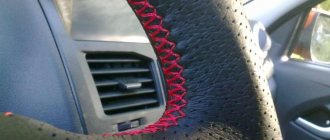
Leather steering wheel Polo sedan.
Steering wheel
The
Polo
sedan is extremely hard and the “space package” appeared in the “Comfortline” only in 2012. And then to order. Therefore, covering it with leather is a must in improving the perception of the car.
Leather steering wheel polo sedan - Volkswagen Polo Sedan, 1.6 l., 2011.
In general, I was climbing around the drive and decided to see what was available at the flea market for polo
in Belarus.
There wasn’t much choice, but they were selling a leather steering wheel
in excellent condition, with a small jamb (there were no gaps when installing the airbag).
VW Polo WRC steering wheel - Volkswagen Polo Hatchback, 1.4 l., 2011.
Hi all! History of rudders
continues.
Last year, in a well-known market, I came across an advertisement for the sale steering wheel
with paddle shifters. I immediately realized that it was worth taking! Fortunately, the platform allows you to connect them.
Table of steering wheel braid sizes - Toyota Corona, 1.6 l., 1999.
Toyota Corona Premio Snow White › Logbook › Table steering wheel
braid sizes .
Pafosanet last online 1 week ago. I’m posting it here for myself... But maybe it will be useful to someone... I just keep forgetting the size of the steering wheel
.
the braids
are designated M, S, etc.
Installing covers and leather steering wheel trim. - Volkswagen Polo.
Installing covers and steering wheel
leather, covers, covers. Either there is no free money, or time, or something else. As they say, either the dick is short, or the shirt is long! and
steering wheel
braid for installation.
Checking the steering operation
Removing and installing the steering column trim. The device must be held firmly on the axis. If the car reacts late to the driver's actions when turning the steering wheel, then this is a clear sign of play. An increased stroke may be caused by loosening of the mechanism fastenings, rods, or wear of individual elements of the system.
The test should be carried out on a flat, non-slip road. The maximum mark that the indicator should not exceed is 5 degrees. The formula by which free play is calculated is as follows: A steering wheel with a diameter of mm can have a play of 16 mm, but no more. For the procedure, you will need a regular ruler and chalk to create marks: The ruler must be installed on the dashboard and placed so that it rests on the outer part of the rim.
We turn the steering wheel to the right and stop at the moment when the front wheels begin to move. Place a mark on the wheel rim. We measure the distance along the rim.
If it exceeds the figure obtained from the calculation using the above formula, then the backlash exceeds the permissible value. There may be several reasons for the malfunction: To fix problems, most often you just need to tighten the nuts.
Removing the steering column cover for Volkswagen Polo Sedan
However, if everything is much more serious, then in such cases the rod ends and other parts that have been worn out are replaced. One way or another, to get to the root of the problem, you have to disassemble the control system. And the first obstacle on the way is the steering wheel. Remove the negative terminal from the battery. If you do not turn off the power, the airbag may deploy. We wait 15 minutes until the capacitor that activates the airbag is discharged.
If not repaired
Set the front wheels to a position that allows the vehicle to move straight ahead. Install the ruler so that it is firmly fixed on the instrument panel, and the plane of the ruler touches the outer surface of the steering wheel rim. Without changing the position of the ruler, turn the steering wheel to the right until the front wheels begin to turn.
In this position, apply a mark to the steering wheel rim.
Polo Sedan
Without changing the position of the ruler, turn the steering wheel to the left until the front wheels begin to turn. Measure the distance between the marks along the rim. One way or another, to get to the root of the problem, you have to disassemble the control system. And the first obstacle on the way is the steering wheel.
Remove the negative terminal from the battery. If you do not turn off the power, the airbag may deploy. We wait 15 minutes until the capacitor that activates the airbag is discharged.
The airbag module must not be disassembled. Also, do not allow water or oil to come into contact with its surface. In order to lower the steering column to the lower position, insert the key into the ignition and unlock the device.
Turn the steering wheel to the left 90 degrees. We insert a screwdriver under the steering wheel cover and press the airbag module lock. We turn the steering wheel by degrees and unfasten the pillow on the other side. Disconnect the block with wires from the connector. Unscrew the bolt on the steering shaft that secures the steering wheel. In this case, you should keep the steering wheel from turning.
For the procedure, you can use the locking mechanism of the anti-theft device: We hit the steering wheel several times so that it comes off the shaft splines. Completely unscrew the bolt on the steering wheel and remove the steering wheel. When reinstalling, it is important to align the marks on its surface and the steering shaft. With a standard steering wheel everything is clear.
There is nothing difficult about dismantling. But what if we go further? Such devices are sold on the Internet.
Work to replace the VW Polo steering rack mechanism: Inspection and check of the steering control of the Volkswagen Polo sedan Regularly check the condition of the steering, as traffic safety depends on it. When inspecting the steering, pay special attention to the condition of the protective covers and threaded connections.
How to remove the steering wheel. — Volkswagen Polo Sedan, l., year on DRIVE2
Remove the steering wheel. Install the steering wheel in the reverse order of removal, aligning the mark on its hub with the mark on the end of the steering shaft.
It all started with an ordinary cast iron handle. To turn left or right, you had to spin this slow, heavy thing around its axis. Removing the steering wheel of a Volkswagen Polo is not an easy job. Therefore, at the end of the 19th century, they developed a mechanism that became the ancestor of that very modern Volkswagen Polo steering wheel that we are used to seeing in the car interior.
It was much more convenient to use and, given the gradual increase in vehicle power, became a real technological breakthrough in the automotive industry. Steering wheel movements affect other steering components.
Volkswagen Polo Sedan 2010- Steering
If damaged, completely replace the steering column. Pass a string through the holes of the protective cover to install the cover on the engine shield - tie the protective cover of the steering column and the universal joint fork with twine, Fig. After installing the cover, cut the twine; — install the eccentric bolt and nut, tighten the connection to the prescribed torque.
Replace the connection protective cover. Carry out the remaining operations in the reverse order of removal, paying attention to the following: This operation is facilitated by a cutout in the lower housing of the steering column switches, providing access to the mentioned screw; — after each removal, replace the steering wheel mounting bolt with a new one; it is equipped with a microcapsule with glue.
Removing and installing the steering wheel (for use on the VW Polo IV model)
On the Volkswagen Polo sedan, the list of system elements, in addition to the steering wheel itself, includes a steering column with electric power, a steering mechanism, a pair of rods with tips that are connected by hinges to the front steering knuckles.
In general, the scheme is quite standard for a modern car.
The steering wheel of the Polo sedan is equipped with an airbag and a horn switch. In addition, happy owners of expensive car trim levels can enjoy convenient control of the multimedia system using buttons on the left spoke of the steering wheel.
Removing the steering wheel of a Volkswagen Polo sedan
Checking the operation of the steering The steering system on the Polo sedan, like on any other car, is subject to the influence of external factors.
The steering mechanism, as well as the steering rods, tend to wear out.
In the steering wheel itself, free play may gradually increase, which will negatively affect the operation of the entire system. Therefore, it is necessary to periodically check the condition of the steering. The braid is the steering wheel trim made from a template.
The material is very different, starting with fabric, ending with leatherette, leather. The diameter of the workpiece matches the diameter of the Volkswagen Polo steering wheel - Fixation on the steering wheel with threads that are tightened with a needle. Typical problems with the steering wheel and their solution: deformation, damage from an accident, accident; short circuit of contacts, terminals, friction; malfunction of mechanical steering wheel removal for Volkswagen Polo due to wear or defect; Steering wheel jamming when turning from side to side.
Reverse side of the airbag unit. Those same fasteners. The steering wheel was removed. Closer. We filmed it together, applying force. The cushion sits very tightly with those white crap in the body of the steering wheel, also a kind of fixation, with a spring, and it’s very easy to install back.
Armed with two screwdrivers, a small one and a large one, and having removed the dashboard, I was afraid of scratching it. I unclipped the lock on the back of the steering wheel and pressed on it at the same time. A friend, in his removal of the steering wheel of a Volkswagen Polo, pulled the corresponding side of the pillow, his fingers probably still hurt.
When drilling, you must wear safety glasses; Rice.
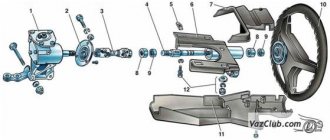
10.3.1. Removal and installation
Safety shear bolt 1 shown one removal of the steering wheel Volkswagen Polo steering column mountings - disconnect the combination switch connector on the steering column; — On the lower side, disconnect the steering column from the intermediate shaft. To do this, remove the universal joint from the small gear and at the same time remove the steering column by pushing it out.
Installation is carried out in the reverse order of removal. The nut on the universal joint must always be replaced. However, before doing this, you need to make sure that the steering column is securely seated.
Disassembling and assembling the steering column Disassembling and assembling the steering column due to its design is a very complex operation. For this reason, it should be carried out at a service station.