Replacing the heater motor without removing the panel
Hi all!
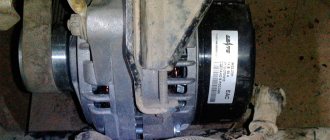
For the second year now, the heater motor on my Kalina has been beeping frequently. If before this happened quite rarely, now for the second day in a row the fan practically does not stop. I decided that there was nowhere to delay and this morning I stopped by BB with a new engine, the price of which is 1,400 rubles. I took the Luzar company, since it was the one that was praised by the majority of potassium growers. So, the first thing I did was remove the front passenger seat by unscrewing the 4 bolts that secure them, which resulted in much more free space.
Then we open the glove compartment, take out all the things from there, and unsnap the “curtain” mounting plate, then unscrew all the screws that are visible in the photo below:
Then unscrew one screw on the left side:
And another one on the right side. After this, you need to unscrew three more screws in the upper part of the glove box lid:
In general, next we remove the side trim of the passenger compartment pillar, as shown in the photo below:
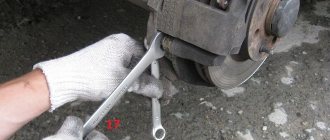
After this, unscrew the screws from below using a short screwdriver or a bit and a ratchet:
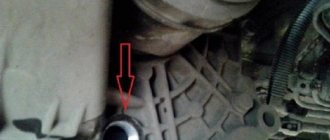
Now we lift the upper black cover and unscrew the two nuts under it using an extension, a socket and a ratchet, as well as two self-tapping screws (shown by arrows):
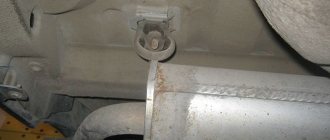
Next, slightly lift the side air duct and unscrew the bolt:
So, we still have to deal with the lower bolts, two on the left and one on the right:
After performing all these manipulations, it seems that nothing will interfere anymore and now you can move the right side of the instrument panel to the side, and then put something under it to fix it in this position:
The photo above does not show an ideal option, and in my case I had to move it back a little more so that I could pull out the stove fan. Then you can crawl up from below with your hands and disconnect the power plug from the heater motor, after first bending the block clamp:
Next, unscrew the three screws that secure the heater fan to the housing:
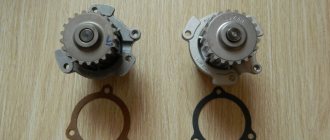
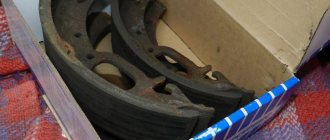
And after that we try to pull the motor out, if you manage to do this. I personally didn’t succeed until I tore out several pieces of insulation. As a result, after an hour of effort, we finally managed to pull the motor out, resulting in the following picture:
Then we put the new fan in its place without any problems! In fact, this is true - installation compared to removal is just idleness! In total, the whole job took me 3 hours.
The new motor works at least twice as well, and now blows better at first speed than before at second! It is not noisy, although the sound is not much different from the standard one.
In general, if you have any questions, ask, I will try to answer. If I messed something up in the description, please correct me, as I was in a hurry and might not have mentioned something!
Source
Modernization of Kalina SOD
The main problem of the Kalina cooling system is the formation of air locks. Today there are a number of effective ways to eliminate this defect. The reason lies in the design features of the SOD. The operation of the cooling system is based on the interconnected functioning of many parts. The use of the large and small circuits depends on the temperature of the antifreeze circulating through the system. The normal operation of the entire power plant depends on this.
You can modify the cooling system yourself or at a service center. Professionals rarely engage in all sorts of modifications, recommending replacing or repairing a particular component. This method may be more expensive, but not always more effective.
Classic ways of improvement
In order to solve the problem with the formation of air locks, you need to remove the expansion tank cap and start the engine. Then wait until the coolant temperature rises to the critical red zone until forced cooling by the fan comes into operation. After this, you need to press the gas pedal several times and turn off the engine.
If the method is ineffective, there is another method. To do this, you need to dismantle the engine protection, loosen the clamp and remove one of the tubes of the throttle body heating fitting. Then unscrew the cap of the expansion tank and, applying a rag, start blowing into it until antifreeze begins to flow from the removed pipe. In order to modify the standard cooling system, many car owners install a more efficient 6-hole thermostat, install a coolant filter and another heater faucet.
To increase circulation efficiency, an additional pump is often installed.
Other upgrade options
If the car is equipped with an electronic gas pedal, the hose that previously went to heat the throttle assembly is now looped into the cooling system. To prevent the formation of air pockets, an additional pipe with a smaller diameter is used, which is installed instead of the above hose. The hose for the air duct is placed near the thermostat; for this, a tee is used, mounted in the pipe fitting to the radiator. The second end of the pipe is connected to the steam removal hose near the expansion tank (you will need another tee).
The modification ensures a stable operating temperature of 90 degrees in urban conditions, and the stove begins to warm up at 50 degrees.
The next improvement method is to equip the steam outlet with a special hydraulic fence. To do this, a tube from a dropper is mounted in the steam removal hose, which is immersed in antifreeze at the bottom of the expansion tank. As it cools, the antifreeze is drawn into the outlet pipe, which prevents air from the cooling system. If desired, you can combine both methods.
The principle of engine operation and main breakdowns
A heater motor is an electrical machine designed to convert electrical energy into mechanical energy. The motor operates on the principle of electromagnetic induction. Structurally, the unit consists of two main parts - stationary (stator) and movable (rotor). Let's look at the reasons why the engine starts to get very hot and then fails.
The most common breakdowns:
- freezing or wear of motor brushes;
- short circuit to ground of the armature winding;
- damage or oxidation of wiring;
- collector oxidation.
All faults can be eliminated, but if breakdowns have become the norm, then the best solution is to replace the stove motor.
Common faults
The stove itself on Kalina is well conceived, but due to the poor quality of the elements and parts, various troubles constantly happen to it. Even the latest models with climate control have various “diseases”.
The list of the most common faults looks like this:
- The heater core is leaking;
- the heater damper is jammed or does not open completely;
- failure of the fan or control unit;
- gear motor failure;
- the temperature sensor or heater resistor has become unusable;
- The cabin filter is clogged.
To find out where this or that element of the heating system is located, you should look at the operating instructions; there will definitely be a corresponding diagram there.
The design of the Kalina stove without climate control is such that the air sucked in by the fan passes through the air filter and enters the heater radiator. There it is heated and supplied to different areas of the cabin through adjustable grilles and openings. The dampers are controlled and the fan speeds are switched manually. This heating system is more reliable because it does not contain any electronics.
Replacing the stove motor
First of all, we purchase a new engine. The cost of the motor varies in the price range from 1500 to 2500 rubles. Most Lada Kalina owners prefer products. However, this is a subjective opinion and the choice, of course, is yours.
Quite often there are sellers who want to make money on the trust and simplicity of people. They tell customers that supposedly the electric motor for Kalina with air conditioning costs much more than for a regular one. In this case, the difference can reach 1000 rubles! If you suddenly come across such a “specialist salesperson” in a store, you shouldn’t trust him. The engine on the Lada Kalina with air conditioning is the same as the regular one. Accordingly, there cannot be a difference in price.
Replacing the motor should be carried out in a well-lit place. All parts are neatly folded in the order in which they were removed from the car. This simple measure will allow you to quickly install all components and assemblies in place after replacing the stove motor.
- a set of flat and Phillips screwdrivers;
- set of heads;
- a set of keys.
- lamp;
- pliers.
- dismantle the driver's seat (freeing up space for work);
- remove the glove compartment;
- remove the side trim of the passenger compartment pillar;
- unscrew the fastening bolts and move the instrument panel to the side, fix it;
- go around the block retainer from below and disconnect the power plug from the heater motor;
- remove the engine and replace it with a new one (When installing a new unit, you need to fix the impeller axis with glue so that it does not accidentally fall out).
As a rule, in order to remove the motor, you have to tear out several pieces of insulation. The whole job takes about 3 hours.
Malfunctions of the Kalina cooling fan resistor
The electric fan only operates at high rotation speeds - The main sign that the additional resistor of the Kalina cooling fan is faulty. The electrical diagram for connecting LADA Kalina fans provides for the simultaneous activation of two blowing systems:
- electric radiator cooling fan;
- air conditioner cooling fan,
If at some point in time only one of them rotates, then we can conclude that the power supply circuit of the second one is broken. The same thing happens when the radiator fan does not spin after the engine warms up. There are several reasons for this phenomenon. This could be either a bad contact or a broken wire, or a faulty electric fan resistor.
Causes of malfunction of the Kalina fan resistor
The main reason for the failure of the additional resistor of the Kalina fan is the blown thermal fuse, which protects the electric motor winding and the power circuit from overload. In this case, it is necessary to repair or replace the Kalina cooling fan resistor. You can do the work yourself, it does not take much time, does not require high qualifications or special tools.
What is needed to check and replace
To remove, check and repair (replace) an additional resistor you will need:
- ohmmeter;
- crosshead screwdriver;
- a set of keys;
- soldering iron;
- rosin;
- solder;
- a new resistor or part of it - a thermal fuse (16A and 180 degrees).
If the car has engine (crankcase) protection installed, it is better to remove it from a pit or on a lift.
Conclusion
Treat your car with care, carry out timely maintenance of the stove and there will be no problems with heating the Lada Kalina. Removal and replacement of the motor will be required only after its maximum operational capabilities have been reached.
Perhaps you know some other interesting ways to replace an engine? Or there is a desire to share with readers your own experience of carrying out repairs. Write comments. Any information would be very helpful.
Source
Kalina heater diagram
The Lada Kalina heater device is designed for heating and cooling the car interior. If the car does not heat up, the windows fog up, or you feel discomfort, then you need to test the performance of the heating system. Understand the functioning of the stove on Kalina.
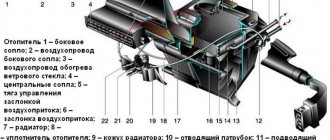
General layout of the Kalina stove
The location of the stove was designed for easy installation of an air conditioner. The system is simple, but at the same time quite reliable.
- Left side flow outlet.
- Left air duct.
- Heated side window.
- Air flow splitter.
- Stove.
- Right ventilation duct.
- Right side flow exit.
- Bottom heating duct.
- Interior heating duct.
- Central outlet of ventilation flows.
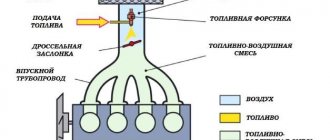
The supply and exhaust principle is used. The air masses inside the car are heated using a special liquid, which simultaneously cools the engine. The operating principle of the Kalina stove is based on the fact that the liquid warms up the radiator, where heat exchange occurs, and the heated air passes into the cabin through the air ducts.
If we analyze Kalina’s heater, the operating principle and the heater circuit will differ in configuration. The first option has a simple and reliable design. And in the other - full electronic control. The air passes through the filter into the air intake, and then the fan blows further through the system. The engine is running and warmed up. Antifreeze moves through the system in which the heater radiator is involved.
The amount of air that is heated by the stove radiator is regulated by a damper. Controls the operation of the fan and dampers by a unit located on the central panel.
Heating device control unit
- Temperature regulator. We change the heating of the air flow by turning the knob. The blue zone produces cold air, the red zone produces warm air.
- Fan speed switch. By turning the knob clockwise, the intensity of the air flow is adjusted. Choose one of 4 fan speeds.
- Air flow separation selector. Distributed in specific areas:
The flows pass through the upper part of the cabin.
The air is directed downwards.
Air flows are directed onto the windshield and down.
Air flows are concentrated in the area of the windshield, as well as the side ones.
- The handle that controls the recirculation of cabin air. We turn on the mode when driving off-road or in a traffic jam. Used for a short time, the glass fogs up.
- Rear window heating mode switch.
We regulate the direction and saturation of air flows through aerodynamic devices. We turn the guide blades and change the position of the dampers to achieve the desired air direction.
Interior ventilation of Lada Kalina
The outlet pipes are located in the car body under the trunk. The heater is located under the dashboard. The air flow enters the car interior through an intake, which is designed in front of the windshield in the engine compartment. The air enters through the filter and is accelerated throughout the cabin under pressure created by the fan.
1.Pipes for supplying air to the rear of the cabin.
2.Side ventilation nozzles.
3.Blowing the side windows.
- Windshield blower nozzle.
5-6-7. Central deflectors for flows entering the car interior.
We direct the supply air through the deflectors by turning the handwheel. If we turn it up, the flap opens and vice versa. You already understand how the stove on Kalina works.
Electrical diagram of the Kalina stove
- Relay with fuse assembly.
- Mode switch.
- Resistor.
- Electric stove motor.
- Egnition lock.
A. To the power source.
Why do you need a heater fan on the Lada Kalina?
The main purpose of the heater on Kalina is to maintain the required temperature in the car interior and prevent the windows from freezing. If the heating system stops functioning for some reason, then operating the car in winter is practically impossible. The operating principle of Kalina's stove is traditional, and does not differ much from similar systems in other cars. Antifreeze is heated in the engine heating system, and then enters the heater radiator through pipes. Next, according to the principle of heat exchange, the hot liquid heats the air, is cooled and sent to cool the motor. The fan blows on the heater core and directs hot air into the passenger compartment. If the motor fails, it’s cold in the cabin.
How to independently change the heater fan in a Lada Kalina car
If the car interior is left without heating in the cold season, this does not bode well for either the driver or his passengers. This rule applies to all passenger cars, and the Lada Kalina is no exception. In general, the heater in this car is quite reliable. But it has one weak point: the furnace fan. It is this part that most often fails and becomes a source of real headache for the Kalina owner. Is it possible to replace the stove fan on a Lada Kalina yourself? Can. Let's figure out how this is done.
Signs and causes of furnace fan failure
The owner of the Lada Kalina will immediately know that the stove fan has broken down. Here are the characteristic signs of failure of this part:
- the pressure of hot air blown out of the deflectors is greatly weakened and practically does not depend on the position of the stove regulator;
- The operation of the heater is accompanied by a loud creaking noise, which turns into a grinding noise when the fan speed increases.
Replacing the heater motor, Lada Kalina. (Replacing the stove motor)
All this happens for the following reasons:
- One or more fan blades are damaged. The fact is that the fan on the Lada Kalina is made of plastic, and this plastic is far from being of the best quality. This is especially true in severe frost. If there is a small crack on the blade, then at low temperatures it is guaranteed to increase and the blade will completely collapse. This, in turn, will reduce the pressure of air pumped into the cabin, which will immediately become noticeable to the driver and passengers by the lack of pressure in the deflectors;
- Fan squeaking occurs due to wear of the bushing on which the fan is mounted. This bushing lasts an average of five to six years, after which it will inevitably have to be replaced, since during this time it wears out almost completely (and it is advisable to install a ball bearing in place of the bushing, since its service life is twice as long).
The ball bearing heater from Luzar is currently in short supply
Website about joints
How to replace the heater motor (fan) of a Lada Kalina car with your own hands. Replacement occurs without removing the panel or seats. Everything should take no more than 1 hour.
With the onset of cold weather, the stove motor began to buzz loudly, and then jammed and stopped working altogether, which was saved by a strong blow to the panel. The owner did not wait for it to completely break down and decided to replace it. There is no need to completely disassemble the panel; just remove the glove compartment, unscrew a couple of plastic covers and we get direct access to the motor mounts. It is necessary to remove the old motor carefully, as the “snail” can easily be damaged.
Methods for replacing the unit
Replacing the Kalina stove fan is not the most difficult procedure. Even a novice car enthusiast can cope with it. The whole problem is that the unit is not very conveniently located. Therefore, before removing the device, you will have to tinker a little. There is an option to contact the service station. However, this repair is quite expensive. If you don’t have extra money or you want to personally change the fan, just out of “sporting interest,” then we’ll consider several options for replacing the unit.
Replacing the fan with removing the dashboard
This method is recommended by the manufacturer of the Lada Kalina. However, due to its complexity, not many car enthusiasts in the “domestic” conditions of an ordinary garage decide to change the unit using this method. If you want to try it, here is the sequence of the operation. To work, you will need a set of Phillips and flat-head screwdrivers, heads for 8, 10, 13.
- Removing the dashboard:
- separate the negative terminal of the battery;
- drain the antifreeze;
- separate the pipes;
- remove the cabin filter;
- unscrew the fastening nuts and lower the steering column to the stop;
- remove the stop signal switch from the wiring;
- snap off the plastic clips and remove the upholstery of the pillars;
- unscrew the fastening bolts and remove the front panel trim;
- disconnect and move the air ducts;
- remove the dashboard.
- Removing the fan:
- disconnect the block with wires from the electric motor;
- remove the ventilation hose;
- remove the engine;
- we change the unit.
Next, we carry out all the steps in reverse order. As can be seen from the description, replacing a fan in this way is quite problematic and will take a lot of time. You also can’t do without assistants. For this reason, many car enthusiasts prefer to change the device in a simpler, so to speak “folk” way.
Replacing the stove fan without removing the panel
It is not wise to remove the entire dashboard just to change one fan. The problem can be solved much easier. You only have to lift the right side of the panel. We take a position upside down. Take a knife and a flashlight. We cut off pieces of sound insulation that prevent access to the fan. Unscrew the mounting screws and remove the unit. Everything is much simpler and faster than in the first case.
Replacing the Kalina stove fan: how to change it if it doesn’t work, do-it-yourself repair
If the car interior is left without heating in the cold season, this does not bode well for either the driver or his passengers. This rule applies to all passenger cars, and the Lada Kalina is no exception. In general, the heater in this car is quite reliable. But it has one weak point: the furnace fan. It is this part that most often fails and becomes a source of real headache for the Kalina owner. Is it possible to replace the stove fan on a Lada Kalina yourself? Can. Let's figure out how this is done.
About lubricating the Lada Kalina stove fan
Lubricating a creaking bushing on a Lada Kalina fan is a pointless task. Yes, lubricant will remove the annoying squeak for a while. but if the bushing is worn out badly, then even the thickest lubricant will very soon be used up and the bushing will begin to creak with redoubled force. Therefore, car owners prefer not to lubricate worn bushings, but to change them along with the fans. and this is the only rational option.
Replacing a heating radiator on a Lada Kalina
Before proceeding with disassembling the heating system, you should stock up on everything necessary for repairs. Here's what we need:
- new furnace fan;
- Phillips screwdriver;
- small pliers;
- set of sockets and ratchet.
Before starting work, it is necessary to do several preparatory operations. First, you need to let the car engine cool down properly. Secondly, you need to remove the negative terminal from the battery.
- To get to the heating fan, you will first have to remove the air filter.
It is held on by two bolts, which are unscrewed with a ratchet. The most convenient way to remove the cover of the Kalina air filter housing is with a ratchet wrench - After this, remove the expansion hose.
It is held on by a blue plastic pin. This pin must be carefully squeezed with pliers and pulled down. The expansion hose pin is removed with pliers - There is an air flow sensor next to the expansion hose.
The wires connected to it are assembled into a single plug. To disconnect it from the sensor, you need to press the locking latch located on the underside of the plug with your finger. To remove the plug, you need to press the bottom latch of the sensor with your finger. - Near the air flow sensor there is an injection pipe with steel clamps.
The bolts on the clamps are loosened with a Phillips screwdriver, after which the pipe is removed and moved to the side. The clamps on the injection pipe are loosened with a flat screwdriver - There is an adsorber under the air filter housing.
It is removed from the socket manually. No tools are required to remove the adsorber - Next to the adsorber socket there are nuts holding the air intake.
They are unscrewed with a ratchet. Unscrew the nuts securing the air intake with a 10mm socket placed on the ratchet - Now the heating fan can be removed along with the housing, but before doing this, the pipe located to the right of the fan should be slightly moved to the side.
To remove the fan from the niche, the pipe located to the right of it will have to be slightly moved - The worn heater fan is replaced with a new one, then the Lada Kalina heating system is assembled in the reverse order.
Replacing the fan speed resistor on a Lada Kalina
Before starting work, you should say a few words about why a car owner might need to change the high-speed resistor on the heater. It's simple: this resistor is responsible for the fan rotation speed.
Replacing the viburnum stove motor without removing the panel
Hi all! For the second year now, the heater motor on my Kalina has been beeping frequently. If before this happened quite rarely, now for the second day in a row the fan practically does not stop. I decided that there was nowhere to delay and this morning I stopped by BB with a new engine, the price of which is 1,400 rubles. I took the Luzar company, since it was the one that was praised by the majority of potassium growers.
So, the first thing I did was remove the front passenger seat by unscrewing the 4 bolts that secure them, which resulted in much more free space.
Then we open the glove compartment, take out all the things from there, and unsnap the “curtain” mounting plate, then unscrew all the screws that are visible in the photo below:
Then unscrew one screw on the left side:
And another one on the right side. After this, you need to unscrew three more screws in the upper part of the glove box lid:
In general, next we remove the side trim of the passenger compartment pillar, as shown in the photo below:
After this, unscrew the screws from below using a short screwdriver or a bit and a ratchet:
Now we lift the upper black cover and unscrew the two nuts under it using an extension, a socket and a ratchet, as well as two self-tapping screws (shown by arrows):
Next, slightly lift the side air duct and unscrew the bolt:
So, we still have to deal with the lower bolts, two on the left and one on the right:
After performing all these manipulations, it seems that nothing will interfere anymore and now you can move the right side of the instrument panel to the side, and then put something under it to fix it in this position:
The photo above does not show an ideal option, and in my case I had to move it back a little more so that I could pull out the stove fan. Then you can crawl up from below with your hands and disconnect the power plug from the heater motor, after first bending the block clamp:
Next, unscrew the three screws that secure the heater fan to the housing:
And after that we try to pull the motor out, if you manage to do this. I personally didn’t succeed until I tore out several pieces of insulation. As a result, after an hour of effort, we finally managed to pull the motor out, resulting in the following picture:
Then we put the new fan in its place without any problems! In fact, this is true - installation compared to removal is just idleness! In total, the whole job took me 3 hours.
The new motor works at least twice as well, and now blows better at first speed than before at second! It is not noisy, although the sound is not much different from the standard one.
In general, if you have any questions, ask, I will try to answer. If I messed something up in the description, please correct me, as I was in a hurry and might not have mentioned something!
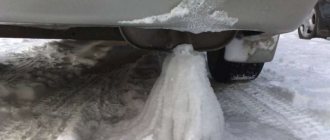
A couple of weeks ago there were real frosts in our city, below -40! I always set Kalina to warm up according to the temperature when the average daily temperature outside is below -25. In this case, I always close the damper, set the heater regulator to the minimum value, set the air flow direction to the front and leave the electric heater fan on at speed 1. This practically does not affect the maximum warm-up temperature, because The temperature regulator is in the minimum position, but you don’t have to worry about the integrity of the windshield, and the interior is no longer at a street temperature.
Replacing the Lada Kalina fan at home - step-by-step instructions
1. First of all, disconnect the negative terminal from the battery.
2. Next, open the glove compartment and, pressing the two stops, open the glove compartment lid. Remove the cover by pulling it up.
3. Next, unscrew the fastening screws one by one. The fastening screw is inside the glove compartment, as well as the screw on the side of the tunnel.
4. Next, unscrew the top screw, which is located under the glove compartment lid.
5. Unscrew the three screws at the top of the glove compartment, shown in the photo.
6. Next, you need to unscrew the fastening screw located in the area of the right passenger air vent.
7. Remove the decorative plastic trim from the windshield pillar, under which there are two fastening screws. Unscrew them and remove the deflector.
8. Unscrew the remaining fastening screws.
9. From the right end of the panel you only need to remove the cover; you do not need to unscrew the two bolts at “13”. Afterwards, we pull the panel towards the seat and find the fan. It is quite difficult to get the fan, and in order to do this you need to cut out a piece of felt sound insulation.
10. Now unscrew the three screws and take out the stove fan.
After the fan of the Lada Kaliina stove is dismantled, it can be replaced or repaired if possible. Assembly is carried out in reverse order.
I have everything, I hope I helped you solve your problems. I think it’s described and shown more than clearly, and you won’t have any problems during disassembly. Thank you for your attention and see you again at vaz-remont.ru.
Conclusion
Any breakdown in a car, as a rule, is not associated with the failure of just one part. Before you start replacing the fan, diagnose the entire heating system. Otherwise, you will have to change the stove motor very often. Carry out vehicle maintenance in a timely manner and there will be no problems with the operation of Kalina.
Perhaps you know how to fix a broken stove on a Lada Kalina using some other method? Or are there any additions or recommendations to the methods described in the article? Share your experience and opinion in the comments. Any information will be very useful to readers.
See you soon and good luck on the roads!
How to independently change the heater fan in a Lada Kalina car
If the car interior is left without heating in the cold season, this does not bode well for either the driver or his passengers. This rule applies to all passenger cars, and the Lada Kalina is no exception. In general, the heater in this car is quite reliable. But it has one weak point: the furnace fan. It is this part that most often fails and becomes a source of real headache for the Kalina owner. Is it possible to replace the stove fan on a Lada Kalina yourself? Can. Let's figure out how this is done.
How to change the stove motor on a viburnum
It's been about 3 months since I wanted to change the heater motor on the viburnum. This morning it became a little cool, the glass was not thawing very well - I listened and the motor was barely breathing. I decided that I needed to prepare the “sleigh” in the summer, otherwise in the winter it wouldn’t be an ice-breaker to lie “under the car.” Bought: motor. The box says: Electric heating motor assembled with impeller on a universal bearing lFh-01230. Also, in the 4th position of the fan, the 25A fuse blew out and at other speeds the fan barely turned and even “whined”; in winter I remember it worked fine, but sometimes it whistled. I made the diagnosis - I read the questions there on the Lada-Kalina forum and everything is clear - NATURAL WEAR OF THE MOTOR - needs replacement. After reading the manual, I realized that I don’t want to remove the entire dashboard because... it's terrible))) and long. To replace such a part, you have to remove so many things))) I found a couple of instructions on the Internet, the point is to unscrew the right side of the dashboard and bend it back to pull out the motor. You need to put your legs on the seat, and your head under the dashboard and unscrew the 3 screws that secure the stove motor))) It seemed like nothing complicated, but I had to fray my nerves to pull out the motor and install it especially. Installation turned out to be much more difficult than removal, because... until I cut off the noise at the right leg of the front passenger. The motor did not want to climb. For convenience, you need an assistant to bend the dashboard and support the impeller from under the hood.
There were some problems too. In short, I plugged in the motor, tightened all 3 screws, put on the hose, put on the wire plug and decided to plug this plug in until it clicks so that the tongue bites the recess (IF YOU DO THIS, HOLD THE MOTOR IN THE CENTER!). I didn’t expect that the fastening with 3 screws is bullshit. While I was pressing on the plug, the motor came off one screw. And as a result, one of the three fastenings was broken, not on the motor, but in the car. The head of the screw slipped through the rubber band. No washers are provided because a cylinder with a small hole inside (see photo) falls into the hole in the rubber band, and a self-tapping screw is screwed into this cylinder, covering part of the rubber band with its cap and resting against the cylinder itself. In the photo I showed where I had to drive the self-tapping screw so that the motor would be fixed in all 3 positions because... one of the three cylinders on which the motor is attached broke))) this is not critical because where I drove the self-tapping screw next to the shock-absorbing elastic band and did not particularly change the principle of fastening - the main thing is not to get into the impeller, DRIVE THE SCREW CLOSER TO THE EDGE))) (there is plenty of space for the self-tapping screw! In the photo, although it’s not particularly visible) it stays on the self-tapping screw even more reliably than on flimsy ones rubber bands that could not hold the motor while plugging in the plug)))
Afterwards I put everything back together in reverse order. Replaced the cabin filter. I turn it on and everything works as it should, it blows like new and blows strongly)))) at 4th speed the fuse does not blow!
The story with the stove began back in August. First the fuse blew, and the problem was quickly fixed by replacing it. One day in September, on a not particularly beautiful morning, the stove did not start working again. 1. The fuse turned out to be normal. (F5 in the mounting block on the left under the steering wheel) 2. The additional resistor was also excluded because and at 4th speed the heater fan did not work)
Removing the old and installing a new radiator
Before replacing a leaking heater radiator, you need to prepare all the necessary tools, namely:
- hacksaw blade for metal;
- a set of socket and open-end wrenches;
- pliers, screwdriver;
- cut plastic canister or basin for antifreeze.
The first and main question: how to remove the stove on Kalina, so as not to disassemble the entire dashboard? First, you need to empty the cooling system by draining the liquid into a prepared container. Then the air filter is disconnected and removed along with the pipe, and the battery is also removed. This opens up access to the pipes leading to the interior heater. They must be removed from the stove fittings, draining the remaining antifreeze into a basin.
Next to the fittings you can find a nut that secures the protective plate located inside the passenger compartment. It also needs to be unscrewed so that later the plate moves freely and does not interfere with dismantling the stove. Then you need to move into the interior and dismantle the following parts:
- Accelerator pedal. It is held on by 3 bolts; first you need to disconnect the cable and bend the plate.
- Side decorative panel.
- Plastic side cover of the stove.
- Brake pedal. There is no need to remove it entirely, just remove the metal rod so that the pedal rises.
Since the heater fittings stick out in the engine compartment, and its frame does not allow the radiator to be pulled out in the desired direction, for freedom of action it is necessary to cut out a piece of plastic from the side.
To do this, use a hacksaw blade to make the cut neat. After which the stove moves back a little and towards the driver's door, being removed from the socket. The new heater is installed in the same way, and the opening is sealed with plastic that was cut out earlier. The rest of the assembly is done in reverse order.
When the radiator is removed, it is possible to change the heater damper gear motor in case of incorrect operation. The gearbox and damper position sensor are manufactured as one unit, attached with 3 screws. You need to unscrew them, disconnect the gear motor and install a new one. Also, with the radiator removed, the heater tap can be easily replaced if such a need arises.
motor, how to remove and change
With the advent of the cold season, many owners of domestic small-class Lada Kalina cars are faced with an annoying situation when the heating system “refuses” to effectively heat the interior space. This state of affairs prompts you to venture into searching for the causes of the malfunction; in some cases, the stove fan needs to be replaced, and sometimes the stove motor needs to be replaced.
Causes of stove failure
In some cases, the “culprit” of a non-working stove is the coolant, which is simply not enough. In this case, the stove fan simply “drives” a cold air flow into the cabin.
However, there are much more serious situations when, for example, the driver turns on the stove, but does not detect any manifestations of its functioning. The obvious factor here is a non-working fan. It is for this reason that the owner does not observe the flow of air into the interior of the Lada Kalina.
There are several reasons that caused the fan to stop. Among the banal factors, one can highlight the burnout of the working element of the fuse link. Wiring can also be annoying at the wrong time in the form of a break or oxidation of contact groups.
If the fan motor or wire is burned out, then an unpleasant odor with a characteristic sign of burning will begin to penetrate into the interior of the Lada Kalina, and then the heater motor will need to be replaced.
Lada Granta wiring diagram
Lada Granta Sport owner reviews
Granta sport technical specifications
Replacing a stove fan in Kalina
Today we will look at the algorithm for independently replacing the heating circuit fan of the Lada Kalina interior, and we will tell you how to remove it, as well as how to change a non-working device. The main advantage of the method we have outlined is that there is no need to dismantle the front panel. The owner will spend no more than one hour on the entire process. As your “helpers” you should take a pair of ordinary keys and a small screwdriver.
- First, we de-energize the network by simply removing the terminals from the battery.
- Next you will need to remove the glove compartment lid. This can be done by pressing on a pair of internal stops. Then the cover is hinged and removed by pulling upward.
- Now you need to unscrew two screws in order, the first of which is located in the glove compartment cavity, and the second on the side panel of the tunnel.
- We find another screw under the compartment cover and unscrew it.
- We move on to the three fastening components, which should also be unscrewed. They are located on top of the glove compartment.
- There is a screw “hidden” next to the deflector on the right side, which we can safely “defeat” with a screwdriver.
- The plastic decorative trim of the body pillar must also be removed. After this, remove the screw holding the deflector itself and remove the ventilation system component.
- We unscrew the remaining fasteners one by one.
- At the right end of the panel we see a small cover, which we dismantle. A couple of bolts at “13” should not be unscrewed.
- Now, by pulling, we move the corresponding side of the panel in the direction of the seat and find the fan located behind it.
- To remove the part we are considering, you will need to cut out a section of the felt soundproofing panel.
- The fan is held in place by three screws and you will have to unscrew them to remove it.
- After removing the faulty component, we install a new or repair fan in this place.
Oil pump - removal, inspection and installation
1. Remove the crankshaft toothed pulley and its key (see “Front crankshaft oil seal - replacement”). 2. Remove the crankshaft position sensor (see “Crankshaft position sensor - removal, checking and installation”). 3. Remove the oil intake (see “Oil intake - removal and installation”). 4. Using a 10 mm socket wrench, unscrew the six bolts securing the oil pump to the cylinder block.
5. Remove the oil pump from the engine.
6. Remove the remnants of the sealing gasket from the mating surface of the cylinder block.
Disassembly
1. Using a 5 mm hex wrench, unscrew the six bolts holding the pump housing and cover together.
2. Separate the pump housing and the cover.
3. Remove the drive gear from the cover.
4. Remove the driven gear from the housing.
5. We wash the pump parts with diesel fuel or kerosene, wipe them dry and lubricate the gears with clean engine oil.
Examination
1. Inspect the oil pump parts. They should not show signs of heavy wear, metal coating, cracks or other damage. 2. Using a caliper, measure the diameter of the mounting hole of the driven gear in the pump housing and the thickness of the partition between the driven and driving gears.
3. Using a micrometer, measure the thickness of the driven and driving gears. If the driven gear is thinner than 7.35 mm, and the driving gear is thinner than 7.41 mm, then replace the gears. 4. Place the drive gear in the oil pump housing. Applying the edge of a bench ruler to the mating surface of the oil pump housing, use a set of flat feeler gauges to determine the gap between the edge of the ruler and the gear. Repeat the test with the driven gear.
Assembly
We assemble the pump in the reverse order of removal. In this case, the driven gear must be installed in the pump so that the side with the mark and chamfers on the teeth faces the housing.
The drive gear should be oriented in the same way during installation: with the chamfers on the teeth facing the pump housing.
Installation
We install the oil pump in the reverse order of removal, replacing the gasket between the pump and the cylinder block with a new one.
The fuses and relays for the fuel pump and engine cooling fan are not located in the main unit, but in the additional unit. Moreover, there are even two of them. One of them is located under the cover near the gearshift lever, just below the ashtray. You can open it by simply prying it with a flat screwdriver:
Let's take a closer look at what it all looks like and which element is responsible for the operation of which device:
The numbers in the picture correspond to the numbering below:
- Main relay power circuit
- Fuel pump
- ECU constant power supply circuit
- ECM diagnostic connector
If one of the fuses fails, remove it with tweezers and insert a new one. The battery must be disconnected while this work is being carried out.
The second additional fuse and relay box is located on the right side of the instrument panel at the very bottom near the heater air duct, under the cover. Look clearly at the photo below:
First, unscrew the screw, which is located in the very industrial corner, and then remove this cover completely.
Now, to remove this relay block, we need a 10mm open-end or socket wrench.
After this, we move the wires to the side and carefully remove the entire block with the relay and fuse. Removing it is quite inconvenient, since rather voluminous wiring harnesses will get in the way. This is what it looks like after removal:
Now let's look at this mounting block in more detail:
- Turning on the engine cooling fan (low speed)
- Main relay
- turning on the engine cooling fan (high speed)
- fan fuse
- fuel pump relay
If one of the above elements fails, remove the burnt one and put a new one in its place. We put everything back in the reverse order.
Disassemble and clean the fan
The main thing is that before starting work, do not forget to disconnect the terminals from the car’s battery so that a short circuit does not occur.
There are two options for developing actions:
- Just clean it: to understand what the problem is, you will need to spin the already removed engine; if it turns over with difficulty, sometimes even familiar noisy sounds appear, then in this case you will need to vacuum the engine and lubricate the bearings and other rotating parts. You can lubricate with any silicone grease or WD-40. Also be sure to clean all dirt from the shaft. In 65% of cases, these actions are enough to get rid of extraneous sounds from the stove and will last for a long time.
- Repair or replace shaft bearings: To determine whether any work needs to be done on the shaft bearings, you first need to look at their condition. If they don't turn at all, then you will have to disassemble the motor. Bearings may fall apart or become jammed from prolonged operation. Of course, you can just buy a new motor and not have to worry about repairs, but a new part costs a lot and if you try really hard, you can still fix the old one yourself.