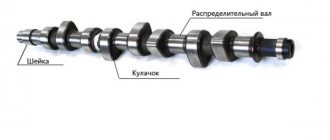
Modern cars use two types of transmission of torque from the timing mechanism to the crankshaft. This is a belt and chain design. The second option is more reliable and durable, however, untimely maintenance and repairs can lead to the device operating too noisily. Chain tensioners, which are equipped with all timing kits, allow you to correct the transmission condition.
Purpose
The mechanism in question ensures the normal operation of the chain and the entire drive. The unit is easy to maintain and simple in design. The tension is carried out under the influence of a spring or oil in the working rod of the device. The engine chain tensioner is a fairly reliable element and rarely fails. However, if extraneous noise is heard, it is necessary to check its condition and, if necessary, replace it.
Ignoring this problem leads to the chain weakening and jumping off, which can lead to more serious damage to the power unit. It is quite possible to clean and replace the part on your own. Next, we will consider the features and operating principle of these devices.
Is it possible to do it yourself?
You don’t have to buy the calm, you can actually make it yourself. To make rockring and fastening yourself, there are many visual diagrams on the Internet. As for pen mounts, self-made models are even better than store-bought ones. Craftsmen, armed with a drill and a jigsaw, assemble very decent options that cope with the main function of the device and prevent the chain from flying off. An easy-to-make but effective damper is made from a reflector.
Most often they make:
- Rockring (partial or full) with BB mount.
- ISCG mount with frames. They make it with their own hands, without using metalworking.
- Rollers for the front (rear) sprocket with partial fastening.
- Frames protecting the chain.
Mechanical chain tensioner
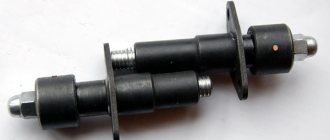
In this case, the required tension value is achieved using a plunger spring. Under its influence, the working element leaves the landing compartment and comes into contact with a special shoe. The load on it continues until the chain resists. This allows you to prevent it from sagging and fix the desired position using a stopper.
With prolonged use, the chain stretches and requires repeated adjustment. After unscrewing the plunger lock nut, the spring will again adjust the degree of sagging. Such chain tensioners have a significant disadvantage. They are susceptible to clogging with small particles, which increases the likelihood of the plunger jamming. This problem can be solved simply by tapping the element. If the device body is damaged, it must be replaced.
Due to the relatively labor-intensive maintenance of a drive with mechanical chain tension, many car owners are switching to an automatic type, which independently adjusts the chain tension and prevents the device from jamming.
How does it work?
The principle of operation of the element is based on the operation of a spring. As oil from the line flows through the valve body, the plunger presses against the plastic tension shoe. Some engines use a lever with an asterisk. Thus, continuous contact of the surface of the working element is ensured. When engine speed changes, the element plunger moves back. The spring is compressed.
Automatic design
This type of timing chain tensioner has a ratchet that automatically controls the sagging and stretching of the transmission element. The unit consists of a housing and a spring-loaded pawl located in it, as well as a gear strip. The teeth are made with a slope in one direction in increments of one millimeter.
The operating principle of this design is as follows:
- the spring of the device acts on the toothed bar with force, depending on the sagging of the chain;
- the bar transmits force to the tensioner shoe;
- reverse movement is eliminated thanks to the ratchet locking pawl;
- the stopper falls between the teeth, preventing the bar from moving back.
This principle of operation consists in the constant action of the spring on the bar with tension on the chain, and the ratchet device prevents it from weakening.
Possible malfunctions and their causes
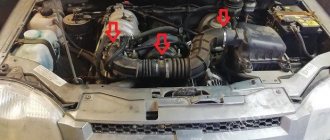
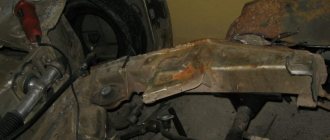
If an increase in noise during operation of the gas distribution unit is clearly noticeable, the chain tensioner of the ZMZ or another engine should be removed and checked. It is located on the right side of the power plant. A similar mechanism works using a spring and oil pressure in the housing, which depends on a similar indicator in the engine itself.
Reasons leading to the appearance of extraneous sounds during operation of the timing chain:
- poor quality purge of the plunger device;
- clogged ventilation holes;
- Excessive plunger wear;
- incorrect spring adjustment;
- failure of the ball valve.
Let's consider the procedure for disassembling and installing this device.
Mounting methods
An important point is how you install the chain guide on the bike. If installed incorrectly, high efficiency will not be achieved. There are four main types of installation of a bicycle chain guide.
- BB – mounted on the carriage, the damper is pressed against the frame. Used when using “bananas” and other partial protections.
- ISCG - usually the mount is located on the frame, if there are no ISCG mounts for the damper, then the kit includes an adapter that is mounted to the frame in three places, which is considered an outdated method.
- The ISCG 05 standard - fastening appeared not so long ago, is the most progressive and is currently supported by leading brands; in this version, the diameter of the circle has changed from 60 to 73 mm, and the distance between the bolts has changed from 48 to 56 mm.
- D-Type, E-Type and others - are mounted instead of the front gear selector; at the moment this option is considered obsolete.
Installation takes about half an hour. The following tools are needed: hexagons, a crank wrench, a carriage puller, a thread locker, a wrench, etc.
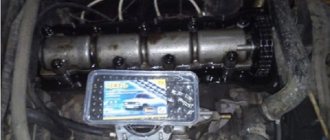
Replacing the chain tensioner
In order to remove the mechanism, it is necessary to unscrew the plunger fixing bolt. This must be done carefully, since the screw is under great pressure from the spring. Then you need to dismantle the spring-plunger filling. The unloaded length of the spring should be 155.5 millimeters.
The next step is to check the device. To do this, the plunger is shaken, while the ball (working element) must move freely. Then the functionality of the valve is checked. When compressed air is blown in, it should open, and after repeating the manipulation on the other side, it should close. If this does not happen, you need to remove the valve from the mounting sleeve and clean both elements. You also need to pay attention to the cleanliness of the blow-out slot.
Road switches
Shimano also makes SORA and TIAGRA road derailleurs. Speaking of switches, it is also worth touching on the shifters (shifters located on the steering wheel). Children's and budget bicycles are often equipped with revolving-type shifters, which can be switched by simply turning them like the throttle on a motorcycle. The advantage of such shifters is that they are inexpensive and you can quickly switch to several gears with one rotation of the wrist.
The downside is that it is difficult to switch to a specific gear, and there is a possibility of accidentally switching by carelessly holding the steering wheel. Therefore, the most common are trigger shifters. Changing gears with such shifters is very easy
Best articles: What types of bicycle garages are there and how to make them?
The two levers are under the index finger and thumb on Shimano, and both under the thumb on Sram. Once you ride a bike with such a shift system, you will immediately remember which lever downshifts and which upshifts. In addition, on road bicycles there are switches on the frame, as well as those combined with the brake handle
Changing gears with such shifters is very easy. The two levers are under the index finger and thumb on Shimano, and both under the thumb on Sram. Once you ride a bike with such a shift system, you will immediately remember which lever downshifts and which upshifts. In addition, on road bicycles there are switches on the frame, as well as those combined with the brake handle.
Installation and adjustment
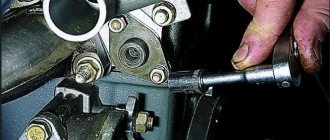
Mechanical type chain tensioners are installed after filling the working chamber with the required amount of oil. The plunger with a spring and a new gasket is placed in the seat, after which the fixing screw is turned. The cone-shaped edge of the spring should face the locking bolt.
After installation, it is necessary to unscrew the cylinder head mounting bolts, after which its cover and the camshaft gear cover are removed. The tensioner should be moved in both directions until oil appears near the fixing screw and real resistance to the movement of the part is felt. At the final stage, the closing bolt is tightened with a force of 35 Nm, and the cylinder head covers and camshaft gears are replaced.
Step-by-step instruction
The transmission elements of bicycles from most manufacturers, with rare exceptions, are compatible with each other. You just need to select the same number of transmission and chain speeds. For example, for a transmission with nine gears you will need a chain designed for the same number of speeds.
Removing the old chain
Using a chain squeezer, press out one of the pins (the pin that connects the chain links) in the bottom passage of the chain. If there is a locking link, remove it. After removing the roller, carefully remove the chain from the bike.
If you use one chain for a long time without replacement, you may need to replace the cassette.
Installing a new chain
Shift reverse and forward gears to the largest sprockets. If your bike has a clutch, loosen it.
Place the chain over the front sprocket and thread the end through the front shifter. Rotate the pedals so that the end of the chain hangs down from the sprocket at a distance of about 10 centimeters. Thread the other end through the rear fork of the bike frame and onto the largest sprocket on the cassette. Lower the rear gearshift down.
Throw the chain over the guide roller, pull it through the mechanism's legs, and wrap it around the tensioner roller. Carefully release the gearshift mechanism.
Chain measurement
You need to make sure that the chain will behave properly when shifting into any gear without damaging other parts of the bike. To check, the chain must be installed on the two largest sprockets, front and rear. Even if you never drive in such a gear.
Align the two ends of the chain and identify the extra links that need to be removed. To fix the chain in this position, use part of a bicycle spoke.
Once the required chain length has been determined, remove unnecessary links. Throw the chain back over the smallest sprockets.
Attention ! On full suspension mountain bikes you need to make sure there is enough chain length when the suspension is compressed
Circuit connection
For Shimano chains, you need to connect both ends with a roller. After installation, the excess part of the roller is broken off with pliers.
Manufacturers SRAM and KMC have a special locking link inserted between the ends of the chain, then the plates are snapped into place. For a complete connection, special pliers are used, but you can use the following method.
Rotate the pedals until the locking link is in the middle of the upper passage. Then hold the rear wheel to prevent it from spinning. Press down on the pedals and the locking link will finally slide into place. Make sure the chain is installed correctly. Pedal the bike using all gears.
Installation of an automatic device
Automatic timing chain tensioners are of a similar design on most vehicles. They are sold with a working rod placed in the body, which is secured with a pin at the end. Removal and installation of this device is identical to the mechanical version.
After installing the device, you need to remove the fixing pin using wire cutters or pliers. After this, the spring will press on the bar. Then the control bolt must be screwed into the end part of the housing. It serves to prevent the spring from falling out and is supplied complete with the main unit. In fact, the process of replacing engine tensioners is similar, regardless of the modification and type of device. Knowing the sequence of operations, you can easily do this work yourself.
We adjust the position of the switch above the stars.
Now we connect the gear shift cable in place. We tighten the cable length adjustment nut (located between the jacket and the shifter) on the switch until it stops, and we also screw the adjustment nut on the shifter (on the steering wheel, located between the jacket and the shifter) until it stops. We simply tension the cable and secure it with a hexagon bolt.
Then we click the shifter two (let’s say) times - as a result, the roller should be (in mind) above the third star. But, most likely, you will have something like the photo below
As soon as you accurately position the video above one of the stars, it will automatically move accurately between other stars.
The exception happens if the switch itself is very worn out (behaved, skewed, the cock between the switch and the frame may be bent) - then you will have to look for something in between. So that it hits more or less below, and above.
After that, we put the chain back on - spin the pedals (is the bike still upside down?), click the switch back and forth, spin the pedals, click again, and enjoy the sight of the chain running across the cassette. You can do this for another 10-15 minutes without getting bored
Design features of tensioners on domestic cars
The VAZ chain tensioner of early modifications is a design with a spring. Modern models (after the seventh series) are equipped with hydraulic devices. The plunger rod is driven by the pressure created by the oil. This type is fully automatic, requiring no additional intervention to adjust the chain tension.
This part, like any other, is subject to wear and deformation. If damaged or clogged, the tensioner should be replaced or repaired. The device is removed according to the standard version. In early versions of the Zhiguli, it is additionally necessary to dismantle the oil supply tube located at the end of the unit body. To prevent liquid from leaking out during the operation, the hole must be blocked with a bolt of suitable diameter or a rag.
Reflector dampener
One of the simplest to make, but quite effective sedatives. It copes well with the main task - preventing the chain from falling off. At the same time, the chain holds perfectly during a quiet ride and during bumps and bumps.
To make a chain guide with your own hands you will need:
- an ordinary bicycle reflector (it is better if the diameter of the mounting ring matches the diameter of the seat tube);
- nuts;
- bolt;
- screwdriver;
- hacksaw for metal.
When you have found all the necessary tools and materials, you begin production. Take the reflector and unscrew the reflector. All you need is a foot. Mount it to the seat tube above the chain. It should not rub against the chain, but should be as close as possible, just a few millimeters. After this, saw off the excess length so that it does not interfere with pedaling. This type of stabilizer will perfectly hold the bike chain when jumping over curbs and during side landings.
Chain stabilizer made of reflective material prevents the chain from falling off
You can screw an asterisk to the foot. You need to install such a tensioner on the pen with the asterisk down. This way you can tighten up the sagging lower part of the bike chain.
Suitability test
After removing the part, you need to check the element for clogging. Oil can carry small particles and other contaminants that can negatively affect the performance of the device in question. Their excessive accumulation causes unstable operation of the plunger rod and its jamming.
You can clean the tensioner yourself without much effort. Place the part in a tank of gasoline for several hours, rinse and dry it thoroughly. When inspecting the case, you need to pay attention to the presence of dents, cracks and scratches. The plunger mechanism is checked in the same way. If no visible damage is detected, check the functionality of the device.
The device is taken in one hand, and with the other we try to move the plunger rod in the frame. It should move freely without getting stuck. If movement is difficult, the washing process must be repeated. If this does not help, the part must be replaced. The element is installed in the reverse order of removal.
What do users recommend?
Car enthusiasts give different advice on how to improve or select a chain tensioner. Mercedes and other foreign cars from well-known manufacturers are often equipped with a timing chain drive. As a rule, the device for tensioning the chain in modern cars is designed to be automatically adjusted. This makes it easier to maintain and repair the unit, ensuring its reliable operation.
In addition, when replacing the tensioner, users recommend setting the rod of the new device to the minimum position. This makes it possible to pump the working chamber as much as possible, avoiding jamming and unnecessary noise. This, in turn, contributes to the correct adjustment of the degree of chain tension.
Completion
Such a small but important part as the engine chain tensioner is a kind of fuse against the transmission element weakening and jumping off. Such things can lead to serious malfunctions of the power unit. If an older car model has a manual version, it is easy to upgrade it by replacing it with an automatic version.
It is more convenient in that it ensures tension of the chain without additional human intervention, eliminates jamming of the rod, and is easier to disassemble and install. According to their operating principle, all variations of timing chain tensioners have a similar sequence. The same applies to replacement and repair of parts.
Step-by-step instruction
The transmission elements of bicycles from most manufacturers, with rare exceptions, are compatible with each other. You just need to select the same number of transmission and chain speeds. For example, for a transmission with nine gears you will need a chain designed for the same number of speeds.
Removing the old chain
Using a chain squeezer, press out one of the pins (the pin that connects the chain links) in the bottom passage of the chain. If there is a locking link, remove it. After removing the roller, carefully remove the chain from the bike.
If you use one chain for a long time without replacement, you may need to replace the cassette.
Installing a new chain
Shift reverse and forward gears to the largest sprockets. If your bike has a clutch, loosen it.
Place the chain over the front sprocket and thread the end through the front shifter. Rotate the pedals so that the end of the chain hangs down from the sprocket at a distance of about 10 centimeters. Thread the other end through the rear fork of the bike frame and onto the largest sprocket on the cassette. Lower the rear gearshift down.
Top articles : Headphones for cycling
Throw the chain over the guide roller, pull it through the mechanism's legs, and wrap it around the tensioner roller. Carefully release the gearshift mechanism.
Chain measurement
You need to make sure that the chain will behave properly when shifting into any gear without damaging other parts of the bike. To check, the chain must be installed on the two largest sprockets, front and rear. Even if you never drive in such a gear.
Align the two ends of the chain and identify the extra links that need to be removed. To fix the chain in this position, use part of a bicycle spoke.
Once the required chain length has been determined, remove unnecessary links. Throw the chain back over the smallest sprockets.
Attention ! On full suspension mountain bikes you need to make sure there is enough chain length when the suspension is compressed
Circuit connection
For Shimano chains, you need to connect both ends with a roller. After installation, the excess part of the roller is broken off with pliers.
Manufacturers SRAM and KMC have a special locking link inserted between the ends of the chain, then the plates are snapped into place. For a complete connection, special pliers are used, but you can use the following method.
Rotate the pedals until the locking link is in the middle of the upper passage. Then hold the rear wheel to prevent it from spinning. Press down on the pedals and the locking link will finally slide into place. Make sure the chain is installed correctly. Pedal the bike using all gears.