| EXECUTION ORDER | |
| Using the “8” socket, unscrew the three nuts securing the window lift mechanism to the inner door panel. |
| We bring the window lift mechanism to the window in the door panel. |
If we do not replace the window lifter mechanism, but remove it when completely disassembling the door,...
| ...then we tie the branches of the cable near the drum of the window lift mechanism with wire. |
We lower the glass by hand until it reaches the rubber buffer (see Replacing door glass). We remove the cable from the four rollers...
| ...and take out the window lift mechanism with the cable. |
| Using a 10mm socket, unscrew the bolt securing the tension roller bracket... |
| ...and take out the bracket with the roller. |
During assembly, after installing the tension roller bracket, do not tighten its fastening bolt. Lifting the glass, fix it.
| We thread the window lift mechanism shaft into the hole in the inner door panel (the new window lift mechanism is sold with connected branches of the cable). |
| We put the cable on the rollers according to the diagram. |
| Using side cutters, we cut the wire securing the branches of the cable. |
We thread the pins of the window lift mechanism into the holes and fasten the mechanism. To tension the cable, lightly tighten the bolt of the tension roller bracket.
| By tapping with a hammer on the “10” head extension placed on the bracket bolt... |
...we move the roller down, tensioning the cable. Finally tighten the bolt. We tighten the screws of the two clamping strips of the glass frame brackets and slightly tighten the screws of the front bracket strip. Rotate the handle placed on the window lift mechanism shaft counterclockwise until the rotation of the window lift mechanism drum stops. We lift the glass with our hands until it stops and, holding it in this position, turn the handle placed on the shaft of the window lifter mechanism clockwise half a turn.
| Using a Phillips screwdriver through the window in the upper part of the inner door panel, finally tighten the screws of the front bracket bracket of the glass frame. |
We lower the glass to the level where through the window of the inner door panel it will be possible to tighten the screws of the rear bracket bracket of the glass frame (see Replacing the front door glass). After checking the operation of the window lifter mechanism, lubricate the cable and rollers with Litol-24 lubricant.
Electric window device
Window lifters first appeared from the German manufacturer Brose in 1928, and their operating principle was based on a mechanical drive. The first automatic window lifts were developed in America in 1940, using an electro-hydraulic mechanism. Since then, the design has undergone a large number of changes in dimensions, operating principle and drives used.
Window regulator installed in the door body
The end result of the developments was electric windows, which are now installed in all vehicles. The device is used to automatically raise and lower car windows. Electric windows do not affect driving safety, but significantly increase the convenience of passengers and the driver.
Massive demand for electric lifts has made the option quite economical and affordable.
Possible motor breakdowns
As a rule, the design of the device is quite simple, and it can be repaired in most cases, however, many motorists simply purchase a new device, since the market offers a large selection of such products. However, in some cases you can get by with less. Main faults that can affect the gearmotor:
- Gear failure. This defect occurs especially often with modern devices: many manufacturers have begun to install plastic parts, which, despite being lighter, have deteriorated strength characteristics. As a result, such elements are more likely to break and crack, and due to broken teeth, so-called sliding occurs when the glass stops at a certain point and does not move further. To improve the strength characteristics, it is better to install a gear made of steel, which can be found in old units or purchased separately.
- Another problem affecting the gear motor is brush abrasion. These elements are necessary to supply the rotor mechanism with current and are a pair of plates equipped with copper plates. Wear of the brushes occurs due to constant friction and the influence of current discharges that form a spark, and a gap appears between the armature and these elements: this also affects the characteristics of the entire device.
- Foreign objects entering the structure, ranging from dust to dirt particles. Usually they get clogged under the winding or get caught on the contacts, and the gearmotor does not work as well as before. In this case, nothing will have to be changed, and you will need to clean the structure, replace lubricants and update the layer of sealing material.
Design features
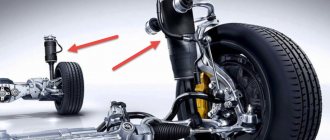
Automatic window regulators are made up of a number of electrical and mechanical components that control the position of the glass. The actuators are installed inside the door. The structural elements include:
- control unit - receives commands from the driver and passengers and generates control signals for the operation of the lifting mechanism;
- drive - an actuator that consists of an electric motor, gear and worm gear, combined into one module;
- lifting mechanism - connected to the glass and directly performs the work of moving.
Window lifter control unit
For control, special buttons are used that are installed on the doors. To lower or raise the glass, just press or lift the button. Each door has its own control, but only the driver can operate the front and rear power windows.
Correctly removing the window lifter
There should be no problems with how to remove the window regulator. Because everything is simple here:
- we use a screwdriver, unscrewing the fasteners that hold the casing;
- remove the protective film;
- unscrew the motor;
- disconnect the unit, after which the glass should move easily from hand pressure;
- Unscrew the remaining fasteners on the window lift mechanism.
The glass must be supported and removed carefully to prevent it from breaking, cracking or chipping.
Since you had to disassemble the doors and get to the internal system, take the time to lubricate all elements that are subject to friction. Thus, the work of the window regulators will be extended, and preparing the car for winter will be one step shorter.
Types of drives and lifting mechanisms
Previously, mechanical drives with a simple lifting mechanism were used to control the position of the glass. It was enough to twist the installed handle, and with the help of a simple design the movement was carried out. Modern systems use an electromechanical drive system, and lifting mechanisms are divided into:
- lever;
- rack and pinion;
- cable
Cable glass lift
The cable device is considered one of the most popular types of mechanisms due to its simplicity and efficiency. Rollers are used inside the structure, between which a flexible cable or chain and a drive drum are pulled. When an impulse occurs, the drum begins to rotate and the cable begins to wind. In this case, the device is connected to the glass and activates it. The main disadvantage is the rapid wear of the cable and the low strength of the drums.
Lever lifting mechanism
Lever lifting mechanisms are quite reliable, fast and compact. The principle of operation of the device comes down to the operation of an electric motor, which rotates the gear and changes the position of one or two levers attached to the glass. The mechanism operates quietly and has excellent performance properties.
Rack and pinion mechanism
Rack and pinion window regulators are in great demand due to their low cost and simplicity of design. The mechanism consists of a guide plate, which is connected to the glass, and a rack. When a control command is given, the guide begins to move using a drive mechanism. Among the disadvantages, it is necessary to highlight the need for regular lubrication and the low strength of rack teeth in budget cars.
Window lift repair
Since repairing a window regulator in most cases involves replacing the mechanism, it is worth considering the step-by-step process from removal to installation. To do this you will need the following list of tools:
- heads or keys for 8 and 10;
- extension;
- ratchet handle;
- flat and Phillips screwdrivers.
Removing the window regulator
The procedure for removing the device from the car is as follows:
- Use a screwdriver to pry up and remove the plugs on the armrest.
- Using a Phillips screwdriver, unscrew the fastening of the armrest to the door and remove it.
- We remove the trim of the window lifter handle by inserting a flat-head screwdriver between the socket and the trim element.
- We dismantle the handle and socket.
- Use a flathead screwdriver to pry off the inner door handle trim.
- We start the slotted screwdriver and push out the 7 clips that hold the door trim on the sides.
- Slightly lower the upholstery and remove it from the inside door handle.
- Lower the window completely and unscrew the cable clamp with a Phillips screwdriver.
- We unscrew the tension roller fastening, then move it and loosen the tension on the window lift cable.
- Remove the cable from the remaining rollers.
- We unscrew the fastening of the mechanism and remove it from the door.
- If the tension roller has become unusable, which can be determined by its external condition, then completely unscrew its fastening to replace it with a new part.
Replacing rollers
Window lifter rollers fail over time. Since replacing the top element is the most problematic, we will dwell on this process in more detail. The part to the door is fixed with hooks at the top, and with welding at the bottom. To work you will need the following set of tools:
- set of drills;
- electric drill;
- flat screwdriver;
- hammer;
- new video.
The upper roller consists of the roller itself and the mounting plate
The replacement procedure consists of the following steps:
- To remove the roller, we drill out the metal at the place where the plate is attached with a 4 mm drill.
- We drive a flat screwdriver inside the door under the roller plate and knock it down with a hammer, dismantling the roller.
- Using the hole in the new plate, we drill a mounting hole in the door.
- We install a new roller and secure it with a rivet or bolt and nut.
Video: replacing the upper window lift roller
Window lifter installation
Before installing a new window lifter, you must check whether the rollers rotate freely. If necessary, lubricate them with Litol. The bracket that secures the cable should not be removed in advance so as not to confuse the mechanism, since returning everything to its original position will be quite problematic. We carry out installation as follows:
- We install the window regulator in place, securing it with nuts.
- We remove the bracket and place the cable on the rollers according to the diagram.
- We adjust the tension of the cable with the appropriate roller and tighten the fastening of the latter.
- We fix the cable to the glass.
- We check the functionality of the mechanism.
- We install the upholstery and door handle, as well as the window lifter handle.
Features of operation and control of power windows
The operating principle of automatic windows is quite simple. An individual control unit is installed on each device, which also receives commands from the central module. The mechanism processes signals from the buttons and activates the actuators - the electric motor begins to work and changes the position of the lifting mechanism.
Some systems allow you to control automatic lifts after turning off the engine, as well as change the position of the glass using external commands (for example, an alarm key fob).
For control, a direct or electronic system is used. The first option is directly connected to the on-board circuit and consists of a three-position switch. It is enough to change the position of the element, after which the glass will begin to move in one direction. Due to the lack of locks and protective mechanisms, it is practically not used.
Electronic control is one of the most popular methods for adjusting the position of glass. The structure consists of:
- electronic control unit;
- input devices (switches, glass position sensors);
- actuators (electric motor, drive).
Individual control buttons are installed on the passenger doors, and the main module is installed on the driver’s side. With its help you can change the position of any lift, turn on the lock or close all the windows.
Window lifter for VAZ 2107
Window lifters on the VAZ 2107, as on other cars, are a necessary element of comfort and climate control in the cabin. The standard power windows on the front and rear doors are not very flatteringly called “crutches” by the people. Their plastic handles tend to break off if the car is not used very carefully; the edge of clothing can get caught on the handle, and then parts may need to be replaced. For tuning the interior, electric windows have long been used, even for the front doors. Their installation is highly desirable. While the passenger is looking for the handle, the driver proudly points to the button. We will definitely tell you about the connection diagram for electric windows in the following articles.
The structure of the window lifter is simple, but there are differences in the design of the mechanism on the front and rear doors. From the front, its schematic diagram is as follows:
The scheme can be divided into:
- internal parts, which include handle 1, lining and latch 2, socket 3;
- window lift mechanism, which includes the star winding mechanism itself 4, brackets 5, lower rollers 11, tension roller 13, bolt 12;
- cable 10 is the only flexible structural element;
- glass fastening mechanism – screws 6, pressure plates 7.
It should be noted that, unlike older “classic” models, the front glass on the VAZ 2107 is not a quadrangle in the form of a parallelepiped, but a pentagon, since the “seven” does not have a separate window. Therefore, on the “seven” the installation, feed, and location of the cable have been changed. Additionally, as can be seen in the figure, the glass connection mechanism on the VAZ 2107 has a fourth tension roller, unlike three rollers on other “classics”. Therefore, in order to remove the window regulator, you need to know these differences. In this case, the repair will be simple.
The operation of the window lifter is adjusted at the factory; independent installation and replacement is possible, but it must be done correctly. Otherwise, the mechanism will jam, or additional sounds, such as crunching and crackling, will occur during operation. Therefore, before performing repairs yourself, you need to carefully study the device.
This is what the main part looks like - the window lifter mechanism. To remove it, you must first remove the door trim.
Layout of parts for the rear window lifter mechanism.
The rear windows, unlike the front ones, do not go down completely, but about 5 cm remains. The layout of the rear windows does not differ from that on other Zhiguli models. This mechanism is installed not only on the VAZ 2107 for the reason that the rectangular shape of the rear windows is the same for all “classic” models. If an electric window lifter is connected to the rear windows, this 5 cm is retained.
One of the most common breakdowns is the breakdown of handle 1, both on the front and rear window lifters. If it breaks, it needs to be replaced, since repairing a broken handle is impractical.
Replacing the handle is as follows: removing the window lifter control handle is very simple, just first free it from the plastic retainer, which can simply be pryed off. To do this, use a flat-head screwdriver to move the outer ring away from the inner ring. After this, the retainer, also called the retaining ring, is removed. After this, the handle can be easily removed and another one can be installed. How this is done is shown in the video:
As you can see, in order to simply change the handle, it is not at all necessary to contact a car service. Anyone can carry out such simple repairs themselves; all you need is a screwdriver.
Why do you need the lock function?
Almost all power windows are equipped with a locking function. Its activation does not allow the window to be raised or lowered even when the control button is pressed. The option is designed specifically to ensure safety. It is difficult for the driver to keep track of children while driving, so it is safer to block the operation of the window regulator. The function is activated using an electronic control unit or a special button on the driver's door and its effect applies only to the rear electric windows.
To increase safety, the reverse movement function is also used. If there are obstacles, the lifting mechanism automatically lowers the glass. The system operates by controlling the rotation speed of the drive. If it decreases or lasts too long, the opposite control signal is received.
Electric windows do not affect driving safety, but they can increase the comfort and convenience of driving. You no longer need to use physical force or turn the mechanical drive for a long time - just press a button and automatically adjust the height of the glass position.
Do-it-yourself repair of glass control buttons in cars
First you need to remove the button block from the doors, it’s not difficult.
Renault car power window control button block
To do this, you need to pry and pull the block up, but always from the side as in the photo, where the arrow indicates.
Next, we free the buttons from the wires and remove them from the case. To disconnect the chips with wires, you need to press the locking tab on these chips in the direction indicated by the arrow. See photo. And then, swinging, we pull together the chips.
We remove the chip with wires
Next, we release the latches holding the button in the unit body - you will see them and now the front window lifter buttons are already on the desktop.
Removed block of buttons on the desktop
Price issue
1. Front right rack and pinion lift for VAZ 2109 (price - about 450 rubles)
2. Rack and pinion Forward for VAZ 2107 (price - from 3139 rubles)
3. Lever Katran for VAZ 2110 (price - from 2990 rubles)
Connecting electrical wiring
- The first step is to measure the distance between the window motor and the buttons on the front panel. Using regular wire with a loop at the end, the wiring is pulled into the rack and under the panel.
- ESP wires can be connected directly to the cigarette lighter, which is the simplest and most effective connection method. Experienced car enthusiasts choose a technically complex connection method, namely directly to the battery, as this guarantees more stable operation.
- After completing the work, it is necessary to attach the door trim, covering the resulting holes with decorative plugs. The installed mechanism must be checked - it is necessary to remove and close all the necessary parts, check the fastenings and contacts.
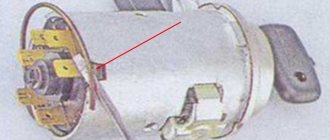
Instructions for replacing the electric motor
Repairing a window regulator may include different stages depending on the breakdown. In this case, we will tell you how to repair a window regulator by replacing its electric motor; as mentioned above, this problem is one of the most common.
The replacement process is considered using the example of a Lada Kalina car:
- First you need to buy a new electric motor, which is sold in a housing with a gearbox. The door trim is dismantled - this operation cannot be performed in the cold, since the trim is fixed using plastic pistons, which will quickly break.
- Unscrew all screws and other fasteners securing the inner handle.
- All wires must be disconnected; for greater convenience, you can remove the speakers. After these steps, the glass, which is fixed in the guides, is unscrewed. In order for the glass to sink to the bottom, you need to unscrew four more screws; to do this, use a 10 key. There is a curtain at the bottom of the glass unit, which must be removed.
- The window regulator itself is mounted on nuts and guides, the electric motor itself is secured with three more nuts. The block can be pulled out through the technological holes in the door. If you disassemble the gearbox, the electric motor will fall apart into two parts. In general, the gearbox must be dismantled and replaced with a new one, further reassembling in the reverse order. The gear cable should be lubricated before use.
1. First remove the door trim.
2. Disconnect all wires.
3. Disconnect the gearbox and replace it with a new one.
Electrical problems
It is better to start diagnosing a malfunction by checking the condition of the fuse, which is responsible for the operation of the power windows in the VAZ 2110. Usually it is numbered F5. If necessary, the fuse must be replaced with a new one. If it is intact, proceed to the next stage. You will need a 12 volt light bulb with two wires going to its positive and negative side.
Connect the wires to the terminals of the window lift motor and press the button. If the light comes on, the wiring is good, but if not, start looking at the wires for breaks. Also don't forget to check the corresponding relay.
Another problem with the electrical wiring circuit is when the window opens when the button is pressed, but when it is released the glass rises again. In some cases, the button does not work until you turn the ignition off and on. These signs indicate a malfunction of the button, so you can try to remove it and clean the contacts, and if necessary, replace it with a new one.
Lever type electric windows
Lever-type ESP successfully combines compact dimensions and a high degree of reliability. In such power windows, the motor turns a gear, which transmits rotation to one or more levers. In turn, the levers move the plate on which the glass is mounted. The main disadvantage of this mechanism is the uneven speed of glass movement; the higher it is, the slower the lifting will occur.
As for glass, regardless of the type of mechanism, it moves along guide channels or special rails.