Content
Tuning or functionality?
We create a spoiler ourselves
It takes a lot of skill to make a high-quality spoiler with your own hands. But the main thing is to be patient and take your time in your work. The manufacturing process may be different, but it is always not rushed.
DIY spoiler
Tuning or functionality?
When people talk about tuning a car, a spoiler or a wing is most often thought of. The wing is an additional part of the car, which, thanks to the gap, increases downforce at high speeds, above 80 km/h. This ensures greater vehicle stability and traction on the road surface. Calling it a spoiler is not entirely correct, but most car enthusiasts know it by this name.
A spoiler or, more precisely, a lip spoiler is a part for a different purpose and does not need a gap for this. Its task is to reduce air turbulence and reduce the aerodynamic drag coefficient. It is usually mounted on the trunk lid, especially if there is a sharp transition from a horizontal to a vertical surface.
The wing and spoilers can be installed on the car initially during production or during operation by the car owner himself. Those installed and made independently usually have a decorative function and do not fulfill their intended purpose. If the rear wing is installed incorrectly or incompletely, the car also loses its technical characteristics, and in this case the spoiler has a negative effect on the car.
The wing is a mandatory element of sports cars when driving on race tracks. The cars are equipped with an adjustable rear wing, which is automatically activated when the pilot presses the gas pedal. This detail significantly increases speed on straight sections and helps when overtaking.
Wing - a mandatory element of sports cars
In order for the wing to cope with the task, it is installed not only on the rear of the car, but also on the hood and on the sides, the so-called body kit and sill extension, respectively. Otherwise, at high speed, as a result of the operation of the rear spoiler, the car will rise above the road front. The body kit in the car also serves as an additional cooler for the internal parts of the car, thanks to the redirection of the air stream.
The disadvantages of the wing include:
- reducing vehicle ground clearance;
- poor visibility in the rear window;
- considerable cost if you buy ready-made and high-quality ones.
If you are going to buy a spoiler, pay attention to the material and manufacturer. A quality product will not be cheap. A professional technician should install such a part; it is better not to do it yourself.
The material for making the wing can be:
- fiberglass is the most popular;
- ABS plastic is lightweight, flexible, and becomes brittle over time;
New style spoiler made of ABS plastic
- silicone with organosilicon polymers;
- carbon – excellent characteristics, but high price.
Spoilers can also be custom - these are designer single copies - and factory ones, which are produced in large quantities. The wing can be attached to the car body with double-sided tape or self-tapping screws if the structure has racks. Depending on the design, steel or aluminum is used for the racks.
We create a spoiler ourselves
Many motorists make their own trunk spoiler. This significantly saves money and in some cases looks no worse than expensive tuning parts.
Before you start making a wing yourself, you should purchase materials and tools for the job. You will need:
- foam for the base, thickness 5 mm;
- spray paint to match the car;
- metal sheet, thickness up to 1.5 mm;
- epoxy adhesive;
- carbon fiber.
You will also need brushes, sanding paper and other small items.
Making a spoiler for a car with your own hands
On the Internet there is also a method for self-production based on polyurethane foam. You can spend a lot of effort on it, but the result is amazing. The base is formed from polyurethane foam on a car previously wrapped in film. Then they cut out the desired shape and polish it. Then they also use epoxy resin and fiberglass, but the top layer is putty mixed with fiberglass and only then regular putty. The further process is similar to the others: priming, sanding, painting, polishing. But as a result, the visor you made yourself for the rear window is indistinguishable from the factory one and looks like an original part of the car.
When making it, you should remember that it doesn’t matter how to make a spoiler for a VAZ or a foreign car, the main thing is that the result is worthy of attention and brings aesthetic pleasure to the owner.
On motorcycles they also install a part related to the spoiler - a fairing. Performs a protective function: the motorcyclist from the headwind and the dashboard in the event of an accident. Thanks to various, sometimes completely unique designs, the bike stands out from the crowd.
And here are ways on how to make a motorcycle fairing yourself. According to the manufacturing principle, they do not differ from those given above. The only difference is in the shape of the fairing and its layout.
Advantages
A car spoiler can have both advantages and disadvantages. Let's start with the fact that this is not just an expensive toy, but an expensive structural element that can even harm the car. If it is installed by a person who does not understand the topic, he will most likely do the installation incorrectly. And then such an element on the car will be useless, and at high speed even dangerous. Then why do you need a spoiler on a car? Its main purpose is to enhance tire grip and improve handling. This can only be achieved if installed correctly.
So, the main advantage of installing this structural element is improving the car’s handling by increasing the coefficient of adhesion of the rear wheels to the road. The car will not drift to the sides.
The second advantage is reduced fuel consumption. Air flows at high speed create resistance to the movement of the car, which causes the feeling that it is slowing down. At the same time, the driver tries to maintain speed and presses the gas pedal, which leads to excessive fuel consumption. The spoiler reduces air resistance, which results in lower gas mileage.
Additional safety is another reason why you need a spoiler on your car. Due to the fact that this part redirects air flows when moving, the likelihood of the vehicle skidding is reduced, and it becomes more maneuverable. The risk of getting into an accident is reduced. It also makes braking more effective, especially in winter. And if additional threshold extenders are installed on the sides, the braking efficiency will be even higher.
What is a car spoiler
A spoiler is one or more special elements designed to change the aerodynamics of a car body by redirecting air flows. The main purposes of installing this part are:
- reduction of aerodynamic drag;
- increased downforce;
- combating vehicle body pollution.
It is worth mentioning that many install a spoiler as a decorative (tuning) element. Its mounting can be done in front, behind, on the roof or on the side of the car. With an individual approach, you can make a custom-made spoiler, which will allow even a production car to stand out in traffic.
An original spoiler from a tuning studio will make your car stand out on city streets.
Pros and cons of installation
The spoiler gives the car the following qualities:
- attractive appearance;
- improved dynamics;
- increased adhesion to the canvas;
- reducing fuel consumption;
- increasing braking efficiency.
It should be clarified that the positive qualities of the element in question appear at speeds above 100 km/h.
Installing a spoiler on a car gives it a number of advantages, but they appear at speeds above 100 km/h
The disadvantages include:
- high cost of structural elements;
- increased fuel consumption due to incorrectly selected form or installation;
- fragile material of manufacture (plastic).
Installation
The front deflector is usually installed using double-sided tape. In addition to protection from stones and a decorative function, it can slightly improve the aerodynamics of the car. Moreover, its installation is quite simple.
There are 2 types of fastenings for this product: a bracket with bolts or double-sided tape. Each method has advantages and disadvantages:
- Bracket - during installation, the paintwork of the machine can be damaged. Damage mainly occurs on the lower part of the hood due to the fact that the bolts are located there.
- Scotch tape is not reliable enough. At high speeds, the product may come off and damage the windshield.
Car tuning options
Today you can choose a spoiler for almost any car, regardless of body type: from a sedan to a minibus. To make the choice easier, you need to understand in more detail the criteria by which this tuning element is classified:
- at the installation site;
- by installation method;
- by material;
- according to form.
You can secure the spoiler using double-sided tape, but only if the part is small in size
The main location for installing the spoiler is the rear of the roof or trunk lid. This depends on the body type, as well as the size of the spoiler and its shape. You can attach a tuning element:
- using double-sided tape. This option is appropriate for small spoiler sizes;
- bolted fastening. Many motorists do not like this method because of the need to make holes in the body part;
- fastening with staples. This option is suitable for those cars that have a certain shape of the rear cover and a gap between the body.
What material is suitable for tuning
As for the material for making the spoiler, the most common are:
- ARB plastic;
- ordinary plastic;
- fiberglass;
- polyurethane;
- aluminum.
To give preference to a design made from one material or another, it is first necessary to consider each of them in more detail, taking into account its chemical and technical characteristics.
Which form to choose
Spoilers can be quite varied in shape. To conclude whether this option is suitable or not, you need to see the part in front of you. There are cases when the shape of an element complements a part of the body, but generally spoilers are represented by the most non-standard designs. With their help, you can give your car not only exclusivity, but also aggressiveness.
Spoilers can also be classified by design:
- custom - represented, as a rule, by a single copy;
Custom spoilers are produced in single copies, which allows you to make the car unique
A spoiler bought at a car store will decorate the car, but will significantly lighten the pocket of its owner
The question arises, why press the car to the road?
At high speeds (over 120 km/h), the air blown under the car begins to lift it (starting from the rear), like a giant wing. Because of this, handling deteriorates, especially when cornering. So, if you try to turn the car at high speed, the car may fly off the road. The only way to reduce the car's lift at speed is to increase its weight. The problem with adding weight to improve traction is that it doesn't help in corners, when traction is needed most. The extra weight has inertia that must be overcome in order to turn. In addition, due to the additional weight, fuel consumption increases. Thus, increasing the weight of the car for better traction is a failed path.
The rear wing is precisely the device that helps press the car to the road at high speeds.
Its advantage is obvious. Instead of a heavy, clumsy car, you can drive a car with a light weight, which is easy to control and the higher the speed, the more force it is pressed to the road. But there is one thing. Every time a wing generates downforce, it also generates drag. Air resistance slows down the car. Thus, additional downforce is good, but too much downforce gives a lot of drag, which is bad. Very powerful sports cars that compete in Formula 1 have something called an L/D ratio. Automotive designers are trying to increase this figure so that the car hugs the road well enough without slowing down.
Rules for selecting a suitable spoiler
Today, many spoilers are produced for a specific car make and model, but there are also universal options that are suitable for almost any car. The only difference is where they will be attached. The car itself should also be taken into account: if we are talking about the executive class, then the spoiler will obviously be an unnecessary element in the design.
It is important to evaluate how the chosen accessory will look. To do this, just take the part, apply it to the car and see from the outside how well it matches its appearance. Many tuning studios have a special program with which you can choose the best option, after which they determine the location of the element’s installation. If the spoiler is designed for a specific car, then this question does not arise.
It is better to purchase a spoiler without a paint layer, which will allow you to find a color that matches the car. An important point is the selection of a suitable fastening method.
In order not to make a mistake with your choice, it is better to contact only reputable tuning companies. Only in such studios can truly high-quality products be installed.
Installation
The front deflector is usually installed using double-sided tape. In addition to protection from stones and a decorative function, it can slightly improve the aerodynamics of the car. Moreover, its installation is quite simple.
There are 2 types of fastenings for this product: a bracket with bolts or double-sided tape. Each method has advantages and disadvantages:
- Bracket - during installation, the paintwork of the machine can be damaged. Damage mainly occurs on the lower part of the hood due to the fact that the bolts are located there.
- Scotch tape is not reliable enough. At high speeds, the product may come off and damage the windshield.
How to make a spoiler for a car with your own hands
When and why do you have to ask yourself the question of making a spoiler yourself? Today, a large selection of the element in question is offered and, it would seem, doing something with your own hands in this regard is not required. But then the cost of a high-quality spoiler turns out to be quite high, and this indicator is not a guarantee that the desired effect will be achieved.
Therefore, some car owners design spoilers themselves, obtaining the desired design and the desired effect from installing such an element. A homemade accessory can be made using various materials, which the owner chooses based on his imagination and free time.
Tools and materials
To start making a spoiler, you will need to prepare the following list of materials and tools:
- foam sheet;
- fiberglass about two meters;
- fastening and welding;
- spray paint (2 pcs.);
- primer (3 cans);
- epoxy glue 2 kg;
- tassels;
- spatulas;
- mesh for reinforcement;
- sandpaper.
Depending on the specific design of the product, the main material is:
- gypsum;
- Styrofoam;
- polyurethane foam;
- metal carcass.
Stages of making a homemade spoiler
The entire process of creating a structure can be divided into several stages:
- mold making;
- material reinforcement;
- putty;
- painting;
- installation.
One of the stages of creating a spoiler is strengthening, i.e. imparting rigidity to the structure
It is best to use cardboard as a pattern. You can also use plywood, but this will lead to additional costs.
Regardless of the material chosen, after realizing the desired shape, be sure to try on the pattern on the machine. You need to make sure that the size is correct and the attachment points correspond to the intended locations. You should make sure that the future product is symmetrical, for which the pattern is bent in half.
The frame can be made of different materials, but its main role is to hold the given shape at the beginning of the manufacture of the part. The spoiler will be given rigidity by fiberglass, as well as a layer of putty and paint. When choosing a filler, you need to take into account the planned shape of the future product.
Video: making tuning elements with your own hands
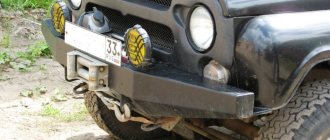
Installing a fly swatter on the hood of a Chevrolet Niva | Chevrolet
The Chevrolet Niva is not designed for high-speed racing, so a spoiler is installed to decorate the appearance. In the article we will consider the need to install a spoiler on a Chevrolet Niva, what they are, and how they are installed.
Unfortunately, there is no video on the Internet on installing the body kit on a Shevik, so it would be relevant to consider in detail how to install the spoiler. Design For Chevrolet Niva body kits are made in a variety of types and materials.
Manufacturing materials: They differ from each other only in cost. A body kit made of aluminum is more reliable and expensive compared to a body kit made of conventional plastic.
installation of deflectors on a Chevrolet Niva
By design, they are divided according to the following parameters: According to the method of attaching the spoiler to the Chevrolet Niva, they are: Attached to the surface using adhesive double-sided tape. A more reliable mounting method, but requiring drilling holes in the body structure. On the Chevrolet Niva, spoilers are installed: This spoiler is designed to protect the hood from impacts from small stones, tall grass, branches, mosquitoes, etc.
These are the main places where spoilers are located on the Chevrolet Niva crossover. Let's look at how body kits are installed on a Chevrolet Niva SUV.
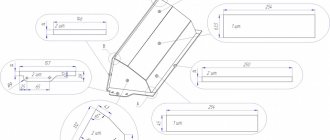
Making a spoiler from foam plastic and fiberglass
One of the important stages in creating a spoiler is proper design. This element cannot be done “by eye”. The ideal option at the design stage would be to involve an engineer or an experienced person who is involved in this type of tuning.
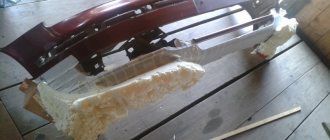
After determining the dimensions and design, you can begin to create a metal frame.
- Quite often, when making a rear spoiler, a sheet of galvanized iron 1.5 mm thick is used, the edges of which are bent upward. M6 nuts should also be welded to the base for subsequent installation of the product.
Galvanized iron is often used as a frame for the spoiler, to which nuts are welded to secure the future product.
To increase the volume of the workpiece, foam plastic is used, which is pasted over the metal frame.
To give the product rigidity, several layers of fiberglass are applied, and drying is performed before applying the next one.
The surface of the spoiler is primed to improve adhesion, puttied, primed again, cleaned and covered with several layers of paint and varnish.
After applying the paint layer and drying, the spoiler is installed on the car
Video: tuning the rear window of the Audi A8
Device.
Basically, lightweight materials are used to make the body kit so as not to increase the weight of the car, the main ones are:
However, they can differ quite greatly in cost. Thus, aluminum body parts are the most reliable, but at the same time they are also expensive. In addition, the rear door spoiler of the Niva Chevrolet is divided according to the type of attachment:
- Sticky. Double-sided tape is used to secure them.
- Supporting. These body kit elements are held in place by special fasteners that are installed on the body. To do this, you need to make additional holes.
The optimal location for installing the rear spoiler on the Niva is the rear door and glass. An additional body kit is also installed on the front edge of the hood. It is designed to protect against rocks, branches and insects. These are the most common locations for installing a body kit on an SUV.
Step-by-step production of a plaster spoiler
Using a material such as gypsum, you can make not only a matrix, but also a copy of your favorite spoiler.
- To pour the gypsum, we make a polystyrene foam box. Then we place the part matrix or the finished spoiler into it, after wrapping it in cling film to avoid damage.
To make a spoiler from gypsum, a polystyrene box is prepared, into which the matrix for the new spoiler is then placed.
After filling the matrix with gypsum, you must wait until it hardens.
After the plaster has hardened, all that remains is to open the halves of the matrix and take out the future spoiler frame
To give the matrix strength, you should follow the same recommendations that are given for making a spoiler from foam plastic.
Best driving instructors:
Driving instructor Elena Automatic transmission: Chevrolet LacettiTeaches in the Southern Administrative District, South-Eastern Administrative District, Vidnoye, Domodedovo REVIEWS
Driving instructor Marina Automatic transmission: Kia Cerato Manual transmission: Chevrolet LanosTeaches in the Northern Administrative Okrug, Dolgoprudny REVIEWS
Automotive instructor Irina Automatic transmission: Kia Cerato Trains in SZAO, JSC REVIEWS
Driving instructor Natalya Automatic transmission: Kia Spectra Teaches in the Eastern Administrative District, Balashikha, Reutov REVIEWS
Driving instructor Oleg Automatic transmission: Chevrolet Lacetti Manual transmission: Chevrolet LanosTeaches in the Northern Administrative District, Dolgoprudny REVIEWS
Driving instructor Yana Automatic transmission: Kia Spectra Teaches in the Northern Administrative Okrug, Dolgoprudny REVIEWS
Driving instructor Yulia Automatic transmission: Chevrolet Lacetti Manual transmission: Chevrolet LanosTrains in the Eastern Administrative District, South-Eastern Administrative District, Lyubertsy, Reutov, Zheleznodorozhny REVIEWS
Automotive instructor Svetlana Automatic transmission: Chevrolet Lacetti Trains at Northwestern Administrative Okrug REVIEWS
Driving instructor Tatyana Manual transmission: Chevrolet Lanos Automatic transmission: Kia SpectrTeaches in Krasnogorsk REVIEWS
Driving instructor Peter Manual: Daewoo Nexia Trains at Northwestern Administrative Okrug REVIEWS
Automotive instructor Oksana Automatic transmission: Hyundai Accent Teaches in North-Eastern Administrative District, Mytishchi, Korolev, Pushkin REVIEWS
Driving instructor Dmitry Automatic transmission: Volkswagen Golf Manual transmission: Chevrolet Lanos Trains in North-East Administrative District, Northern Administrative District, North-Western Administrative District, Dolgoprudny REVIEWS
Driving instructor Oksana Automatic transmission: Kia Spectra Manual transmission: Chevrolet Lanos Trains in the Southern Administrative District, South-Western Administrative District, Vidnoye, Podolsk REVIEWS
Automotive instructor Dmitry Manual transmission: Lada Granta Teaches in the South-East Administrative District, Lyubertsy REVIEWS
How to make a foam spoiler at home
The procedure is simple, but requires care to avoid damage to the bodywork.
- We cover the upper part of the trunk lid with polyethylene, you can also use masking tape.
Before applying foam, protect the surface of the trunk lid with plastic film or masking tape.
Polyurethane foam is applied to the prepared surface, which should preferably be moistened for better hardening.
When the foam hardens, use a knife to form the future spoiler
To impart rigidity to the structure, fiberglass is used, which covers the product in several layers.
The matrix can also be made from plasticine. The process is similar to the described sequence of actions for making a foam spoiler. Regardless of the chosen method, care must be taken to ensure sufficient rigidity of the structure. In addition, fastening such a tuning element should prevent its loss, ensuring reliable fixation.
Not only foam plastic, but also plasticine can be used as a material for making the matrix.
Necessary materials:
- A sheet of foam plastic 1x1 m, approximately 5 cm thick. More is possible, but this should be enough (unless, of course, you are going to make a vertical bar instead of a spoiler)
- Fiberglass (the quantity will need to be calculated independently, based on the size of the spoiler. There will be 6 layers of fiberglass)
- Epoxy resin
- Reinforced mesh
- Piece of sheet fabric
- Putty and primer
- Plastic bags
And so we will transgress. First you need to cut a hole diagonally in the foam for the future spoiler. We cut according to our plans and fantasies. That is, as you imagine, you cut out the future workpiece.
Installation nuances
I can say that it is no more difficult than installing a power bumper, and much easier than installing thresholds on a car.
By the way, if you have already started tuning your car, think carefully about how to make it really better. Don't overdo it by trying to change literally everything. The beauty of tuning lies in the spot adjustments. Even a simple modification to the radiator grill can make you look at the car completely differently.
So that in a few weeks you do not ask on the forum how to remove your clumsy black spoiler, but for a long time you are happy with the result, first, take a meaningful approach to the question of choice. Look at different pictures, highlight interesting ideas. Nowadays it is not difficult to find tuning variations for almost any car. This way you will have an approximate understanding of how a car can look with this or that element.
I’ll briefly tell you how to install a spoiler on the front or rear bumpers. The principle is the same. If you want, you can also check out how to make your own DIY spoiler. But with such a variety of excellent ready-made elements, it’s better not to take risks, but to buy something suitable for your car.
Let's get started.
Incorrect installation can negatively affect the appearance of the car, as well as change the aerodynamic characteristics for the worse. Therefore, I advise you to select elements for a specific car brand. Such spoilers will be more expensive, but they will actually be able to perform their functions.
If you have personal experience installing and even manufacturing spoilers for cars, write to us. We'll definitely discuss it.
Watch this video on YouTube
With this we will say goodbye
Thank you all for your attention! Subscribe, leave comments and ask relevant questions