Lancer 9 1.6 and 2.0 had a timing belt, but for Lancer X the manufacturer has already installed a chain. A chain is more reliable and economical compared to a belt.
Firstly, the schedule for the planned replacement of the chain is 250 thousand mileage, and secondly, it cannot unexpectedly fail (as happened with the belt and this brought a lot of problems), since you will know about problems with the chain in advance by the roar from the under the hood (so still listen to your car).
Of course, the chain can stretch “ahead of schedule,” but not earlier than 150-200 thousand kilometers, and this happens quite rarely.
What you will need to replace the timing chain on a Mitsubishi Lancer X 2.0 (CY4A body):
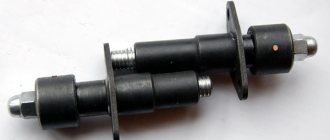
1) The chain itself - 1140A073
2) Left chain guide - MN183892
and right - MN183893
3) Timing chain tensioner - MN183894
4) There is also an upper chain guide. Not everyone changes it, but it’s still worth changing too. Cars have it until 09.2010
Upper chain guide - 1140A019
This machine has one more circuit - Engine Oil Pump Drive Chain or Balancer Chain. It also needs to be changed. The manufacturer does not write anything about it, so the replacement period is unknown. But by analogy with the timing chain, its resource is also not eternal. It is best to change it together with the timing chain, but first consult with a specialist.
Oil Pump Chain Kit:
1) Engine oil pump drive chain - MN183896
2) Oil pump chain guide - MN183897
3) Oil pump chain tensioner - MN183898
Source: https://all-for-car.blogspot.com/2016/12/mitsubishi-lancer-x-20.html
Description of replacing the timing belt on Lancer 9
In order to replace the timing belt, it is recommended to use the instructions below.
Remove the right front wheel. Remove the wheel arch protection.
View after removing the wheel and arch protection.
Unscrew the three bolts securing the upper timing belt casing. Remove it.
Loosen the tension bolts of the power steering pump and alternator.
Loosening the tension bolts.
Location of the power steering pump tension bolt.
Remove the pump pulley. To do this, you need to unscrew the fasteners shown in the photo below.
Unscrew the crankshaft pulley mounting bolt.
The process of unscrewing the crankshaft pulley bolt.
Align the crankshaft to the marks. Check the position of the camshaft. The location of its mark should coincide with the tide on the cylinder head.
Removing the power plant support.
Unscrew the bolts holding the lower timing case cover.
Removed bottom cover.
Reassemble everything in reverse order.
The timing belt is a rubber ring with teeth on the inside that are needed to engage the gears. The operating efficiency and service life of the engine depend on its condition.
Replacing a belt drive is a mandatory technical procedure that is carried out in accordance with the regulations or depending on the condition of the part. The Mitsubishi manufacturer recommends changing the timing belt after 90 thousand kilometers. Its wear is affected not only by constant friction, but also by other factors:
- technical condition of components and mechanisms;
- terms of Use;
- driver's driving style, etc.
Therefore, it is necessary to regularly check its condition after running 15 thousand km. Replacement will be required if the following defects are present:
cracks and bumps on the surface;
- worn or damaged teeth;
- frayed edges;
- peeling of material from the base;
- stains from working fluids;
- poor tension that can no longer be adjusted;
- uneven wear.
Experts recommend replacing the tensioner and pump along with the timing belt. Their service life is almost the same as that of a rubber product. If they are not changed at the same time, they will have to be changed after a short period of time with a new disassembly of the unit.
Specifications
The 4a91 engine unit is one of three representatives of the 4a engine line. The volume of its working cylinders is 1499 cubic centimeters. Depending on the vehicle on which the 4a9 is installed, it is capable of developing power from 102 to 109 hp. The approximate lifespan of the engine, which it can cover without major repairs, ranges from 80,000 to 150,000 km, depending on the loads on the engine and the quality of the lubricants and fuel fluids used. Its operation is based on the DOHC system. Engines with this system have two camshafts, 4 cylinders, and 16 valves.
The location of the camshaft is on top of each row of intake and exhaust valves. This engine has no rocker arms, rods or rockers. To significantly reduce loads and better combustion of the fuel-air mixture attributable to the springs, these engines install four lightweight valves per cylinder, instead of two, heavier valves. This also led to the fact that, thanks to two valves with a small diameter at the inlet, 50% more fuel enters the cylinder than through one valve of a larger diameter.
It also contains a system that allows you to change the phases of gas distribution. Engines with this mechanism have higher economic indicators and efficiency compared to other naturally-aspirated engines of the previous generation. The power unit number is located on the surface of the front part of the cylinder block, near the location of the hydraulic power steering pump.
Chain on Mitsubishi Lancer replacement, when to change
lancer x 2 0 Adjusting valves and replacing chain
It is difficult and extremely inconvenient, everything basically unscrews, there are not many parts to drain the oil, belt, rollers, pump pulley, air conditioner compressor bracket, oil pan - just unscrew the bolts in the cover. And this will happen after about one hundred fifty to two hundred thousand kilometers. The official figure of the manufacturer is generally two hundred and fifty thousand kilometers.
Using sealant, install the timing cover. That's right, improve it, make it even more reliable.
Inspect all elements included in the chain drive.
I started by emptying the garage - I threw out the trash for 3 hours, and then I had a chance to ride bikes with my dad through the snowdrifts to the house. After diagnostics, I didn’t even start the car, they dragged me on a tie to the garage, fortunately not far away, they snorted vodka under a barbecue in the next garage and pushed it together to the garage.
They took off the valve cover in 5 minutes: the old damper was already swollen and almost collapsed, even on the cover there are traces of its friction. It is difficult and extremely inconvenient, everything basically unscrews, there are not many parts to drain the oil, belt, rollers, pump pulley, air conditioner compressor bracket, oil pan - just unscrew the bolts in the cover. The pan is on sealant, the timing cover is also on sealant, and even on coke, which of course is coked.
Stretched timing chain on a Mitsubishi 4B12 engine avtoremont13.ru
The lid has many ridges to separate it from the block, but it’s practically impossible to get to them. Replace if necessary.
Unscrew the timing cover mounting bolts in the following order: The location of the bolts is shown in the photo below. After this, secure it with a pin.
Turn the exhaust valve shaft clockwise. Remove the chain and tensioner. Inspect all elements included in the chain drive.
Typically, their resource corresponds to the life of the chain. Often, the chain replacement procedure only involves replacing the tensioners, the chain itself does not change.
It should be regularly tightened, as it wears out, but, I repeat, until the chain completely fails, the car can be driven and driven. Another interesting fact: This again speaks to the reliability of this part and the fact that the manufacturers, speaking about thousands of kilometers without replacement, did not exaggerate at all.
If it did happen that you heard a very unpleasant rumble from under the hood and realized that the Mitsubishi Lancer X timing chain needs to be repaired or replaced, then there are two options: A repair kit, including a chain, guide and shoe, will cost approximately four thousand rubles. Care during assembly and even greater care during assembly.
First you need to remove all engine attachments and turn off all sensors. Drain the antifreeze using the special tap located in the lower right corner.
Then you need to remove the intake manifold along with the throttle valve, while disconnecting the heating pipes with antifreeze.
Engine repair 4A91
Material from Mitsubishi Lancer Club FAQ
I’ll say right away that I’m not a professional, but rather a fan of tinkering with technology in my free time, so I ask you to be loyal to the details.
Patient:
Lancer X, purchased in Rolfe in 2008, mileage 108 thousand km. All maintenance according to regulations in Diamante.
Starting from about 80 thousand km, an appetite for oil appeared. In anticipation of a serious burn, my mother went and added oil as needed, and I waited until it got big so I could change the rings.
But then a nuisance happened in the form of refueling with bad gasoline somewhere in the depths of the Ryazan region, and as a result, my mother came home with an engine running on 3 cylinders. It became clear: repairs were inevitable.
Using a video endoscope, it was determined that the cylinder failure was associated with a burnt-out exhaust valve in the 2nd cylinder.
After weighing the pros and cons, I decided to repair it myself.
So, for repair you need:
literature on the 4A91 engine from Colt (“The Third Rome” sucks, everything there is for two-wheelers, a lot of things are not the same as in real life, everything has to be thought out and done by analogy, because everything is schematic, there are no tightening torques). A set of good tools, a set of Torx sockets and a torque wrench are also required. I had these sets:
In order (I will indicate the usual operations briefly, since a more or less experienced person will get into the engine, I don’t see the point of indicating about every screw and wiring), we begin to remove all the attachments:
Engine mount and belt attachment:
Air filter housing, fuel hose, all wiring to various sensors, unscrew the brackets from the head:
Drain the antifreeze (there is a special tap in the lower right corner):
We remove the intake manifold together with the throttle valve, while disconnecting the heating pipes with antifreeze:
I removed the fuel rail while the head was standing, but it’s better to remove it later, after washing off the dirt; if there is one, it’s more convenient to pull it off on a fixed head. In my case, I removed the valves, so it was possible to clean the intake. If the valves are normal, then the ramp does not need to be removed; it is enough to thoroughly wash the dirt on the already removed head.
Well, everything is ready to remove the valve cover (note that there are Torx head bolts everywhere.)
We remove the valve cover and see the cleanliness:
Next, we climb down, unscrew the crankshaft pulley (in my case, it was unscrewed with a long wrench from the kit; there are turnkey recesses on the camshafts, they can be used to fix the knee through the timing chain) and remove the pan. There are also Torx bolts, and it is sealed. To unstick it, you need to work hard. In general, we grab the corners with a sharp screwdriver and gradually tear it off. I even bent mine a little, but then I tapped it and straightened it, so it’s not a big deal if it’s bent.
Next, unscrew the oil receiver, and, making sure that nothing is in the way, unscrew the timing chain cover. There are many different bolts, so I advise you to remember which ones are screwed in where:
Please note that the pump sits glued to the lid. If it works, then you don’t have to peel it off, it doesn’t interfere, and it will be more intact. I removed it because I needed to wash off all the carbon deposits. The following picture appears:
Before removing the chain, I had no information about the location of the marks on the pulleys, so I prudently stroked the marks on the pulleys and chain teeth just in case. Like this:
Remove the timing chain. To do this, you first need to loosen the exhaust camshaft pulley bolt:
Then loosen the chain itself by loosening the tensioner; to do this, turn the “flag” and remove the chain shoe:
Unscrew the camshaft pulley completely, remove the chain and tensioner shoe:
Next, we remove both camshafts; to do this, we unscrew all their supports (all timing parts must be in a certain order.).
We take out all the valve glasses and put them in a clean place (by the way, it’s convenient to pull out the glasses using the magnetic thing from the tool kit).
Then you should unscrew the exhaust manifold; to do this, first unscrew it from the catalyst, and then unscrew the manifold from the head.
Now you have access to the head mounting bolts, unscrew it and remove it (you need a Torx bit):
Everything is in complete trash, especially the oil scraper rings are clogged. They have to be cleaned until they shine.
Well, here is the actual process of disassembling the engine to eliminate oil leakage.
I advise you to wash everything with carburetor cleaner, it corrodes everything until it shines.
After washing all the parts and removing the old sealant, reassemble in the reverse order, and before installation, lubricate everything generously with new oil.
1. The pistons with rings must be installed very carefully. Don't press too hard. The rings are like foil. There is a special crimp for this, but I didn’t have one, so I carefully inserted one ring at a time using a thin screwdriver, gradually squeezing each ring. The ring locks should be positioned something like this:
It’s better NOT to use such a homemade product.
2. When assembling, strictly observe the tightening torques; they are in the Colt manual. There is also data on the required thickness of the sealant layer in different places.
3. Before installing the chain, place the first piston at TDC.
Here you can see the marks (on the left shaft the mark coincided with my mark, but on the right, don’t look at the mark, look at the groove in the middle of the Mivek):
Crankshaft mark straight up:
The location of the marks is also in the Colt manual.
That's all, I hope I haven't forgotten anything.
Some photos of the assembly:
Because in my case, the valve also burned out, I will separately describe the process of disassembling the head, grinding in and replacing the valves.
Source
Consequences of malfunctions
Problems in the timing chain drive lead to the following problems:
- A stretched and weakened chain jumps several teeth. As a rule, this happens when the engine starts.
- A chain operating with increased free play often breaks the guide and even “gnaws” a groove in the cylinder head made of aluminum alloy.
- In some brands of cars where a single-row chain is used in power units, it may break.
Double-row chains also break, but very rarely
The consequences of these problems may be as follows:
- The most harmless option is a shift in valve timing due to the chain jumping 1-2 teeth. The engine does not start well and vibrates strongly during operation, and there is a clear loss of power while driving. When you press the accelerator pedal sharply, shots are heard in the intake manifold or exhaust pipe.
- When there is a 3 tooth offset, the engine will no longer start. Another thing is that in practice such situations are rare; a too loose chain skips much more. The result is a piston hitting a valve that opened at the wrong time.
- Due to severe wear or breakage of the damper, the chain drive is weakened even more, causing the consequences described above.
- The damage caused by a broken single-row chain depends on the type of engine and the moment when it happened. If all the valves were closed, then the pistons, which continued to move, would not reach their plates.
This is what the valves look like after meeting the pistons
In power units with 8 valves, encounters with the piston are quite rare due to the technological clearances provided for by the design (except for individual motors). But a 16V engine valve that is open when the chain breaks or jumps almost always receives a blow from the piston. As a result, its stem bends and the valve remains in the open position. In especially severe cases, the consequences are as follows:
- even the valve seat and guide bushing are damaged;
- a through hole appears in the upper part of the piston;
- A dent appears on the plane of the cylinder head near the combustion chamber, which makes it necessary to replace it entirely.
A chain that has jumped or broken while driving makes itself felt by a sharp loss of power or complete engine failure. If you were able to hear a metallic knock, indicating the meeting of the piston and valve, then you should prepare for serious repairs to the power unit.
And this is a piston pierced by a valve plate
Engine block head Lancer 10 1.5 l.
The Mitsubishi Lancer X 1.5 liter cylinder head is made of aluminum alloy. The camshafts directly affect the valves. That is, the cams of the shafts run into the cups, which in turn press on the valve stems. Luckily there are no rocker arms there. But this engine also does not have hydraulic compensators. The valve clearance is adjusted by selecting pusher cups (size 31), which have different bottom thicknesses. The spark plug wells are located in the center of the cylinder head.
Timing drive of the Mitsubishi Lancer 10 1.5 l engine.
The timing drive is chain driven and usually does not cause problems. All marks for installing a new chain are present. But experienced craftsmen make their own additional marks. Do not forget that there is a phase shifter on one shaft, which operates due to oil pressure, which is regulated by the solenoid valve of the MIVEC system. The service life of the chain is not known for certain, since against the background of stiff valve stem seals, sunken piston wheels and wild oil consumption, this is not a problematic part of the engine at all. Timing drive diagram for Mitsubishi Lancer 10 1.5 below.
Engine characteristics Lancer 10 1.5 l.
- Working volume – 1499 cm3
- Number of cylinders – 4
- Number of valves – 16
- Cylinder diameter – 75 mm
- Piston stroke – 84.8 mm
- Timing drive - chain (DOHC)
- Power hp (kW) – 109 (80) at 6000 rpm. per minute
- Torque – 145 Nm at 4000 rpm. per minute
- Maximum speed – 178 km/h
- Acceleration to the first hundred – 14.3 seconds
- Fuel type – gasoline AI-95
- Fuel consumption in the city – 8.9 liters
- Fuel consumption in the combined cycle – 7 liters
- Fuel consumption on the highway - 6 liters
This engine is rather weak for the Lancer, but for the Mitsubishi Colt the engine is perfect. Before buying a used Mitsubishi Lancer X 1.5, think about how much it will cost you to repair the power unit.
Source
Maintainability and maintenance
In general, the engine is very simple and compact in size. This allows you to carry out repair work even in a garage environment. However, spare parts, their availability and price, if the main elements break down, forces the owner to replace the entire engine with a contract unit. Most often, in monetary terms, this replacement costs the owner less than purchasing a large set of spare parts to be replaced.
After repair work has been carried out on the engine, it is necessary to configure it for correct operation. Engines with a DOHC system have their own distinctive features in valve adjustment. The fuel consumption, as well as engine compression, depend on the correct setting, as a result of which you can notice a deterioration in the dynamic acceleration qualities of the car. Pistons and piston rings are supplied to the Mitsubishi automaker by Teikin and TP - Teikoku Piston.
The ignition system and attachments are reliable elements in the 4a91 engine. It is necessary to replace spark plugs on time, since the power plant is very sensitive to the quality of the spark. The data written in the book on maintenance and repair of engines from the 4a9 series indicates the need to replace spark plugs every 10,000 km, regardless of their condition. Also, the manufacturer of these motors recommends paying attention to the tightening torques of all engine connections, since the internal combustion engine contains many associated elements that operate under high loads.
The drive of the gas distribution mechanism is shown in the figure
1 - Tension shoe; 2 - Exhaust valve gear; 3 - Exhaust valve gear; 4 — Chain damper; 5 - Crankshaft gear; 6 - Timing drive chain; 7 - Chain tensioner; a,b,c,d,e – Timing chain marks
Required Tools
In order to replace the Lancer 9 timing belt, you need the tools and materials shown in the table below. Table - List of tools and materials required to replace the Lancer 9 timing belt.
| Name | Note |
| Socket heads | “at 10”, “at 12”, “at 19” |
| Wrench “10”, “12” | “at 10”, “at 12” |
| Pliers | Can be replaced with pliers |
| Penetrating lubricant | For example, WD-40 |
| Rags | To clean dirt |
| Jack | In the absence of a lift or inspection hole |
| Marker | For ease of label control |
| Screwdriver | Flat blade |
If there is no inspection hole or lift, you will need to jack up the car. After this, supports should be installed. You will also need a wheel wrench to remove the wheel.
Work technology
Algorithm of actions:
- Remove the power steering drive belt. To do this, loosen 3 fastening bolts (you can get to two of them through the technological holes in the pulley), and then unscrew the adjusting bolt, after which the power steering pump will move, which will allow you to remove the belt;
- Jack up the front of the car on the right side (in the direction of travel), remove the wheel;
- Remove the protective cover on the fender liner to gain access to the crankshaft pulley;
- We dismantle the generator drive. Loosen the bolt securing the unit to the engine (located at the bottom of the generator) and the adjusting bolt lock. Then unscrew the adjusting bolt a little and remove it from the bracket. We feed the generator towards the engine and remove the belt;
- Unscrew the bolt securing the pulley to the pump and remove it;
- We dismantle the crankshaft pulley. To do this, ask the assistant to turn on the 5th gear at the gearbox and hold down the brake pedal, thus stopping the engine, which will allow you to tear off the pulley mounting bolt;
- Unscrew the 3 mounting bolts of the upper protective cover of the timing drive and remove it;
- We dismantle the lower timing cover by unscrewing its 5 fasteners;
- We set marks on the crankshaft and timing belt. To do this, turn on the 5th speed at the gearbox, put the wheel on the hub, and turning it, align the marks with the special ridges on the engine. We make sure that the marks on the knees and camshafts coincide with the sagging marks;
- Using pliers, remove the end of the roller tension spring from the groove and remove it. We unscrew the bolt securing the roller and dismantle it. After this, turning the crankshafts and timing gear is strictly prohibited, so as not to displace the marks;
- We install a stop (a wooden beam of suitable height) under the power unit;
- Unscrew the motor mount (mount). Moreover, you should unscrew its fasteners both to the body and to the engine. Remove the support;
- We unscrew the bolts of the jumper installed between the landing pad of the engine support and the power steering pump. Don’t forget to lubricate the contacts with graphite grease;
- Remove the timing belt;
- Install a new roller and secure it with a bolt;
- We put on a new belt, correctly placing it behind the roller;
- Install the tension spring.
After this, we check that the marks match correctly. To do this, after installing the new belt and tensioning it with a roller, turn on 5th gear again and install the wheel.
When turning the wheel, we make two revolutions of the crankshaft, align it with the mark and see if it coincides with the influx on the camshaft.
You can turn the gear off with the key.
If the location of the marks is not violated, we assemble the power unit in the reverse order. For convenience and correct assembly, it is advisable to mark some elements and parts with a marker or chalk during disassembly.
Why is a broken belt dangerous?
It would seem like an ordinary piece of rubber, what serious thing could happen if it breaks? But we must not forget that this element ensures the coordinated operation of the camshaft and crankshaft. During a break, the crankshaft continues to rotate, but the torque is no longer transmitted to the camshaft. This causes the cylinders to hit the valves.
What are the consequences? Starting from bent cylinders and ending with the complete destruction of a group of valves. Such repairs will cost you a large sum, and all because of that very “piece of rubber”. Therefore, replacing the timing belt is a mandatory step that will prevent waste in the future.
Mitsubishi Lancer 10 engine 1.8 timing device, characteristics
Reading time: 1 minute
The Mitsubishi Lancer 1.8 liter engine is the topic of our article today. The naturally aspirated gasoline Lancer 10 produces a decent 143 hp, which is enough even for active and dynamic driving. The Mitsubishi 4B10 engine is a fairly reliable unit. Although more powerful engines were offered on the Lancer X, this one turned out to be the most popular. Next, we will talk in detail about the design and technical data of the engine.
Engine design 1.8 Mitsubishi Lancer 10
The engine was developed by the Global Engine Manufacturing Alliance and has a huge number of modifications with different displacements. In addition to Mitsubishi, the engine is used on Kia/Hyundai and even Chrysler models. Each manufacturer uses its own developments, settings and technological solutions, but the basic design of all motors is common.
So the 1.8-liter Lancer X engine is a 4-cylinder, 16-valve unit with an aluminum cylinder block and a timing chain. Mitsubishi is equipped with a proprietary variable valve timing system with electronic control MIVEC. Fuel injection is controlled by a system with ECI multiple multi-point injectors. If before the development of this engine, Mitsubishi installed a phase shifter only on the intake camshaft, then on this unit the actuator for changing valve timing appeared on both shafts, intake and exhaust.
Summary table of technical characteristics of internal combustion engine 4a91
| Power | 102 hp (75 kW) | 105 hp (77 kW) | 109 hp (80 kW) |
| Fuel type | Gasoline | Gasoline | Gasoline |
| AI-92, AI-95 | AI-92, AI-95 | AI-92, AI-95 | |
| Maximum torque/speed | 138 N*m (14 kg*m)/ 4000 rpm | 141 N*m (14kg*m)/ 4000 rpm | 143 N*m (15 kg*m)/ 4000 rpm |
| System that changes the cylinder displacement | Absent | Absent | Absent |
| Fuel consumption | 6 l/100 km | 6.2 l/100 km | 6.3 l/100 km |
| Compression ratio | 10.5 | 10.5 | 10.5 |
| Piston stroke | 83 mm | 83 mm | 83 mm |
Motor reliability
This unit does not have very good reliability indicators and requires special attention during the entire period of operation. Even cars that have just rolled off the production line are sometimes characterized by increased oil consumption in large quantities. Violation of regulated maintenance is guaranteed to lead to increased wear of the cylinder-piston group and other elements. In the future, this will lead to the following consequences: the appearance of oil in the spark plug wells, the piston rings may become stuck, and the connecting rod bearings and main bearings may rotate, since the engine oil is not distributed correctly due to wear of the cylinder-piston group.
The designers installed a chain in the gas distribution mechanism. This is a good solution because it gives greater reliability to the engine. The removal and installation of the timing chain must be carried out by highly qualified specialists, since incorrect installation of the chain can lead to serious problems, even to the point of requiring expensive engine repairs.
Design features and purpose
The gas distribution mechanism controls the supply of fuel to the cylinders.
Its operation is impossible without a drive. Modern manufacturers produce systems with chain and belt drives. Many cars have a belt. This product is a closed rubber belt with special teeth on the inside. It passes through several pulleys, but its main purpose is to synchronize the rotation of the camshaft and crankshaft. The use of rubber makes the operation of such a belt almost silent. The high elasticity of rubber can lead to its most unpleasant consequences. If you find the slightest defect, you should urgently change the timing belt.
Regulations for replacing belts and rollers
Diagram of a belt drive for attachments on a Mitsubishi Lancer 10 with a 1.5 engine.
To replace the belt, you should prepare the necessary tools:
- set of spanners and sockets;
- new belt and tension rollers;
- special rod for fixing the roller;
- knife or spatula for dismantling;
- protective gloves;
- sheet of paper and pen.
Before replacing, you need to remember the location of the belt or make a drawing on a piece of paper. Then you need to do the following:
- Remove the right wheel and expansion tank. Remove the expansion tank and power steering reservoir. Remove the boot in the right wheel arch.
- Use a wrench or a 16mm socket to move the main tensioner to the side and use a special rod to secure it.
- Use a spatula to remove the belt or cut it with a knife, since the narrow space between the motor and the spar creates inconvenience during removal. We remove the old damaged belt.
- Put on a new belt, falling into the grooves on each pulley. We install the new belt first through the engine compartment, then put it on the crankshaft pulley from the side of the wheel arch.
- Check the installation using a wrench by turning the crankshaft pulley.
Rollers
When replacing the belt, it is recommended to also replace the rollers. To do this, you need to: remove the wheel and expansion tank, move the main tensioner aside and remove the roller.
Unscrew the deflection roller.
First of all, you need to remove the upper bypass roller, then the middle one, and lastly the main tension roller. The second bypass roller is equipped with a left-hand thread.
Assembly is carried out in reverse order.
Belt and roller selection
In order for a part to serve for a long time, it is necessary to choose a quality product from reliable suppliers.
Article number of original spare parts for Mitsubishi Lancer X with a 1.5 l engine:
- drive belt – 1340A113;
- two deflection rollers – 1341A005;
- tension roller – 1345A079.
These parts must be replaced within the specified period or when the following symptoms appear.
If the belt breaks, the engine continues to run, but all other attachments stop working. If the water pump fails, the coolant circulation stops and the engine stops removing heat (overheats). In a short time, the engine overheats, which can lead to a major overhaul of the power unit.
Symptoms for replacement
It is recommended to periodically check the belt for visible damage.
Replacement must be done every 90,000 mileage or as wear occurs. This is what the regulations say, we recommend not to tighten it, and to “renew the belt” at 60,000 km.
Characteristic signs for replacing the alternator belt are:
- a knock or whistle coming from under the hood;
- drive grinding or creaking;
- the battery charge light came on on the dashboard;
- the engine cannot be started.
Unpleasant sounds
Extraneous sounds may indicate wear on the rollers. The photo shows a new tension pulley and an old one after a mileage of 70,000 km.
- The belt can make unpleasant sounds when oil or coolant gets on it or the shaft. The squealing occurs due to its slipping along the shaft. To solve the problem, the belt must be removed and wiped with a clean rag soaked in gasoline.
- Loosening the belt also leads to a whistling noise; to eliminate the cause, it must be tightened.
- Whistling sounds can be created when the belt misses the pulley line; even slight misalignment will cause rapid wear. The pulleys need to be aligned correctly.
- A belt that is too tight also produces unpleasant sounds because it does not allow the pulleys to rotate normally. This situation often occurs at sub-zero temperatures, when the belt freezes and becomes hard. When the engine warms up, the squeal disappears.
- Creaks and whistles appear when the bearing on the shaft wears out; after replacing it, the sounds disappear.
Frequent breakdowns occur due to the long service life of spare parts, violation of car care rules and the choice of low-quality parts.
conclusions
Timely identification and elimination of faults guarantees uninterrupted operation of vehicle attachments.
Replacing the timing belt Mitsubishi Lancer 4G18 1.6
For safety reasons, some car brands have long provided for the replacement of the timing belt with a chain. Just like a timing belt, if not replaced in a timely manner, can create a completely unfavorable situation called “valve bending.” Literally, when the piston interacts with the valve, it begins to bend. There are, of course, a number of reasons, for example, a broken timing chain, a rotating toothed pulley, insufficient belt tension, etc., but still a broken timing belt is the most common reason. We'll tell you how to replace the timing belt yourself on a Mitsubishi Lancer 9 car, engine 1 and 6.
How often should the timing belt be replaced? It is for this brand of car, based on practice, that we provide for replacing the belt after ninety thousand kilometers.
For what reasons can you notice the need to replace the timing belt?
If the deadline has not yet passed for replacing the belt, but there are a number of reasons that concern you, then you should think about premature replacement. So:
- You find drops of oil on your belt. This is one of the signs that you have problems with the seals or crankshaft, as well as the camshaft.
- Cracks on the belt, protruding threads.
- Clearly defined stratifications. All these are the first and important calls.
Which belt to choose? There is always nothing better than the original in everything. Therefore, the first advice is, of course, to buy a more expensive option, but one in which you will be completely and completely confident. In the event that replacement is necessary immediately, but there are temporary financial difficulties, then analogues of the original belts will suit you.
For those who are not aware, we will tell you a little about the price difference between originals and analogues. If the price tag of the original belt reaches three thousand rubles, then the price of an analogue belt is much less. You can purchase it at a reasonable price from five hundred to seven hundred rubles. If we talk about the price in the capital of Russia (Moscow) for 2022.
As for the separate payment for replacing the belt, you will have to fork out some money here too. One hour of work will cost about a thousand rubles. If you come across a conscientious worker, he will do it in two and a half hours. Total - two and a half thousand rubles. Otherwise, you will spend significantly more.
How to replace the belt yourself? Let's tell you now.
Basic tools: ratchet wrench for ten, twelve and nineteen. Twelve wrench, pliers, jack, screwdriver, felt-tip pen or chalk.
1.To replace the belt, you can use a pit or get by with just a jack, you just need to lift the front part. Don't forget to install stops. Remove the wheel located on the right side.
2.The second thing we do is remove the crankshaft pulley. This is not at all easy to do. But first, be sure to remove the lower casing, pumps and crankshaft pulley. We switch to fifth gear, spin the wheel and make sure that the marks match. The crankshaft mark must match the camshaft mark and the engine block mark itself.
When you install the tension roller, do not rush to install the spring, screw the roller on first and carefully put on the belt
Pay attention to the back side of the roller, put it on so that the back side is as stretched as possible. Then install the spring
And screw it in the center of the roller.
You can remove the timing belt.
The American Dream remains a reality. Cadillac introduced new crossovers
See all photo news >>
What are the signs that a Toyota chain needs to be replaced?
If a Toyota engine is equipped with a timing chain, it means that it transmits rotational force from the crankshaft to the camshaft located in the cylinder head (overhead valve type engines).
All chains in Toyota are divided into two types: gear and roller, and the latter are practically not used. On most machines with a gas distribution mechanism, gear systems are installed if a chain drive is used.
Toothed units ensure smooth operation, have increased reliability, and make virtually no noise during operation. In operation, gear systems are similar to belt drives. It is impossible to accurately answer the question of which is better. If you start discussing this topic, you will get a full-fledged article.
The timing chain system includes the chain itself, the tensioner, and the lubrication system. Over time, due to wear of parts, the mechanism begins to work worse: the tensioner or the chain itself in the Toyota needs to be replaced.
How to understand that the timing belt has become unusable? To do this, listen to how the motor works. We heard metallic sounds and a crackling noise at high speeds, which means that the gas distribution system has failed.
Press the accelerator pedal sharply, you will immediately understand that the circuit is faulty. In this case, the ignition will not work properly, and when the speed increases, you can see black exhaust gases coming out of the exhaust pipe. This indicates that the fuel mixture is over-rich.
You should also inspect the tensioner in the Toyota. It should be in such a position that the chain is well tensioned. Have you noticed that it is sagging? This means it needs to be replaced. Many motorists who do not have the opportunity to replace the chain do the following. They install bolts on the tensioner or even install a second tensioner. This manipulation is considered a last resort and can only be performed in emergency cases. After all, the effect will be temporary, and it will be more difficult to repair the mechanism later.
How long a chain will last depends on the material from which it is made. It must be high quality
You should also pay attention to the degree of effectiveness of the heat treatment of the material.
Timing sprockets must also meet the above requirements, because they participate in the operation of the mechanism. The lubrication system must not be allowed to malfunction, as it affects the functioning of the unit. Only high-quality lubricant should be poured into the engine and changed on time.
If the chain drive is made of durable material and the required tension is set during maintenance, and the oil is changed regularly, the mechanism will properly serve as long as the engine.
On the contrary, a stretched chain will quickly fail. To avoid the need to replace it, you should buy a high-quality part, set the tension correctly, and use a suitable lubricant.
Source
Replacing the Timing Chain Lancer 10 1.5 ~ AUTOTEXNIKA.RU
Home page » Replacing the Timing Chain Lancer 10 1.5
15.10.2018
Mitsubishi Lancer 2.0 Mt › Logbook › Replacing the chain
Timing Lancer X
Usually, if a new model in a car line comes out, then virtually everything changes, only the signature features remain. But what if the previous model was super successful? That's right, make it better, make it even more reliable.
Which, in fact, is what happened with all the new Lancers. Every time, Japanese designers found something to amaze and amuse fans of this series.
Time after time, the Japanese sports car became better, faster and more reliable. At the moment, we will consider one important detail that has undergone a change, and a very fundamental one at that.
We are talking about the timing belt, which in the tenth Lancer was replaced with a chain.
Let's talk a little about the Lancer 10 timing chain
Chain replacement
The timing belt of the Mitsubishi Lancer 10 is a good solution by the designers. Such a chain is even more reliable than a belt, and its service life is much longer. There are often cases when the owner of a car sells his “swallow” without even changing the chain.
Another advantage is that the chain will not break “suddenly”; you will hear a noise under the hood, clearly indicating that it is time to change the chain. And this will happen in approximately 100–50–200 thousand kilometers. The official figure from the manufacturer is generally two hundred and 50 thousand kilometers. There will be cons of the chain
.
More precisely, one is the price of the chain
, and replacements are higher than a similar set and replacement of a timing belt. But still, the chain turns out to be more economical - it needs to be changed even less often.
Replacing the timing chain Lancer 10 1.5
Replacing the timing chain of a Mitsubishi Lancer X at a car service center will cost you a large sum, from 5 thousand rubles. This work is responsible, and accordingly, it pays well. If you install it incorrectly, you will end up with damage to the engine and repair, and no one wants that.
Tuning
The problem with upgrading the 4a91 engine is that it is ideally tuned by the factory to meet all the declared indicators of dynamism and efficiency. Any intervention in the integral design of the engine installation will lead to less than ideal engine operation, as well as a possible increase in the consumption of lubricating and fuel fluids. The most common type of tuning of any engine from the 4a9 series is changing the readings and flashing the electronic control unit. It is tuned so that fuel economy and dynamic performance indicators correspond to the declared indicators. If you set it for maximum fuel economy, the dynamic qualities of the car will decrease significantly. The advantage of the ECU installed on these engines is that returning to factory settings is very simple.
Source