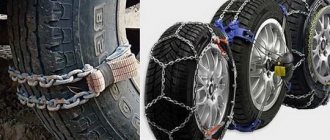
Often, traveling in a car unprepared for winter can result in unpleasant consequences for the driver and passengers, which may require the help of a tow. A snow-covered road or ice significantly reduces the vehicle's maneuverability, so before driving in the snow, it is advisable to equip yourself with snow chains. They will increase the cross-country ability of the car several times. Such equipment can be purchased at a specialized store or you can make wheel chains with your own hands. But how to make snow chains for a car with a minimum of funds? This will be discussed in more detail in this article.
Purpose
This wheel improvement is designed to improve the vehicle's maneuverability in snow-covered areas or particularly slippery sections of the road.
For example, a car enthusiast is driving along the highway. So far he hasn't had any problems getting around. His car doesn't skid. But after a while he will need to turn onto a country road. As practice shows, such sections of the route are not always properly cleared of snow.
In order to eliminate all such situations associated with the car getting stuck in the snow, you should use snow chains. They will increase traction and help the driver a lot.
After driving through the problematic section of the road, they can be removed and placed in the trunk. It does not take a lot of time.
Ways to increase vehicle cross-country ability
To improve the vehicle's maneuverability on muddy or snowy road surfaces, drivers use various methods to improve the traction of tires on a sticky road.
There are two ways to improve a car's cross-country ability:
- Buy and supply tires with deep treads with a certain pattern, for example, herringbone.
- Buy or make your own bracelets or snow chains.
Tires with appropriate patterns and deep treads create a lot of resistance while driving, which increases fuel consumption. In addition, all-terrain tires are heavy and noisy.
A FullFree device has appeared, which, according to manufacturers and sellers, reduces fuel consumption and protects internal combustion engine parts from low-quality fuel. Let's find out whether fuelfree experts are telling you whether it's a scam or true.
Using the second option, to put on the chains, you need to use a jack or by unfolding the chain and driving over it, followed by fixing it.
What are the dangers of using snow chains?
The following negative consequences are possible with constant use of snow chains:
- The load on the steering device increases.
- The suspension wears out quickly.
- The chains make a lot of noise when driving.
- Tire wear increases.
- Unable to maintain high speed.
- It's not comfortable to move around.
Do not use these hard type devices when driving on asphalt roads - this will damage the road surface. Observe the speed limit: for hard ones - no higher than 80 km/h, for soft ones - no more than 50 km/h. Use such equipment only in emergency situations to increase cross-country ability. Homemade hooks (mordovkas, anti-skid belts, anti-slip tapes) are suitable for any car - Gazelle, truck, tractor, UAZ, VAZ, Niva and others.
How do they travel with them?
Even the best anti-skid devices, which are made by yourself, are not a panacea for off-road conditions.
A car equipped with bracelets requires special attention. A lot depends on what kind of surface the road has. On a slippery, steep climb, in mud and clay, or in dense snow, the bracelets perform well. Attempts to use them in sand or loose snow may not yield results. If in the summer the car gets stuck in a high rut or the body sits on the ground, then there is a high probability that the bracelet will be useless. Moreover, the wheel dressed in it will sink more and more into the ground. Here you will need a shovel, a winch, a tow rope and a tractor. Similar problems arise in winter, when the snow is loose and the temperature is close to zero. The bracelets turn out to be useless, digging a hole under the car.
It is also important to strictly observe the speed limit when driving with an anti-skid device. It is unacceptable to drive with bracelets on snow or ground at a speed of more than 40 km/h. If you have rocky or icy ground under your wheels, you must drive especially carefully at a speed of no more than tens of kilometers per hour.
Design and types of anti-skid means
These devices are based on a simple design consisting of steel links or reinforced wire. A successful application is to distribute the elements evenly over the entire radius of the tire. Failure to comply with this condition may result in rupture of the product and loss of anti-slip properties. The classic scheme, tested by more than one generation of motorists, consists of internal and external components that run along the entire circumference of the tire. They are connected to each other by transverse parts, the so-called “lugs”. The technology for making a chain for wheels with your own hands is accessible even to beginners. Depending on the arrangement of structural elements, there are three types of devices:
- in the shape of a ladder;
- in the form of a honeycomb;
- in the shape of rhombuses.
Each type has its own advantages and disadvantages. In terms of labor costs, the first option is the most accessible - “ladder”.
Installation of bracelets on wheels, mounting options
Installing bracelets on wheels is not a particular problem. There are several mounting options you need to be aware of. The difference between them is quite significant:
- The first option is to install bracelets only on the rear wheels. This method is especially relevant for cars with front-wheel drive.
- The second option is to install only on the front wheels. Accordingly, it is most effective for cars with rear-wheel drive.
- The third method is to install on all 4 wheels. The most reliable and safe option, guaranteeing maximum grip on the road.
The main rule, regardless of the fastening method, is an even distribution of bracelets. That is, if you attach a total of 3 belts to a wheel, then this must be done at an equal distance from each other. Only this method will minimize rubber wear and achieve precise anti-skid performance.
Main stages of work
First you need to cut four pieces of chain to the appropriate length. To do this, measure the required size and cut it with a grinder.
And after that, you will need to thread straps with a lock into the prepared sections of the metal chain (in the first and last link). Four pieces of chain will require eight straps.
And in the end we get ready-made “elements” - now you just need to install them on the wheels. No one should have any problems with this.
Such “shoes” are unlikely to be suitable for a long drive, but if you need to go out for a short time, then homemade chains will do just fine. Moreover, the cost of materials is cheap. For details on how to make snow chains on car wheels in 15 minutes, watch the video on the website.
Ready-made anti-slip bracelets
If you don’t want to make your own anti-slip bracelets, you can always purchase a ready-made version. The stores offer a huge assortment of a wide variety of options, differing in both quality and price. You should definitely choose, taking into account the characteristics of your car, as well as the factors of the area where you are going. Having visited the store, you can immediately understand that the finished products are divided into “soft” and “hard” options. Let's look at what their differences are.
How to make chains yourself
It is worth noting that you can make snow chains yourself. Here you will need the chain itself. Examine it carefully. There should be no cracks in the links.
Welding should not be present, this can cause the links to break. You will also need an angle grinder and a set of carabiners with a tensioner.
Before you start the work itself, decide on the drawing. The simplest is the ladder. It is recommended to start with it.
Then we measure the length of the chain. It should be enough to wrap around the wheel. We cut off the excess length with a grinder.
We attach carabiners along the edges. They are needed to secure the edges. We equip one of the edges with a tensioner. It will securely fix the device on the wheel.
Doesn't it all sound so complicated? That’s right, it will take a little perseverance and the right tools. The assembly process takes a couple of hours.
If you have any questions about this point, it’s better to watch a video about making snow chains with your own hands. They will tell you what other forms there are and how to make them. And it will be easier to navigate, seeing how the manufacturing process occurs.
Circuit selection criteria
A rigid body kit is used in conditions where the off-road section has a long duration.
If difficult-to-pass sections are intermittent and often change to a dirt or asphalt surface, use soft anti-skid devices. You can move in them on a dense surface, whereas hard ones would have to be constantly taken off and put on again.
The choice of pattern also depends on this factor:
- “ladder” – for short-term use in particularly difficult areas;
- “Rhombus” and “honeycomb” - for long trips.
The preferred material for rigid chains is stainless steel. Aluminum ones weigh little, but break quickly.
If off-road sections are short and rare, it is advisable to use the so-called. anti-slip bracelets. They are easy to install, even on a car stuck in mud, but they only cover part of the wheel, so they are not intended for long-term use.
Making a simple homemade chain for car wheels
It is not always possible to purchase an anti-skid device - the high price and lack of availability of the required size forces car owners to solve such issues on their own. I must say that this is a pretty good choice - all the necessary components are always available in hardware stores. In a critical situation, you can simply try to wrap the tire with a cable or a piece of metal rigging, but not everyone carries such a kit with them. Moreover, for a disc brake system this option is absolutely contraindicated - such a design will disrupt the operation of the mechanisms. Therefore, it is worth preparing homemade wheel chains in advance, for which you will need:
- steel chain with a cross-section of at least 5 mm;
- hooks;
- carabiners with a screw-on coupling;
- tension device;
- bolts, nuts and washers.
The dimensions of the blanks depend on the dimensions of the tire used, so it is important to first measure the required indicators. The number of transverse parts is also individual - craftsmen recommend making sure that there are two “cross members” at once in the plane of contact of the tire with the ground. Thanks to this scheme, the traction characteristics and reliability of the entire product will increase. The process of preparatory actions and assembling chains on wheels with your own hands consists of the following points:
- cutting longitudinal blanks;
- cutting of transverse parts;
- securing the transverse element to the 6th link of the longitudinal chain;
- installation of subsequent “crossbars” every 9 links using rings or hooks;
- In the middle of one longitudinal workpiece, fasten a segment consisting of 6 links and a tensioning device with a hook.
As can be seen from the description, if you have certain skills and tools, the operation will take no more than 40 minutes. Those with experience in welding can put it into practice and abandon threaded connections, which will certainly affect the quality of the equipment.
After checking the reliability of the finished product, all that remains is to install it on the car.
Step-by-step manufacturing instructions
A set of chains for the wheels of the drive axle (2 pieces) costs up to 9 thousand rubles. For comparison: 4 summer Kama tires for VAZ family cars cost 7 thousand rubles.
Thus, the decision to make body kits yourself looks attractive, especially since this process is not difficult.
Selection and preparation of materials
You need to purchase the following components:
- steel chain;
- connecting elements;
- locks with tensioning device.
The budget option allows the use of a cable as a harness. Then an expensive chain will only be needed for the transverse elements. This design is characterized by low reliability, since the cable unravels or frays over time. If you don’t have a lot of money, it’s better to use a chain for tying too. Stainless steel is preferred.
On average, 2 anti-skid devices require about 15 m of chain. The exact length is calculated based on the size of the car wheels. In this case, the diameter of the supporting side rings is selected so that they are located at the middle of the tire height.
The number of lugs is taken such that there are at least 2 of them per contact patch between the tire and the road.
Connecting elements for fastening individual sections of the chain together can be made independently. Using a grinder, cut the link, bend it a little, then after assembly, compress it again and weld the joint.
Homemade rhombus
Assembly is carried out in the following order:
- The wheel is removed from the car and placed on a horizontal surface.
- A chain in the form of a ring is laid along the tire in the middle of its side surface.
- Part of the lock is screwed to its end.
- Mark the chain link to which the second side of the fastener will be attached, and make a cut with a grinder.
- Attach the lock with a connecting ring to the other end of the harness.
- Make an exact copy for the opposite plane of the wheel.
- Having slightly loosened the locks, secure both rings in the working position with a rope or electrical tape.
- Draw diamond-shaped lugs on the tire with chalk, trying to make the pattern evenly distributed.
- Apply the chain to one of the drawn sections to measure its length.
- Cut off the required fragment.
- Using it as a template, cut the chain into pieces in an amount 2 times the number of lugs.
- The transverse elements are assembled by connecting the individual pieces with rings, then they are attached to the harness.
The wheel anti-skid device is ready.
DIY honeycomb
The same procedure is used, only rhombuses in the drawing alternate with straight sections. The weaving begins to be formed from the outside. Here it consists of half-diamonds with straight segments.
Drawing can be done in 2 ways:
- assemble from short pieces, connecting them with rings;
- lay out in one single piece of chain.
The pattern on the inside complements the outside. It is composed of individual short fragments that make up the second half of the diamond.
“Honeycombs” are attached to the harness in one of 2 ways:
- bolts and nuts with large washers (budget option);
- brackets (3 different types will be required).
The device for the opposite wheel is made as a mirror.
Homemade ladder
The simplest option. The right and left strappings are fastened with straight sections in the amount of 13-15 pieces, laid across the tire.
We study the process: how to make snow chains for cars with your own hands and video of working moments
Experienced motorists assure that at critical moments a cable or even simple rigging comes to the rescue. You can simply wrap them around a wheel, another question is that such things are not always at hand. Moreover, this method is strictly contraindicated for cars equipped with a disc brake system. Therefore, it is better to be patient in advance and make a “chain body kit” yourself.
When making snow chains with your own hands using available videos, where the footage of the blanks is not always indicated, it is important to make accurate measurements of the radius and width of the tire. Based on the results obtained, calculate the parameters of the future product. The number of transverse elements (lugs) is also selected individually for each car model. Experts recommend focusing on the fact that there should be two transverse parts at once in the plane of the contact patch of the coated rubber.
The procedure for assembling a device to increase cross-country ability consists of performing the following points:
- cut longitudinal and transverse chain blanks with a grinder;
- secure the first transverse element to the 6th link of the longitudinal part using bolts and washers, hooks or welding;
- mount all subsequent crossbars every 8-9 links;
- in the center of one longitudinal element, install a segment consisting of 6-8 links and a tension device to securely fix the product;
- Install carabiners with a diameter of at least 5 mm at the ends of the longitudinal sections.
If you have certain skills and tools, the operation will take about 40-60 minutes. It will be useful to have experience in welding work, which will allow you to avoid threaded connections in practice, which will have a positive effect on the quality of the device.
Dimensions and pattern
You can also divide these designs by size and pattern.
The size is selected solely according to the parameters of the car itself, namely, what ground clearance, wheel width, etc.Basically, the instructions write for which cars this or that chain is designed. Otherwise, you can measure everything yourself. This is very necessary in order to protect yourself from the possible snagging of this very chain on parts of the car’s chassis.
There are 3 classifications of drawing:
- Ladder
- Triangles
- Honeycomb
"Ladder" is the most affordable option. This chain fully corresponds to its name, because the weaving occurs in stripes along the tread, perpendicular to the wheel.
This design is suitable for muddy areas, but due to the small contact with the road there is a risk of self-burrowing. Therefore, in deep snow, this type is not effective.
"Triangles". Great in deep snow, but not effective in muddy areas. If you look at the width of the tread, you can see a zigzag shape.
Honeycombs are intersecting diagonal lines. This option has 100% contact with the ground, which ensures excellent lateral stability. But the design limits the speed of movement.Project of an anti-skid device for a car
We were inspired by last year's research to get creative. Then we chose what was better to buy: chains or anti-slip bracelets. The verdict was that there is nothing to do with anti-slip belts on serious off-road conditions. In addition, the cuffs damage alloy wheels, which is critical for many owners. But the real help in making something with your own hands was the price list for the Konig chain. Last year they demanded about 9,000 rubles for the ZIP Ultra model. For a moment, for the same money a ready-made set of winter tires with above-average quality for the now popular 15-inch is sold. Agree, this is impressive.
Choosing a chain weaving pattern
Before purchasing and making anything, you need to have a project in hand: this principle underlies any serious invention and the tire chain is no exception. When designing wheel attachments that increase your vehicle's ability to maneuver in snow, it is important to choose a weaving pattern that suits your needs.
| Ladder | Honeycomb | Rhombus |
| +The most powerful traction force + Low price + Simplicity of design | +Excellently storms the rut +Smooth running on hard ground +Best handling in class +Good lateral grip | +Excellently gets out of ruts +Good handling |
| - Doesn't get out of a rut —Worst lateral grip in class —Increased load on transmission units on hard surfaces | —Average traction level | —Rows mediocrely —Does not prevent the machine from sliding sideways —High vibration load of the transmission |
| Suitable for driven axle | The best choice for mountain roads and light off-roading | Not recommended for use. Pay attention to the honeycomb or ladder |
Link size
Not just a drawing. The caliber of chain links also determines a number of important characteristics, including cross-country ability and durability. This way, a thin chain won’t last long, but a larger option may not fit into the wheel arch. Strictly speaking, in this matter you should not focus on just one parameter:
- As the caliber increases, traction capabilities in snow and mud improve, the service life of the anti-slip product increases, but rubber wear occurs.
- Small-link snow chains cling to ice well, have a moderate appetite for rubber, but wear out quickly. This is abstract reasoning. For each class of car, “working” ranges of link sizes have long been determined and, admittedly, they grow with increasing vehicle weight:
- Passenger cars and crossovers: 3.5-6 mm. Our colleagues from Autocomfort have experimentally determined that it is better to equip a two-ton SUV with 6 mm chains. It’s even better to choose an asymmetrical shape of 6x8 mm - then the machine demonstrates everything that it is capable of. As for the smaller size, a 5 mm chain will be too small for those over 2,000 kg.
- Trucks and special equipment: 6-19 mm.
Accessories
When you see branded kits, it becomes clear that the anti-skid device does not consist of one chain at all. The design also provides:
- Two connecting lines linking the chain sections at the back and front of the tire.
- A tightening device that tightly fixes the chain on the wheel (lock).
- Fasteners that fasten metal sections together directly on the tread (connecting rings).
What exactly can serve as one or another component is determined by the budget and range of equipment available. Here are examples for each of the three groups of fittings:
- The best option for connecting lengths of chain on the sides is to use a chain of the same gauge. In this situation, maximum strength and durability are guaranteed. The only thing that discourages this decision is the high cost. This is why the second version appeared - to use a cable for these purposes. A linear meter of cable rope is noticeably cheaper, but it can fray and unravel, and is therefore less reliable.
- The signature chain tie is also made from chain. It is difficult to implement such a solution in everyday life, so turnbuckles and peculiar locks, known from anti-slip devices “Made in the USSR,” have taken root on homemade products. The widespread use of lanyards is due to their availability in retail sales and the absence of the need to make anything with your own hands. At the same time, such a fastening scheme has poor dirt protection. This led to the belief that the turnbuckle was difficult to loosen after several trips. The advantage of the Soviet lock design is reliability and trouble-free operation. However, the lock has only one drawback: it is difficult to manufacture (additional equipment is required).
- The easiest way to connect straight and diamond-shaped sections in the tread area (applies to “honeycomb” and “diamond” weaving patterns) is to use special rings. If it is difficult to get them, then you can get by with a well-known technique: cut the link with a grinder, engage it and weld it with a welding machine.
The listed accessories are the backbone of the anti-slip device. Depending on the manufacturing technology, a number of mandatory parts are selected:
- Cable circuit for linking the chain on the sides of the tire. Additionally, you will need thimbles, shackles and clamps to secure the cable from unraveling.
- Chain linkage on the sides of the wheel. What is needed are plates connecting sections of the chain along the perimeter of the front and rear walls of the tire + removable brackets used on the section of fastening the lock/turnbuckle.
Alternative solutions
The thoughts of folk craftsmen do not stand still - and now they are offering an alternative solution: anti-slip bracelets. In principle, these are the same homemade metal chains for wheels, only with the difference in the absence of longitudinal elements. The advantages of bracelets are:
- ease of manufacture;
- quick installation;
- high reliability and efficiency.
So, what is needed for production:
- rubber mounting element for the VAZ muffler;
- metal chain with a diameter of at least 6 mm.
Tires with a width of 195 and 205 mm will require about 4 meters of chain. As you can see, the costs are minimal and you only need to cut the material to the required length. Another alternative option is kits for making DIY wheel bracelets using chains, which are quite affordable and of good quality (with the exception of Chinese ones).
The set consists of:
- chain blanks;
- fastening accessories;
- sling;
- clamping mechanism.
The kit is very easy to use and does not take up much space. An important plus is the ability to use it on cars with disc brakes. Judging by the reviews, owners of expensive SUVs do not hesitate to use it, which once again speaks of the practicality of the device. For more information on how to make snow bracelets with your own hands, watch the video:
Important to remember
Any traction control equipment adversely affects the safety of tires, as well as the condition of the chassis. You need to be especially careful when choosing locks for homemade chains on car wheels, since the trouble-free operation of the car depends on them.
Moving on hard surfaces is unacceptable. When driving on loose snow or mud, you should maintain a driving speed of 20-30 km/h; it is not recommended to allow wheels to slip. Experienced drivers advise periodically checking the tension of the equipment along the entire inner and outer perimeter of the tire while driving.
Manufacturing technology
First, the chain is divided into equal parts in accordance with the number of bracelets that are planned for installation. To do this you just need to take into account the thickness of the wheel. For example, for 215 tires, two pieces of chain of 15-17 links each will be enough. everything is calculated empirically, the main thing is that the chain segments are the same.
When the chain is divided into segments, the bracelets are connected in two pieces of chain using a bolt with a diameter corresponding to the size of the link and a length of 50 mm. To ensure that the ends of the chain are fixed and do not move while moving along the bolt, either a bushing of the appropriate length is put on it, or nuts are screwed on so that the end of the second section of the chain is firmly attached.
It is better to use a self-locking nut or flare the thread to prevent spontaneous unscrewing. When the bracelets are ready, their ends go around the wheel and are connected with rigging straps.
After installing the device on the car, it is recommended to drive a couple of hundred meters and check the strength and reliability of the structure. Naturally, with bracelets, the maximum speed will be limited at the discretion of the driver, but it is not recommended to exceed the barrier of 50-60 km/h on a flat road, and to stick to 20 km/h on off-road roads.
So a simple device can make any road passable and any point accessible all year round. Do not exceed the speed limit with bracelets, and have an easy road for everyone!
What is needed to make homemade car snow chains for wheels?
The inability to purchase factory-made devices that increase cross-country ability, as well as their high price, push car enthusiasts to solve the problem on their own. It should be noted that this is a completely reasonable choice - the necessary components can be found in any hardware store, and every self-respecting driver has a minimum set of tools.
It should be said that information on how to make snow chains with your own hands and videos do not always include a list of design elements. Let's focus on the simplest model, made according to the “ladder” scheme. To implement it you will need:
- chain with a cross section of at least 5 mm made of steel;
- carabiners with a threaded coupling;
- tension mechanism;
- washers, bolts and nuts;
- hooks, carbines.
On average, to assemble chain devices for the drive wheels of a passenger car, about 15 meters of chain will be required; more accurate figures will be known only after specific measurements. It is recommended to use stainless metal hardware as chains. The preparatory process ends with the collection of tools:
- Bulgarian;
- vice;
- hammer;
- set of wrenches.
Dressing rules
Installation of chains can be carried out in two ways - it all depends on the type of device, weather conditions and your skills.
The first method is using a jack.
Everything is simple here. It is necessary to secure the car with special stops and set the parking brake.
Next, lift each wheel one by one with a jack, put on the chain, and snap the locks.
Second way.
Requires certain skills (no jack needed). Park the machine on a level area and place the chains in front of the wheels.
Make sure that the locks are located on the outside. It is very important that the links and nodes are not twisted.
Now all that remains is to smoothly lay out the snow chains in front of the wheels and drive over them. In this case, about 25-30 cm should remain to the end.
Next, a long section of chain is thrown onto the wheel, and the inner and outer parts are fastened. That's all. All that remains is to tighten the product with an adjusting cable.
Before crossing any obstacle, it is advisable to drive a few tens of meters on the chains, tighten them and then hit the road.
Otherwise, the effectiveness of the products will decrease.
Quality wheel chains can turn your vehicle into a powerful all-terrain vehicle. All you need is to buy the design you like or make your own chains.
Materials and features of bracelets
Devices can be made of different materials, but the most common ones are:
- devices made of durable alloy steel;
- reinforced rubber fibers;
- polyurethane;
- bracelets made of high-strength plastic.
The more severe the road conditions, the more rigid the design of the device should be and the stronger the material should be. So, for shallow snow on hard compacted soil or asphalt, softer lugs are used and speed limits may not apply to them.
The use of traction control devices also depends on the diameter of the vehicle's wheels. Depending on the nature of the coating, choose a lug pattern: for deep snow it is more advisable to use a ladder; honeycombs and diamonds with a smaller pattern are intended more for icy roads.
Making your own snow chains
To make homemade chain equipment, you must perform the following steps:
- Measure the circumference of the tire with a tape measure. Cut 2 segments from the chain equal to this measurement minus 20-30 cm. The finished segments, closed in a ring, should lie approximately on the line of the tire tread. Connect them into 2 circles using carabiners.
- For transverse sections, measure the distance between the two rings from the chain on the outside of the tire (here you need to take into account the length of the connectors).
- Cut the required number of cross chains - there should be at least 8 pieces.
- Attach carabiners or hooks to the ends of the resulting segments. They can be made from reinforced wire or use chain links, but be sure to secure them by welding.
- Now attach the transverse sections to the circles at equal distances.
- To adjust the tension, you need to make a suitable system. You can make it from a piece of chain, adding a regulator with two screws. It is also possible to use metal springs or rubber bands. Attach carabiners to the ends of the regulators as well.
- It is best to use 2 tension regulators: on the outside and inside of the wheel. If necessary, you can tighten the system with one adjuster.
On front- and rear-wheel drive cars, the equipment is placed only on the drive wheels. On vehicles with all-wheel drive, the entire set of wheels must be “dressed in armor.”
Watch a video on the topic.
Details: which locks on homemade snow chains are better and why?
When making traction control devices in garage conditions, drivers most often use the following types of locking mechanisms to secure them to the tire:
- S-shaped;
- hook-shaped;
- with ratchet mechanism.
Some homemade wheel chains are equipped with an S-shaped lock structure, which is locked with a four- or hex key. However, many complain about unreliable fixation and lack of adjustments for this option. In addition, installing such equipment is a complete inconvenience.
The second option for fixing the chain device is more common and holds quite well. If the chain is correctly laid, fastening can be done with a screwdriver without any problems. For a complete guarantee, car enthusiasts advise tying the contact point with 1-3 mm soft wire. Disassembly of the equipment also occurs quickly without much effort.
The ratchet lock model was previously used on trucks. It is characterized by high reliability and ease of operation. The sample provides fixation without the use of additional materials.
Bottom line
It is possible to turn any car into a real SUV using chains. The manufacturing process will not take much time, no more than three hours.
The main thing is to choose the materials wisely and carry out the assembly efficiently. If you wish, you can buy this device at a specialized store.
Sources
- https://avtoadvice.ru/cepi-protivoskolzheniya-svoimi-rukami/
- https://remontautomobilya.ru/cepi-protivoskolzheniya-svoimi-rukami-poshagovaya-instrukciya.html
- https://autoclub.su/samodelnye-cepi-na-kolesa/
- https://sdelairukami.ru/kak-sdelat-tsepi-protivoskolzheniya-na-kolesa-za-15-minut/
- https://autobann.su/kak-sdelat-zepi-protivoskolgeniya.html
- https://autostadt.su/tsepi-protivoskolzheniya-svoimi-rukami/
- https://AutoTopik.ru/sovet/712-cepi-protivoskolzheniya.html