Changing the oil of a VAZ 2110 is a mandatory and quite responsible procedure, but at the same time it is so simple that almost every car owner can cope with it.
In domestic vehicles produced by AvtoVAZ JSC, the oil change (“working off”) in the engine must be carried out every 10,000 km . And the VAZ 2110 is no exception. The reliability of its operation is largely determined by the quality of regularly performed maintenance, where one of the most important operations is the replacement of used engine oil.
Oil change intervals
Almost any driver knows the regulations for replacing technical fluids in his car, which are established by the manufacturer. But, in addition to the recommended timing, there are cases when the oil needs to be changed “unscheduled”. Such cases include, for example, carrying out a major engine overhaul or running-in. In the latter case, the oil change should occur after 3000 km. This is done in order to eliminate the consequences of break-in, that is, to remove chips from the engine.
Subsequent replacements are carried out after the car “passes” 10-15 thousand kilometers. Considering the quality of motor oils, it is recommended to do this more often, at least once every 8 thousand km.
Remember! The more often the engine oil is changed, the cleaner the engine is from the inside and the longer it retains its service life.
An oil change on a VAZ 2110 with a manual transmission is performed once every 40-60 thousand kilometers, and in an automatic transmission - every 60-80 thousand kilometers.
About installing a magnetic plug in the engine crankcase and gearbox on LADA
During operation of the engine and gearbox, tiny metal particles enter the oil, which appear due to the rubbing of parts against each other. A crankcase drain plug with a neodymium magnet helps collect metal debris and extends the life of the units by allowing them to operate in clean oil. Let's figure out how to make a magnetic crankcase plug for LADA cars with your own hands and whether there is any benefit from it.
The process of modifying the drain plug is shown using the example of a Lada Priora car. On other modern LADA cars (Vesta, XRAY, Largus, Granta, Kalina, Lada 4×4) all actions are performed similarly. You will find examples of work on other LADA models in the comments.
- Standard drain plug.
- Neodymium magnet N52 Ф12*10mm
Finalization
drain plug is very simple. The magnet should be secured inside the stopper. To do this, you can use epoxy glue or rivet the edges of the cork with a core.
Tests
showed that after running for 3000 km, 3-4 mm of metal dust and oil had accumulated on the magnetic plug of the engine crankcase.
It is worth noting that ready-made accessories can be found on sale. For example, for a Renault engine and gearbox, the sump plug with a magnet has the article numbers: 7703075210, 7703075348, 7903075033.
- In China on AliExpress (for LADA a plug with parameters M16X1.5 is suitable)
- In our online store (link to product)
Will you install a magnetic crankcase drain plug on your LADA car?
Let us remind you that we previously talked about other simple modifications that improve the operation of the car, for example:
Source
Required volume
Before buying motor oil, you need to decide on the volume. The best option is to purchase a 4-liter canister, which will last for a long time. This is convenient, because you can add the remaining liquid as the liquid is consumed, without worrying about buying a new one every time.
Well, now specifically about the one-time filling volume. The engine model plays an important role here. The VAZ 2110 used two engine variations. This is an 8-valve and 16-valve engine. In the first case, the volume of the oil sump is 3.2 liters, and in the second - 3.5 liters.
Rules for choosing oil
There are three basic rules for choosing engine oil for the “ten”:
- When purchasing, you must be able to distinguish a fake from the original. Counterfeit oils are a real problem in the modern car market. As a rule, those liquids that are counterfeited are those that have a high cost and are produced by famous brands. The use of such motor oils can have a detrimental effect on the engine.
- Every car owner should know about the approvals. Each car has its own motor oil tolerances, which determine the permissibility of using a particular liquid.
- Do not forget about the viscosity of motor oil, which depends on the region of operation, climate and weather conditions.
What to pay attention to
Now let's look at each of the above points in more detail. And first, let's return to fakes and understand the rules for identifying them. The easiest way to recognize it is to look closely at the canister. Even the slightest difference from the original will immediately reveal the efforts of the scammers. Non-original oil is also distinguished by another feature: the absence of a foil protective seal on the filler neck. It should be under the lid. If it is not there, the canister has already been opened, and not real oil was poured into it.
The optimal viscosity of engine oil for the VAZ 2110 is 5W40. Especially if the car is used with low mileage all year round. If the car is used quite often, for example in a taxi, then the oil should be selected according to weather conditions. In Russia, it is recommended to pour 0W30 in winter, and 10W40 or 15W40 in summer.
On a note! Sometimes, as an alternative to oil, regular mineral water is poured after break-in to save money.
A brief overview of the best motor oils
If a car owner finds it difficult to choose motor oil, it is recommended to pay attention to the following brands:
- Lukoil Lux. This is the cheapest motor oil for the VAZ 2110. It is recommended for use in cars with high mileage. Lukoil Lux is an ideal option for topping up, since the price of a liter canister is only 250-300 rubles. The oil has good cleaning properties, and, most importantly, no one will counterfeit a cheap liquid. After all, you must agree, this is unprofitable.
- Shell Helix HX8. This is a fairly high-quality oil for VAZ engines. Shell Helix has excellent lubricating properties and is ideal for all types of engines. It is more advisable to use this type of lubricant in an engine after a major overhaul or with a mileage of up to 200 thousand kilometers. In other cases, using this oil is a very dubious pleasure, since the price of a 4 liter canister is 2000 rubles.
- Elf. Not long ago Elf left the Renault assembly line, but was remembered as a good motor oil. Car owners began to pour it not only into popular foreign cars, but also into VAZ and
- Lada 110. To have a good effect, it is recommended to change Elf more often than required by the regulations. Ideally, it is recommended to reduce the frequency to 7-8 thousand kilometers.
Draining procedure
If you don’t want to overpay for a car service center, but don’t have practical experience in how to drain coolant from an engine, then you can check out the master class on replacing antifreeze using the example of a VAZ-2114 car. First of all, it is necessary to carry out certain preparatory manipulations, which include:
- Placing the car on the platform, since ideally it should be in a horizontal position.
- Waiting for a certain time necessary so that the motor and the liquid in it can cool down and not cause burns to the novice master. Even opening the cap of the expansion tank or any other unit can trigger the release of scalding antifreeze steam with all the ensuing consequences.
- Study of the system design and location of antifreeze drain points.
The presence of a special drain plug, which is not provided in all designs, is of great importance for the process of draining used technical fluid. And if it is not there, then the antifreeze is released from the main engine block by disconnecting the lowest pipe from the radiator. This is how the antifreeze is drained from the cooling system, after which it must be thoroughly rinsed with distilled water to prevent the development of possible problems due to potential incompatibility of technical fluids from different manufacturers.
Sometimes, in order to completely drain antifreeze from the system, it is necessary to resort to additional manipulations. The process of cleaning the radiator and engine block will be performed as follows:
- After the recycled liquid comes out on its own, the drain hole is left open and the expansion tank cap is closed. Then turn on the stove at full power and start the engine. In this way, it will be possible to create additional pressure in the system, thanks to which the antifreeze will come out even from the most inaccessible places.
- The engine is turned off literally after a few minutes, since its operation without coolant can lead to overheating of the elements and, as a result, to their deformation and damage. If antifreeze continues to drip from the drain or radiator hole after disconnecting the pipe, then the procedure must be repeated when the car has completely cooled down.
- An indicator for monitoring the degree of cleaning of the vehicle cooling system is the presence of released antifreeze drops. Their absence should be regarded as a sure sign that the antifreeze has been completely drained.
Oil change methods
Changing the lubricant can be done in two ways:
The first is relevant when completely replacing the fluid and switching, for example, to another manufacturer.
With engine flush
Depending on the type of flushing, replacing engine oil can be divided into two types:
- 5 minutes. This is the most popular type of flushing. How is everything going? A special cleaning fluid is added to old motor oil. Then the motor is started for 5 minutes and allowed to run without load. After this, the old oil is drained along with the flush. This method is good because the old lubricant becomes more liquid and is easily removed from the engine along with the dirt.
- use of flushing oil. The use of this flushing option when performing a procedure such as changing the oil on a VAZ 2110 is performed as follows: the old oil is drained, then the oil filter is changed, and flushing fluid is poured into the engine. After this, the car must be driven a certain distance without heavy load. Then this oil must be drained and replaced along with the filter. This is a more expensive and high-quality type of washing.
Attention! Flushing the engine is done at your own risk. The fact is that caustic substances can raise coked dirt in layers and clog oil channels. Because of this, the oil pressure in the engine may drop. This is especially dangerous for 16 valve engines. In order to properly flush the engine and fill in a new type of engine oil, it is recommended to use a longer flush.
No engine flushing
If the type, brand and model of engine oil does not change, then the replacement is performed without flushing. To do this, the old oil is drained, the filter is unscrewed, a new one is installed and fresh lubricant is poured in. You don't need to do anything else.
Noise Removal
The noise of the VAZ-2105 gearbox can occur due to wear of bearings, wear of gear teeth and gears, as well as synchronizers, and axial displacement of the shafts relative to each other.
If such a problem occurs, it will be necessary to remove the transmission from the car, since it cannot be repaired otherwise. Note that eliminating noise is one of the most difficult operations to perform, since it requires complete disassembly and reassembly of the gearbox with replacement of worn elements.
In addition to the standard set of keys and screwdrivers, you will additionally need a universal puller. Next, we’ll look at how to completely disassemble a VAZ-2105 5-speed gearbox.
So, all work is done on the removed gearbox:
- Drain the oil and remove the bottom cover. We immediately assess the condition of the gear teeth. If their damage is not noticeable, most likely the noise is coming from the bearings;
- We check the position of the gearshift lever (it should be in neutral), after which we dismantle the gear shift mechanism (link) from the gearbox;
- Remove the cover of the clamps and remove the springs and balls;
- We remove the elastic coupling from the secondary shaft, and then its hub (to unscrew the hub nut, unscrew the bolt securing the 3rd and 4th gear forks, engage 1st gear in the gearbox and displace the 4th gear synchronizer clutch. Two at a time the gears are engaged, the gearbox will be blocked and the nut can be unscrewed);
- We unscrew the speedometer drive, the sensor for turning on the reverse speed light and the exhaust system pipe mounting bracket;
- We unscrew the fastening elements of the rear gearbox cover (5-speed gearboxes have 5 external nuts and 1 internal nut, 4-speed gearboxes do not have an internal nut). Then remove the cover. In this case, the bearings are second. the shaft and the 5th gear block will be disassembled - the inner races will remain on the shafts, and the outer ones, together with the rolling elements, will be in the cover, and all this will need to be dismantled for replacement;
- Remove the speedometer drive gear and oil deflector from the secondary shaft;
- We dismantle the gear block of the 5th and reverse gears by unscrewing its fastening bolt installed in the shaft, as well as the reverse intermediate gear from the axle;
- Remove the 5th gear synchronizer from 2nd. shaft, the 5th and reverse gear shift fork together with the axle, then remove the 3rd and 4th gear axle block;
- We dismantle the synchronizer hub and the reverse gear from the second. shaft;
- We unscrew the bolts securing the pressure plate of the secondary shaft bearing and remove it;
- Unscrew the clutch housing from the gearbox;
- Unscrew the intermediate shaft bolt and remove the front bearing;
- We remove the rear bearing of the intermediate shaft, after which it can be pulled out of the box body;
- We remove the axles and forks of the remaining gears, as well as the axle block of the 1st and 2nd gears;
- We take out the input shaft;
- We remove the secondary shaft along with the gears;
Well, then troubleshooting of the component elements is carried out, worn and damaged components are replaced and assembly is carried out.
Note that this disassembly diagram is general and does not consider such nuances as removing retaining rings, sealing washers, engravers and other small elements.
Step-by-step instructions for changing the oil in a VAZ 2110
In order to change the engine oil on a VAZ 2110 without problems, you need to adhere to the following procedure:
- Place the car on a pit, lift or overpass. Warm up the engine to operating temperature.
- Unscrew the bolts securing the motor protection and remove it.
- Place a 4-liter container under the tray. A cut-off old canister works well for this.
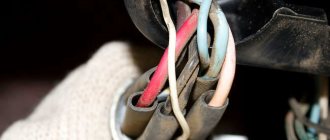
- Unscrew the drain plug and let the old oil drain. While it is draining with both hands, you need to tear off the oil filter and dismantle it. If it does not unscrew, it is recommended to pierce it with a screwdriver and, using it as a lever, unscrew the old filter element.
- Install a new oil filter by first pouring a small amount of oil into it and lubricating the rubber band. Visually check that the filter valve is working properly.
- Replace the drain plug and screw on the protection.
- Fill in new engine oil to the level. Screw on the filler cap and start the engine. Make sure the pressure sensor goes out.
- Check the oil level after 3-5 minutes. If it is normal, there is no need to add it; if it is not at the level, it is recommended to drain the excess oil or add the missing oil.
The procedure is no different from the same one when changing the oil in a VAZ 2110 gearbox.
General issues
Let's consider general philistine questions about Granta and butter.
How to check the oil level in Grant
We check the level classically;
The dipsticks on the Lada suffer from the fact that they are difficult to read. You may need to wipe and lower the dipstick again.
When to change the oil of a VAZ 2190
According to the regulations, replacement on the Grant is required every 15,000 kilometers. Practical experience suggests replacement every 10,000 km. mileage, or once/twice a year.
The Grants are stuffed with Rosneft from the factory. The brand has not proven itself to be reliable and of high quality.
The first replacement occurs after the new car has been broken in - after 2000 km. This is not a requirement from the factory, but common sense - change the flooded s to something normal.
Which oil to choose
Next is a table with factory recommendations for Grants.
Excerpt from the documentation for the VAZ 2190.
Changing the oil in the gearbox on a VAZ 2110
To change the oil in a VAZ 2110 gearbox, you must do the following:
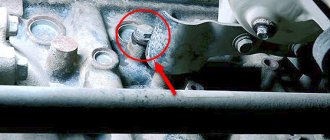
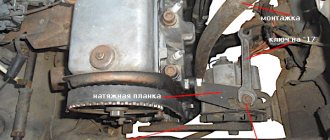
- Unscrew the drain plug using a 17 key. It is located on the side of the manual transmission.
- Drain the old oil.
- Screw the plug into place and, using a transmission oil filler, add new fluid until it begins to overflow. For filling, use another hole; it is located on the side. To access it, you need to unscrew the filler plug by 17.
When changing the oil in a VAZ 2110 gearbox, you must use exclusively transmission oils. Motorized ones are not suitable for this.
That's all you need to change the oil in a VAZ 2110 engine and transmission yourself. The most important thing is to have a standard set of tools. The rest of the procedure is quite simple.
Source
List of parts and equipment
To simply change the engine oil, the owner of a car with an automatic transmission will need a core wrench. The standard size “6 edges by 8 mm” is suitable. In principle, you don’t need anything else except a flat key “10”. They unscrew the battery terminal with it.
Plug key for all trim levels with automatic transmission
For those who have a mechanical transmission, it is easier to use a set of ring wrenches. We need standard sizes 8, 10 and 12 mm. That's all.
Let us indicate how the drain plugs are designated in the AvtoVAZ catalog:
- 21120-1011061-00 – plug for equipment with automatic transmission;
- 21080-1011062-00 – washer for the plug (automatic transmission only);
- 21080-1009156-00 – option for cars with manual transmission.
The filler plug is designated by the numbers 11190-1009146-00. And the control dipstick is a part from the VAZ catalog with number 21120-1009045-00.
To unscrew the oil filter housing, use a puller. There are universal pullers on sale, and a cup puller (Renault 7711381992) is also suitable. The choice is made based on standard parameters: diameter is 76 mm, number of edges is 12.
Cup puller
If we talk about the oil filter itself, part 21080-1012005-08 was installed from the factory. This is a filter produced in the city of Livny. You can look for an imported replacement, but keep in mind that the height of the case should not be less than 70 mm. Otherwise, the oil will not cool well.
Selection of analogues
The screw plug that closes the hole in the crankcase of cars with automatic transmission is not a unique VAZ part. You can use analogues instead:
- Renault 77 03 075 348;
- Fa1 153.520.001 (for a tetrahedron rod).
If you remove the spaces from the top number, you get the designation of the traffic jam for Largus.
It will be more difficult to find a replacement for the washer. Renault, which produces part number 11026 5505R, will help here. Without a space, we again get the AvtoVAZ part designation: 110265505R - sealing ring from Lada Largus.
The VAZ plug number 21080-1009156-00 has its own long history. It appeared on Eights and is suitable for front-wheel drive Lada engines that are not equipped with an automatic transmission. A unique feature of the part is the presence of a tapered thread. Of course, it cannot be made on a lathe.
Replacement frequency
According to the official manual for the VAZ-2110, it is recommended to change the oil every 8-10 thousand kilometers on this Russian-made car. The frequency directly depends on the operating conditions.
In practice, in rare cases, a car can easily travel 10 thousand kilometers before scheduled maintenance. In fact, the quality of roads, climate, gasoline and a number of other factors significantly reduce the intervals between engine fluid changes. That’s why most car owners change it every 6–8 thousand kilometers.
The condition of motor oil and its physical and chemical properties are negatively affected by:
- regular driving in city conditions and constant traffic jams (the engine idles a lot of time);
- cold climate (low air temperature increases oil viscosity, which increases the load on engine components);
- operation of the machine in conditions of polluted, dusty and sandy roads;
- prolonged idle time of the car in a garage or in an open parking lot (condensation forms in the crankcase, mixing with oil);
- savings on consumables;
- refueling at cheap gas stations;
- aggressive driving style, etc.
When the lubricant begins to noticeably darken, this indicates its wear and the need for mandatory replacement in the near future. Darkening indicates that a large amount of combustion products has accumulated in the lubricant. Continued operation of the machine with worn oil can lead to serious consequences, including the need for major engine repairs.
Severe operating conditions
But sometimes you have to deviate from the instructions in the instructions and change the fluid more often. This is necessary if the car is operated in difficult conditions. These include the following situations:
- The car is regularly operated in dense city traffic jams, which is why the engine idles for a long time;
- The climate of the region where you live includes low temperatures and very cold winters. This causes the oil viscosity to increase and the load on the engine elements to increase;
- Operation on dusty or sandy roads soon leads to the oil becoming contaminated and losing its properties;
- The car stood idle for a long time, due to which condensation formed in the engine, which negatively affected the composition and quality of the oil used.
Determining that it is time to start replacing the fluid inside the engine is quite simple by its appearance. The oil becomes dark due to the accumulation of fuel combustion products . If you ignore the recommendations and drive for a long time with poor lubricant in the crankcase, this will lead to serious consequences and expensive repairs.
Symptoms of a problem
Replacing the crankcase is a complex and responsible procedure that must be performed in strict compliance with technological standards. Making mistakes is strictly not recommended.
If the replacement is carried out incorrectly, the rupture may occur again, foreign particles will get inside the crankcase, sealing will be insufficient, which will lead to failure of the engine or its individual components.
It would seem like a simple gasket, but what a burden of responsibility lies on it.
To determine the need to replace the gasket, you should pay attention to the characteristic signs of such a problem:
- Oil is leaking.
- There is a decrease in pressure in the oil system.
- The oil level drops more rapidly than usual.
Materials
For all 16-valve engines on 2112 hatchbacks, the volume of the lubrication system is no different. It is 3.6 liters. When replacing, pour 3.3, and if the filter is changed, then 3.4 liters (plus another 100 ml into the filter itself). The choice of material does not depend on the engine type.
Brand Viscosity API quality class
| LIQUI MOLY OPTIMAL | 10W40 | SL/CF |
| LUKOIL-SUPER | 5W40, 10W40, 15W40 | SG/CD |
| LADA SUPER | 5W40, 10W40, 15W40 | SG/CD |
| ESSO ULTRA | 10W40 | SL, SJ/CF |
| MOBIL SUPER S | 10W40 | SL, SJ/CF |
| SHELL HELIX PLUS | 10W40 | SL/CF |
| HAVOLINE EXTRA | 10W40 | SL/CF |
| ZIC A PLUS | 5W30, 10W30, 10W40 | SL |
| MANNOL RACING | 15W40 | SL/CF |
| NOVOIL-SINT | 5W30, 5W40 | SG/CD |
| NOVOIL-SUPER | 5W30, 5W40, 10W30, 10W40, 15W30, 15W40, 20W50 | SG/CD |
| UTEC NAVIGATOR | 5W40, 10W30, 10W40, 15W40, 20W40 | SG/CD |
| MANNOL ELITE | 5W40 | SL/CF |
| ESSO UNIFLO | 10W40, 15W40 | SL, SJ/CF |
| TNK SUPER | 5W40, 10W40, 15W40 | SL, SJ/CF |
| SHELL HELIX SUPER | 5W40, 10W40 | SL/CF |
| MOBIL 1 | 0W40 | SL, SJ/CF |
| MOBIL SUPER M | 10W40, 15W40 | SL, SJ/CF |
| VALVOLINE DURABLEND | 10W40 | SL/CF |
| MANNOL CLASSIC | 10W40 | SL/CF |
| VISCO 2000/3000/5000 | 10W40 or 15W40 or 5W40 | SL/CF |
| LUKOIL-LUX | 5W40, 10W40, 15W40 | SJ/CD |
| MANNOL EXTREME | 5W40 | SL/CF |
On a working engine, the oil level between changes remains above the MIN mark. That is, they do not top up. In general, on the VAZ-2112, oil changes are performed once every 15 thousand km. The filter is changed at the same time.
The use of API SF oils on engines 21124 or 21120 is unacceptable. There are no such materials on our list.
What kind of oil should I pour into 8 cl viburnum?
| Oil brand | SAE class | Group |
| Lukoil-Lux | 0W-40, 5W-20, 5W-30, 5W-40, 5W-50, 10W-30, 10W-40 | SL/CF |
| Luxe (Hit and Best) | 10W-40 | SL/CF SJ/CF |
| Novoil Super | 5W-30, 5W-40, 10W-40, 15W-30, 15W-40, 20W-40, 20W-50 | SJ/CF |
| RosNeft Maximum | 5W-40, 10W-40 | SL/CF |
Interesting materials:
What are the conditions under which a marriage is considered invalid? What information does DNA encode? What information does the site see? What information is prohibited from being classified as confidential information? Which camera should I take for a vlog? What book is worth reading novel? What button do you get for 100 million subscribers? What load can the M12 Hairpin withstand? What responsibility do LLC participants bear for the company’s obligations? How much area does permafrost occupy in Russia?
Functions of an oil filter in a car
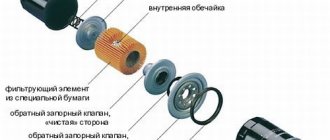
In a car, all parts tend to come into contact with each other, and to prevent wear due to friction, it is necessary to periodically change the lubricant. But to prevent dust, dirt, scale, chips and other particles from getting into it, an oil filter is needed. Its main function is to clean motor fluid from impurities and microparticles.
The automaker's instructions give clear advice: in a VAZ 2110, the oil filter should be replaced every 15-20 thousand kilometers, and in difficult and intensive vehicle operating conditions, the replacement frequency is reduced to 6-7 thousand kilometers.
Thus, it is necessary to check the condition of the oil once every 5 thousand km. If it has darkened and acquired a different consistency, you should urgently repair the oil filtration system and replace the engine fluid.
Several factors influence the frequency of repairs:
- year of manufacture and service life of the vehicle;
- performance of all car parts;
- driving style;
- quality of the liquid being poured;
- the quality of the fuel mixture on which the car is operated.
Tip: To find out the location of the filter device, you need to study the car's maintenance instructions or crawl under the bottom of the car.
The VAZ 2110 has an accordion-shaped filter with folded paper-type fibers. When choosing a new element, you must take into account the manufacturer’s recommendations and install the original part.
However, choosing a new oil is much easier than choosing a new filter. Today, most brands produce low-quality devices or pass off counterfeits as original filtration. And, although this also applies to oil, it is easier to fake a filter element.
To choose the right new element, you need to consider:
- strength of the body and cassette material;
- pricing policy;
- brand promotion.
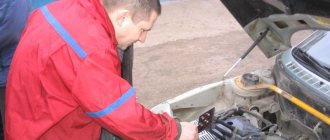
Drain the old oil
Place an empty container to drain the waste - about 5 liters of old lubricant should flow out, this will take about 15-20 minutes.
First of all, you need to unscrew the oil filler cap - this will avoid the formation of a vacuum and drain the old mixture as much as possible.
Before changing the mixture, warm up the engine . High temperature oil has a lower viscosity , which allows it to flow out better and more efficiently .
Next, remove the drain cover and give time for all the waste to flow out. If the drain plug falls into the waste mixture, it’s not a big deal. Once everything has cooled down, it can be easily removed and cleaned. Once all the oil has drained away, this stage is over.
Flushing the system
Having drained all possible liquid, a small amount remains In order for the oil change to be as effective as possible, it is recommended to flush the system.
To do this, you need to close the plug on the drain hole. The flushing solution is injected into the filling hole to the “minimum” level. Afterwards, at idle speed, the engine should run for about a quarter of an hour . This liquid dissolves the remaining engine mixture and possible sediment, thus cleaning the system.
The engine is turned off - drain the flushing fluid in exactly the same way as old oil. Now is the time to replace the oil filter . The old filter is dismantled, engine oil will drip from this hole for some time, you need to wait until this process is completed. Then a new one , into which about 300 ml of motor fluid is first poured.
Fuel pump mesh
The mesh is a coarse fuel filter and serves to protect the fuel pump from large particles of debris entering the fuel pump, which can damage it.
The mesh is located in the fuel pump glass and to replace it you need to dismantle it.
Replacing the Granta fuel pump mesh
Relieve the fuel pressure from the fuel line. We dismantle the gas pump glass and take out the pump itself, replacing the mesh in it and assembling the structure in the reverse order.
Replacing the oil filter
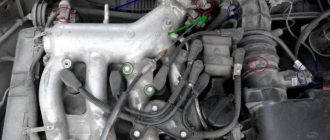
If the filter will not be replaced, proceed to the next chapter. The filter housing is very easy to find: you need to stand near the right wheel and look under the exhaust manifold.
Found the oil filter housing
The old filter can most often be unscrewed by hand. If that doesn't work, take a puller. Installation of a new filter is done as follows:
- Residues of “working off” are removed from the crankcase;
- The filter housing is filled halfway with oil (100-120 ml). Also lubricate the rubber gasket with oil;
Prepared the part for installation
- The new filter is installed in place.
The tightening force for the filter housing is 37.48–87.47 N*m.
Instead of a puller, a screwdriver is sometimes used. Then the filter jar is pierced closer to its bottom!
Fill
Now we have reached the last step - adding new oil to your car's engine. The procedure for the VAZ 2110 looks like this:
If you strictly follow the instructions and also correctly select the lubricant for your VAZ 2110, the replacement procedure will become an easy task for you, which you will cope with on your own in literally an hour.
So that you understand, the cost of such a procedure, not counting washing, at a service station will cost you at least 500 rubles. So the ability to change the lubricant in the engine with your own hands is also a great way to save your budget. Considering that replacement is carried out approximately once every 8 thousand kilometers, you can save a lot of money over the entire period of ownership of your VAZ 2110.
Preparatory activities
To prepare for changing engine oil, you will need to collect the necessary materials, tools and take into account some of the features of this procedure.
- In order for more oil to leave the system, you need to start work immediately after a trip or with a warm engine. Just run it at idle speed for a few minutes. When oil is warm, it becomes more fluid. This allows the lubricant to drain as much as possible and eliminates the need for flushing.
- Only fill in the oil that was previously used in the engine. Not only the characteristics of the oil must match, but also its manufacturer and specific type.
- If you are switching to another type of oil, it is better to do a flush first. This is a simple, but useful and necessary procedure for the VAZ-2110.
You will also need replacement tools. The required list includes:
- spanners;
- dry rags;
- new filter;
- fresh motor lubricant
- puller key for the oil filter (you can do without it);
- pit or lift;
- funnel;
- container for used oil.
It is recommended to additionally use thick clothing, closed shoes and gloves. Since the oil is hot, when unscrewing the drain plug there is a possibility of liquid getting on your skin. Professionals easily cope with this task, but beginners get burns quite often. Therefore, be extremely careful.
Finishing touch
Know that on a VAZ-2112, changing the oil does not end with one fill:
- 3.2 liters of new material is gradually poured through the neck;
- Start the engine and wait 3-4 minutes. It’s good if the Oil Can lamp goes out;
- Stop the engine, remove the dipstick, check the level;
You need to know how much to add
Changing the engine oil out of the blue
It may be useful to know that pits and overpasses are not necessary to change the oil on our cars. The drain plug on the oil pan is located just behind the right wheel. Therefore, to change the oil, it is enough to jack up the car, remove the wheel, turn the steering wheel to the right, bend back (for convenience, not critical for the job) the plastic protection and everything is ready to change the oil. The procedure took about 30 minutes. I think that you are familiar with the oil change procedure, so there is no need to describe it point by point. Just a couple of points: 1. If there is a slope, we stand with the starboard side down. When we jack up the car, it is leveled horizontally. If there is no tilt, then after unscrewing the drain plug, lower the jack to level the car. 2. Do not forget about safety measures when working with a car on a jack.
Source
How to remove the oil pan (engine oil pan) without removing the engine
The oil pan is a reservoir located under the engine and is designed to collect unused oil that circulates throughout the system. This element resembles a metal bathtub, has a simple structure, and is therefore not susceptible to breakdowns. However, there are times when the container breaks through during off-road travel, or simply rusts. To remove the oil pan, you need to know not only its location, but also its design features.
Where is the oil pan located and what does it look like? When to remove the engine pan?
Tools for removing crankcase protection How to remove the crankcase pan on a domestic car How to remove the crankcase pan on a foreign car Possible problems when removing the engine pan
- Tips and tricks