VAZ 21213 and 21314 SUVs use a supply and exhaust ventilation system. While the car is moving, air is forced into the cabin by natural pressure through the air intake slots on the hood. Air leaves the cabin through openings in the rear roof pillars. We will talk about these and other features of the Lada 4×4 heater (stove) further..
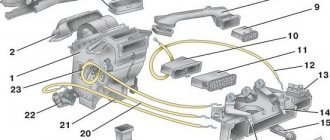
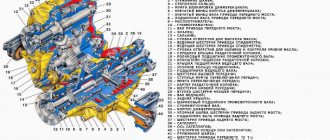
Heater device
1 – side deflector; 2 – side air duct; 3 – air duct for heating the windshield; 4 – central deflectors; 5 – air duct damper cable; 6 – air duct damper; 7 – stove radiator; 8 – radiator seal; 9 – radiator casing; 10 – radiator outlet pipe; 11 – radiator inlet pipe; 12 – stove tap; 13 – air distribution cover; 14 – electric fan casing; 15 – fan impeller; 16 – fan electric motor; 17 – stove tap cable; 18 – windshield heating damper cable; 19 – bracket for heater control levers; 20 – air duct damper control lever; 21 – control lever for the windshield heating flap; 22 – lever for controlling the stove tap.
How to upgrade the Niva-21213 stove
If you are the owner of a Niva-21213 and are in love with this vehicle, then you are unlikely to give it up if you find some technical defects in it. In principle, this is absolutely correct; you can remain faithful to your “iron horse”, and if defects are identified, try to eliminate them yourself.
Niva-21213, indeed, needs some of your intervention; tuning the Niva stove will not be superfluous at all.
https://www.youtube.com/watch?v=3ch3Fh8Xx38
In the summer, you won’t be able to notice any inconvenience, but with the onset of cold weather, you definitely won’t be able to do without enhanced wardrobe equipment in the form of cotton pants and a jacket.
You don’t want to constantly feel like a “tanker”, so most owners of this car decide to roll up their sleeves and modify the stove of their own Niva. By the way, the same problems are inherent in another domestic model - the UAZ, the owners of which are also actively searching for what to do to improve the performance of the stove.
The process of refining the heating system
It is useful to note that modification of the VAZ-2121 stove is not accompanied by high problems. Even a car enthusiast who does not have special technical and repair skills can eliminate such technical defects.
Discounts on new cars! Advantageous loan from 9.9% Installment plan 0%
In addition, modification of the Niva-2121 stove may involve performing a variety of actions, including the most basic ones.
Heating in your car can be improved by even just slightly upgrading the air ducts. If you want to radically improve the heating system and increase comfort, then, of course, you will have to tinker a little more.
Air duct modernization
Unfortunately, if you carefully examine the air ducts that your Niva is equipped with, you will be horrified at how it was possible to install so many cracks in it. Is it possible to expect good heating with such a design?
The answer, of course, is simple, since all the heated air is dispersed under the dashboard, and the interior is heated according to the residual principle.
However, it’s good when a problem is so easily identified, then solving it is much easier. Upgrading the air duct involves applying silicone glue to all joints.
Be prepared for the fact that performing such actions is sometimes quite difficult, since not all places have unobstructed access. You still have to get used to it and apply silicone glue to all the joints.
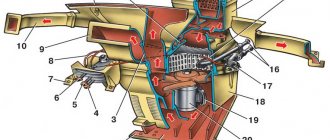
Heater diagram
1 – damper; 2 – electric fan casing; 3 – fan electric motor; 4 – impeller; 5 – heater radiator; 6 – radiator inlet pipe; 7 – radiator outlet pipe; 8 – radiator casing; 9 – air duct damper; 10 – air duct box; 11 – air duct for heating the windshield; 12 – central deflector damper; 13 – central deflector; 14 – crane control lever; 15 – control lever for the windshield heating flap; 16 – air duct damper control lever; 17 – control lever bracket; 18 – windshield heating flap; 19 – windshield heating damper cable.
Preventing glass from fogging
To protect the windshield and door windows from fogging, it is enough to direct cold air onto them, for which:
- close the heater cover with lever 10;
- move lever 7 to the right, and set lever 8 to the middle position;
- If necessary, turn on the electric heater fan.
If you need to warm up the incoming air a little, move lever 6 of the heater valve control partly to the right.
To protect the rear window from fogging, turn on its electric heating with switch 11.
Heating and ventilation system components
The heater fan (ME-255) supplies air to the passenger compartment through air ducts. Its rotation speed is controlled by a three-position switch on the panel.
An additional resistor is designed to reduce the fan rotation speed (intermediate rotation speeds).
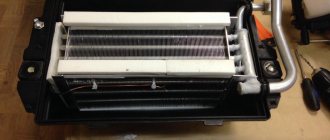
The heater radiator is installed in the passenger compartment under the panel in a plastic case and serves to transfer heat to the interior.
The heater valve is installed at the inlet of the heater radiator and serves to regulate the flow of antifreeze that passes through it.
The damper control levers serve to distribute air flows that are directed into the cabin, as well as to control the heater tap.
The design of the heater has a number of disadvantages, for example, strong fan noise, as well as its low performance. We'll talk about this and other problems in the improvements section.
Keywords: stove 4x4 | 4x4 air ducts
0 0 0 1 2 0
Share on social networks:
Technical details of the procedure
The efficiency of the new heating system on Niva will be determined not by the cost of the purchased parts, but by their quality. To operate, you will need the following elements: a car resistor, a figure-eight heater and a “snail”. It is a mistake to believe that only “original” spare parts are suitable for repairing a heating device. The main requirement is technical compatibility.
If in doubt, a drawing of the heating system will provide clarity. The further procedure is as follows:
- Cut a new mounting hole. This is done carefully, because the reliability of the heating system’s operation depends on the quality of the preparatory process. It is recommended to place the engine as low as possible in the air duct, otherwise the device will rest against the hood. This should not be allowed to happen, otherwise the stove fan will not last long.
The heating system of a new model is checked by test switching on. It is recommended to switch modes smoothly. The device must remain on each of them for at least 5-7 minutes. The driver’s task is to make sure that the operation of the system is not accompanied by extraneous noise and vibration.
Replacing the faucet
Unfortunately, the culprits for poor heating of the Niva can be not only the fan and air duct, but also the faucet of the stove itself. In particular, its diameter is incredibly small, which contributes to the slow spread of liquid throughout the radiator.
It is for this reason that many car owners decide on yet another additional tuning for heating the interior of their beloved Niva, which involves replacing the tap.
The crane will, of course, have to be borrowed from other vehicles. Many foreign cars can act as “donors” to solve this problem, but the best from a financial point of view are cranes removed from Volkswagen or Opel.
Initially, you will have to remove the old faucet. This process is labor-intensive, so it is important to follow the algorithm recommended by those car owners who previously had to modify the heating system themselves, and the result was effective.
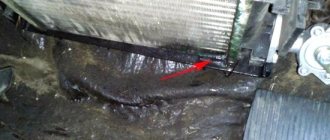
Open the hood, find the clamp that secures the hose to the pipe, and try to loosen it using pliers. Masters recommend performing such actions with gloves, since when performing such actions you have to make an effort, the hand often breaks and can be damaged if it is not wearing gloves.
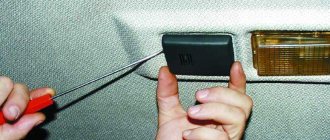
Your next task will be to disconnect the seal; you just need to unscrew the screws that secure this seal to the partition. Next, all that remains is to simply remove this seal. The storage shelf can be removed in the same way, and nothing prevents such actions from being performed.
Now go from the interior side and slightly loosen the tap screw. Next, it will be easy to remove the cable from the crane lever.
Now you have come directly to the tap itself, unscrew the screws that hold it in place. Depending on the configuration of the stove radiator, the quantity may vary, and nuts may be installed instead of screws.
Remove the tap, remove the pipe from it, also first unscrewing the nuts.
Next, pick up the new faucet that you prepared in advance and install it in the car, using the same algorithm only in reverse order.
Masters only recommend using a little trick. When attaching the faucet to the radiator, the nuts are very often unscrewed, and accordingly, they get lost while the car is moving. To prevent such “losses”, it is recommended not just to tighten the nuts, but to first place them on plasticine.
So, the process of upgrading the heating system can be carried out by anyone, and in gratitude he will receive comfortable conditions inside the cabin even in those moments when the frost outside is fierce.
Fault Diagnosis
The stove supplied as standard will need to be modified for preventive purposes. The procedure will not take much time, but it will prevent many problems in the future. Driving experience suggests that the first severe frosts will undermine the “health” of the device.
The list of main weaknesses is as follows:
That is why it is better to take the necessary measures in advance. The driver has few alternatives. On the one hand, everything remains in its place. The heating device is used at minimum power. During mild winters this is still tolerable, but with the onset of real cold weather the conditions will become unbearable. On the other hand, it's easy to spend a few hours rectifying the situation.
Further developments proceed as follows. If the heating in the car is running at ½ power, you can limit yourself to minor repairs. The main thing is to make sure that there are no noises or extraneous knocks, otherwise the Niva 21213 should immediately go for a technical inspection.
The presence of an unpleasant sound indicates the need to replace the device. A specialized retail network offers ready-made options for heating mechanisms for Niva. If desired, it can be assembled independently.
The second option is considered more preferable. When you assemble it yourself, you have the opportunity to literally personalize the stove. To do the work yourself, you will need to visit a specialized store or market to buy spare parts.
When purchasing, original parts or analogues are selected. The main thing is that they have a quality certificate. Otherwise, they cannot be installed. It would be useful to rewrite the technical data of the vehicle so as not to exceed the parameters recommended by the manufacturer.
Fan replacement
Experienced car owners recommend not stopping there and continuing to modify the stove by tuning the fan.
Some people suggest getting rid of the fan installed by the manufacturer and installing a figure eight fan instead.
If you also decide to carry out such a replacement, you need to additionally decide whether you will leave the original control of the stove or also replace it with a “eight” analogue.
Having decided on the second option, take care of purchasing the following additional items:
- fan speed switch;
- additional resistor for the stove.
So, after you have completely prepared all the necessary components, you can proceed directly to the process of modifying the fan.
Initially, you should dismantle the old air supply box. Unfortunately, despite the fact that this requires unscrewing only four nuts, it will not be possible to do this without outside help. Your partner will need to hold the screws under the hood while you unscrew them using a wrench.
After this, you can easily remove the air intake. Clean it if it needs it, and then cut away a small amount of the plastic to provide enough space for the new fan to operate.
Install the fan and carefully inspect for anything that may interfere with the operation of the installed fan. If you find such obstacles, carefully cut them off.
Once you are sure that there is nothing else that can prevent the fan from working, secure it with sealant. There are small gaps around the fan nozzle; it is important to eliminate them by covering them with any material. This will prevent warm air from escaping.
Now the assembled fan is being introduced back into the space in which its old counterpart previously “lived”. Everything is securely fastened and the closing and opening of the hood is checked. In some cases, after the introduction of a “foreign” fan, it is not possible to close the hood normally.
If everything is fine, reconnect all wires and install new controls. Upon completion of the work, be sure to check your results in action.
The stove should work perfectly, and warm air should spread very quickly inside the car.