In order for the car to work properly and not fail on the road, the car owner must constantly monitor the technical condition of his “four-wheeled friend,” while paying a lot of attention to the car generator. If the unit fails, the battery will not be able to receive electrical recharging, and as a result, the car will work only from recharging the battery, the reserve of which will be enough for a short period of time.
As soon as the battery supply is depleted, the engine will stop functioning and the car will simply stop, anywhere. In this case, the car owner will have to look for a lot of money to purchase a new generator, as well as to check and install it. But the process of monitoring technical serviceability, in which the most important thing is to monitor what voltage the VAZ-2110 generator should produce when driving, will help save money and know that the car will not let the owner down under any circumstances. If you notice that the generator is working intermittently, then you need to check the functionality of the unit, especially since it is quite simple to carry out such a process yourself, taking into account the advice and recommendations of professionals in their field. However, before work, the car owner must familiarize himself with some rules that will help check the serviceability of the unit without damage.
How many volts should the generator produce?
In order for the car to work properly and not fail on the road, the car owner must constantly monitor the technical condition of his “four-wheeled friend,” while paying a lot of attention to the car generator.
If the unit fails, the battery will not be able to receive electrical recharging, and as a result, the car will work only from recharging the battery, the reserve of which will be enough for a short period of time. As soon as the battery supply is depleted, the engine will stop functioning and the car will simply stop, anywhere. In this case, the car owner will have to look for a lot of money to purchase a new generator, as well as to check and install it. But the process of monitoring technical serviceability, in which the most important thing is to monitor what voltage the VAZ-2110 generator should produce when driving, will help save money and know that the car will not let the owner down under any circumstances.
If you notice that the generator is working intermittently, then you need to check the functionality of the unit, especially since it is quite simple to carry out such a process yourself, taking into account the advice and recommendations of professionals in their field. However, before work, the car owner must familiarize himself with some rules that will help check the serviceability of the unit without damage.
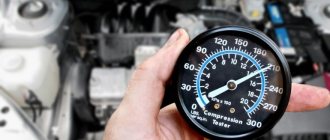
Constant undercharging of the battery or its absolute discharge at the most inopportune moment is a headache for many car owners. One source of these problems may be the generator. But how to check it? Perhaps it's not his fault at all? Let's figure out together how much the generator must produce for the normal functioning of all car systems and maintaining the battery in a charged state.
It is traditionally believed that 13.5-14.5V should be supplied by the generator to the battery and this is absolutely enough to replenish the battery costs.
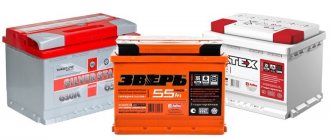
It is worth considering that using a battery with a higher power in a car than the manufacturer recommends also requires the installation of a more productive generating device.
It is necessary to take into account the load that the generator must withstand - it is calculated based on the maximum indicators of all electrical appliances and car systems.
Do not forget that the charging current from the energy-generating device will allow you to start the car in the cold season. In order to avoid problems with starting the car, we recommend purchasing generating equipment, the charge current of which will be approximately 10% of the capacity of the power source.
That is, a battery of 100 A/h requires a generator that can produce 10A. Please note that for many cars, 100 amp equipment will operate at its maximum capacity, because the power consumption of the automotive system is in the region of 80 amps. Therefore, the choice of a source generating energy must take into account both the battery capacity and network consumption.
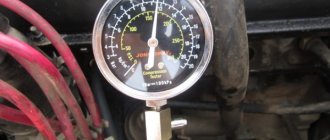
The potential difference can be diagnosed in two ways - directly at the generating equipment and through the battery. The generator is directly connected to the power source with a thick wire, therefore, to check the level of potential difference, you can measure the voltage at the power source. To do this, you will need special devices - a voltmeter, multimeter or load plug.
The wires of the first measuring instruments are connected to the battery in any sequence. The plug must be connected to the battery terminals with strict observance of polarity. It is generally accepted that the normal voltage in the network should not be lower than 12 volts. At idle speed without turning on all the electrical appliances of the car, this indicator should be at the level of 13.5-14V. A drop in voltage values to 13.3-13.8 volts is considered acceptable.
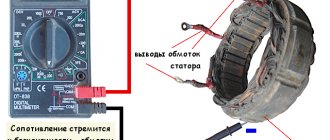
At the same time, using conventional testing equipment, you can check the resistance of the generator elements - rotor, stator and diode bridge. Diagnostics of rotary equipment is carried out by its winding. It is necessary to connect the probes of the device with slip rings. If the multimeter gives readings from 2, 3 to 5.1 ohms, then this element is working. The current consumption of the winding should be within 3-4.5 amperes.
Its normal resistance is 0.2 Ohm. The diode bridge is checked by the presence or absence of resistance, the indicators do not matter. The only thing worth considering is that there should not be a zero dimension. Measurements are carried out in pairs - positive output and all plates on this side or minus and all elements.
We remind you that for normal charging of a car battery, the voltage supplied by the generator must be from 13.5 to 14 volts.
For correct operation of the car, it is necessary to regularly check the functionality of the car generator. If this unit fails, the battery will no longer receive main power. This state of affairs (when the car is “powered” only by the battery) leads to a rapid loss of power to the entire car.
Timely monitoring of the technical condition of the electrical source will allow you to avoid accidental failure of the element, saving your money and mental strength.
The breakdown of the power unit generating current is determined by one of the following signs:
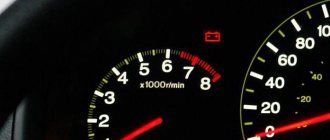
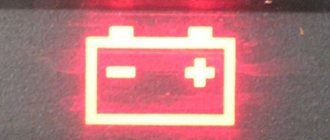
- The light on the dashboard is constantly on (signal of insufficient current);
- The battery constantly runs out;
- electrical equipment malfunctions or does not work at all when the engine is turned on;
- burning smell from the engine compartment;
- the stator overheats;
- The NODE makes uncharacteristic sounds (for example, rustling).
The principle of operation of the generator on the VAZ-2114
In order to convert one type of energy received from the engine into another, created by the generator, the presence of a magnetic field is necessary. And in order to create all the conditions for its appearance, the generator contains two main and very important elements - the rotor and the stator.
Generator rotor and stator
- The rotor in the generator is a movable element equipped with a steel core with tips. On these tips there are special coils for excitation, to which external power is supplied.
- The stator, in its design, is a ring, motionless according to the principle of operation, assembled from individual steel elements isolated from the winding. Inside the stator there is a winding made of fairly thick copper wire.
- The pulley is the direct drive of the unit, onto which the belt is placed, transmitting the energy of the engine.
- There are two bearings in the generator, front and rear. If the rear bearing fails, it can simply be replaced, which cannot be done with the front one, since it is pressed directly into the housing, and if it breaks, the entire part of the generator housing must be replaced.
The unit body has two removable parts, front and rear, which are fixed with bolts. The fixation is carried out in the same way for the stator, only it is already located on the inside of the housing.
Design of the VAZ-2114 generator
Features of operation
During its operation, the following basic rules must be observed:
Do not allow the generator to operate when the battery terminals are disconnected
This is due to the fact that in the absence of a battery, there will be constant surges of electrical energy in the network, which can negatively affect all devices and the condition of the generator in particular. When carrying out welding work on a car, make sure that the wires are disconnected not only from the battery, but also from the generator. Make sure that all wires are connected according to polarity, because incorrect connection of wires, even for a short period of time, can render the entire system unusable. Checking the functionality of the generator should be carried out only in a strict order of work (indicated below - approx.).
Step-by-step check of the car generator regulator
The basic rules used when checking the generator voltage are simple, but mandatory for all car owners without exception:
- Under no circumstances should the functionality of the generator be tested using a so-called spark, that is, using a short circuit;
- It is not allowed to connect the device to the generator terminal “ ”;
- Welding work cannot be carried out in the body of the car if the wires are connected to the battery and generator.
It is important to consider the following points when checking voltage:
- measurements are carried out using special instruments called a voltmeter and an ammeter;
- checking the valves of the device is permitted if the voltage does not exceed 12 V;
- If the voltage test requires replacement of the wiring, you need to select identical wires both in cross-section and in length.
Before starting the test, make sure that all connections are working properly and that the device belt tension is correct.
It is not difficult to check what voltage a VAZ-2110 car generator should produce if the test is carried out in stages, and the car owner takes into account the advice of experts:
- Initially, you need to start the car engine, selecting medium speed and turn on the headlights. The car should remain in this mode for about 20 minutes. The indicator, as mentioned earlier, is measured with a voltmeter, the measuring scale of which is from 0 to 15 V, or with an ammeter.
- The voltage between the generator input “ ” and the mass of the unit is determined. If the generator is working properly, the indicator on the device scale should not exceed 14.5 V. If the device data is higher or lower than the established norm, then most likely you will have to replace the failed regulator.
- You can measure the voltage in another way, in which a voltmeter is connected directly to the battery. However, the resulting indicator will be accurate only if the car wiring is completely intact.
- You can also check the voltage using a special lamp, which is located on the dashboard; it is called a “control device”. In the time interval between turning on the ignition and starting the engine, the control light should be on, which allows you to control the voltage of the generator. If, when starting the engine, the lamp goes out and does not light up again, this will indicate that the generator is operating normally, without interruptions.
Ways to troubleshoot battery problems
First of all, you need to check the battery charging while the engine is running.
During normal charging, the voltage will be in the range of 13.6 - 14.2 Volts. If the charge is weak, the value will be below 12 Volts (the author of the video is VAZ 2101-2107 repair and maintenance). To troubleshoot problems, you need to prepare instructions with a diagram of the electrical equipment of the VAZ 2110 car and the necessary tools:
- pliers;
- flat and Phillips screwdrivers;
- multimeter;
- 12 V indicator light;
- knife;
- sandpaper.
Checking the battery in a car There are the following troubleshooting methods, which can be determined by how the battery light lights up and goes out:
- If the charge indicator on the dashboard does not light up, this indicates that the battery is low. The reason why the battery is not charging may be due to oxidized contacts. The contacts on the battery should be cleaned. If this does not help, you need to measure the voltage at terminal “30” of the generator. To do this, one probe must be connected to ground, and the second to terminal “30”. If the flowing current greatly exceeds the charge on the battery, it is necessary to clean the terminal on the generator. It is possible that the wire connecting the generator to the device needs to be replaced.
- If the voltmeter on the dashboard and the warning light show that there is a charge, but the battery is discharged. In this case, the charge at the terminals is within normal limits, and when the equipment is turned on, the charge arrow occupies the extreme left position. This indicates insufficient tension on the generator drive belt or damage to it.
- The battery may not charge due to a breakdown in one of the diodes, as well as a break in the starter winding. In this case, with the ignition off, use a multimeter to check the diodes and, if necessary, replace them.
- The battery is not charging, but the indicator does not light up and the charge sensor does not work. The reason is a blown fuse F10.
- If the ignition is on, all devices are working, the charging indicator does not light up, and there is no charge, then you need to check the generator. To do this, remove the wire from terminal “61” on the generator and connect it to the car body, which will act as a “minus”. A lit battery indicator indicates a problem in the excitation winding of the generator device. The reason may be poor contact at the connection point. In this case, you need to clean the contacts. If this does not fix the problem, it is possible that the cause is a burnt-out lamp.
- When you turn the key in the ignition, the battery charging light comes on, but when the engine starts, it does not go out. In this case, there is no charging or it may periodically disappear, this indicates that the battery is discharging. The reason is insufficient contact in the place where the instrument panel is connected. It is possible that they have oxidized and need to be cleaned.
- The relay regulator should also be checked. To do this, you need to apply voltage to the contacts from the battery. If it is 12 volts at the brushes, then the relay is working properly. Otherwise it should be replaced.
- If the electrolyte level is insufficient, add the required amount of distilled water.
- If the battery case is damaged or the service life has expired, it should be replaced.
Sorry, there are no surveys available at this time.
Troubleshooting
A lot depends on the operation of the VAZ 2110 generator. If it malfunctions, what can start the battery? And when it stops providing the required voltage, you have to urgently figure out what the reason is. But just by external signs you can determine that the generator is creating problems:
- The charging light starts flashing at low speeds;
- there may be a burning smell in the cabin;
- there are mechanical damages.
If a visual inspection does not bring results, you must:
- remove the plastic cover from the generator;
- check all electrical connections;
- Unscrew the diode bridge, as well as the voltage regulator relay with brushes.
Diodes are checked with a special tester. When they operate normally, the current will only flow in one direction. If the current flows in two directions or the diodes do not pass it at all, then the reason has been found.
The cause of poor performance may be the belt. If it is worn out, it can be seen immediately. If the generator winding “flies”, it is better to entrust the solution to this problem to a specialist.
Possible malfunctions and ways to eliminate them
So, why does the generator unit heat up and hum, and how can you protect the unit from exposure to water?
We suggest that you familiarize yourself with the main causes of unit malfunctions:
- Brush wear. This problem is relevant for many generators, not only “decimal” generators. When the brushes wear out, they will need to be replaced.
- Pulley damage or failure will also require repair. If the pulley starts to work incorrectly, the unit will not be able to produce the required amount of voltage. Failure of this element is usually associated with wear of the teeth. In addition, various wear-related damage may occur on the device itself.
- Slip rings and commutator are two components that also wear out frequently. If these components fail, the unit will not be able to perform its assigned functions. If the brushes wear out, the unit will be forced to operate with high power consumption, which leads to its overheating.
- Voltage regulator. As stated above, if this element fails, the voltage in the vehicle’s on-board network will increase, and this will not result in anything good.
- Short circuit of the winding of the stator mechanism. If such a malfunction occurs, you will either have to rewind the windings, which is very labor-intensive, or completely replace the stator. The second option is more appropriate.
- The hum and appearance of third-party sounds during operation of the generator unit may be due to wear of the bearing devices. The unit will not be able to work properly, and it will also begin to heat up over time.
- Failure of the rectifier unit.
- Worn drive belt. This item belongs to the category of consumables, so sooner or later it will wear out in any case. When worn, the belt must be replaced.
- Broken or damaged power wiring.
Signs of a generator malfunction
What could be the problem with the generator when, when you turn on the ignition, the light flashes or does not turn on at all and the control devices do not function? You should check to see if the fuse located in the mounting block is ok. If there is a break in the power supply, the following may occur:
- the “O” wire with the wires from the mounting block to the devices is broken;
- there was a breakdown of the “GP” wire with the wires from the ignition switch to this unit.
If the battery is discharged, the generator voltage will not give the desired figure.
And the reason may lie in the fact that the control lamp has burned out, or perhaps the socket contacts are not pressed sufficiently against the printed circuit board. In this case, the lamp or faulty contacts are replaced.
You should look to see if there is an open circuit in the circuit connecting plug “D” of the generator and the devices. If this is exactly the case, then you need to look at the “KB” connections.
A lot also depends on the brushes if the VAZ 2110 generator does not produce the required power. They can wear out, freeze, the contact rings can oxidize, then you need to replace the entire brush holder along with the brushes. Oxidized parts are wiped with gasoline.
The terminals of the generator winding may become unsoldered from the slip rings, which need to be soldered or the surface of the generator rotor should be leveled.
A short circuit may occur in the valves, and the rectifier will have to be replaced. If the generator is noisy, it means there is a breakdown - the bearings are damaged; If the generator makes too much noise, you need to check the stator.
But when the generator 2110 does not produce 14.2 V, as it should, you need to start the engine - let it run for a while. In a few minutes, pressing the gas pedal, you need to increase the crankshaft speed to 3000 rpm. Now all functions should work, after which the voltage at the battery terminal is measured.
Troubleshooting
Lack of charging can be caused by a wide range of reasons, which we will talk about today.
These reasons include:
- Weak contacts;
- Winding breaks;
- Short circuit on the rotor housing;
- Interturn short circuits;
- Mechanical breakdowns;
- Closing the positive clamp on the body;
- Short circuit in the phase winding;
- Short circuit of the stator to the housing.
Let's look at these situations in more detail to determine the true cause of the breakdown specifically in your case.
Start by turning off all additional equipment in your car that is not included as standard - DVR, navigator, audio system, etc.
Next, we perform the following operations.
- Measure the current output when the vehicle is cold, not running and all life support systems are disconnected. If there is no return at all, that's good. But this rarely happens. Almost always on tens there may be insufficient contact, some kind of short circuit, due to which there is recoil, but it is small. It’s much worse if the recoil is impressive and leads to battery discharge in one night spent in a parking lot or garage.
- If everything is normal, there are no strong current leaks or they are insignificant, and the battery has retained its charge, then you can return all the devices to the places that were installed additionally.
- Recheck the recoil. If at the same time the instruments show an active leak, then the reason does not lie in the battery and is not related to the generator. The culprit of the problem is one of the additionally connected devices.
- If no recoil is observed, then you need to carefully inspect the generator.
- There are many sources of trouble that can lead to generator failure. These include:
- Insufficient contact between the rotor rings and brushes;
- There was a break in the excitation winding;
- An interturn short circuit has occurred on the field winding coil. In this case, the generator will hum and get very hot;
- The field winding closes to the rotor housing;
- The stator shorts to the housing;
- A break occurs in the stator phase winding;
- The diodes have broken through in the rectifier block, that is, the diode bridge;
- The plus is shorted on the body;
- Mechanical problems have occurred.
Next, we will take a closer look at each of the reasons presented above.
Disassembled unit
Problem solving
- Poor contact. Loose contact can occur due to contamination, oil getting on the brushes, slip rings. Also, contact may deteriorate due to shrinkage of the springs that press on the brushes, or the brushes are stuck. Such phenomena lead to an increase in excitation resistance and can sometimes break the circuit. To eliminate the problem, sometimes it is enough to simply treat the surfaces with a rag soaked in gasoline. If the brushes are worn out, it is better to replace them. At the same time, check the condition of the springs and rings. The rings oxidize, so treat them with glass sandpaper.
- The winding has broken. If this happens, the battery will no longer charge. To determine the problem, place your hand on the battery. If there is a break, the device will begin to heat up. If you want a more accurate check, then disconnect the end of the field winding from the brush and connect the battery wires to it and terminal Ш using a voltmeter or a light bulb. If there is a break, the lamp will not light up and the voltmeter needle will not budge. Test each coil individually to determine which one is preventing the alternator from working. The internal coils must be replaced, and the internal coils must be soldered.
Unit diagram
- Short circuit between turns. An interturn short circuit can occur in any field winding coil. If such a situation occurs, the winding will begin to heat up, and the excitation current will increase. To check, be sure to measure the resistance of each coil. For this you will need a voltmeter.
- Short circuit on the rotor housing. Such a breakdown leads to the fact that the entire field winding is short-circuited. The generator stops working. The most common short circuit area is where the ends of the winding lead to the rotor rings. To check, use a 220V light bulb. One wire should be connected to any contact of the ring, and the second to the rotor core or shaft. If there is a short circuit, then the light will turn on. It is impossible to operate a car with such a generator. It is necessary to isolate or completely replace the faulty winding. The first option is only suitable for getting to a service station and carrying out a full repair.
How much should the generator produce to properly charge the battery?
The battery in a car is an important element of the system, which is responsible for providing the car’s on-board network with electricity. The generator is used to charge the battery while it is active. Unstable operation of a device generating electricity causes a voltage drop in the network and failure to restore the capacity of the power source.
Normal generator performance means timely and complete replenishment of the battery charge level, which decreases under load. Checking the battery charge level from the generator is simple and can be done by the car owner himself.
Diagnostics of an automotive energy-generating device includes a visual inspection of the unit, its elements and related parts, as well as voltage and current measurements. At least twice a year, you should check the tension of the drive belt, excessive weakening of which leads to a decrease in the performance of the generator, and sometimes can lead to breakdown of the device.
Diagnostics of indicators such as voltage, current, resistance are also necessary twice a year. To carry it out, you will need special devices - a voltmeter, multimeter or load fork.
What to do if the voltage relay fails?
As we mentioned earlier, the main element of the circuit is a certain number of diodes. Finding three-stage switches for them is quite problematic. In addition, you need to correctly calculate and install radiators for cooling. Otherwise, the risk of diode burnout increases significantly.
During the development of the regulator, long wires will be needed, because the connection is made directly to the device through the cover.
Additionally, you will need to make or find a suitable plastic case for such equipment. All internals must be securely fastened inside the device.
It happens that the relay fails at the most inopportune moment, when you still have a drive home and the battery is not charging. The battery capacity in economical mode can ensure fairly long engine operation, which will allow you to get to the repair site without any problems. Below we will provide a list of recommendations that will help you drive, as they call it, “on battery power” and not stall.
- If the battery is overcharged, the relay must be disconnected from the circuit. To do this, the contact wires are removed from it and left hanging. In the case of the “ten”, it is enough to unplug the plug with the wire from the generator brush connector. Thus, battery charging is turned off, and further movement will no longer harm the battery.
- Many experts suggest going the other way - turning off the generator excitation winding. To do this, remove the corresponding fuse. However, this can be done if you know where the fuse is located.
- If the battery is weakly charged, then there is practically no reason to panic. To get to your destination, you need to maintain high speeds in order to, at least a little, bring the voltage value to the nominal value. Before stopping the engine, it is recommended to maintain the speed at 3000 rpm for a few seconds using the gas pedal. This will prepare the battery for the next start.
- Avoid using music, power windows, headlights (especially high beams), and other electrical devices unless their use is absolutely necessary. This will save battery power well.
Relay regulator VAZ
- disconnect the negative terminal from the battery;
- disconnect the drive block from the terminal marked “D”;
- unscrew the nut, which is located under the rubber boot (it needs to be moved a little to the side);
- disconnect all existing wires in the contact pin;
- unscrew the nut in the generating device circuit (this fastener secures the terminal) and remove it.
Then you will need to remove the generator casing by unscrewing the nuts (there are three of them) that hold it in place, as well as dismantle the relay housing and remove the screw securing the disassembled mechanism from the rectifier compartment. Now the VAZ 2110 voltage regulator can be easily removed. You can install a new device instead. After replacing the relay, all the described steps are performed in the reverse order.
- If the battery is overcharged, the relay must be disconnected from the circuit. To do this, the contact wires are removed from it and left hanging. In the case of the “ten”, it is enough to unplug the plug with the wire from the generator brush connector. Thus, battery charging is turned off, and further movement will no longer harm the battery.
- Many experts suggest going the other way - turning off the generator excitation winding. To do this, remove the corresponding fuse. However, this can be done if you know where the fuse is located.
- If the battery is weakly charged, then there is practically no reason to panic. To get to your destination, you need to maintain high speeds in order to, at least a little, bring the voltage value to the nominal value. Before stopping the engine, it is recommended to maintain the speed at 3000 rpm for a few seconds using the gas pedal. This will prepare the battery for the next start.
- Avoid using music, power windows, headlights (especially high beams), and other electrical devices unless their use is absolutely necessary. This will save battery power well.
Other causes of low voltage
A small potential difference in the system is not always associated with a breakdown of the generator or a bad battery. If the diagnosis of these elements does not reveal any problems, then you should pay attention to the following:
- condition of the battery terminals - connection density and oxidation;
- electrical wiring problems - oxidation, violation of its integrity;
- output contacts to electrical appliances;
- correctly selected energy consumers.
Each contact must be tightly adjacent and intact, that is, there must be no formations (for example, sulfation) that will disrupt the flow of current. Incorrect connection of contacts leads to accelerated battery discharge even when the car is not running.
To improve the connection of the elements of the car's electrical system, it is necessary to clean all contacts and restore the integrity of the wires by replacing them or connecting them and wrapping them with insulating tape.
In conclusion, I would like to repeat that stable operation of the car requires constant monitoring of all elements, and the generator should attract special attention. The battery is charged from it and provides electricity to the entire car system. Pay attention to all elements: generator brushes, slip rings, voltage regulator, equipment winding.
The most correct measurements should be carried out when the battery is fully charged and in various modes. Remember that the manufacturer links the characteristics of the generator to the number of engine revolutions - they help produce a certain current.
Do you have experience diagnosing an alternator and solving problems in a vehicle's electrical system? Please share your experience and opinion with our readers in the comments. If you have questions about the topics covered, we will be happy to answer them.
If the symptoms described below appear, carry out diagnostics. You can do it yourself or take the car to a car service. To determine the cause of the failure, special equipment is needed. If you decide to figure it out yourself, master a multimeter tester.
Five possible sources of difficulty are described below:
- bearing wedge (lubricant is used up, sometimes the belt breaks - you will need to replace or rebuild the unit);
- the winding has burned out (a common cause is the reagents used to treat winter roads);
- brush wedge (cause - wear of graphite cores);
- the regulator relay is faulty (this element prevents the battery from overcharging and stabilizes the voltage);
- The diode bridge is broken.
How much should the onboard voltage be for 21124?
#1 Mr_Romanov
- VIP Member
- 399 messages
- Car make: VAZ211240
- From: St. Petersburg
#2 Igor_Kholodov
- Car make: VAZ-2108
- From: Moscow
#3 Mr_Romanov
- Car make: VAZ211240
- From: St. Petersburg
If at XX, then everything is normal, although more can be done (but if trips in winter are at least 30-40 minutes, then it’s fine) Rev up, raise to 2000 rpm and measure again! Always at the battery terminals
#4 Ilyukha2110
- Car make: VAZ-21101
- From: Moscow region
#5 Igor_Kholodov
- Car make: VAZ-2108
- From: Moscow
Everything is XX, damn it, but unfortunately the measurements are so far only from BC Multitronics
incorrect. The voltage can vary greatly. Buy a multimeter, it's inexpensive and useful.
And I’ll ask again, how much should it be?
Ideally 13.8-14.2 without consumers. with consumers the drawdown is no more than 0.5V (we check at 1500-2000 rpm) Normally 13.5-14.4 somewhere
Could the voltage regulator be faulty?
Unlikely, but you can check
The regulator assembly with brush holder, removed from the generator, is checked according to the diagram shown in Fig. . Between the brushes, turn on a 1-3 W, 12 V lamp. Connect a power source to the “D+” and “ground” terminals of the regulator, first with a voltage of 12 V, and then with a voltage of 15-16 V. If the voltage regulator is working properly, then in the first case the lamp should light up , and in the second - go out. If the lamp lights up in both cases, then there is a breakdown in the regulator, and if it doesn’t light up in both cases, then either there is a break in the voltage regulator, or there is no contact between the brushes and the terminals of the voltage regulator. The latter can be checked by connecting the wires from the lamp not to the brushes, but directly to the “D +” and “DF” terminals of the voltage regulator.
1 – control lamp; 2 – output (ground) of the voltage regulator; 3 – terminal “DF” of the voltage regulator; 4 – voltage regulator; 5 – terminal “D+” of the voltage regulator; A – to the power source
Most likely you don’t have a breakdown, otherwise the voltage would be higher (especially if you turn on the gas) and it’s unlikely that there’s a break; the battery light would be on (the generator wouldn’t give off energy)
#6 Mr_Romanov
- Car make: VAZ211240
- From: St. Petersburg
Important points
The voltage (U) and capacity of the car battery are the main parameters that need to be paid attention to when choosing and checking a power source.
The main purpose of the battery is to start the engine during the period when the car's generator has not yet been connected to work, and the battery is the only power source.
To eliminate operational problems, the car owner should know the following points:
- What does the battery life depend on?
- What should the voltage be (in normal mode, after starting the engine and under load);
- What causes the decrease in capacity during the cold season and other issues.
Let's consider these questions in detail.
We increase power with our own hands
The voltage regulator should not allow values to drop below 13.8 Volts. Such indicators can be achieved using an additional diode, which is included in the electrical circuit. This element is not used in the on-board network at normal values.
If there is not enough electricity, then to activate the diode it is enough to turn on the toggle switch. With the help of such manipulation, the voltage regulator is deceived.
When choosing and installing a diode, you need to consider the following important points:
- the device must produce at least 5 Amperes;
- strictly observe polarity when connecting;
- this element must be placed outside the generator to prevent it from overheating;
- It is better to choose the silicon version of the diode.
To complete the work you will need:
- terminals with male-female wires;
- heat shrink insulation;
- diode.
First, connect the terminals to the diode ends. Solder the “mother” terminal to the negative terminal (cathode) with a strip on the body, and solder the “male” terminal to the positive (anode) terminal.
Place the resulting structure inside the heat shrink tube.
Connect the device to an electrical circuit. Connect the negative “female” terminal to the relay-regulator, and insert the positive wire with the “male” terminal into the diode bridge connector.
Having completed the above steps, you need to assemble the circuit to the end and check the electrical parameters when the generator is running. As practice shows, this method, despite its simplicity, is distinguished by its reliability and reliability.
What determines the shelf life of a battery?
Each manufacturer, after manufacturing a battery, sets a warranty period for its operation.
In addition to this parameter, there is an actual period that depends on many factors - timeliness of maintenance, compliance with operating rules, condition of electrical wiring and other points.
Due to the fact that battery maintenance conditions differ, the shelf life of the product also differs.
Car owners who use their car only in the warm season have the longest battery life. It's another matter when you need a car all year round, regardless of the outside temperature.
In such a situation, the battery life is reduced. This is also due to the fact that in the second case the driver can cover more kilometers.
The battery life is also affected by:
- Serviceability and correct operation of the generator and voltage regulator.
- Connecting additional equipment with a large rated current to the vehicle's electrical wiring.
- Operating mode. The batteries that last the least are those in taxis that travel a long distance throughout the year. In addition, such cars operate in frequent engine starting mode, which puts a load on the battery and generator. If the vehicle is actively used, the service life of the power source does not exceed 1.5 years.
Under normal operating conditions, when the car owner regularly checks the battery and carries out maintenance, the battery life is 4-5 years with a total mileage of 60-80 thousand kilometers during this period.
To avoid problems, it is advisable to periodically check the voltage of the generator and battery.
But the mentioned service life is not the highest, because with careful maintenance the battery can last up to eight years.
But you should know that sooner or later the battery will need to be replaced, because from the moment you start using it, the working plates gradually wear out. The more charge and discharge cycles a battery goes through, the faster it breaks down.
Practice shows that the key role is played by the generator, its serviceability and current voltage. That is why this aspect needs to be given key attention.
Minimum battery input voltage parameter
When checking the parameters of the generator, it is worth taking into account the characteristics of the battery itself. Many car owners are interested in what the voltage at the battery output should be for normal engine starting.
Many car owners are interested in what the voltage at the battery output should be for normal engine starting.
There is no exact answer here, but the average parameter should be 12.6-12.7 V. Depending on operating conditions, this indicator can be adjusted.
Some manufacturers claim that their product has a voltage of 13-13.2 Volts. This parameter is real, but you should not measure the voltage immediately after recharging with a generator or charger.
It is advisable to wait 1-2 hours before carrying out work. In this case, U should drop to a level of 12.7-13 V.
If this parameter begins to “float” or drops below 12 V, this indicates a 50% battery discharge or a generator malfunction.
It is recommended to check the charging circuit or use an external charger.
If you continue to operate the battery in this condition, sulfation of the lead plates occurs, which reduces the performance of the battery and reduces its service life.
In practice, such a decrease in voltage is not critical, because the battery can still be started, and then the generator recharges to the required level.
The main thing is to make sure that the charging circuit is working properly and that the voltage at the battery terminals is increasing.
If U at the output drops below 11.6 V, we can talk about the complete discharge of the power source.
In this case, further use of the battery is impossible - it must be removed, checked for serviceability, and charged from an external device.
Taking into account the above, we can conclude that the voltage on the battery with a working generator should be (with the engine off) 12.6-13.2 V. In practice, this parameter is slightly lower and amounts to 12.3-12.5 V.
This voltage indicates a slight undercharging of the battery. There's nothing wrong with that. The main thing is not to allow U to decrease below 12 V.
multimeter test diagram and step-by-step description
Inside each car there is a miniature power station - a generator, which is responsible for generating electricity. If something breaks in it, the battery will start to work incorrectly. The result is a suddenly stalled engine. For some reason this always happens at the most inopportune moment. To avoid being left without a car somewhere in the wilderness, periodically check the generator voltage regulator.
What is it, where is it located, how does it work
This part of the car is responsible for maintaining the voltage of the on-board network within certain limits. The regulator controls the ambient temperature, rotor speed, electrical load level and other parameters. It also protects the sensitive elements of the generator from overloads and is responsible for activating the field winding and other systems.
The product is located directly in the generator. Regardless of the machine model, the principle of operation of the regulator is the same - when the voltage increases or decreases, the component reduces or increases the excitation current to return the indicators to the desired level.
This is what the voltage regulator looks like
The most common causes of breakdown
- Short circuit of the diode bridge or generator brushes. The result is a shutdown of the generator or a transition to uncontrolled voltage.
- Stabilization voltage shift. In this case, the stability of the voltage is maintained, but it is constantly either low or high.
- Oxidation or burnt contacts.
- Changing the size of the gap between the contacts.
- Relaxation of spring tension.
- Problems with the windings - breaks or short circuits.
Breakdowns can be identified at an early stage - to do this, pay attention to the ratio of fuel consumption to the efficiency of the car. If the car consumes much more fuel than it needs, but works worse, most likely the problem is in the regulator.
A sure sign is the strength of the headlights at night. If, when driving at night, you notice that the intensity of the side lights and instruments has decreased significantly, it’s time to check the regulator.
A few words about electrolyte
One of the main indicators by which you can judge the health of a battery is the electrolyte level. The voltage of the power supply depends on it under different operating modes.
In the process of discharging the battery, acid is consumed, the share of which in the total volume of liquid is a third (35-36%).
The result is a decrease in the density of the liquid. When the battery is charged, the reverse process occurs.
In such a situation, water is consumed, and acid, on the contrary, is formed. As a result, the density of the electrolyte increases.
In the normal state, when the battery voltage is 12.7 V, the density is 1.27 g/cc. Moreover, all parameters directly depend on each other.
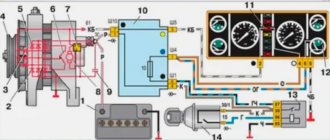
VAZ 2110 generator and its features VAZ Repair Zone
On the VAZ 2110, the generator consists of the same components as on any other car. The circuit has been proven over the years, is reliable and durable. And the most important thing is that there are so few knots in it that there is simply nothing to break. But it seems so only at first glance; in fact, breakdowns do happen and they cannot be avoided. But to carry out repairs, you will need to know some nuances - the principle of operation of the generator, its main components (which is responsible for what in the design). To begin with, it is worth considering the design features of the tens generator.
VAZ 2110 generator: rotor
It is located in the middle of the VAZ 2110 generator. It is held in the housing thanks to two bearings. The rotor has a winding that is powered by direct current (and stable voltage). It is worth noting that the price of the rotor is quite high, since it is one of the main elements. Its design is standard for DC machines - a metal base and winding. The latter is supplied with voltage using two slip rings and graphite brushes.
In the same housing with the brushes there is a voltage regulator built on a semiconductor. If you change the brushes, then the regulator must also be replaced and vice versa. A drive belt pulley is installed on one side of the rotor. On VAZ 2110 cars it can be of two types, depending on whether the engine is injection or carburetor. If the second, then the pulley is the same as on the old nines and eights - for installing a V-belt. If the engine is fuel-injected, then a multi-ribbed belt is installed, and the pulley is wider and smaller in diameter.
Generator stator tens
And now we need to talk about the stationary part of the VAZ 2110 generator, which is called the stator. The internal part is the winding, which is located on a metal core. This core is made of a special grade of steel.
Stator windings are very similar to those seen in induction motors. As in the latter, there are only three windings, which consist of the same number of turns. They are made from the same wire. This means that the output produces a three-phase voltage, which is converted into a constant unipolar voltage using a rectifier cascade.
The only difference from the motor is that the windings do not consume, but generate alternating voltage
Please note that the VAZ 2110 generator produces three-phase alternating voltage. It is this electrical signal that is removed from the stator output. The windings are connected according to the “star” circuit
Next we need to talk about those units that help achieve normal power supply to the on-board network
The windings are connected according to the “star” circuit. Next we need to talk about those units that help achieve normal power supply to the on-board network.
Rectifier block
Six semiconductor diodes that rectify the voltage of the VAZ 2110 generator
But, it is necessary to pay attention to the fact that these diodes operate over a wide voltage range. If there is no regulator, then the output of the windings will have a three-phase voltage with a value of up to 30 V. For a passenger car such as a VAZ 2110, this is too much
For a passenger car such as the VAZ 2110, this is too much.
Therefore, stabilization is carried out using a small assembly that helps power the rotor winding. The fact is that with a stable voltage on the rotor winding, the magnetic field will also be created stable. Its value will directly depend on the applied voltage. On dozens, the regulators are small and fit into a small hole on the back cover.
It is worth noting that the early models (classic series) used remote-type regulators, which were mounted on the partition between the engine compartment and the passenger compartment.
In the VAZ 2110 generator, this circuit is no longer used; it has been somewhat transformed. The lamp indicating the lack of charging, which is installed in the instrument panel, is connected to the power circuit of the voltage regulator and the excitation winding. Therefore, if, for example, brushes are destroyed, it will notify the driver of a problem. But to be more precise, it was not the scheme that changed, but the design.
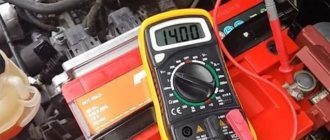
What generator voltage is considered normal?
To check the generator voltage, you need to start the engine and turn off the entire load. In this case, the multimeter should show 14.3 -15.5 Volts (see video at the end of the article). A deviation of 0.1 Volt in one direction or the other is allowed.
After this, it is necessary to connect consumers one by one and check the generator voltage.
Ideally, it should “drop” by about 0.2 Volts when you turn on each new load. In this case, the total U should not fall below the level of 12.8 Volts. Otherwise, the battery will be discharged.
Reduced tension in winter: what causes it?
Sometimes car owners are faced with a situation where, during the cold season, the battery parameters deteriorate and the car cannot be started.
To avoid problems, prudent drivers remove the power source and take it to a warm place.
In fact, the essence of the problems is as follows. When the temperature drops below “zero”, the density of the electrolyte also changes. Consequently, the voltage level is also adjusted (as noted above).
Even with normal charging of the battery, the density of the electrolyte increases, which is why U also increases. Therefore, if the battery is normally charged, it has nothing to fear.
The situation is worse if you leave a discharged battery in the cold. In this case, the density will drop and problems with starting the motor will appear. In some cases, the liquid may freeze.
As for the problems associated with starting a battery in the cold season, they arise due to the inhibition of chemical processes inside the device when the temperature drops below zero.
This means that with a normal charge, the density and voltage of the battery will be sufficient to start the engine even in winter.
About regulators
Structurally, tablets that control the voltage in the generator are capable of increasing the current to 13.6 volts. It is known that there are two schemes for connecting the regulator: old and new.
The old circuit is a more reliable option, which does not increase the voltage too much, but also does not allow it to drop to critical values. But the new one - although it is completely copied from the old one, has many shortcomings.
Chronic undercharging of the battery is precisely the drawback of the new scheme. Starting the engine becomes problematic in the cold season. Owners have to install preheaters or come up with something else.
Poor quality regulators force the battery to absorb energy only in the summer, i.e., at above-zero temperatures. In winter, especially if you make short trips by car, the battery does not have time to warm up, at least to 0, and periodically discharges.
Experienced motorists recommend driving for at least 20-30 minutes in winter to restore the battery.
So how is the problem solved? Obviously, the best option is to increase the voltage in the on-board network, but how to do this? It is necessary to make the tablet “believe” that there is supposedly low voltage in the network. Thus, we will ensure that the gene produces the missing voltage.
Low voltage in the vehicle's on-board network can be caused by the presence of a large number of consumers. For example, if you use a powerful speaker system with a subwoofer and amplifier, voltage dips are inevitable.
Instead of a diode, you can also use special regulators that produce three voltage values, depending on the air temperature: 13.2, 13.9 and 14.5 volts. There are three modes: summer, spring/autumn and winter.
We recommend viewing the table, which shows data on the normal charge of the battery and the standard operation of the generator.