The car has two steering rods attached to telescopic struts. Thanks to these rods, the wheels move. If they fail, they become deformed, steering play appears and, possibly, some wheel will move incorrectly (not completely) when the steering wheel is turned all the way.
Note! You will need the following equipment: a special puller for steering rods (purchased at a car store/car market, we do not recommend buying an expensive one, since you will rarely use it), penetrating lubricant like WD-40, a set of wrenches, screwdrivers, sockets, wrenches and pliers!
Location of rods
Installed rods are difficult to show on a car, because... they are covered with many details. We decided to post a diagram on which you can clearly see the location of the rods (indicated by the number 11 and number 6), they are located under the hood of the car.
When to change rods?
In the following cases:
- there was play at the steering wheel;
- There were various kinds of knocking noises coming from the front of the car (especially noticeable when driving over bumps).
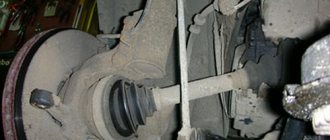
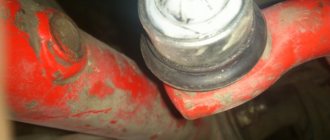
Note! These symptoms are also characteristic of a faulty rack and other parts of the steering mechanism, so it is impossible to be 100% sure that it is the rods that have become unusable. We recommend checking their functionality and inspecting them for rust. Look at the boot (indicated in the photo by an arrow), if the boot is torn - the rods must be replaced! (In principle, it is possible to replace only one tip assembly; we will describe it in more detail later in the article).
Pulling and eliminating play in the VAZ 2109 steering rack
The causes of play or knocking can be:
- loosening of the steering rack;
- natural wear and tear of the transmission pair;
- wear of ball joints of steering rods and so on.
I warn you that tightening the steering rack may not solve the problem with play. Only an autopsy can show the degree of wear of parts. But you should always start with the simple, i.e. with braces.
What will you need? Special key - available in many auto parts stores. I got mine for 55 rubles.
Next, open the hood and get to the adjusting screw at the bottom of the rack.
We remove the rubber plug/plug and, without fanaticism, try to tighten the adjusting screw a little (half a turn was enough for me). At the same time we pull the steering rod. We seize the moment when the bullshit disappears. Next, you should take a ride and make sure that the steering wheel is light and returns from a turn to a straight position.
It's a bit tight - loosen the screw a little. As a rule, the first tightening of the rack helps to get rid of knocking and play.
Of course, major repairs are not necessary in every case, and replacement of component parts is also not always necessary, because:
- On the VAZ 2109, the steering rack is adjustable, and if you know how to tighten the steering rack mechanism, then you can remove steering knocks without any financial investment at all
- This is possible, of course, if the knocking is caused by operational or factory control play
- To adjust, you should use a trestle or inspection hole, find the adjusting nut under a layer of dirt, then use a special wrench “17” to tighten it
Adjustment
So, the situation is such that tightening the steering rack can still give a positive result. Therefore, you need to find out how to tighten the knot and what is required for this.
You can adjust the rack through the bottom of the car, removing the engine protection, or through the top. In the second case, the work will have to be done by touch. So decide for yourself what is more convenient for you.
- To adjust the steering rack, you will need to tighten the adjusting screw. You can find it in the steering mechanism. To be more specific, in the end cap.
- It is optimal to have an overpass or a pit at your disposal in the garage. If there are no such conditions, you can get by by raising the car with a jack. Only in this situation will it be necessary to additionally secure the car in order to avoid it sliding off the jack and the likely consequences.
- Before lifting the body with a jack, be sure to align the front wheels straight.
- You can measure the backlash using a backlash meter. Moreover, they can be old or electronic. The latter are more relevant and convenient to use, but some people don’t have to choose. What you find is what you will use.
- According to current norms and standards, for the VAZ 2109 the steering wheel play should not exceed 10 degrees.
- Find the adjusting screw and begin to tighten it gradually. The operation is carried out slowly. Periodically check the steering wheel movement and any play or knocking in the steering column.
- Use a special key for adjustment. It is available at any auto parts store.
- The key is inserted into the adjusting screw and turned counterclockwise. Scroll a little and check the result.
- The procedure may take a long time. Still, take your time.
- When you feel that the adjustment has reached the desired level, take a test drive in your car, feel how the steering wheel moves, whether the knocking or play has disappeared, how hard the steering wheel rotates.
- If the steering wheel has become too tight, you will have to slightly loosen the tension on the adjusting screw.
Special key If there is no positive result after the adjustment, you will have to eliminate play and knocking by dismantling, repairing or completely replacing the unit. Now decide for yourself.
You should not rely solely on reiki adjustments as a cure for all its ills. But you shouldn’t rush to conclusions about the need to replace the rack. Try to adjust, and then act according to the situation.
Causes
There are three main reasons that lead to the need for such an event as replacing tie rod ends.
| Cause | Peculiarities |
| Natural wear and tear | Time spares no one, therefore, as the operating life, diluted by far from ideal road conditions, ends, the tip wears out. It rotates constantly, and wear and tear on rotating, moving elements is completely natural. Therefore, when you know that the service life of your old tips is coming to an end, we recommend that you monitor them more closely. They can refuse at any time |
| Torn boot | Just like in the case of a ball joint, the tie rod ends of domestic nines are enclosed in a protective boot. During operation, this protective casing often breaks, which sometimes leads to quite sad consequences. For example, if dirt, dust, or debris gets inside the boot, this will cause even faster wear of the parts. Therefore, the tips will definitely not last their entire lifespan. |
| Insufficient amount of lubricant | What does friction lead to when there is no lubrication? That's right, no good. Therefore, if the tips had a small amount of lubricant, very soon it will be used up and will no longer be able to perform its functions. As a result, the steering system elements wear out and require urgent replacement. |
Whatever one may say, under any circumstances, replacing tie rod end switches is a matter of time. To extend this time between replacements, purchase only quality products.
Tools and accessories for repair
Of course, you need to buy the tie rod ends directly. It is advisable to choose the production of one of the three.
You need to pay attention to the fact that AvtoVAZ produces cars, not spare parts for them! Therefore, to say that the steering ends were produced by the AvtoVAZ company is completely wrong. All spare parts are produced on the territory of our vast country, as well as in near and far abroad
It would be more correct to say that you need to purchase stock elements. These are the ones that are installed by the vehicle manufacturer. But this does not mean that they are produced by the same plant. It is highly undesirable to buy tie rod ends that have been restored. They are unlikely to last more than a month or two
If we take into account the fact that steering tips, the price of which does not exceed 400-450 rubles. can be found in any store, it turns out it’s easier to buy new ones
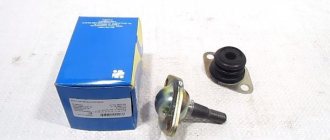
You will also need to buy nuts and locking pins. Anthers, as a rule, are already installed on the tips, and there is lubricant inside. And the most important thing is a steering tip remover; you can’t do without it.
Replacing steering rods on a VAZ 21099
Once upon a time, I was on my way to an important meeting and, due to my haste, I got into a small accident with a motorcyclist. Everything was fine, except that a motorcycle with a sidecar hit me directly in the wheel and tore off a piece of the bumper. It would not have been difficult for me to buy a bumper, but the right link was bent. I don’t think it’s worth telling you that the tie rods need to be replaced in pairs. Today we will talk about replacing steering rods on a VAZ 21099 yourself.
I advise you to immediately pay attention to our notes and recommendations. Note: Check the axial play in the steering rod ball joint on a VAZ 21099
To do this, vigorously shake the steering rod along the hinge axis. If play is detected, replace the tie rod end and joint assembly.
Note:
Check the axial play in the steering rod ball joint on the VAZ 21099. To do this, vigorously rock the steering rod along the hinge axis. If play is detected, replace the tie rod end and joint assembly.
Recommendations:
Be sure to replace the torn, cracked or lost elasticity protective covers of the steering linkage ball joints. Water, dust and dirt that get into the hinges and mechanism will quickly damage these components. Bent steering rods must be replaced.
Do-it-yourself replacement of steering rods on a VAZ 21099
1. Brake the vehicle with the parking brake and install support blocks under the rear wheels. Turn the front wheels to the right if you are removing the left tie rod, or to the left if you are removing the right tie rod. Raise and support the front of the vehicle.
2. Remove the cotter pin from the tie rod ball joint nut to the swing arm.
3. Unscrew the nut securing the steering rod ball joint.
4. Using a puller, press the tie rod ball joint pin out of the strut swing arm.
5. Unlock the bolts securing both steering rods to the steering mechanism by bending the ends of the locking plate with a screwdriver.
6. Loosen both bolts and unscrew the bolt securing the steering rod being removed.
7. Rotate the connecting plate so that you can disconnect the rod from the steering mechanism.
8. Remove the steering rod.
9. Clamp the tie rod in a vice using the hexagon on the coupling. Loosen the locknut securing the tip.
10. Unscrew the tip, counting the number of turns. Write this number down. Screw in the new tip the same number of turns as when unscrewing.
11. To replace the protective cover, remove it, lubricate the contact surface of the cover with sealant and install a new cover.
12. Install the steering rod in the reverse order of removal. Tighten the bolts securing the steering rods to the steering mechanism to a torque of 70–86 N·m (7.8–8.6 kgf·m). After this, lock the bolts by bending the edges of the locking plate.
Do-it-yourself replacement of steering rods on a VAZ 21099 has been successfully completed. If you don’t have much time, I recommend that you familiarize yourself with how to replace the wheel hub bearing on a VAZ 21099 yourself.
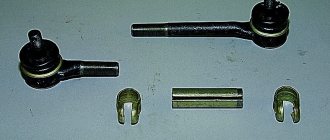
Rod repair
Note! In this section we will describe the process of replacing tips, and also tell you how to change the boot.
1. You need to start by fixing the pull, for example, with a vice. Loosen the nut securing the tip to the rod (arrow 1 in photo). Unscrew the tip by hand (photo 2) and remove it from the rod, but when unscrewing, count how many turns you make. When installing a new tip or replacing the old one, you will need to repeat the number of turns as when unscrewing.
2. To replace a torn boot, first remove it from the O-ring (photo 3), then remove the snap ring (photo 4) and finally remove the boot itself (photo 5). Once you get inside, check to see if it is very dirty, then remove the grease from the tip (photo 6) and look again to see if dirt has gotten into the inside of the hinge. Got it? – change the tip, no? – put grease directly into the boot, half its volume, and install the new boot in place. Place the edge of the boot onto the seat on the hinge body and securely fasten it with the two rings removed earlier.
Note! Check the tightness of the fit; any hole will soon render the tip unusable due to dirt getting inside.
Additional video
We recommend watching the video below:
Source
Dismantling and installation of tie rod ends on VAZ 2109-2108
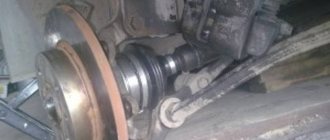
The first step is to jack up the car, or rather its front part, and then remove the wheel to gain easier access. Then we bend it with pliers and pull out the cotter pin, which secures the nut securing the tip to the steering knuckle of the strut:
After which you can unscrew the nut with a 19 mm wrench, and it is most convenient to use a union one. To apply a more powerful lever, you can put a pipe on the end of the wrench, if necessary:
Then try to rip off the nut securing the tip to the steering rod, for which you will need a 27mm wrench:
If the entire coupling is unscrewed instead of the nut, you will then have to remove it along with it, after which at the very end of the procedure you will try to unscrew the tip in place.
Now we need a special puller for ball joints and other articulated joints. We insert one of its levers under the rubber of the tip, and the second end should rest against the finger from below. This is clearly shown in the photo below:
Next, you need to turn the puller bolt until the steering tip pin pops out of its place:
If the nut on the rod has moved out of place, you can try to unscrew the tip. It is worth noting that you need to turn it clockwise:
While unscrewing, count the number of turns made so that when installing, tighten the same amount. This will allow you to maintain approximately the previously established wheel alignment.
Now you can buy new tips and replace them. The price of these parts for the VAZ 2109-2108 is about 600 rubles per pair. Keep in mind that they are different: that is, the right and left tips are different! Installation is carried out in reverse order.
Consequences of a malfunction
The steering end screws onto the long steering rack arm. This achieves a movable connection between the rack and the steering knuckle, but at the same time it is quite rigid. Long trips with a faulty tip will lead to serious problems with steering and more. Tires are most often affected.
During long trips with faulty joints, wheel alignment is disrupted. This causes increased wear of the rubber. But this is far from the only consequence of problems with the tip. In fact, this hinge should protect the steering rack from impacts and shocks. If there is a malfunction, this function is lost; if you continue to drive further, the risk of damaging the rack becomes quite large.
The work process itself is not complicated. In addition to the basic tools, you will need a special ball puller. Without it, removing the finger from the steering knuckle will be problematic. In principle, if you don’t have a puller, you can get by with a pry bar. A few hours before work, clean the threaded connections from dirt with a wire brush and treat them with liquid wrench. Replacement is carried out in the following order:
- First, jack up the car and remove the wheel. The steering knuckle is turned to its maximum position;
- Using pliers, remove the cotter pin from the castle nut, after which it is unscrewed;
- Lightly tap the pin fastening with a hammer. Use a puller to remove it from the steering knuckle. If this action is performed using a mount, you will have to tinker a little. To remove it, you need to press the tip with the mounting tool. At the same time tapping the steering knuckle mount with a hammer. The most difficult thing is to rip the hinge out of place;
- Next, use a caliper to measure the distance from the middle of the ball to the rod. This will help avoid problems with wheel alignment. If uneven wear of the rubber has been observed, then you don’t have to bother with measurements. You will still have to go to a service center to check and install the angles;
- Loosen the locknut and twist the tip;
- Before installation, lubricate the threaded connection of the rod and the tip with grease. Lithol is good for this;
- Screw the end onto the rod. Don't forget to set it to the previously measured distance. After this, tighten the locknut;
- Press the pin into the mounting ear of the steering knuckle. Next, lubricant is also applied to it, and the nut is screwed on. After tightening it, the connection is pinned.
This completes the work of replacing the steering tips. Experienced car enthusiasts still recommend checking the wheel alignment angles. This will help ensure you avoid problems.
Conclusion
. As a rule, every 15,000-20,000 kilometers, owners of domestic cars are faced with the need to repair the steering and chassis. Therefore, the question of how to replace steering tips on VAZ 2109 and 21099 is not uncommon. This work in itself is not difficult. It does not require special knowledge or tools. You should not delay its implementation.
Signs of breakdown
By studying the signs of malfunctions in the design of the steering rack, you will be able to promptly identify the breakdown and take appropriate action to eliminate it.
The symptoms below may indicate not only a damaged rack, but also problems with the steering column, ball joints or linkages. Therefore, be careful.
| Symptom of malfunction | Peculiarities |
| Increases free play of the steering wheel | This indicates that the gear sector has worn out due to dirt and dust getting into it. Or the gap between the rack stops and the rack itself has increased. Therefore, the engagement of the rack with the gear decreases. Plus, such a sign may indicate wear on the silent blocks of the rods or weak fastening of the supports in the steering knuckle |
| Noisy or knocking noises near the steering unit | Most likely, a gap has formed between the rack and the stop, or the plastic bushings have worn out. A knock is also a sign of wear on the traction silent blocks, ball joints, or loosening of the gear shaft to the column shaft. |
| Steering wheel turns hard | Here we can talk about possible damage to the steering rack bushing and a violation of the integrity of the gear shaft bearing. But you shouldn’t rule out the possibility of damage to the ball joint or strut bearings. |
Having determined the presence of signs of malfunctions, it is important to understand what exactly caused them to appear. Node diagram
Node diagram
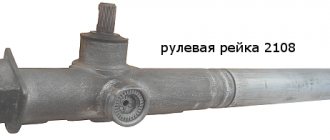
How to replace the steering rack on a VAZ-2109, 21099
If, when turning the steering wheel sharply from the neutral position (the wheels are straight), extraneous knocks and noises are heard in the area of the steering rack, this means that the steering rack on your VAZ-2109, 21099 car is faulty, and it is urgently necessary to repair it.
An alternative to repair is tightening the steering rack nut with a special wrench. This method can have a positive effect (although not always), but with possible consequences. For example, if the nut is tightened too much, then the resistance to the rotation force of the steering wheel will increase, as well as more serious consequences, up to the steering wheel jamming, which can be extremely dangerous while driving. It is better to repair the VAZ-2109, 21099 steering rack with an assistant, although you can do it yourself. Among the necessary tools: a steering rod puller (photo 18) and WD-40 fluid, which can be bought at any car market.
Below is the procedure for repairing the steering rack (perhaps it is a little simplified, but during the repair everything will become clear to you):
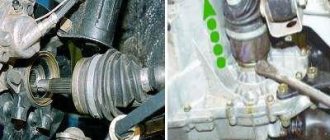
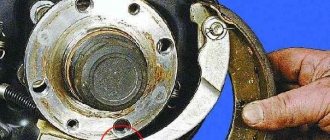
1. First of all, raise the front of the car to achieve full lift of both front wheels. Anti-slope bars should be placed under the rear wheels (photo 1);
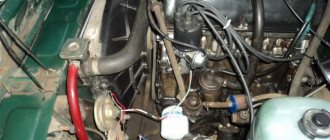
2. Remove the front wheels. At the same time, we check the condition of the anthers on the steering fingers (photo 2); 3. Now you need to gain access to the steering rack mount. It is necessary to disconnect the gas adsorber, as well as the alarm siren, if available and installed in this particular location (photo 3). We remove the terminal with the wires from the adsorber, and, as far as the hoses allow, we move them to the side (again, photo 3). After removing these components, access to the steering rack mount is free (photo 4); 4
If you install a used steering rack, you should pay attention to the condition of the boot boot and steering rod silent blocks (photo 5); 5. Now set the steering wheel to a neutral position (when the wheels look straight)
Using a spanner wrench or a head to the universal joint, unscrew the bolt from the splined joint, which is located near the pedal assembly (photo 6, 7, 8); 6. We clean the tie rod attachment to the car suspension struts from dirt (photo 9);
7. After the fastening units are cleaned, using pliers, pull out the locking pin from the connection (photo 10), and then unscrew the steering tip nut (photo 11);
8. Next, install the puller (bought at the car market, photo 12), tightening the puller nut and gently tapping the puller from below with a hammer until the pins of the steering tip come out of the cone joint (photo 13);
9. Now, back under the hood, you need to unscrew the nuts on the steering rack (photo 14, 15);
10. Using a screwdriver, pull the steering rack off the mounts (photo 16) and pull it out through the window in the wheel well (photo 17);
11. Let's start installing the steering rack. In order to catch the required middle position of the steering rack, you must first install the steering pins in the racks, after which we install the shaft on the splines in the cabin. The steering shaft in the cabin has free movement, making it easy to install it in the required position. Be careful, there is a groove in the steering rack for the clamp bolt, and you need to install it so that the clamp is opposite the groove, this will allow you to install the bolt back without any extra effort.
12. Now we assemble the entire steering unit in reverse order.
If you also replaced the steering rods at the same time, then it is necessary to restore the wheel alignment. The technology for repairing the steering rack on a VAZ-2109,21099 is similar to repairing racks on all VAZ cars with front-wheel drive.
Replacement
Well, now let's proceed directly to the replacement procedure. The work cannot be called difficult, but without a certain set of tools you will not be able to achieve the desired result.
When there is no special puller
Therefore, you should have:
- Reliable jack;
- Balloon wrench;
- Pliers;
- Socket wrenches or open-end wrenches (the first option is better);
- Puller for tie rod ends;
- The Almighty WD40 Rust Remover;
- Hammer;
- Brush for working on metal.
Replacement process
All is ready? Begin.
- Place the car on an overpass or inspection hole, install anti-roll bars under the wheels, engage the handbrake and gear. Safety comes first.
- Using a wheel wrench or a suitable socket with a long wrench, unscrew the wheel bolts, but do not completely unscrew them.
- Properly position the jack and lift the vehicle, lifting the wheels off the ground. To increase reliability and stability, it is better to place something like bricks, a stump or other similar support under the car. Having one jack is not enough; it is very dangerous.
- Now you can completely unscrew the bolts and remove the wheels.
- Turn the steering wheel to the side all the way, which will provide you with fairly comfortable access to the place of work.
- Using a metal brush, clean the threads of the tip, and then be sure to treat the area with a rust killer - WD40. Both threads should be processed - the thread where the tip is screwed into the rod and the thread on the finger.
- Wait a while for the product to react. After this, take pliers or pliers, with which you need to unpin the tie rod end connection.
- Using a spanner wrench, unscrew the fastening nuts of the damaged, failed tip. If problems arise when unscrewing, the fasteners do not want to come off, treat with a wedge again, wait and try again. Take a larger lever, which will make the task easier.
- After removing the nut, you need to remove the tip pin from the stand. This is where a tie rod end puller will come in handy. You can buy it or borrow it from friends. But many people don’t have such a puller. Therefore, craftsmen found a way out of this situation.
- To remove it you will need a hammer, physical strength and a pry bar.
- Screw the nut onto the tie rod end pin so that the pin does not stick out.
- Use the pry bar to rest against the protrusion of the stand and begin to pry the rod upwards.
- With precise straight blows using a hammer, begin to knock the tip up. The blows are applied at the junction.
- With this artisanal method of dismantling, the most important thing is your accuracy when striking. Hit as accurately as possible so as not to damage other suspension components of your VAZ 2109.
- When the finger is finally removed, you can proceed to further steps.
- Unscrew the lever from the steering rod. But before that, be sure to measure the screw-in distance of the tip. This way you can more accurately install the new element at the toe angles.
- Measuring the distance is often done by eye, relying on marks from the old tip. Apply a mark or simply use a ruler or tape measure.
- Unscrew your damaged end from the rod. Here you can already do everything manually.
Not difficult, but long
In the process of replacing tie rod ends, many people relax after dismantling the old elements. In fact, reassembly is an equally important stage of repair, on which the overall result largely depends.
How to remove the rail?
The rack is screwed with four bolts to the car body, and in the cabin it is attached to the steering shaft through a splined connection. First of all, unscrew the steering shaft in the cabin; it is the most difficult to get to. To do this, you will need a 13mm wrench; unscrew the nut and remove the shaft from the spline joint.
The rack itself can be removed with or without tie rods. If you are sure that the rods together with the tips are in excellent condition or you are lucky enough to buy a rack without tie rods (this is also sold) - well, you don’t have to change the rods, but simply remove the rack.
If you do not change the rods with tips
Unscrew the rods from the rack - one bolt for each rod.
Unscrew the rack from the body - two bolts on each side. And take out the rail. It's best to stick it out through the right (passenger) side. To be honest, I couldn’t stick it out any other way.
We completely change the steering
And if you decide to replace the entire steering in one fell swoop, you will have to remove the ends. To do this, we lift the front of the car and remove the wheels, so we can get to the tips.
Remove the stoppers and unscrew the nuts. Then you will need to tap a little with a hammer on the steering knuckle, around the tip pin. He must come out on his own. The hammer won't break anything, the design is quite reliable. If you can’t get the tip out this way, use a puller. After fixing the puller and applying some force to the tip, tap it around your finger - the tip should come out easily. The tip can be removed on both sides in the same way.
In this form we take out the rail.
Why is steering needed?
A complex system - steering - is an integral component of the car, supporting the motion vector set by the driver, synchronizing the position of the steering wheel with the angle of rotation of the wheels.
Car steering device
The driver's command to the wheels of any ground vehicle is transmitted through the steering control, be it a VAZ-2114 car or another car.
Signs of malfunction of VAZ-2109 steering tips
It is the steering tips that most often wear out on a car. To check them, you need to use an overpass, a lift or an inspection pit. It is not very convenient to work by lifting the front part of the car on jacks, since there is not enough space. Carefully inspect the anthers of the steering tips. If they have cracks, it is advisable to carry out repairs immediately. It is unknown how old these cracks are. And in just a few hours, quite a large amount of dust and dirt can penetrate through one.
This will cause the ball joint to wear out more. Even washing followed by applying fresh lubricant and replacing the boot may not save the situation. Check the amount of play in each rod end. It should not exceed one and a half millimeters. If more, then the tie rod ends need to be replaced. Also a sign of wear is the presence of extraneous sounds from the steering.
Checking status
To make sure that all the signs mentioned are caused by the tips, this fact should be checked.
Many rush to conclusions, blaming the rod ends. In fact, the same signs of breakdown may indicate a faulty steering rack. Sometimes, after tightening or repairing it, everything returns to its place, and the tips are still in quite usable condition.
So, let's check if the tips are really to blame. For this:
- Drive the car onto an overpass or place it in a viewing hole;
- Apply the handbrake and install chocks under the wheels. Security measures have not yet been canceled;
- Go under the car and grab the steering rod with your hands. It needs to be pulled up and down with quite impressive force;
- If the element is really worn out, this can be determined with the naked eye, since the play in the hinge will be significant;
- Do not forget to carry out the same operation with the second steering rod end.
When changing rod ends, purchase a pair at once. Leaving one new and one old element in the work is a big mistake that can lead to the most unpredictable consequences.
Nuts - they're everywhere