01/25/2022 7 194 Fuel system
Author: Victor
The fuel filter in the Nissan Almera Classic, as in any vehicle, is one of the main components of the fuel supply system. Its regular maintenance and replacement are a prerequisite for maintaining the car in good condition.
[Hide]
Is it necessary to replace the Nissan Almera N16 fuel filter: signs of malfunction
And these signs are:
- Difficulty starting the engine;
- The occurrence of interruptions in the operation of the motor. If its diagnostics did not reveal any failures in the electronic component, as well as the synchronization of the operation of the pistons and valves, the quality of the exhaust system and the failure of the lambda probes, then the reason for this most likely lies in the failure of the element we are considering. To be fair, we note that often interruptions in the operation of the power unit arise due to the quality of the fuel itself - its low octane number. So that's something to keep in mind as well;
- Significant drop in engine power. It is not surprising that by not receiving enough fuel, it reduces its efficiency;
- Unreasonable increase in gasoline consumption. Oddly enough, if the fuel purification element has poor permeability, the engine, losing power, begins to demand more and more of it and at the same time operate at higher speeds. The consequence of this is that higher gears have to be engaged at lower speeds than before;
- With all this, the engine often stalls, especially at low speeds when starting off. So, if at intersections your car every now and then stands rooted to the spot, then the reason for this should be sought in the quality of the work of the element we are considering;
- A significant decrease in the dynamics of the car - it accelerates much more slowly. This is especially noticeable on cars equipped with automatic transmissions. Of course, this symptom corresponds to a number of malfunctions, but coupled with those described above, it irrefutably indicates that replacing the Almera H16 fuel filter is the only way to get rid of the whole range of problems that have arisen;
- An incorrectly functioning fuel purification element creates additional load on the fuel pump, which may require replacing the fuel pump on the Nissan Almera H16.
The fuel filter and fuel pump in Almera Classic cars are combined and located in the fuel tank. It is possible to replace the fuel filter in a garage, but it is recommended to entrust this procedure to professionals from service centers. Everything you do is at your own peril and risk. Before replacing the fuel filter, the fuel pressure must be relieved. To do this you need:
- Find the fuse box under the car's dashboard.
- Open the cover and find the fuse that controls the operation of the fuel pump (FUEL PUMP).
- Remove this fuse.
- Start the engine. After 5-20 seconds it will stall.
- Repeat the procedure several times until the engine stops starting altogether. In this case, it is necessary to maintain an interval between attempts of 60-75 seconds.
- After this, the pressure in the fuel line will be released.
Oil filter replacement process:
- Open the hood and unscrew the oil filler plug.
- Having previously placed a container for collecting waste under the drain hole, unscrew its plug.
- After draining the old oil, you should clean the seat of the drain plug, change the gasket on the plug if necessary, and then screw it into place.
- In order to get to the oil filter, you need to remove the engine protection.
- The old filter is unscrewed using a special wrench. If there is none, you can try to tear it off with a gas gun.
- We inspect the mounting hole and the filter gasket; if there is no damage, it can be reused on a new element.
- Pour a little clean engine oil into the new filter, and then lubricate its gasket with it.
- The new element should be screwed on and tightened only by hand, without applying excessive force.
- Next, fill in the required amount of new engine oil, checking its level using a dipstick, and close the oil filler cap.
- We start the power unit for a few minutes and turn it off. This is necessary to ensure that the oil is evenly distributed throughout the power unit.
- We monitor the oil level and top it up if necessary.
As you can see, there is absolutely nothing complicated in the process of replacing consumables on a Nissan Almera car, and timely implementation of the described procedures will increase the service life of the systems in the design of which they are included.
Self-replacement of Nissan oil filter video
Motor oil is required to prevent friction of parts by creating a special oil film. Considering that the tachometer constantly rolls up numbers, the original properties of the car’s engine oil also deteriorate.
In addition, the Nissan Almera n16 oil filter also needs to be changed. There is nothing complicated about replacing the fluid - the procedure is standard, but it is extremely important.
This process cannot be delayed - we will tell you how to change the oil in this Japanese passenger car.
What kind of oil to fill?
One of the main questions that can be found on the forums is what oil to pour into the Nissan Almera n16 engine? Many people are also interested in which oil filter to use and how much oil is required.
We note that you cannot randomly trust unverified sources of information when choosing a lubricant. First of all, the oil must be suitable for your car and have the appropriate viscosity.
You can determine what it should be with the help of a car operating book. Alternatively, you can fill in Nissan 5W-30 oil, which can be found under catalog number KLAM2-05304 .
It is well suited in terms of viscosity, and in general the original lubricant is of the highest quality and most reliable.
It should be noted that the choice of oil should be made taking into account the operating conditions of the vehicle.
For example, if in summer the air temperature in your region rises to 30-35 degrees, instead of 5W-30 lubricant it is better to fill in 5W-40, as it retains its properties better in the heat.
The original oil with this marking can be found under the number KE90090042 . Many car owners are confused between KE90090042 and KE90090042R, and some think that they are the same thing.
For the winter, if the air temperature at this time of year drops to -30 degrees, you can fill the engine with 0W-40 semi-synthetic oil. When replacing, there is no need to buy the original NISSAN Motor Oil lubricant, but you can replace it with a product from other brands, such as:
- Castrol;
- Eneos;
- Mitasu;
- Xenum;
- Mobil and others.
Never listen to the advice of experienced motorists who recommend pouring thicker oil when the oil consumption is high. The fact is that it is more difficult for too thick motor oil to pass through narrow oil channels in the power unit, as a result of which the quality of lubrication of moving parts is significantly deteriorated.
Once you have determined which motor oil you will use, purchase the amount you need. In total you will need approximately 3 liters.
Tools
Having decided on the type of oil to be poured into the engine, proceed to subsequent work. Before you begin the replacement, review the list of tools that you should have with you when performing the procedure.
To successfully change the engine oil, you will need the following:
- rags;
- key to 14;
- new filter;
- container for draining old lubricant;
- funnel and rag;
- new oil.
Procedure
Having studied all the previous points, you can start replacing the fluid. Follow the following instructions:
So, you have successfully replaced the liquid lubricant in the engine of your Nissan Almera, and in the video you can see the whole process with your own eyes:
Video: Changing the oil in the Nissan Almera N16 engine
Fuel filter for Almera Classic – where to find it, which one to buy?
On all Nissan Almera Classics, regardless of configuration, the main fuel filter is built into a special unit (module) located in the gas tank. To access it, you just need to lift the back seat and unscrew the small technical hatch, under which the fuel station is located above. Many owners of this car even have the misconception that there is no fine fuel filter element on the Almera Classic, but only a mesh. The original article number for this module is 1704095F0B.
The manufacturer does not provide for a separate replacement of the main fuel filter (as, in principle, other components of this fuel unit). Everything should only be changed as an assembly, as a whole module. Therefore, a separate article is not provided for both the filter and the mesh.
You can also install one of the analogs of the assembled module, since they are usually 1.5 - 2 times cheaper.
| Manufacturer | vendor code | price, rub. |
| Ruei | 2457 | 3600 |
| Cross | KN17-03055 | 6000 |
| ASParts | ASP2457 | 3700 |
Since replacing the entire module assembly at once is quite expensive, and is not always justified (since only the filter may become clogged, or the pump may fail, but everything else may be in good condition), many drivers often change the design of the unit, making a tie-in, and connect any remote fine fuel filter.
The second option for upgrading the fuel module is to install a fine filter from other fuel units that require its replacement. But for this, a cutout is usually made in the module body for the pressure regulator, since on all analogues it is located in a different place from the original. The list of fuel filters that are suitable for installation and have already been used by drivers of this car is below.
| Manufacturer | vendor code | price, rub. |
| SCT | ST399 | 300 |
| Japanparts | FCH22S | 370 |
| Hyundai/Kia | 319112D000; from Hyundai Elantra III (XD) | 1400 |
As for the mesh filter, if necessary, you can simply wash it with a carburetor cleaner - Carb Cleaner. If a replacement is needed, then you can use one of the following analogues.
| Manufacturer | vendor code | price, rub. |
| Krauf | KR1111F | 100 |
| LADA | 1118-1139200 (from VAZ 2110-12) | 30 |
| Hyundai/Kia | 3109025000 | 340 |
When to change the fuel filter on Almera Classic?
According to the Almera Classic maintenance regulations, the manufacturer does not provide for replacing the fuel filter after strictly defined mileage periods. It is replaced as a whole, as an entire module, which in turn is designed for the entire service life of the pump. On average, the fuel pump becomes unusable between 100 thousand km and 200 thousand km.
If the fuel unit is upgraded independently (remote filter, or replaceable for collapsible modules), then it can be replaced every 45 - 60 thousand km. The filter mesh can be simply washed through one maintenance.
Where is the fuel filter located?
Fuel pumps on Nissan Almera Classic cars are located in a special removable module inside the fuel tank. These machines use a two-stage gasoline purification system.
It consists of two filters:
- the first one is intended for rough cleaning of fuel and is located at the inlet of the fuel intake module;
- the second - fine cleaning - is installed on the upper part of the fuel pump housing.
The location of the fuel filters and pump on the Nissan Almera H16 is absolutely identical to the location of these devices in the Nissan Almera Classic.
Layout of filters in the fuel pump module
The Almera G15 model is equipped with a simplified fuel filtration system, consisting of only one device for coarse cleaning.
If you don’t change it, what are the consequences?
A car consumes a lot of fuel over its entire service life. At around 100 thousand km, about 10,000 liters of fuel passes through the fuel system. Even the cleanest gasoline contains impurities and dirt, which are successfully retained by filters. Therefore, Nissan Almera Classic and other foreign cars use a two-level filtration system, which is much more efficient and lasts longer.
However, the mileage takes its toll. Over time, the filters themselves become clogged. The first symptoms of a poorly functioning filtration system are known to experienced car enthusiasts:
- engine loss of traction;
- work intermittently;
- increased fuel consumption (the pressure in the fuel system does not correspond to the nominal value);
- difficult startup (up to complete failure).
First, this leads to damage to the pump, since clogged filters cause disruptions in liquid pressure. Several such failures - and the mechanism stops pumping gasoline, the impeller rotates freely on the shaft. Almera Classic or N16 has a submersible fuel pump. It receives cooling by pumping fuel. No fluid flow - no cooling.
If dirt gets inside the injector, the result is even worse. The owner has to repair the entire fuel system, including the intake manifold and injectors. The latter, as is known, operate synchronously on the Almere Classic with distributed injection - in accordance with the valve timing (the electronic control unit receives signals from the phase sensor). The system reacts instantly to clogging of at least one of the injection elements. The engine stops starting and fuel consumption increases.
If you have the described symptoms, it is better not to hesitate. Contact DDCAR car service to replace the fuel filter. Our craftsmen will do this work for only 600 rubles. You can wait for the work to be completed in a cozy relaxation area with Wi-Fi.
How to replace the air filter on a Nissan Almera Classic
To prevent dust from entering the engine cylinders, it is necessary to regularly replace the air filter in the Nissan Almera Classic. To do this, it is not necessary to visit a service center. This procedure is very simple, and even a novice car enthusiast can handle it. To do everything quickly and efficiently, just follow the step-by-step instructions.
What is needed to carry out the procedure correctly?
In order to successfully replace the filter in a Nissan Almera Classic car, you do not need any specialized equipment. Even the simplest tools will not be used in this process. All you need is an air filter, part number J1321008.
A dirty air filter before removing it
Step by step instructions
The air filter in the Nissan Almera Classic is located under a cover that is secured with metal latches.
The process for replacing it will be like this:
The entire operation takes no more than 15 minutes. The most difficult thing about it is to open the latch, which is located on the back of the lid, since you have to do it “blindly”. Closing it is also a little more difficult than the other three. But after 2-3 such operations you will do them automatically, and the time spent on these actions can be reduced to 5 minutes.
In addition, when replacing, it is recommended to pay attention to the housing. If a lot of dust has accumulated in it, then it needs to be cleaned. Otherwise, the air filter in your Nissan Almera Classic will clog much faster and clean the air less well. This means that it will have to be changed much more often.
New air filter after installation
When to change?
During normal operation, this procedure is usually performed every time the oil is refilled. But if you often drive in off-road conditions, then replacement should be carried out much more often.
Every 5 thousand kilometers it is recommended to check the condition of the part and, if necessary, replace it. This way you can protect your car from wear and tear on engine parts.
Even if the part does not look dirty, it must be changed at least as often as required by the manufacturer.
Video “On the ease of replacing spare parts”
This video clearly demonstrates how quickly and easily you can replace the air filter in a Nissan Almera Classic.
We share our experience in our reviews! ?
- Replacing the fuel filter on Nissan Almera Classic and N16
- How to replace the cabin filter on a Nissan Almera Classic?
- We change the automatic transmission oil in a Nissan Almera Classic car
How to change it yourself?
Sometimes car owners turn to an official dealer to replace Nissan Almera Classic fuel filters. But more often than not, many people prefer to do this work themselves.
Preparation
Before replacing the fuel filter, you need to prepare tools and auxiliary materials.
A short list of what you need:
- wrench 10;
- gas key;
- a screwdriver with a narrow flat and cross-shaped blade;
- cleaning agent (acetone, solvent or carburetor cleaner);
- an empty, stable container with a volume of 0.5–1.0 liters for draining remaining gasoline from the main line;
- rags for collecting spilled fuel.
Stages of work
After preparing the tool, you can begin work on removing and replacing parts.
Step by step sequence:
It is necessary to relieve pressure in the fuel system. To do this, you need to find the pump fuse in the mounting block, which is located under the instrument panel in the area of the driver’s left foot. It is marked on the diagram on the block cover as “fuel pump”. You should remove it from the socket. Then you need to start the car engine. It will run for a short time and then die. It is advisable to repeat this procedure several times with an interval of about a minute between starts. While the engine is running, open the filler neck of the gas tank to equalize the pressure with atmospheric pressure. Fold back the rear seat cushion, under which the tank is located. It has a mounting socket in which the fuel module is installed. Before removing the cover, it is advisable to wipe off dust and dirt around the socket. Using a 10 mm wrench or a Phillips screwdriver, you need to unscrew the three bolts securing the cover. Underneath there will be a cylindrical module made of white plastic with a black ring around its circumference. If the fuel pressure has not been relieved using the method described above, it can be lowered with the pump power connector disconnected. The procedure for starting the engine is similar. Then you need to install a container next to the drain module. By pressing the clamping ring, you need to pull off the fuel supply hose, previously wrapped in rags, and quickly throw it into the container
It is important not to spill fuel on the interior components, since gasoline will evaporate from them for a very long time. Up to 0.2–0.3 liters of fuel can leak from the line. Next, unscrew the module cover, which is secured with a ring nut (black ring with protrusions around the perimeter of the module)
The nut is tightened quite tightly and access to it is inconvenient. To unscrew, use the handles of a gas wrench. Now you can get the fuel pump module assembled with filters. In this case, it is important not to damage the float of the fuel level meter installed in the lower part of the device. You need to remove the top cover of the module by bending the three blade clamps with a flat screwdriver, and disconnect the connectors from the fuel level sensor and pump. Sometimes the wires may be held together with a nylon tie that needs to be cut off. After disconnecting the connectors, you can remove the pump with filters from the module housing. It is secured with three clamps that must be pressed while simultaneously pulling out the pump. The pressure regulator is located on the clamp and can be removed very easily. Then you need to clean the plastic cup of the module from the dirt accumulated inside. Next, an external inspection of the pump is carried out, as well as repair and maintenance of structural elements. The coarse filter is located on the bottom of the mechanism and can be easily removed by hand. The fine cleaning device is located at the top of the pump and is secured with two plastic clips. To bend them, use the tip of a flat screwdriver. When dismantling the filters, it is important not to forget to remove the cuffs from the pump fittings, which are installed in the new cleaning mechanisms. Then you can change the filtration devices and begin assembly in reverse order. In this case, you need to modify the pressure regulator valve by cutting its tube and extending it with an insert from a gas-resistant hose.
You can watch the procedure for replacing fuel filters in a video from user Azat Alikberov.
Changing fuel filters for Nissan Almera G15
The stable operation of the Almera G15 power plant depends on the cleanliness of all fuel channels. The most common cause of malfunctions in the gasoline system is clogging of coarse and fine fuel filters. Their replacement or cleaning should take place after preparing the following materials and tools:
- Set of wrenches and screwdrivers.
- Large quantities of rags are necessary for quickly wiping up spilled gasoline after dismantling the filter elements.
- Containers for receiving gasoline - will be required when removing the pump.
- Fire extinguisher - necessary in case of fuel fire.
- Injector cleaner - you can use special liquids or acetone.
- You may also need: a vacuum cleaner, a hair dryer or boiling water, fuel hoses (can be purchased from Russian cars), metal clamps, a mounting spatula.
Buy tubes and clamps in advance
We remove the fuel module from the tank
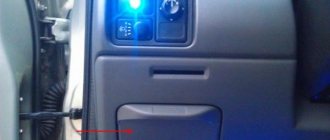
Replacing the Almera G15 fuel filter begins with dismantling the module. For this:
We pry up and open the plug, disconnect the power cable
- We fold back the lower part of the rear sofa.
- Remove the protective cover of the fuel supply unit. To do this, pry it off with a screwdriver.
- Having released the latch, disconnect the power supply block with wires from the module.
- The next step will require relieving the fuel pressure throughout the entire circuit. To do this, start the Almera G15 engine and wait until it stalls due to lack of gasoline.
- Turn off the ignition.
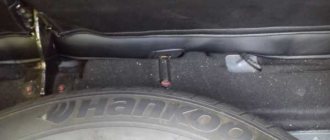
- Remove the tube from the module cover by squeezing the latch.
- Unscrew the retaining ring of the gasoline pump. It is more convenient to do this using a mounting spatula, resting against the stiffening ribs of the cover.
- Remove the rubber sealing ring.
Disconnect the fuel line, unscrew the fastening ring, remove the gasket
We remove the module from its seat along with the float of the gasoline level sensor.
You can make a puller
Disassembling the fuel module
After removing the fuel supply unit, you should drain all remaining gasoline from it into a previously prepared container. Cover the resulting hole in the gas tank with a rag or polyethylene to prevent dirt from entering. In the future, work should be carried out very carefully, since from the factory the Almera G15 gasoline supply module is designed to be replaced as an assembly. Follow the following disassembly order:
Disconnect the fuel level sensor wires, disconnect the clamp and remove the fuel level sensor,
- From the inside of the module cover, disconnect the power supply from the gasoline level sensor.
- Remove the fuel level sensor by removing it from the clamp.
- Remove the protective plastic casing of the filter element. It is held in place by three clips. In the inner part of the casing there is a gasoline pressure regulator and a valve.
- Further actions are performed on the opened part of the gasoline pump. Remove the rubber ring from the pressure regulating channel.
- Remove the filter element from the fuel pump.
- Using a screwdriver, press the latch and remove the module cover. This will open the spring and release it.
- From the inside of the cover, disconnect the fuel pump supply connector.
- The fuel pump is removed from the fuel filter.
We change the fine filter, connect the tubes and assemble.
We disconnect the three latches, remove the glass, carefully with the small gasket, remove the coarse filter
To replace the Almera G15 fine filter element, you will need to disconnect two corrugated tubes: from the pump and its cover. To do this, you will need to heat them with a stream of boiling water or a hair dryer.
Press the cover latch, remove the cover and spring, disconnect the wires
Prepare new ones in advance, as the tubes cannot be reinstalled. When performing assembly, the following sequence of actions is followed:
- A short tube is installed between the pump and the fine filter. First, you will also need to heat the ends of the plastic hose.
- The ends of the long tube are seated on the pump fitting on the module cover and on the fine filter.
We remove the fuel pump and disconnect the hoses
- The disconnected power chips are connected.
- A fuel level sensor and a protective cover are installed.
The final step will be to check the tightness after turning on the ignition.
Markers are visible at 10 o'clock, they should converge
Selecting a filter
Original fuel filters for Nissan are not available for sale separately. They can be purchased and replaced only as an assembly with a fuel pump. The part number for ordering the product is 17040–95F0B.
Analogs
As an analogue of the original filter mechanism for the fuel system of Nissan cars, they use devices from other automakers. Most often, a coarse filter from the Hyundai Accent (product code 31090–25000) or the domestic VAZ 2110–12 is used for this purpose. These parts, unlike the original, have a different shape for the installation part, which will have to be trimmed a little. From original spare parts, you will need a rubber ring to seal the module cover (17342–95F0A). Usually it has to be changed after damage due to careless dismantling of the cover.
The choice of fine filters is a little richer - this is the original part from Accent (article 31911–25000) or its SCT analogue with the number ST 399. These devices differ from the original Nissan filters in the location of the mounting point of the fuel pressure regulator. When installing them, you need to slightly trim the plastic body of the cup where the fuel pump is located. The installation of such elements has been repeatedly tested on Nissan cars produced in 2006, 2007 and 2008. For the Almera G15, the suitable filter is Francecar FCR 210141, which was successfully tested on a 2014 model.
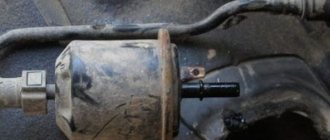
Fuel filter
Gasoline vehicles
Removal
Attention! Before removing the fuel filter, the system should be depressurized to prevent fuel from escaping. The pressure in the fuel system is maintained even after the engine is turned off.
In specialized workshops, to relieve pressure, they use a diagnostic tester connected to the diagnostic connector. When replacing the fuel filter yourself, you can use the following technique.
1 Start the engine and let it idle.
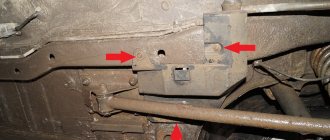
2 Open the fuse and relay box located in the engine compartment and disconnect the fuel pump relay with the engine running,
3 Turn off the ignition as soon as the engine stops. This will relieve pressure in the fuel system.
4 Reinstall the fuel pump relay
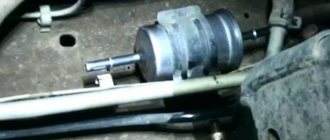
5 Disconnect the supply and return fuel hoses from the filter by loosening the fastening clamps, and remove the filter (see illustration).
- 6 Install a new fuel filter.
- Diesel vehicles
- Removal
- 7 Disconnect the plug of the condensate level sensor in the fuel filter.
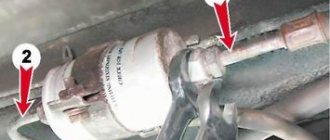
8 Remove the filter using the appropriate tool (see illustration).
Installation
9 Clean the surface of the filter on its cover.
10 Lubricate the O-ring of the new filter with a small amount of fuel (see illustration).
- 11 Screw the filter onto the lid until its O-ring seals, and then tighten the filter another 2/3 of a turn.
- 8.5 Disconnect the supply and return fuel hoses from the filter by loosening the fastening clamps, and remove the filter
Attention! When installing the fuel filter, follow the manufacturer's instructions on the housing. 12 Connect the plug of the condensate level sensor in the fuel filter
12 Connect the plug of the condensate level sensor in the fuel filter.
13 Use a manual priming pump to remove any air that has entered the system from the filter and fuel lines. To do this, perform several swings with the pump until noticeable resistance appears when pressed (see illustration).
14 Start the engine and check the fuel system for leaks.
Attention! If after starting the engine runs unevenly, then increase its speed 2-3 times by pressing the accelerator pedal. Attention! If the fuel tank has been completely emptied, then after refueling it is also necessary to remove air from the fuel system
Attention! If the fuel tank has been completely emptied, then after refueling it is also necessary to remove air from the fuel system. The fuel filter of a car with a diesel engine must be drained of accumulated condensate at certain intervals.
A signal that the condensate needs to be drained is when the light on the instrument panel lights up.
The fuel filter of a car with a diesel engine must be drained of accumulated condensate at certain intervals. A signal that the condensate needs to be drained is when the light on the instrument panel lights up.
15 Place a container under the fuel filter to collect condensate.
16 Loosen the drain plug on the fuel filter by 4-5 turns and drain the condensate (see illustration). To speed up the draining, make several swings with the manual pumping lever. Draining of the condensate is confirmed by the exit of clean fuel through the drain hole. When it comes out, the plug should be tightened.
Attention! To avoid splashing of condensate when draining, it is recommended to put a transparent hose on the drain plug
- 8.8 Remove the filter using a suitable tool
- 8.10 Lubricate the O-ring of the new filter with a small amount of fuel
- 8.13 Use a manual pump to remove any air that has entered the system from the filter and fuel lines.
- 8.16 Loosen the drain plug on the fuel filter by 4-5 turns and drain the condensate
When replacing the fuel filter or draining the condensate, it is recommended to check the condition and fastening of the fuel lines and fuel hoses and, if necessary, replace cracked, damaged or frayed hoses and pipelines with new ones. The clamps that secure the hoses to the pipelines must also be replaced if they are rusty and do not provide the required hose landings. The clamp should be 3 mm from the edge of the hose, and the clamp screw should be positioned so that it does not touch nearby parts (see illustration 8.0). The tightening torque of the fuel hose clamps is 1.0-1.5 Nm.
- After draining the condensate from the fuel filter, it is necessary to remove air from the fuel system,
- 8.0 The clamp should be 3 mm from the edge of the hose, and the clamp screw of the clamp should be positioned so that it does not touch nearby parts
Tools
If the fuel system is not able to fully perform its functions, this can lead to contamination of its components, which impairs the performance of the vehicle as a whole. It is often impossible to start a car with a clogged gasoline filter. According to experts, most breakdowns in Nissan cars can be prevented by promptly replacing engine oil, filters, transmission fluid and other consumables.
So, you have decided to clean or replace a fuel system component for your Nissan Almera Classic or N16. To do this, you will need to prepare the following materials and tools in advance:
- A lot of rags - keep in mind that some gasoline will spill out of the filter when dismantling it. You need to be careful and, when you take out the filter, immediately remove it from the car and not spill gasoline on the seats, because then dry cleaning the interior will be much more expensive.
- A small container (up to 400 ml) for collecting fuel from the fuel pump hose.
- Fire extinguisher. Situations are different, but when replacing a fuel filter or pump in general, do not forget - you are working with gasoline, so safety is paramount.
- Cleaning agent - either acetone or injector cleaner will do.
- Screwdriver Set.
- Set of wrenches.
Consequences of untimely replacement
The fuel pump supplies fuel to the engine. Therefore, if the filters are clogged, the engine will not start due to lack of gasoline. This problem is considered the most common. However, the Nissan Almera Classic fuel filter also performs another, more important function: due to the supply of fuel, the pump parts are cooled and lubricated. In this regard, the lack of fuel after turning on the ignition can lead to damage to this part.
In addition, dirty fuel filters on the Nissan Almera Classic are not able to remove small particles of dirt from gasoline. In such cases, the latter penetrate the system that pumps fuel. In extreme situations, dirt accumulates near the injectors, which ultimately leads to the need to replace these parts.
Detailed description of replacing the fuel filter and fuel pump
Replacing the Almera Classic fuel pump and filter must be performed in a sequence that will be discussed in detail below. The work will be carried out in three stages: extraction, disassembly and reinstallation.
Required parts and tools
The gasoline pump and filter components are replaced with the following tool:
- gas key
- set of open-end and ring wrenches
- pliers
- Phillips screwdriver and flat blade.
Replacing the Almera Classic fuel filter
You also need to prepare spare parts:
- coarse and fine filter
- fuel pump
- fuel tank flap gasket – 17342-95F0A
- hoses resistant to oil and gasoline, as well as clamps for fixing them
- rags
- solvent
- container for receiving remaining gasoline from the system.
Filter elements and a gasoline pump are selected according to the previously presented articles.
Removing the fuel module
Before dismantling the Almera Classic fuel module, it is necessary to completely relieve the gasoline pressure in the car system. To do this, repeat the following procedure three times at intervals of several minutes:
- Remove the fuse from the interior mounting block, which is responsible for the fuel pump;
- Start the Nissan Almera Classic engine;
- Wait until the engine stalls.
In the future, you will need to move into the car interior and perform the following steps:
- Fold down the lower part of the rear sofa;
- Clean the hatch cover and the area around it from dirt and dust;
- Remove the hatch cover by unscrewing the fasteners;
- Disconnect the supply cable from the fuel pump;
- Start the engine, wait until it stalls;
- Place the container, loosen the clamp of the fuel supply hose, remove the hose and lower it into the container. Wait until the remaining gasoline drains out.
Now you can proceed directly to dismantling the fuel module.
- Using the handles of the gas wrench, unscrew the locking ring of the module. It is necessary to rest them against special plastic protrusions, applying force in a counterclockwise direction;
- Carefully remove the module so as not to damage the fuel level sensor float
Let's sort it out
We begin disassembling the Almera Classic fuel module. It is recommended to follow the following sequence of actions:
- Using a flat blade screwdriver, press out the three plastic clips to dismantle the lower housing;
- The supply wire is disconnected from the gasoline level indicator;
- Holding three clamps, the pump and Almera Classic filter elements are removed;
- By loosening the clamp, the pressure sensor is disconnected;
- Use a rag soaked in solvent to wipe the internal cavity of the housing;
- The condition of the fuel pump, coarse and fine filters is assessed. The first is located at the bottom of the device and can be removed by hand. The second is secured with plastic latches, which should be released using a flat-head screwdriver;
- We compare prepared spare parts by size;
- All sealing rubber bands are removed from the fine filter.
Dirty coarse filter
Installation of a new fuel pump, filters and assembly
The process of reassembling the Almera Classic fuel supply system begins with the installation of sealing gaskets in the fine filter. Then:
- The fuel pump and fine filter element are mounted in its seat;
- Depending on the prefilter, it may be difficult to install. They are due to the presence of two plastic protrusions that prevent the element from being fixed to the fuel pump. Therefore, you will need to grind them off with a file;
- On the pressure sensor you will need to cut a suitable pipe, cutting off the curved part;
- When installing the pressure sensor into the seat, you will need to break off part of the fuel receiver housing, which will interfere with installation;
- We use an oil and gasoline resistant hose to connect the parts of the previously cut fuel pressure pipe. In this case, it is necessary to secure both ends of the hose with clamps. The sensor is secured using the original clamp;
- We install the lower part of the fuel module in place, having previously lubricated the fuel supply pipe. This will allow you to align the tube with the sealing rubber bands without excessive resistance.
All that remains is to install the module in its seat in the reverse order. Do not close the hatch cover until the fuel system is checked. To do this, start the engine and if everything is in order, then turn off the engine and screw the cover into place.