Filter at the inlet of the fuel pump - purpose
It is clear that the main purpose of the filter is to retain various contaminants. The mesh on the Lanos fuel pump (popularly also called a diaper) is a filter element for rough cleaning of fuel. It serves to prevent contaminants from entering the fuel pump.
The absence of a mesh will lead to accelerated failure of the pump. That is why a mesh is installed at the entrance to the gasoline pump to prevent large and medium-sized contaminants from entering the electrical mechanism. After the fuel pump there is another filter, which is designed to clean the gasoline pumped from the tank to the fuel rail. The absence of this filter will lead to accelerated clogging of the injectors and a decrease in their performance.
Where is the relay located?
The part on cars is installed mainly together with all the fuses, but in some brands of cars there is also a different arrangement of devices. In cars with an injector, the relays can be located both under the hood and under the instrument panel. Most often, the fuel pump relay is located in the following places:
- Near the ABS blocks.
- Near the fuel injection control unit.
- Under the dashboard. Most often it is installed on the passenger side under the dashboard.
Since the fuel pump relay ensures the supply of fuel, it is sometimes worth diagnosing the part so that an unpleasant breakdown does not cause a premature end to the trip.
When to change the fuel pump mesh Lanos, Sense and Chance
Any filter becomes dirty over time, and this also applies to the mesh installed at the inlet of the gas pump. When the element becomes clogged, there is a decrease in its throughput, resulting in a decrease in the amount of intake fuel. Reduced gasoline absorption has a negative effect not only on the fuel pump itself, but also on the functioning of the engine. A clogged mesh of the Lanos suction device leads to the following consequences:
- The load on the pump electric motor increases, causing it to heat up more. This reduces the service life of the device
- The absorption of the amount of fuel decreases, which ultimately leads to a decrease in the quality of cooling of the pump electric motor.
- The pressure in the fuel line decreases, which negatively affects the functioning of the internal combustion engine
The main signs of a clogged fuel pump filter on Lanos are:
- Problem starting the engine due to low pressure in the fuel line
- The engine does not start at all if the filter is heavily clogged
- When the car moves, jerking and jerking appears, indicating problems with the fuel supply
If the above symptoms occur on Lanos, it is necessary to resort to replacing the part. Every driver can cope with this, but the biggest drawback of the process of replacing the fuel pump grid on Lanos is that this will require dismantling the entire module.
This is interesting!
Some drivers prefer to clean it instead of replacing the mesh. This is not a rational approach to such an event, since it is impossible to clean the element to perfect condition. However, this method is suitable when the engine does not start due to a clogged filter mesh, but you still need to get home or to a car service center.
Cleaning the injectors
Cleaning and washing the engine injectors, as well as replacing the fuel pump mesh on a Chevrolet Lanos, is necessary every 30,000-35,000 mileage (and with the current quality of gasoline, even more often). There are several washing options:
- Flushing the injector with specialized fuel additives is the easiest and most affordable cleaning option, but also the most questionable. These additives become effective when regularly added to gasoline;
- Cleaning without removing from the engine
- instead of the factory power supply system, a unit is connected to the injectors that supplies a special cleaning solvent, the engine runs on it for 20-30 minutes. The efficiency of this method is very high; all deposits are removed from the injectors without leaving any residue; - Cleaning on an ultrasonic stand
is considered the most effective way of washing and cleaning. The advantage is that there is no need for an expensive solvent, but you have to remove the injectors from the engine; - * We also recommend reading the article “How to wash injector nozzles.” Everything is explained there in detail.
There are also ways to wash it yourself; with the right approach, it will be no less effective, but we’ll talk about that separately.
Instructions for replacing the fuel pump mesh on Chevrolet, ZAZ and Daewoo Lanos, Sens and Chance
It should be noted right away that the resource of this filter element ranges from 50 to 100 thousand kilometers. It all depends on the quality of the gasoline being poured into the tank, but you can refuel once unsuccessfully and, at best, end up having to replace the filter, and in the worst case, you will have to change the fuel pump.
Next, we’ll look at how to replace the Lanos fuel pump mesh yourself, and what you’ll need for this. When carrying out the work, you will need a minimum set of tools, consisting of a flat or slotted screwdriver, steel wire and a hair dryer. To replace the mesh, you will need to remove the entire fuel pump module. How to do this yourself is described in detail in the material on removing the gas tank or instructions for replacing the Lanos fuel pump. The process of dismantling the fuel pump assembly with the mesh must begin by disconnecting the negative terminal of the battery.
After the fuel pump module assembly is removed from the mounting hole of the tank, we proceed to further steps to replace the strainer:
- After removing the pump, there will be some fuel left in it, which can be drained back into the tank or container by turning it upside down
- We place the entire mechanism assembly on a clean cloth or newspaper, and proceed to replacing the mesh
- The first step is to dismantle the float, for which the plastic clip in the shape of the letter “C” is removed. To remove the clip, you need to squeeze it and remove it from its seat.
- To get to the fuel pump coarse filter, you should remove the top cover of the plastic flask. It is attached using three protruding slots, which you need to press with a screwdriver.
- Before removing the top cap of the flask, you need to disconnect the power supply connector for the fuel level sensor. This sensor is attached to the outer flask (also called a glass)
- Next, we move on to dismantling the inner flask with the fuel pump, since the mesh is attached specifically to it. You can dismantle the inner flask using strong steel wire, from which you need to make a hook. An example of such a hook is shown in the photo below.
- The hook is needed to dismantle the inner flask (with the fuel pump), to which the mesh is attached. This flask is fixed using an internal protrusion along the circumference on the outer flask. The photo below shows a protrusion in the inner part of the outer flask, through which the fuel pump bracket with filter is fixed
- To simplify the process of dismantling the inner flask, it is necessary to heat the walls of the outer bowl with a hairdryer. This will lead to its expansion, which will allow you to easily and quickly remove the flask (it is important not to overdo it with a hairdryer)
- Using a hook, you need to hook onto the plastic protrusion on the inner flask and pull towards you (moderately). To increase the effectiveness of actions, efforts should be made alternately at several points. As a result, the inner flask with the fuel pump and the mesh located at the bottom is removed
- It is this mesh that needs to be replaced, having previously assessed its condition
- In 100% of cases, the inside of the outer flask will have contaminants that should be removed
- Let's start removing the mesh, for which you first need to remove the locking ring (washer) by prying it off with a screwdriver
- The old filter is removed, replaced by a new one, and secured with a retaining ring. It is recommended to purchase a new ring, since when it is removed, the quality of fixation has significantly decreased. If you install an old ring, there is a high probability that the mesh may come loose during use.
- We install the Lanos gas tank mesh in place and carry out the assembly in the reverse order
The procedure for replacing the gas tank mesh is not difficult, but it is very responsible, since the work is carried out with parts that are coated with highly flammable substances.
After assembling and installing the fuel pump with the new element in place, you can put the negative terminal on the battery and turn on the ignition. When the pump pumps gasoline and turns off, you can start the engine. This completes the process of replacing the fuel pump mesh.
This is interesting! Two types of fuel pump modules TA and TG were installed on Lanos. The principle of replacing the mesh on TG type devices is discussed above. Blocks of the TA type differ in that the mesh on them is located on the outside. You can read more about the differences between the modules here.
Replacement process
Let's start with the fact that the fuel pump is sold assembled, which simplifies the replacement process. With special tools, you only need a puller key to remove the disk, but you can make do with improvised means so as not to waste money.
So, let's proceed directly to the process:
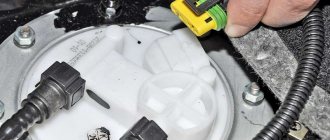
We carry out the work to replace the fuel level indicator sensor, the resistor of the fuel reserve indicator lamp or the fuel module assembly. Relieve pressure in the power system. Disconnect the wire terminal from the negative terminal of the battery. Inside the car, raise the rear seat cushion. Using a slotted screwdriver, pry off the cover of the fuel module hatch and remove the cover.
To disconnect the engine management system wiring harness block from the fuel module cover connector, move the engine management system wiring harness block blocker (orange)…
...and, pressing the latch at the rear of the wiring harness block...
Squeeze the clamp on the tip of the drain pipe...
...and remove the tube tip from the fitting of the fuel module cover.
We remove the fuel module from the opening of the fuel tank.
The connection of the fuel module cover with the flange of the tank opening is sealed with a rubber ring.
Pump selection
Source
Selecting a fuel pump strainer for Lanos, Sens and Chance and its features
Before you start replacing the fuel pump strainer on Lanos, Sense and Chance, you must first purchase the part. Meshes for fuel pumps for Lanos are produced by different manufacturers. Before deciding on the manufacturer, you need to find out what diameter of the filter element you need to buy. Fuel pump screens for Lanos are available in different diameters: 11 mm and 22 mm. How they differ, and how to understand what diameter filter element to buy for a gas pump, we will find out further.
- New 11 mm mesh - designed for Lanos and Sens cars from 2003
- Old-style mesh 22 mm - for Sens and Lanos cars until 2002
These parameters need to be taken into account, since during the replacement process it may turn out that you bought the mesh of the wrong size, and it will need to be changed. Which manufacturer is the best product to buy? Today, the products in question are produced by the following companies:
- FSO is a Polish manufacturer characterized by the production of reliable and affordable spare parts. Part number for the fuel pump for Lanos is 96350589
- ICRBI is a Chinese manufacturer that produces spare parts of no worse quality than FSO. Part number 13042081
The price of the spare part in question is not so high as to save on it and sacrifice the quality of the engine. As a result, it should be noted that the procedure for replacing the mesh takes a little time, and most importantly, you can do it yourself.
Design and types of fuel level sensors
The fuel level sensor on Lanos cars is located directly in the gas tank. This device is a potentiometric device or variable resistor, which has a number of advantages:
- Simplicity of design
- Reading accuracy
- Reliability
- Low cost
Among the disadvantages, it can be noted that due to the simplicity of the design, the device tends to wear out during operation. This wear is especially accelerated when the driver adheres to the refueling method when the gas tank is completely empty. To understand why the device fails, let’s look at its design.
A potentiometric device consists of a group of contacts, some of which are movable. Due to this mobility of contacts, the filling of the gas tank with fuel is determined. When the moving contact (slider) moves, it rubs against a fixed scale, consisting of conductive marks made of resistive material. During the friction process, the fixed scale wears out, which causes malfunctions such as incorrect readings or a complete malfunction of the fuel gauge on the Lanos instrument panel. The photo below shows the design of a potentiometric fuel level sensor, which is used on Chevrolet and Daewoo Lanos cars. Such sensors are called lever sensors, but there are other types of such devices.
FLS on cars, installed directly in the gas tank, are of the following types:
- Lever or float
- Tubular
The principle of operation of both types of sensors is the same, and it is based on the fact that the float connected to the moving contact of the sensor takes the corresponding position on the fixed contacts. As the gas tank empties, the position of the float decreases, which means that the moving contact moves along a fixed scale. The amount of fuel in the tank is measured due to the fact that an electric current flows through fixed contacts. By changing its position with the moving contact, the resistance increases or decreases, on the basis of which the level of gasoline in the container is determined.
If a lever sensor is a block consisting of a fixed resistive scale and a moving contact connected to a float, then a tubular sensor is a separate container. This container is presented in the form of a tube, which is filled with gasoline. Inside the tube there is a float that changes its position depending on the fuel level in the tank. The float is connected to a movable contact that moves along a fixed resistive scale. The advantage of a tubular sensor is that it is possible to determine the amount of fuel in the tank more accurately than when using lever devices.
This is interesting! The disadvantage of a tubular fuel level sensor is that it is not suitable for use in all cars, which depends on the geometric parameters of the tank.
Lanos cars with nameplates from various Chevrolet, ZAZ and Daewoo factories, as well as Sens and Chance, use lever-type fuel level sensors. They are located directly inside the gas tank, and they are attached to the fuel pump module.
Checking the fuel pump directly
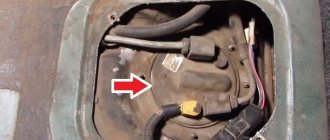
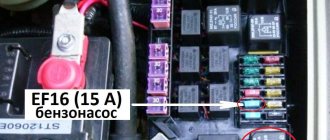
Having suffered a fair amount, it’s time to suffer even more... To gain access to the fuel pump cover, you need to “pull” the rear sofa: it is attached in two places to the floor (seen in the photo above), approximately in those places you need to pull. We removed the sofa - we unscrew the cover with a screwdriver and see the fuel pump connector (in the photo above on the right). To check the fuel pump directly, excluding all other elements of the car's electrical wiring, you need to apply voltage to the fuel pump directly from the battery. To do this, you first need to find which contacts in connector C901 are responsible for powering the fuel pump.
The picture above shows a connector (or, as people say, a chip) of a fuel pump (view from the pins). I didn’t remove the fuel pump from the gas tank, I just used a long wire to connect it to the battery. The fuel pump turned out to be alive!
Having experienced some bewilderment in connection with the diagnostic information received (the pump is working, the fuse is working, the relay is working - all the obvious participants in the circuit are working!), I decided to use a tester to check the voltage on the second half of the fuel pump connector (C901), coming from the bowels of the car. There was tension on him! That is, voltage was supplied to the fuel pump, the fuel pump was working, but did not work! How is this possible, you ask?
Why this situation has arisen and what transient contact resistance is, I will tell you in the next part of my adventures as a car enthusiast: Lanos (Lanos 1.5) will not start, part 2: the “Check” does not light up, the fuel pump or “C301 connector” does not hum
What fuel pressure in the rail should be
Normal pressure is considered to be 2.5 atmospheres at idle. When gas is added, the pressure briefly increases to 3-3.2 atmospheres - this is a kind of imitation of an accelerator pump, like on a carburetor. These indicators are influenced by several factors:
- rail pressure regulator;
- fuel pump performance.
If the fuel pump does not provide the proper pressure, then there will be no pressure in the ramp. But within certain limits, the ECU will be able to compensate for this by increasing the injection time. But at low pressure, the accelerator pump imitation will not work, which will lead to failures.
A working fuel pump gives a pressure of about 5-7 atmospheres. But then how does 2.5-3 stay on the ramp? It's simple - the pressure regulator in the fuel rail is responsible for this. This is a small bypass valve, which is located on the rack, in the area of the fourth cylinder. Structurally, the pressure regulator is made in the form of a spring-loaded valve, which is also connected to a vacuum membrane.
You've probably seen that the rail pressure regulator is connected by a thin tube to the intake manifold. If it is disconnected from the manifold, it will maintain pressure due to the spring, and it will be equal to 3-3.2 atmospheres. And when the vacuum tube is connected, not only the spring, but also the membrane acts on the valve stem. Thus, the regulator has the ability to further adjust the fuel pressure in the rail due to changes in the vacuum in the manifold.