VAZ 2110 gearbox diagram
The operating scheme is as follows: the main shaft (29) is made in the form of a drive gear block, which is meshed with the driven gears of all forward gears. The countershaft (25) is a hollow shaft with a removable drive gear (3) for the final drive. The countershaft is equipped with driven pulleys (16, 18, 19, 21, 23) and synchronizers (17, 20, 24) for the forward gears. The front bearings (4, 31) are roller bearings, and the rear bearings (22, 28) are ball bearings. Under the front bearing of the countershaft there is an oil trap (5), which directs the flow of oil to the countershaft and then down to the driven pulley.
The differential is a double shaft. The differential bearing preload is adjusted using the thickness of the adjusting ring (13). The differential housing flange fits into the driven gear (12) of the final drive.
Gear shift drive diagram
| 1 — gear selector lever. | 10 - Rotary sleeve. |
| 2 — Gear selector lever. | 11 - connecting part. |
| 3 - Gearbox housing. | 12 - Clamp. |
| 4 - Clutch housing. | 13 — Lever cover. |
| 5 — Gear selector lever. | 14 — Gearbox control lever. |
| 6 — Lever bushing. | 15 — Gear shift lever. |
| 7 — Piston rod oil seal. | 16 - Ball cage. |
| 8 - Protective cover. | 17 — Ball bearing on the gear shift lever. |
| 9 - Union. | 18 - Jet rod. |
The gear shift control actuator consists of a gear shift lever (15), a ball joint (17), a rod (14), a gear selector lever (5) and a gear selector and shift mechanism (off "P").
To prevent spontaneous separation of P due to axial movement of the power unit on its mounts while the vehicle is moving, reaction rods (18) are introduced into the gearbox, which are connected at one end to the power unit, and at the other end are connected to the cage (16) of the ball bearing rod (15), which displaces P .
A lever (1) is attached to the inner end of the rod (5), which acts on the three-way lever (2) of the P-selector mechanism. This mechanism is made as a separate unit and is attached to the plane of the clutch housing.
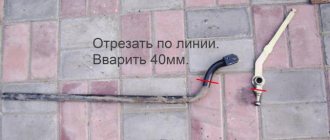
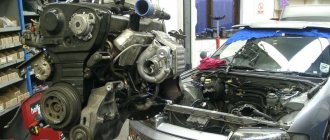
Removal and installation of gearbox 2108,2110,2112,2118, Kalina
Removing and installing the gearbox, replacing the VAZ clutch.
GENERAL INFORMATION Recommendation Remove the gearbox with an assistant.
EXECUTION ORDER
Remove the battery, drain the gearbox oil and remove the starter
Disconnect the block with wires from the speed sensor by squeezing the spring clips.
Remove bolt 1 securing the ignition module bracket to the gearbox and two bolts of the upper gearbox mounting to the engine. Bolt 2 (front of the car) is short, bolt 3 is long.
At the bottom of the car, disconnect the block with wires from the reverse light switch.
Remove the two bolts securing the torque rod bracket to the gearbox.
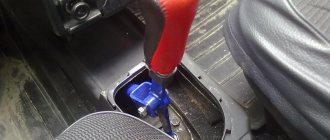
Loosen the bolt of the gear shift rod clamp and disconnect the rod from the gear selector rod hinge by sliding it back.
Remove the wheel drives. Tie the plug inserted in place of one of the drives with a rope or wire so that it does not fall out when removing the box. The right drive does not need to be completely removed. It is enough to disconnect it from the gearbox and, moving it to the side, hang it from the body.
To make it easier to remove the box, unscrew the two mounting bolts and disconnect the left ball joint from the steering knuckle
Unscrew the nut of the lower right mounting of gearbox 1 to the engine (engine side)
Please note that on models with a fuel injection system, an intake pipe support bracket 2 is installed under this nut, which must be removed from the stud. If necessary, loosen the upper nut securing this bracket.
If necessary, loosen the top nut securing this bracket.
Unscrew the three fastening bolts and remove the lower cover 1 of the clutch housing 2.
Remove the bolt from the lower left mounting of the gearbox to the engine. Suspend the engine using a hoist or board.
From the bottom of the car, unscrew the nut securing the left power unit support.
Unscrew the two nuts securing the rear power unit mount to the body.
Unscrew the two bolts securing the rear support of the power unit to the gearbox, holding the nuts from turning with a second wrench, and remove the support.
By inserting a screwdriver between the clutch housing and the cylinder block, slide the gearbox off the guide bushings. Be sure to hold it while doing this.
Typical gearbox faults
The VAZ 2110 gearbox breaks down relatively rarely; it is one of the most reliable car units. If you carry out routine maintenance in a timely manner and buy oil for the VAZ 2110 gearbox from a trusted supplier, the car will not let its owner down. If regulations are violated, or when operating in extreme conditions, certain problems may arise.
Possible gearbox breakdowns, their causes and repairs.
| Fault type. | Cause of malfunction. | Repair. |
| Extraneous sounds while driving. | The cause of extraneous noise may be wear of gears, bearings, and synchronizer blocking rings. | You need to check the oil level. If it is below the minimum, immediately fill the box with oil to the maximum level. Repair involves replacing failed parts. Specific diagnostics require disassembling the unit and visually inspecting the parts, unless the gearbox cushion needs to be replaced. |
| Leaking lubricant. | Transmission oil for the VAZ 2110 can leak from worn constant velocity joints and a carelessly reinforced box cover. Oil from the gearbox may leak through the input shaft seals due to wear of the gear selector rod. The cause of fluid leakage from the box may be wear of the seals. | Repair consists of replacing oil seals and other worn elements. While working, it is necessary to tighten the bolts and nuts and tighten the drain plug tightly. Specific diagnostics and repairs require disassembling the unit. |
| Spontaneous shutdown of gear (usually first and second). | The reason for the shutdown is often significant engine vibrations as a result of wear of the rubber elements of the rear supports. Gears are often not fully engaged due to insufficiently precise adjustment of the drives. Often the reason is worn out synchronizers. If the gear is knocked out when hitting a bump, this indicates a failure of the clutch. | Repair consists of adjusting the unit or replacing worn or damaged parts. |
The last item on the list differs from the previous ones in that troubleshooting may not require disassembling the box.
Experienced professionals can sometimes distinguish the specific humming of specific parts that have failed “by ear”, even before disassembling the unit, determining what exactly needs to be replaced. But this method of diagnosing faults is available only to great masters, and even then not always.
Changing the oil
According to the documentation, the lubricant component in VAZ 2110 engines and transmissions must be changed every 15 thousand kilometers or at least once a year.
So, we need to warm up the engine well and prepare the required oil and, preferably, a new oil filter, as well as the tools necessary for the job.
gearbox housing 2110
To drain the waste, you will need to unscrew the plug from the oil pan. Next, within 10-15 minutes, the oil is drained into a special container, which will need to be prepared in advance. Then the drain plug returns to its original position and is screwed tightly. Now you can replace the old oil filter with a new one (if necessary).
Now that the old oil has been drained, pay attention to its color and presence of inclusions. If the oil is dark brown in color and to the touch contains various types of inclusions such as metal dust or pieces of dirt, then the transmission will need to be flushed
DON'T SPEND MONEY ON REPAINTING! Now you can remove any scratch from the body of your car in just 5 seconds.
For this purpose, special solutions are used, which are poured into the engine and gearbox before new oil. In this case, you will need to drive the car with such a solution for a short time and not quickly, five minutes along the garage will be enough, and then drain the mixture and the dirt that it has collected in the same way as described for the process of draining the “working off”.
In order to fill with fresh oil, you will need to remove the filler cap. In this case, from 3 to 4 liters of oil are poured into the engine, depending on the readings of the dipstick. Ideally, the oil level is between the min. marks. and max.
These marks are marked on the dipstick as the minimum and maximum values. Next, you will need to start the engine and wait until the oil light (or oil pressure light) goes out. After this, turn off the engine, check the oil level and, if necessary, remove excess or add more oil.
There are times when the light bulb just won't go off. In such cases, it is better to check the quality of the oil filter or replace it if it was not changed during the replacement process.
Possible problems and troubleshooting
| Causes of problems | Remedies |
| Difficulty shifting gears | |
|
|
| Noises in manual transmission | |
|
|
| Oil leak in manual transmission | |
|
|
| Transmissions switch off spontaneously | |
|
|
Troubleshooting
Many transmission malfunctions that cause the reverse gear to disappear or fall out can be eliminated without removing the unit from the car.
VAZ 2110 will not start. Revival. Reverse gear does not engage.
If the cause is a loosening of the bolt securing the clamp on the rod, then to correct the defect it is necessary:
- Place the car on a lift.
- Completely loosen the clamp nut.
- Place the gearshift lever in the fully engaged reverse gear position.
- Fully engage reverse gear at the gearbox using the shift rod on the crankcase.
- Tighten the clamp mounting bolt.
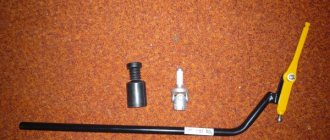
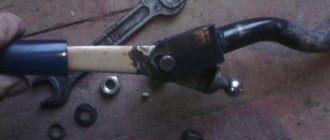
Spring replacement
Often, owners change the entire mechanism assembly, which costs on average about 2 thousand rubles. But you can disassemble the mechanism and get by with replacing the spring, which costs up to 50 rubles.
You need to do the following:
- Remove the stopper from the blocker axle and remove the axle itself.
- Unscrew the lever axle nut.
- Remove the axle and replace the spring.
- Reassemble in reverse order.
Repair procedure
I want to share some important points about repairs.
The reasons why I decided to start repairing it:
1. Oil leak. As it turned out, the problem was not only in the gearbox, oil was also leaking from the rear crankshaft oil seal. The Victor Reinz seal failed. More on this later. 2. There was noise coming from the box due to bearing wear. It was especially audible when the temperature outside dropped below minus 5 degrees. As the engine warmed up, the gearbox warmed up and the noise became quieter. 3. Problem with engaging first gear. Sometimes you stand at a crossroads and can’t get the first one in. When turned on, a slight crunching sound was heard. Sounds familiar, right? 4. The second gear was engaged with tension.
We remove the box. I won’t describe how to do this, there is a lot of information on the Internet. To make it easier to remove the box, drain the oil, remove the drive and the entire left rack with levers. Place the machine on a stand.
Wash the outside of the box very thoroughly. It doesn’t matter how you do it, the main thing is that water doesn’t get inside. To do this, it is necessary to plug the holes under the shafts, since sand from the outside will definitely get inside. Sand inside the box is certain death.
Be sure to remove the speed sensor. I didn't and broke it.
Cleaned the checkpoint. Started the disassembly procedure
Disassembling and assembling the synchronizer
Synchronizers of 1st–2nd, 3rd–4th and 5th gears are disassembled and assembled in the same way. We show the disassembly and assembly of a synchronizer using the example of a 5th gear synchronizer. Before disassembling, we mark the blocking rings and their position relative to the synchronizer clutch. Remove the blocking rings. We mark the position of the hub relative to the coupling and the position of the crackers relative to the grooves of the hub, so that during subsequent assembly they will be installed in their original places.
To disassemble the synchronizer...
...carefully slide the coupling along the hub, holding the balls with your hand to prevent them from “shooting out”.
5th gear synchronizer parts
:
1 - coupling;
2 - ball;
3 - cracker;
4 - spring;
5 — hub Before assembly, inspect the synchronizer parts. Nicks and chips on the splines of the hub and coupling, the gear rims of the locking rings and the coupling are unacceptable. We replace defective parts with new ones. If there is significant wear on the working conical surface of the blocking ring (the minimum permissible axial clearance between the ends of the gear rims of the gear and the blocking ring is 0.6 mm), it must be replaced.
For ease of assembly of the synchronizer, generously lubricate the springs, crackers and balls with grease.
Putting the hub on the workbench...
...we insert springs into the hub sockets, and crackers into the grooves (in accordance with the previously applied marks). We insert the assembled hub into the coupling, orienting it so that when the ball is subsequently installed...
... it was located exactly in the middle part of the coupling groove - in its deepest place.
Place balls in the holes of the crackers...
...and, pressing each ball in turn with a screwdriver... ...we push the hub along the splines of the coupling.
When installing a synchronizing shaft on the synchronizing shaft, the grooves on the coupling and hub must face:
— for the synchronizer of 1st–2nd gears — to the 1st gear gear;
— for the 3rd–4th gear synchronizer — to the 3rd gear gear;
- for the 5th gear synchronizer - to the thrust plate of the shaft bearings.
Grooves on the clutch and synchronizer hub
Troubleshooting
Disassemble the box. Wash the insides of the gearbox with clean diesel fuel. Carefully inspect all teeth on all gears, clutches and synchronizers. A microscope helped me in this matter. To my regret, the teeth on gears 1, 3 and 4 were partially or completely missing. With the first gear everything is clear, this was the reason for the poor engagement. But in 3rd and 4th gear, I still didn’t understand why there were no teeth. The teeth of the reverse gear seem to have been cut off. I also noticed that there was a lot of wear on the 1st and 2nd gear forks, this was the reason for the inclusion of the second gear with a crunch. All clutches and 2nd gear are in perfect condition.
Missing teeth on 1st gear gear
The process of checking parts under a microscope
The synchronizers in all gears were in excellent condition. The gap between the gear and the synchronizer was 0.9 - 1 mm. Please note that there are new and old synchronizers. To avoid mistakes when purchasing, take old synchronizers and gears with you. Try it on in the store.
Photo taken from the Internet
Product delivery options
Note! Below are the shipping methods available specifically for this product. Payment options may vary depending on the delivery method.
Detailed information can be found on the “Delivery and Payment” page.
Parcel by Russian Post
Available payment methods:
- Cash on delivery (payment upon receipt)
- Using cards Sberbank, VTB, Post Bank, Tinkoff
- Yandex money
- QIWI
- ROBOKASSA
Shipping throughout Russia. Delivery time is from 5 to 12 days.
Parcel by Russian Post 1st class
Available payment methods:
- Cash on delivery (payment upon receipt)
- Using cards Sberbank, VTB, Post Bank, Tinkoff
- Yandex money
- QIWI
- ROBOKASSA
Shipping throughout Russia. Delivery time is from 2 to 5 days. More expensive than regular delivery by Russian Post, approximately 50%. Parcel weight up to 2.5 kg
Bearing selection
The bearings of the primary and secondary shafts were installed with the marking “APP-group” (Kirelis LLC). Strange marking, I don’t know this company. After searching on the Internet, I realized that these are Chinese bearings, the price of which ranges from 80 to 90 rubles. Now it’s clear why the box was “rustling.” We purchase “factory” bearings from SKF, SNR and Torque.
Bearing selection
Let's start comparing. All bearings are of very good quality. The quality of processing is at a very high level, but if you compare the quality of sliding, then SKF is unrivaled. (May our factories forgive me). The inner race of the bearing seems to slide relative to the outer race. But the price of imported ones is 3 times more expensive than ours. Here you need to understand whether it is worth it or not. I wanted to make the checkpoint as high quality as possible. Therefore, the choice fell on SKF.
SKF bearings
Finding a new synchronizer
Since the synchronizer is assembled for a specific gearbox, there is no reason to think that the mechanism from one car can be installed on the gearbox of another car. Of course, the operating principle of these two mechanisms will be the same, but, for example, their geometry may be different. It would be best to select a spare part according to:
- Vehicle VIN code;
- Code of an already installed synchronizer;
- Parameters of the vehicle and its gearbox.
- Onnuri (South Korea);
- Transporterparts (France);
- KAP (South Korea);
- Omix-ADA (USA).
Also, synchronizer components can be found in the catalogs of major European packers. The quality of these spare parts, as noted by car enthusiasts, is not always high. But spare parts from South Korean companies, on the contrary, please with both price and workmanship. As for assembled synchronizers, they can only be found under the names of automakers, i.e. originals . If you wish, you can save on buying a mechanism by choosing an option at a dismantling shop. If you are interested in purchasing a spare part with the longest service life, it is better to buy a new original.
Selection of seals
BRT and Corteco oil seals were purchased. I checked the quality of the seals visually and by touch. In terms of appearance, the input shaft oil seal was chosen from Corteco. All appearance indicated a high-quality oil seal. But during installation, it was installed very tightly and, as a result, became deformed. I had to install the BRT oil seal, it installed with a slight interference fit.
Comparing input shaft seals
Comparing input shaft seals
The drive seals were immediately selected from BRT. Visually and to the touch they gave a pleasant impression of a high-quality oil seal. Installed without problems. After installing the seals, I checked the parallelism of the installation with a caliper. I didn't like the drive seals from Corteco.
Gearbox seals
Checking the correct installation of oil seals
Replaced the rear crankshaft oil seal from Victor Reinz with Corteco. The Victor Reinz seal was very soft and visually perfect, but for some reason oil was leaking through it. Before installation, I compared the rear oil seal BRT and Corteco. The BRT seal was made terribly. There is some kind of flaking on the working surface around the entire perimeter, which is generally unacceptable. A bunch of strange extra rubber. Visually it was terrible and did not give the impression of a quality seal.
Victor Reinz crankshaft rear oil seal. It leaked for reasons unknown to me.
Victor Reinz crankshaft rear oil seal. I don't recommend it!
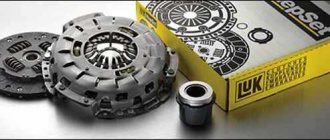
Clutch
Replaced the basket, clutch disc and release plate. Installed by LUK. The result exceeded all my expectations. Soft, very smooth starting, on a hill it is very easy to catch a “dead spot”. The grip is amazing. The main thing after installation is to adjust the pedal so that the free play of the pedal is 125-130 mm.
Great clutch from LUK.
Installed clutch from LUK
And now the most important thing!
Where was the noise coming from? These were the differential bearings. 2 years ago I had the gearbox repaired, apparently, the guys didn’t have adjusting rings and they decided to sharpen the differential bearing and put a ring in there! In my opinion, this is unacceptable! The required preload was not provided, which is why the bearings were pinched and simply burned out. The bearing rollers had concentric stripes on them, indicating that they were operating in a clamped state. Darkened stripes were also visible on the bearing races, which indicated that the bearings were heating up.
Differential bearing race
Replacing the differential bearing.
Clamp the differential in a vice. Place a thick chisel between the bearing and the differential housing. We hit the chisel with a sharp blow with a hammer. The chisel should not be sharp or thin, otherwise there is a possibility of damaging the differential axle. After the bearing has moved a little, install a stop in the center of the differential axis and pull off the bearing with a puller. Do not throw away old bearings! The inner race will help you drive new bearings. Place the new bearing on the differential axle, place the old bearing on the bottom, and do the same on top. Apply a blow to the old clip with a hammer. Thus, the new bearings fit evenly on the axle.
Removing the differential bearing. Photo from the Internet
Old differential bearing races can be removed from the gearbox housing with hooks or knocked out through the drive seals with a spacer. Naturally, the seals will need to be changed in this case. Adjusting the differential.
Remove both gearbox bearing races.
Under one of both there is an adjustment ring. Using this ring, the preload is adjusted. Many people confuse the concepts of preload and clearance. Preload is the applied constant load that acts on the rolling elements and rings inside the bearing. Preload can be considered negative internal clearance. According to the book it should be 0.25±0.1 mm. It is necessary to determine the free play of the differential and add 0.25 mm to it. By selecting the adjusting ring in this way, we will ensure preload. In this case, the bearing will operate “under load”, as it should be. The procedure for selecting an adjusting washer to create preload in the differential bearings
: 1. Remove the adjusting ring from under the differential bearing race. 2. Clean and remove all dirt from the differential bearing seats. 3. Drive new differential bearing races into the gearbox housing, without the adjusting washer. To do this, we use old bearing races as mandrels.
Installing the differential cage
4. Lubricate the new bearing races with transmission oil. 5. Install the differential inside the box body and tighten it with 4 nuts with a force of 24 N*m.
Tighten the gearbox housing with 4 nuts as in the photo
6. Install a dial indicator on top of the differential. 7. From below we use the old internal grenade. Press down from below with an old grenade with an iron ball installed in the center. That, in turn, puts pressure on the satellite and the differential moves up.
Checking differential play
8. Using the clock indicator, read the free play of the differential. In my case it was 0.72 mm. 9. Calculate the thickness of the differential shim.
Calculation of the thickness of the differential shim
X = A+B+C (mm) where X is the thickness of the desired adjusting washer. A – free play of the differential without a washer. In my case, it was 0.72 mm B - the preload value, according to the VAZ it should be 0.25 ± 0.1 mm. C – thickness of the box sealing element. In my case it will be equal to 0.15 mm, since I will be collecting sealant. I found the meaning on the Internet. Some claim that if you assemble it with a gasket, the gap will be 0.25 mm. You need to measure everything with a micrometer in place. So, the thickness of my ring was X=0.73+0.25+0.15 = 1.12 mm. After thinking a little, I decided that there might have been errors in the measurements and therefore ordered 3 rings of different thicknesses from production: 1, 1.1, 1.2 mm. All were manufactured in plus 0.01 mm. To do this, I bought 3 rings that secure the 6305N gearbox bearings. The thickness of the rings is 1.7 mm. Using these rings on a sanding machine, I was able to make 3 rings of the required thickness. As it turned out, it was not in vain. As a result, I installed a ring with a thickness of 1.2 mm, because... it provided the necessary preload.
Checking the thickness of the differential shim
ready-made washers of different thicknesses
Checking the manufactured ring showed that along the entire perimeter of the ring the change in thickness does not exceed ±0.01 mm.
Checking the quality of the manufactured washer
Checking the correct selection of the adjusting washer.
1. Unscrew the gearbox 2. Remove the differential. 3. Remove the differential bearing race from the gearbox housing. 4. Install the adjusting washer. Hammer the bearing race. 5. Place plain A4 paper in a circle. The thickness of the paper is 0.1, thereby compensating for the sealant that will be used when assembling the gearbox.
Cutout for satellite axis
Bend under the collar
6. Take an aluminum tube. We cut a cutout for the satellite axis. On the other side, bend the tube under the square of the knob. 7. Insert an aluminum pipe into the gearbox drive hole, resting the cutout against the satellite axis. Insert a knob into the tube. I had a 40 cm collar.
Checking preload
8. Make 3-4 full turns and then hook the scales onto the edge of the knob and pull. My force at which the shaft begins to rotate was 610 grams.
Force in grams
We open the book on the VAZ and read: “The force for new bearings is 147 – 343 N*cm (15-35 kgf*cm), for run-in bearings at least 30 N*cm (3 kgf*cm).”
It is necessary to convert the value into grams for a 40 cm long knob. Convert centimeters to meters A1 = 15 cm = 0.15 m; A2 = 35 cm = 0.35 m; B = 40 cm = 0.4 m. For the minimum value: m = A1 / B = 0.15 / 0.4 = 375 grams. For the maximum value M=A2/B=0.35/0.4=875 grams. where A is the value of the moment from the book (kg). B is the length of my collar (m). M – scale readings (g). We calculate the nominal point Mnom = ((875-375)/2)+375 = 625 grams. The difference between the nominal value and the obtained Mnom = 625-610 = 15 grams, which is a very good result. Next, we assemble the gearbox using Petmatex Gear Oil RTV sealant for manual gearboxes.
Sealant for manual transmissions
All bearings and gears are lubricated with SMT2 grease.
Useful tips.
1. When assembling the gearbox, do not skimp on the sealant. You don’t need a lot of it, but you shouldn’t save it either. The book states that you need to apply it with a 2X2 mm sausage. I recommend applying a little more. 2. When installing gear locks, 4 plugs are installed on the gearbox. Use only new gaskets made of brass or copper! Aluminum seals do not hold oil. 3. When assembling, use only new nuts for the primary and secondary shafts. 4. Use only new screws and washers for fixing the plate. 5. Tighten all nuts and bolts using a torque wrench according to the book. 6. If some seals did not leak, for example, like my rocker seal, it is better not to touch it. There are cases when they take and change an oil seal that worked perfectly, after which the new one begins to leak. 7. After assembly, do not expect that the gearbox will immediately work quietly. The details need to be worked in. In my case, the gearbox stopped making noise only after 5 minutes of running-in. I don’t know what it was connected with, but immediately after assembly a strange sound was coming from the gearbox. Similar to the sound of rubbing parts. 8. I filled the oil with Shell Spirax S4 G 75W-90 2 mm above the maximum. This will provide additional lubrication to 5th gear. The dry box took approximately 3.6 liters of oil. 9. When installing the gearbox, I do not recommend tightening the gearbox and engine with bolts. It is better to initially place the gearbox on the guides, and only then tighten it with bolts. 10. Before assembling, rinse everything thoroughly in diesel fuel again. Assemble the gearbox only with clean hands.
And lastly, it would be wrong to remain silent about the disadvantages of the work done:
1. Now I can’t hear the gearbox whether I pressed the clutch or not. Previously, when the clutch was pressed, the box stopped humming, now it is not audible in all modes and it is confusing. 2. Clear inclusion of all speeds without a characteristic crunch. Which is also confusing. It’s not immediately clear whether you turned on the gear or not. 3. Very smooth starting, without any jolts or jerks. Unusual.
Despite these disadvantages, I was pleased with the result of the work done. I hope the information will be useful to someone.
How to change the box on a VAZ 2110
The VAZ 2110 is equipped with a mechanical, two-shaft, five forward gears and one rear gearbox. It is structurally combined with the differential and main gear. The service life of the VAZ 2110 gearbox and its performance directly depend on driving style and timely maintenance of the manual gearbox.
Frequent intense acceleration, incorrect shifting of the selector lever, untimely replacement of transmission oil, and the gearbox oil needs to be changed every 75,000 km , lowering its level can greatly reduce the service life of the gearbox. Removal of the VAZ 2110 gearbox and subsequent repair or replacement is carried out if faults are detected in the unit itself.
Repairing the box
In the event that this kind of adjustment work did not bring much results, you will have to remove and disassemble the gearbox of your VAZ 2110
The main attention should be paid to the gears, as they are most often knocked out. This is especially true for first and second speeds.
It will also be important to check the latch. There are three latches in total in the gearbox.
The very first of them is very long and is responsible for 1st and 2nd gears. Next comes the clamp for third and fourth gears, and the shortest of the clamps is intended for 5th gear
There are three latches in total in the gearbox. The very first of them is very long and is responsible for 1st and 2nd gears. Next comes the clamp for third and fourth gears, and the shortest of the clamps is intended for 5th gear.
complete gearbox assembly
Signs of a faulty VAZ 2110 gearbox
Characteristic symptoms that require replacement of the VAZ 2110 gearbox are the following:
- appearance of noise. The cause of this defect may be worn gear parts. Also, if the bearings are damaged, knocking and grinding noises appear.
- spontaneous switching off of gears or the gear does not engage completely. This is due to wear and tear on the forks and selector mechanism.
In some cases, when this transmission unit cannot be repaired due to objective reasons, replacing the VAZ 2110 gearbox is necessary. It is worth mentioning that the price of a new box will be 16,500 rubles, but its repair at a service station will cost 7,500 rubles (parts and the repair itself) without removal and installation. You can also “exchange” the checkpoint, the price will be 5,000 rubles. without installation or 6000 rub. with installation (prices are indicated for spring 2017 in Moscow and the region).
So it's up to you. The following is a technology for removing a VAZ 2110 gearbox and then replacing it.
Gearbox adjustment
It is not always necessary to remove it to get the box working properly. Although, if replacement of gearbox bearings or other repair measures is planned, simple adjustment is not enough.
Adjustment is required in several situations:
- Recently, the input shaft bearings were replaced on a VAZ 2110 or another type of repair with the mandatory removal of the gearbox;
- There is a constant overshoot of one of the speeds;
- The gears are switched slowly, poorly, or are knocked out directly while driving.