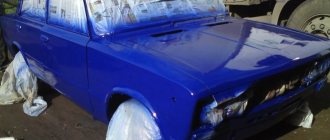
Primer is a mandatory process both before painting the entire car and when refreshing the paintwork on individual parts. The primer layer is intermediate between the car body and the base paint. Before priming the car, you need to carry out some preparatory work necessary to obtain a better result.
Procedure
The entire priming process can be divided into several simple steps, each of which is equally important. Additionally, before starting work, you can watch a video that will help you clearly grasp the essence of the process.
All priming work before painting a car includes the following steps:
- preparing the premises for work;
- preparation of all necessary tools;
- preparing the car for priming;
- preparing a primer mixture;
- applying the first layer of primer;
- drying and processing the first layer of primer;
- applying a second layer of primer;
- final drying and polishing.
Dry sanding
If we are proponents of the progressive dry sanding method, we can do most of the work using a sander. However, we still cannot completely avoid “manual labor”.
Firstly, there are quite a lot of areas on the car body that you simply cannot reach with a machine. Secondly, those areas of soil that are applied to the putty areas must first be sanded by hand in order to “outline” the plane and even out the unevenness of the layer. To do this we need a sanding block and an abrasive strip such as P320 .
If the thickness of the layer allows, you can use a slightly coarser abrasive, for example 240 or P280, this allows, in some cases, to “cut” the plane more efficiently. But you need to sand carefully so as not to break through the filler, and then you definitely need to repaint it with a P320 gradation (this can be done on a machine). Remember the hundred units rule!
If the primer is applied to a flat, unputtyed surface, leveling by sanding is not necessary.
In order to facilitate finishing of the surface, it is recommended to apply a developing coating to the primed area before sanding. Both dry and sprayed development can be used.
If you use a sprayed development coating (sometimes leftover base enamel is used for this), then it can be applied to the surface only after the primer has completely dried. Otherwise, this may negatively affect the strength of the soil, it may become looser and more prone to shrinkage, and when sanding it will heavily clog the paper.
The grinding itself must be performed with diagonal movements so that the irregularities are “cut down” evenly over the entire area.
Apply dry development coating
We sand the surface with a hand sander and a P320 abrasive strip. Grinding should be done with diagonal movements so that the unevenness is “cut off” evenly over the entire plane.
After the leveling has been completed by grinding, you can begin finishing the surface. With this operation we will remove directional marks remaining after manual grinding and create on the surface the necessary roughness for the adhesion of the coating enamel.
To finish the filler, we need a sander with a small eccentric stroke (optimally 3 mm) and a soft sole. The small stroke of the eccentric and the soft sole are due to the fact that the surface to be painted requires more delicate processing, so that we only follow the general contour of the part, knocking down the mark, but do not violate the shape and do not sand the filler.
Regarding the choice of abrasives for finishing:
It should be remembered that it is impossible to sand the soil “dry” with abrasive material finer than P600, since the scratch left by it is too small and is not able to provide sufficient adhesion to the paint.
When grinding, you need to ensure that the working surface of the sander is completely adjacent to the surface being processed, and the pressure on the sole is uniform. Many people cannot get used to this - they just want to “speed up” the process by pressing harder on the edge of the sole. Some do just that, thereby creating irreparable “holes”.
Before sanding, you can reapply the development coat to make it easier to identify under-treated areas.
Reapply the developing coating
Consistently reduce the risk with circles of gradation P400-P500
Treatment of hard-to-reach places
The main surface is processed. But what about those places where it is impossible to treat with a machine or a block due to the risk of damaging the surface? These can be the edges of the part, curved surfaces, and various hard-to-reach places. To treat such areas, it is convenient to use special abrasive sponges made on a foam rubber base - they are elastic and do not cut sharp corners.
For soil treatment, sponges of grade P600-P800 (Superfine/Ultrafine) used sequentially are suitable. You need to grind the entire surface of your palm with even pressure and in one direction. If you sand with your fingers, you can create streaks.
After grinding, the part is blown with compressed air and degreased. Ready!
Preparing the premises
It is highly undesirable to carry out priming in an open space, as flying dust, scorching sun and other factors will negatively affect the result. To carry out this type of work, it is best to prepare a sterile room, which is pre-cleaned and slightly moistened. To get an idea of the priming room, you can watch the corresponding video, which will tell you the dimensions and conditions of the work area.
It is very important to take care of the ventilation of the room, since the vapors of the primer material are very harmful to human health. In this case, drafts should be avoided, as this can lead to an uneven result. The room must be provided with adequate lighting. If you work in low light, then when inspecting the car on the street you will find many defective areas and defects.
Methods for grinding primer-filler. Advantages and disadvantages
There are two ways to process filler primer for painting:
Both methods have their advantages and disadvantages.
The “wet” method is most popular in private workshops, and there are still cases of treating not only soils, but also putties with water (hello to future rust and bubbles). Here, many craftsmen are skeptical about the very possibility of using “dry” technology for preparing surfaces for painting.
The main reason for this is that in such workshops both sanding and painting are most often carried out in the same room, so when using dry technology the rooms become very dusty, and removing all this dust is problematic. During wet processing, dust emission is minimal, and work can be carried out in any well-ventilated area.
In addition, with manual processing there is a much lower risk of violating the integrity of the primer layer, and the sanding paper itself is used very sparingly and becomes less “greasy” even when processing soft soils (we are now talking about the advantages of wet technology exclusively for processing soils, since dry technology is used for processing putty - the only correct option).
There are basically only two disadvantages of this technology - low labor productivity and a long time for soil to dry after grinding. Dry technology does not have these disadvantages.
Western European stations have long abandoned the use of water when preparing surfaces for painting. The fact is that discharging water contaminated with grinding products into the sewer system is dangerous from an environmental point of view. In addition, working in damp conditions is harmful to human health.
But the main argument is that the dry grinding process has significantly higher productivity compared to wet grinding. An eccentric sander with a dust extraction system is several times more effective than holding hands with a sanding block and a bucket of water. And the access of moisture to the metal and putties is completely excluded, which means the likelihood of such defects as swelling, cracking of the layer, and others is minimized.
The only disadvantages of the dry method include the need for expensive equipment for grinding, good ventilation of the entire room, and lattice floors.
It is clear that this is not achievable everywhere, so both “dry” and “wet” soil treatment are allowed. Which method to choose depends on the conditions of your workshop and the availability of equipment with dust extraction.
Set of tools and consumables
- Spray gun. It is needed to uniformly apply primer to the surface of the car. You should not expect a good result from doing the job with a cheap and low-quality spray gun.
- Sander. Sanding can be done by hand, but it will take much longer and will affect the quality of the work.
- Primer. When choosing a primer, you should consider the color of the car and the type of paint that will be used in the future.
- Alcohol. Before priming work, it will be necessary to degrease the surface.
- Fine sandpaper. Usually R-800 and R-1200 are sufficient.
How to set up a spray gun for priming?
To understand the settings of the spray gun, you can read a detailed article about this.
I unscrew the flow of the sprayed material completely (you can unscrew it two full turns for a smaller flow), and set the pressure to not very high (I’m used to navigating without a pressure gauge, just by feel). The size of the torch, depending on the primed area. If you have no experience, then you need to do test sprays and adjust the adjustments as you need. The primer should not be applied dryly or too thinly.
Preparing the car
If the entire car will be primed, then before doing this it is necessary to cover all the windows, headlights and other parts with special materials. If a separate part is primed, it is either dismantled or isolated from the rest. To properly cover individual parts, it is better to use high-quality tape from well-known or trusted manufacturers.
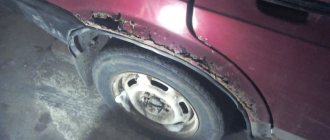
Before priming, the surface must be thoroughly cleaned of rust and old weakened paint. All defects on the body or parts are eliminated using putty and returned to the original geometry.
Next, you should clean the body from dust and degrease the entire surface. For these purposes, you can use either alcohol or a non-aggressive solvent. Additionally, care should be taken to dry the parts, as moisture will prevent the correct application of the primer layer.
What kind of primers are there? How to choose?
Globally, there are two types of soil: one-component and two-component. The first does not require special preparation and is sold in the form of jars or aerosols, which can be applied as the manufacturer did.
Two-component, as the name suggests, consists of two liquids: a polymer and a hardener, which are supplied in different containers. Before applying to the surface, the painter mixes the components in the required proportions and applies them to the parts. But the speed of application is important here, since the mixture hardens quickly and the minutes count.
If we divide the primer into components, then it comes in three types: acid, epoxy and acrylic.
- Acid primer.
Used for rough coating and protects the body from corrosion. - Acrylic.
The most common two-component primer, which is prepared no earlier than an hour before application. It is often applied to putty, and it dries from three to eight hours in a heat chamber. - Epoxy.
A primer that is applied before painting. It has the most durable anti-corrosion properties. It also fills microcavities well and creates good adhesion. But it takes a very long time to dry - at least 12 hours - and high temperatures cannot be used, because the epoxy will bubble.
Primer preparation
Before purchasing a primer, you should consider in advance several options that the market offers. The primer must be correctly selected in color and composition. This will make the work much easier and improve quality.
Before filling the spray gun, the primer is thoroughly mixed until smooth. If a primer with a hardener is used, it must be added as accurately as possible. In this case, you should not mix the entire volume of primer with the hardener, since its application will occur in several stages, and the pre-prepared primer may set during the drying period of the previous layers.
After mixing all the components, it is advisable to strain the primer through a special filter to cut off large particles. If this is not done, the spray gun may become clogged, which will lead to the ejection of large drops of soil and the formation of smudges. For straining, you can also use ordinary gauze, which is folded into several layers.
Particular attention should be paid to obtaining a primer of the required consistency. For this purpose, the spray gun kit includes a special device that allows you to measure this parameter. To dilute the soil, it is necessary to use an appropriate solvent. Ideally, the solvent should be from the same manufacturer as the primer.
Primer Basics
After pasting the car, you can start diluting the soil. First of all, you need to mix it thoroughly to lift heavy components from the bottom of the jar, and then dilute it with a hardener (it is highly advisable to use only the original one) and a solvent (preferably the original one, but 646 is also possible). The proportions must be indicated on the can. It is better not to dilute by eye, but to use a special container where you can see the grams.
It is advisable to filter the finished mixture through a proprietary filter or ordinary gauze, folded 3-4 times. Usually it is enough to apply the primer in 2-3 layers. It is extremely important to maintain a drying time of 5-10 minutes between coats. Otherwise, the soil may boil, which is highly undesirable.
On a note
The choice of soil color is of great importance. The paint should cover the primer so that it does not show through at different angles. The universal color is grey.
There are also primers in black, white, red and other colors. Using this palette you can mix primers and get the desired color. It is important to remember that the materials being mixed must be from the same company.
On a note
Before applying the primer, you must wipe the car with an antistatic cloth, then degrease it with anti-silicone or alcohol.
According to technology, the first layer needs to be filled normally. But, if the primer is applied to the old paintwork, which in some places has been rubbed down to the old primer, then it is in these places that the new primer can be undermined. To prevent this, you need to spray the first layer and dry for about 10 minutes. The second and third layers can be poured, then let dry for 24 hours.
The soil can be treated either dry or with water. It should be remembered here that soils partially absorb water, which over time leads to metal corrosion, therefore, it is better to process dry. A special grinding machine can help with this. For metallic paint, the body should be sanded with R-600 and R-800 sandpaper, but for regular acrylic, R-400 and R-500 will be sufficient.
New parts need to be given extra attention, because they are covered with shipping primer (usually black). In order for the repair of the machine to be of high quality, the transport soil must be cleaned with R-240 sandpaper down to the metal. After this procedure, you can put 2-3 layers of soil.
It’s also useful to read: Choosing the cheapest option for car painting
After 10-15 minutes, you need to develop the primer with paint of a contrasting color. The next day you can start cleaning. During processing, development may show minor unevenness. In this case, you will need to re-prime the flaws or the entire part.
Do-it-yourself car priming is absolutely safe if you approach it correctly. The fact is that during any paintwork, including body priming, it is necessary to use personal protective equipment (respirator, gloves, suit). Primer fumes are very harmful, so be careful about your health.
Applying the first layer of primer
After the preparatory work, you can begin the first application of primer. The first layer can be applied with small smudges, which are subsequently corrected by sanding. In general, the initial layer should be applied to the edge of the drip, ensuring sufficient thickness and adherence to the surface.
The primer should be applied with uniform movements of the gun from a distance of 25-30 centimeters. This uses cross movements to distribute the material more evenly.
After applying the initial layer, it must be given the required time to dry. If primer with hardeners was used, the drying process will not take more than 15-20 minutes. In cases where soil is used without special additives, drying can take a very long time. Some primer mixtures take about 24 hours to dry. But they are used extremely rarely.
Acrylic primer for cars
As the name suggests, the material is based on acrylic particles. Thanks to such active substances, it can be used not only on metal surfaces, but also on plastic. And this is especially important when you need to process the bumper.
In addition to filling various irregularities, the soil simultaneously solves the following problems:
- The surface of the body becomes perfectly smooth, which is especially important before applying a layer of paint.
- Improved adhesion characteristics.
- Protection of metal from the appearance of rusty specks and drips.
The material is applied to the treated area immediately before painting. After such careful preparation, the paint goes on as smoothly as possible and works well with the metal body. This allows you to achieve reliable and long-lasting results.
The soil is distinguished by the following features:
- Strength. The primer for cars should be as durable as possible.
- Resistance to environmental factors (rain, high humidity, UV light).
- Resistant to temperature changes.
Due to its numerous characteristics and advantages, the material is universal, therefore it is often used by craftsmen.
Acidic soil is used less often.
Acrylic primer for cars
Sanding the initial layer
Sanding the first layer of primer is a rather time-consuming and labor-intensive process, even with the use of a sander. However, the final result depends on the execution of this operation, so it should be treated with great responsibility and patience. Sanding the first layer is carried out with fine sandpaper until a uniform matte surface is obtained. If defective areas were identified during the work, then at this stage it is not too late to correct them using putty, which is also sanded to a perfectly smooth surface.
Particular attention is paid to areas where primer leaks have formed. They are ground to zero until a smooth surface is obtained. You should also pay attention to translucent areas. If old paint or metal protrudes from under the primer, priming will have to be repeated several times.
Grouting the primed body
Each stage of car painting has its own purpose. The primer is an intermediate layer between the paint and the metal. If the part is puttied, then the primer is placed on the putty. However, the primer layer itself needs to be sanded, since it initially has some bumpiness.
Grouting of the soil can be done either manually or by machine. You need to work with abrasives very carefully, since a thin layer of primer can be easily wiped off. If this happens, it is convenient to cover the wipes with epoxy primer in an aerosol can.
The finishing primer is sanded with 800 grit. This size is considered optimal for applying paint. If, as a result of grinding, the developing layer indicates defects, then it is necessary to eliminate them with finishing putty, which will then have to be primed again, but this time spot-on. These places are then sanded again, and so on until the part is perfect.
Applying acrylic primer to a car
Acrylic primer is applied to:
The thickness of acrylic primer application can range from 50 to more than 100 microns.
Depending on the number of elements, the primer can be one-component or two-component.
The first is applied in a thin layer and is mainly used for applying to new parts before painting. This ensures improved adhesion and rust protection.
A two-component primer is more versatile and suitable for any work on the body.
It is necessary to strictly observe the proportions when diluting the primer
In addition, only thinner is added to a one-component primer (approximately 1 part thinner to 5 parts primer). No hardener is added. In a two-component mixture, you need to first add a hardener and then a thinner (usually 1 part hardener and 1 thinner to 4 parts primer).
How to dilute automotive acrylic primer
These mixtures contain many elements. And it is from the final composition of a particular primer from a particular manufacturer that you need to select a substance that can subsequently be used to dilute the primer. There are only two best options:
Most often it is recommended to maintain the following proportion - 4:1 with the addition of a thinner. For more detailed information, please refer to the instructions on the product label.
For example, the label of Novol Protect 300 4+1 MS primer says that for 4 parts primer you need to take 1 part hardener and 25%-35% thinner.
It is important to understand that acrylic fillers remain in an unchanged state for 30-60 minutes, which is how long after mixing they will be ready for use. This time must be taken into account when stirring the primer and applying it.
The resulting composition is applied using a spray gun. But before you fill the mixture into the device, it must be filtered (for example, through nylon or a double layer of gauze). This is done in order to cut off all large fractions that could clog the pneumatic sprayer.
How to apply primer - tips and tricks
Primers are mainly needed to enhance adhesion between the substrate and the paint. The principle of working with it is somewhat simpler:
Adding Plasticizer to Primer
It is possible (and even recommended) to add a plasticizer to the acrylic filler primer that will be applied to plastic and other synthetic surfaces of the body - this is a special additive that will make the material more elastic and help avoid cracking of the paint even when the painted element is deformed. In addition, it neutralizes the impact of high and low temperatures on the material - the paintwork will shrink and expand as the temperature changes along with the element itself.
Plasticizer additive Novol Plus 770
The amount of plasticizer added to the primer can usually be deducted from the product label. Usually this is 10-30% of the finished primer mixture, then a hardener and thinner are added. The stiffer the plastic, the less plasticizer needs to be added.
After adding the plasticizer, the primer does not need to be infused or other manipulations carried out with it, but it is worth noting that the drying time of the applied layers will be increased by approximately 2 times.
Tintable primers
Fillers (secondary primer) can also be tinted. This is done by introducing acrylic paints into the composition - approximately 10-15% of the volume. The result is a tone that is as close as possible to the factory or re-applied enamel. This is done in order to:
Is priming necessary before painting? Why primer before putty?
It has long been known: paint does not stick to ferrous metal. Cunning technologists have come up with a way to combat the problem. A layer of primer is applied between the paint and the car body. This intermediate layer ensures the strength of the connection. On the one hand, the primer adheres tightly to the metal of the car, on the other hand, it adheres well to the paint.
Ensuring adhesion of the paint layer to the body is not the only function of the primer. Many of its types perfectly protect the car from corrosion, excluding the penetration of moisture. Even if a crack or chip appears on the top paintwork, the primer will prevent the body from rusting.
A layer of primer should be applied not only when painting pure ferrous metal, but also after repair work on a putty surface. Putty, like pure body metal, does not blend with car paint.
The only case when you don’t need to prime before painting is when working on a relatively new car on the original coating to change the color. This approach applies to cars under 1 year of age. In this case, it is enough to “roughen” the coating, that is, process it with medium-coarse sandpaper. A rough, rough surface will ensure good adhesion of the new paint coating to the old one.
Part overview and work to be done
As mentioned earlier, today we will prime the body of the car shown in the video.
In previous episodes, we talked about how to prepare certain body elements. At the moment, the body has already been sanded with P220 sandpaper and is ready to apply protective primer.
And also all parts that should not be primed are covered with protective film. In this case, these are glass, openings, wheels and other elements that cannot be primed. This was discussed in detail in the previous part #16 of the video.
The body will be completely primed, as there were many defects in all body elements that had to be corrected and now need to be protected with primer.
A filling acrylic primer and locally an epoxy protective primer will be applied to the car body. A protective primer will be necessary because individual parts have been rubbed down to bare metal and these places need to be isolated from corrosion.
Tools and materials required for work:
- Antisilicon;
- Paper napkin;
- Epoxy (two-component) primer;
- Filling primer (two-component);
- Measuring container for soil dilution;
- Painting sieve (190 microns);
- Knife for stirring materials;
- Spray gun 1/4 for applying epoxy primer;
- Spray gun 1/7 for working with basic soil;
- Solvent 647.
In order to correctly observe the proportion of soil dilution, you can always use the annotation on the container with soil itself, where this proportion is indicated. For example, epoxy primer is diluted 1x1, and acrylic primer is diluted 1x4, as indicated on the cans of materials.
But also on the container with the materials there is always an explanation (technical instructions) on how to work with this or that soil, which is very convenient, especially for novice craftsmen who perform car repairs with their own hands.
After working with the spray gun, it is necessary to wash it with a solvent so that the soil does not remain in the channels, where it will dry out and ruin the spray gun. And also, if necessary, the instrument is cleaned from above.
A solvent will also be needed for diluting soils. In our case, this is an ordinary solvent, but according to technology, the acrylic primer must be diluted with an acrylic solvent. However, this does not matter much, it’s just that with the “native” solvent the soil dries longer. We, I repeat, will work with a regular solvent, and the material will dry faster.
How to prepare a car for painting
Many people ask the question: how to prepare a car for painting?
In fact, this process is very complex, which must be taken with full responsibility, and it includes the following equally important stages of preparation: removing pockets of corrosion, sanding, priming, puttying and painting itself.
In fact, there are also many intermediate stages, but let’s talk about everything from the very beginning.
Removing corrosion from a car
Very often, before starting work, it is necessary to remove the top layer of paint from the car, as there may be small blisters on it due to rust on the car, which will peel off.
This is not easy work, but to avoid problems in the future, it is better to do everything right at once, otherwise after about a month the old paint will begin to fall off.
Car primer
After the top layer of paint has been removed, the surface needs to be puttied and thoroughly cleaned, and then the metal must be coated with anti-corrosion primer.
With the help of this primer, the car will be reliably protected from damage by corrosion. It is a primary primer, after which it is necessary to cover it with a secondary primer.
If the surface of the metal that has been cleared of paint is smooth, then the primer will not adhere to it. In order for the primer to adhere well, you need to take 180-240 sandpaper and give the surface a matte finish. There should be no shiny areas left on the metal.
After this, you need to take a degreaser and clean the surface of the car from any remaining dust.
Then wipe the surface with a napkin, and all these actions must be performed with rubber gloves so that the clean areas do not become contaminated. The next step is to sand the surface and remove all irregularities.
Puttying the surface
Polyester putty must be applied in a thin layer. If the layer is made thick, you will not get a high-quality coating.
This putty contains two components that need to be mixed just before use. The first component is the resin, the second is the hardener.
The putty and hardener are mixed until a trace of red hardener appears. When the putty is ready, it should be used within 10 minutes, otherwise it will harden.
Before applying the putty, it is necessary to evaluate the depth of the unevenness, based on this, select the desired putty:
- soft putty is used for dents no more than 1 mm deep;
- fiberglass putty is used for dents of any depth;
- finishing putty is applied to minor scratches on the body.
Can I paint with acrylic paint over varnish?
If it was just acrylic varnish, then there are no obstacles. And if it is a construction or industrial varnish, with a dense glossy varnish film that does not absorb moisture, then the varnish surface must first be prepared before applying acrylic paints or acrylic primer.
Interesting materials:
How to enable hyper v on Windows 10? How to enable or disable Hibernation in Windows 10? How to enable kernels on a Windows 7 laptop? How to enable processor cores on Windows 7? How to enable Game Mode in Windows 10 1803? How to enable game mode in Windows 10 on a laptop? How to enable game mode in Windows 10 pro? How to enable the camera on an Acer Windows 10 laptop? How to enable the camera in Skype Windows 10? How to enable keyboard on screen in Windows 10?