Hello dear reader of the RtiIvaz.ru blog. Let's find out today and talk to you about which radiator pipes are installed on Lada VAZ 2108, 2109, 21099, 2113, 2114, 2115 cars. Many car owners do not know what rubber radiator pipes for the cooling system are needed for and how they work. Here I’m trying to explain in simple language about RTI auto repair kits for vases, and also show on video what goes where. Forgive me if I'm wrong somewhere, since the rubber pipes of the cooling system are very difficult to understand. As a car enthusiast, I will try to explain to you about the radiator pipes for the cooling system, which ones fit where. Look at the photo and also at the video of the inlet, outlet, and bypass pipes. In general, you need to at least somehow understand the hoses on your Lada VAZ cars for a fulcrum under the hood.
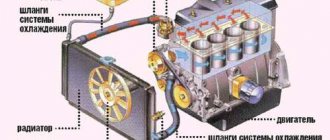
Next, see a photo of the pipes of the Lada VAZ 2108, 2109, 21099, 2113 for cars with a carburetor engine:
For VAZ cars with carburetor engines
Number 1 is the “upper” pipe that “supplies” coolant from the engine to the radiator, the so-called “wave”, has the shape of a wave. And number 2 is the lower “angular” rubber pipe, which drains coolant from the radiator to the engine. At numbers 3 and 4, there is one “short” one, a bypass connects the engine head to the thermostat, and the second connects the thermostat to the water pump. Expansion barrel pipe for carburetor engines number 5. Design numbers:
- 2108-1303025 radiator supply hose number -1
- 2108-1303010 outlet hose -2
- 2108 -1303092Р thermostat coupling numbered -3; 4
- 2108-1303080 cooling system filling hose with extension number -5
You are a car enthusiast, you probably know that the upper supply hose supplies hot liquid from the engine for cooling in the radiator. And the lower outlet hose carries the already cooled liquid to the engine. This is the unusual role played by the rubber hoses of the cooling system. Next, see a photo of the pipes of the Lada VAZ 2108, 2109, 21099, 2113, 2114, 2115 for cars with an injection engine:
For VAZ cars with injection engines
Number 1 is the “upper” pipe “supplying” coolant from the engine to the radiator, “angular wave”, has the shape of an angular wave. And number 2 is the “lower” coolant discharge pipe. At number 3 is the “angle” bypass connected from the engine head to the thermostat and further to the water pump through the “short” coupling 4. At number 5 in the photo is the hose of the expansion barrel for injection engines. Design numbers:
- 21082-1303025 radiator hose, supply number -1
- 21082-1303010 outlet hose - 2
- 2109-1303093-01 connecting hose for thermostat and water pump -3
- 2108 -1303092Р thermostat connecting coupling -4
- 21082-1303080 cooling system filling hose number -5
That an injection engine and a carburetor engine also have a “antifreeze” hose of the same length and thickness for removing steam from the radiator to the expansion tank (see video). The steam exhaust hose “antifreeze” VAZ 2108-2115 differs from the steam exhaust hose VAZ 2110-2112 only in length. What is the difference between auto repair kits for radiator pipes of injection and carburetor engines, I will not describe in this auto article, look friends, you can clearly see it in the photo and video.
The cooling system gave me problems all 4 years of owning the car, either the reservoir would burst, or the throttle heating pipe would crack, then it would leak, or the heater hose would crack, and while putting this entire cooling and heating system in order, I thought for a long time about what to replace the standard pipes of the car with, The throttle heating hose burst 2 times, the heater hose in the cabin cracked and began to leak. In general, after much thought, I decided to buy expensive silicone pipes and hoses from the Salers company. I would like to say right away that this is not any kind of advertising, just in searching for information about silicone pipes I didn’t find a lot of information on them and I had very big doubts about the order - what if it doesn’t fit, what if it’s a scam, etc. Looking ahead, I’d like to to say that all the pipes and hoses fit perfectly and fit without any problems - if someone wants to order - don’t be afraid, everything will fit.
Replacing coolant on 2ZZ-GE
Antifreeze is a car coolant because its freezing point is lower than the freezing point of water. Antifreeze is designed to prevent damage to parts caused by the expansion of water when it freezes. Antifreeze not only has a lower freezing point, but when frozen, it forms a mushy mass, the formation of which does not damage engine parts, although it does not allow the engine to operate normally.
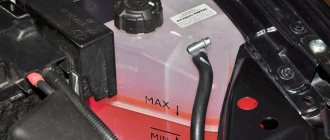
Drain the coolant. Note: To reduce the risk of burns, do not remove the reservoir cap while the engine and radiator are still hot, as liquid and steam may escape under pressure. Remove the radiator support cover. Remove the radiator cap. Fill with coolant. Tighten the radiator drain plug and pour coolant into the radiator until it begins to overflow. Volume: 6.7 l (7.1 us qts, 5.9 imp. qts). Advice:
Compress the radiator inlet and outlet hoses with force several times. If the coolant level has dropped, add coolant.
Tighten the radiator cap. Fill the reservoir with engine coolant until the “full” line is reached. Warm up the engine until the thermostat valve opens. Tip: While warming up, squeeze the radiator inlet and outlet hoses with force several times. Stop the engine and wait until the coolant temperature drops. Next, remove the radiator cap and check the coolant level. If the level has dropped, then perform the above procedures again. If the level does not drop, adjust the coolant level in the reservoir. Check for engine coolant leaks. Fill the radiator with coolant and attach the radiator cap tester. Pump the tester until the pressure reaches 118 kpa (1.2 kgf/cm2, 17.1 psi) and check for leaks.
Features of draining antifreeze and replacing the pump pipe on a Priora
The coolant pipe on the Priora is connected through a hose to the thermostat. It regulates the circulation of antifreeze in a small or large circle, depending on its temperature. If a defect is detected on the pipe itself or at the junction with the pump and the unit, it must be dismantled. The procedure involves preliminary draining of antifreeze.
The work is performed in the following order:
- The engine protection is removed;
- The expansion tank cap opens;
- Carefully unscrew the “lamb” of the drain located at the bottom of the block;
- Antifreeze is poured into the prepared container.
Drain hole on Priora
Draining is performed on a cold engine. To completely drain the coolant, you need to turn the motor shaft using the starter.
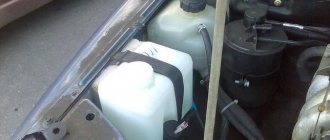
Expansion tank
The supply pipe is dismantled after unscrewing the 2 mounting bolts on the cooling pump and removing the thermostat hose. The new part and gasket are installed in the reverse order. After adding antifreeze, it is necessary to test run the engine and check for fluid leaks at the connections.
the supply pipe of the coolant pump on the VAZ 2110 has leaked | Topic author: Valentina
the hole is 1 mm in diameter, when the coolant temperature reaches 90 the clamp begins to leak, share your ideas
Anatoly cold welding, like plasticine. when it hardens like stone is made. special for this, sold in auto parts stores
164 Repair of the cooling system, coolant is leaking.
21 Aug 2011 - 2 min. — Added by user Anna Chekhova164 Repairing the cooling system, coolant is leaking. Anna Chekhova. Loading. Unsubscribe from Anna Chekhova? Cancel
What kind of oil is poured into the Volkswagen Polo sedan from the factory in Kaluga 2016
Is it possible to install 17 rims on a Volkswagen Polo sedan?
Why is there no spark from the ignition coil on a Ford Sierra?
The pump on the VAZ 2110 is a pump that distils coolant. This is an important element of the engine cooling system. The device is necessary for pumping coolant, which ensures coolant circulation through the circuits.
The structural elements of the pump are:
- Bearing;
- Impeller;
- Frame;
- Drive gears.
On a VAZ 2110, the pump is located to the right of the cylinder block in the direction of travel under the timing belt cover. The pump operates by rotating the timing belt, which drives the drive gear.
Breakdown and signs
There are several characteristic signs based on which you can recognize the failure of the coolant pump:
- A hum or a rustling sound appears near the timing drive;
- There are traces of coolant leakage from the pump seat;
- Mechanical damage occurred to the belt - cracked, delaminated, teeth broke;
- The engine began to overheat excessively;
- The coolant level drops below normal, even when topping up;
- Liquid does not circulate well through the system.
Most often the pump fails due to bearing failure. It, in turn, breaks due to wear or incorrect installation of the timing belt tension. If such problems are found, the pump must be completely replaced.
Consequences of ignoring
If you ignore a pump breakdown and do not take any action to repair or replace it, this can lead to dire consequences. Namely:
- The timing belt is damaged or broken. It will then have to be repaired, the cylinder head, gas distribution mechanism, and piston group must be replaced;
- The motor is overheating. Because of this, all rubber connection elements of the engine cooling system, cylinder head gasket, valve cover, and rubber components of the piston group can be destroyed.
REPAIR OR REPLACEMENT OF RADIATOR
Let us consider in detail the features of the work.
RINSE
Replacing the cooling radiator is required if the internal combustion engine heats up due to its clogging. But before changing it, you can try flushing the cooling system of the VAZ 2114 engine. Often flushing helps, and the engine stops heating up. We perform washing as follows:
- We park the car on a level surface;
- Unscrew the expansion tank cap;
- Drain the coolant from the radiator by unscrewing the bottom plug;
- We unscrew the water plug from the cylinder block (it is located between the internal combustion engine and the fan in the starter area) and drain the antifreeze from the block;
- We wrap the plugs and fill the system with plain clean water;
- Let the engine run and drain the water. If the water that comes out is dirty, repeat the flushing. We repeat the procedure several times until the draining water becomes clear;
- After flushing, fill in new coolant. It should be noted that the volume of the VAZ 2114 cooling system is 7.8 liters, and if all the antifreeze is not included in the system, most likely an air lock has formed in it. It is necessary to fill the container as much as possible to avoid overheating of the internal combustion engine.
Replacement
Having purchased a new coolant pump, you can begin the replacement procedure.
The VAZ 2110 works in conjunction with 8 valve and 16 valve power units. Despite there being a certain difference between them, the pump replacement procedure is identical.
Dismantling works
The instructions below are relevant for dozens with two types of motors.
- Place the car on a level area above a hole or on an overpass.
- Lift the hood, remove the negative terminal from the battery, which will turn off the power to the car.
- Unscrew the cap of the coolant expansion tank. This will relieve excess pressure in the system.
- Now get down under the car.
- Place a clean container with a volume of at least 5 liters under the cylinder block.
- Unscrew the coolant drain plug using a 13mm wrench, which will allow you to drain the coolant. Be careful, unlike oil, you need to drain the coolant when the engine is cool.
- When all the coolant is out, screw the plug back into place.
- Using a 10mm wrench, unscrew the three mounting bolts that hold the timing case in place.
- Remove the casing.
- Place the crankshaft at TDC of the first cylinder - top dead center. To do this, you need to turn off the gear and turn the special bolt that holds the generator pulley to 19 with a key. Turn until the marks on the camshaft gear align with the mark on the rear timing case.
- Make sure that the marks on the flywheel and clutch housing match. To do this, you will have to remove the plug on the crankcase. It is made of rubber and is located to the right of the cylinder block.
- Lock the crankshaft in this position. You can use a simple slotted screwdriver that fits into the teeth of the flywheel.
- Slightly loosen the tension roller locking nut using a 17mm wrench.
- Turn the roller using a special wrench in a counterclockwise direction. This way you can loosen the tension level of the timing belt.
- Now you can quite easily dismantle the tension roller and belt.
- The next step is to remove the five mounting bolts that hold the lower timing case in place. These include 3 bolts that hold the pump. You will need a socket wrench or a 10mm socket.
- The casing can then be removed.
- The VAZ 2110 provides for installation of a pump using three hexagon bolts. Once you unscrew them, you can simply carefully remove the pump by tapping on the body.
- If that doesn't work, then use a flathead screwdriver to pry up the coolant pump housing, which will allow you to remove the pump.
- Remove traces of the old gasket that should remain on the surfaces of the seats.
Changing the gasket
- The gasket is lubricated on both sides using a special automotive sealant. The prepared and processed new gasket is placed on the body of the new pump.
- The new pump is installed in its rightful place, taking the baton from the old coolant supercharger.
Air lock formation
Replacing the pump supply pipe and draining the antifreeze associated with the work can lead to the formation of an air lock in the cooling system.
There are 2 ways to fix the problem:
- With the engine warm, remove one of the 2 throttle body hoses for 5-10 seconds. A small amount of antifreeze may leak out, which must be added through the expansion tank.
- The car is installed on a rise (overpass) so that the radiator is higher than the engine. The expansion tank cap is removed and the engine is started. After removing the plug, coolant is added.
Maintaining the cooling system in good condition ensures high-quality operation of the car engine. When replacing the supply pipe of the coolant pump on a car with high mileage, it is recommended to simultaneously replace the used antifreeze and flush the entire system.
Steering rack cover (corrugation) for VAZ 2108-21099, 2110-2112, 2113-2115
with 12% discount
Modernized AGAT clutch cable end guide for VAZ 2110-2112, Lada Priora, Kalina, Granta, Datsun
with 10% discount
Signs of a pump malfunction
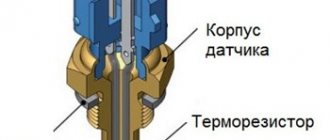
Thanks to the rotation of the pump driven by the timing belt, the impeller circulates a special fluid (antifreeze, antifreeze) through the small and large circuits of the cooling system. A damaged pump can cause the engine to overheat or cause the timing belt to break. To avoid an emergency on the road, you should do preventive repairs on time. On a VAZ 2110 with an 8-valve engine, the omen of replacing the pump can be recognized by the symptoms described below.
Noise from the timing belt cover
When the engine is running, a shuffling rotating sound is produced from the side of the timing belt protective cover. This is an indication that the pump bearings are sufficiently worn. According to the maintenance regulations, the pump should be changed every second timing belt replacement. The recommendation should not be neglected, since the rolling shaft bearings operate under load and wear out relatively quickly. Sometimes antifreeze or antifreeze gets into the bearing race due to a leaky seal. As a result, the lubricant is washed out and wear of rubbing parts accelerates.
Coolant leak from under the pump
Hermetic seals: the oil seal and rubber cuffs, as well as the bearings, have a limited service life. Typically, seals leak after bearings wear out, as there is play in the shaft. In addition to this, the constant cycle of heating and cooling of the engine gradually destroys the material of rubber products. As a result, small puddles of coolant appear under the engine compartment of the VAZ 2110 on the pump side.
Misalignment of drive shaft pulleys
A defective pump can result in noisy engine operation and frequent timing belt breaks. According to the performance characteristics, skewed rotation of the pulleys does not provide the vehicle with a long service life. The belt cannot withstand additional loads and breaks after a mileage of up to 1000 km. As a result, you will have to replace the defective pump, otherwise on such a VAZ 2110, an unscheduled replacement of the timing belt will become a regular procedure.
Motor overheating
The pump impeller may be partially destroyed. The lack of blades leads to a decrease in coolant circulation. As a result, the engine does not receive proper cooling from the small circuit and the temperature rises, even to the point of boiling. Overheating, in turn, has a detrimental effect on the engine.
Among the most common consequences, the most difficult to eliminate should be listed:
- can “drive” the cylinder head;
- the cylinder head gasket burns out;
- piston rings are destroyed;
- the motor risks jamming;
- The crankshaft bearings fail.
For reference! Frequent use of a special sealant to eliminate coolant leaks reduces the service life of the water pump. The foreign mixture tends to stick to the impeller, forming a solid clot and clogging the channels of the cooling jacket.
Diagnostics and identification of supply pipe faults
A malfunction of the cooling system associated with an antifreeze leak is manifested by a decrease in its level in the expansion tank and a critical reading of the temperature sensor.
Antifreeze leak
Mechanical damage to the supply pipe or its depressurization in the area of attachment to the pump or engine block may be accompanied by:
- The release of steam in the engine compartment due to coolant entering the “pants” of the manifold.
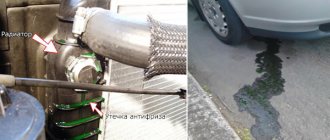
- The appearance of a stain from leaked antifreeze where the car is parked, VAZ 2110, VAZ 2112, VAZ 2114 and Priora - in the area of the front part, VAZ 2109 - between the engine and the passenger compartment.
Additive Additive
Regularly topping up antifreeze and adding additives to eliminate coolant leaks is not a solution to the situation. Replacing the pump supply pipe with a new one will not take a lot of time and money to purchase parts and gaskets.
Which pump to choose
There is no need to save money on purchasing the main coolant unit. Today the market is saturated with various types of pumps, with any pricing policy. For VAZ 2110 car owners who decide to replace the pump with their own hands for the first time, auto repair shop experts recommend paying attention to branded manufacturers such as: KolbenShmidt, SKF, GRAF, HEPU, Valeo, Quinton Hazell. It is not recommended to install: FEBI, Dolz, RUVILLE, Airtex, Pex.
Replacing the pump
After preparatory steps, such as: searching for a garage box (if you don’t have one for personal use), preparing keys (open-end sockets), purchasing spare parts and coolant, you can get to work.
To explain as briefly and clearly as possible how to change the pump on a VAZ 2110, we will describe the process in the form of step-by-step instructions:
- It is advisable to install the machine above the inspection hole. As an option, an overpass is suitable;
- It is recommended to carry out plumbing work on a de-energized car, so you should unscrew the negative terminal from the battery;
- remove the expansion tank cap, this will prevent the formation of a vacuum in the cooling system;
- A 5-liter container (at least) should be installed under the engine to drain the coolant, since it is recommended to change the pump when the antifreeze or antifreeze on the VAZ 2110 is almost completely drained. Otherwise, when the pump is removed from its seat, the contents of the system will spill out randomly;
- On the back of the block there is a coolant jacket plug, which should be unscrewed with a 13 mm wrench and the liquid should be drained into a container placed under the engine. Screw the plug back;
- Next, you should unscrew the timing drive casing (with a 10 mm wrench), secured with three bolts;
- disconnect the casing and set it aside;
- it is necessary to set the gas distribution mechanism to the top dead center according to the marks. Having moved the gearshift lever into neutral, rotate the camshaft gear by the mounting bolt (19 mm wrench) until the marks on the inner timing drive casing align;
- you have to check the mark on the flywheel: remove the rubber plug in the upper part of the crankcase on the right side of the engine and shine a flashlight into the opening;
- the correct position should be fixed by inserting a metal rod or a powerful screwdriver into the camshaft gear;
- loosen the roller nut (17mm wrench) and use a tension wrench to turn the roller mechanism counterclockwise, reducing the belt tension;
- Next, remove the belt and roller;
- unscrew the bolts of the internal timing drive casing (2 pieces) and the pump bolts (3 pieces). It is more convenient to work with a 10 mm socket wrench (head);
- remove the casing and put it aside;
- use a slotted screwdriver to pry up the edge of the pump and pull it out of its seat;
- The installation site must be cleaned before installing a new pump;
- a new pump gasket can be lubricated on both sides with a thin layer of high-temperature automotive sealant;
- insert the new pump into the seat and tighten the mounting bolts;
- Next, you need to return the dismantled parts to their place, observing the reverse order. After installing a new kit: pump, belt and timing pulley, you can count on a certain service life of the parts declared by the manufacturer.
Important! Do not tighten the timing belt too much. It’s easy to check the correct tension: the installed belt can be turned 90° with your fingers (with the teeth facing out), but no more.
- After final assembly, it is necessary to fill the system with coolant to the specified level. We start the engine and warm it up to operating temperature. All hoses should be hot, and when they are compressed, the hand will feel internal circulation. This is an indicator of the correct operation of the cooling system.