Door clip VAZ 2109
- Registration
- Entrance
- To the beginning of the forum
- Forum Rules
- Old design
- FAQ
- Search
- Users
- List of forums AUTOLADA.RU
- Family "Samara"
- 1
- 2
- >
Dear friends, I'm tired of one problem.
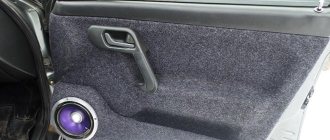
The door trim is all old and crooked, and it just doesn’t want to stay on properly on the hedgehog pistons. At first it snaps into place, and then after a couple of days the casing comes off again and rattles. The very places where the hedgehogs are attached to the casing are also broken, sometimes hedgehogs fly out. Only one crude solution comes to mind: At the places where the brushes enter the iron of the door, screw the studs; they just look like a round hole. Make holes in the sheathing for these studs. Insert the studs into the through holes on the casing and tighten with a bolt, under which a wide washer is placed (to increase the pressure area). In general, it will turn out so authentic and hardcore..
Maybe there are more humane dogs?
Glue the pistons to the casing with superglue and everything will be fine, I did the same thing and now the casing is holding up fine.
let’s say it’s not entirely humane, but I did it for myself, look at the link, I’m just too lazy to post the photo again —-> https://lada-forum.ru/index.php?showtopic=7966&view=findpost&p=377271[/list]
It’s cool, I should also do it in my spare time and do the same thing, only mushrooms are still better than black ones IMHO
see the link
let’s say it’s not entirely humane, but I did it for myself, look at the link, I’m just too lazy to post the photo again —-> https://lada-forum.ru/index.php?showtopic=7966&view=findpost&p=377271[/list]
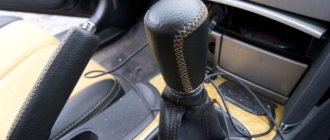
Well, yes, I wanted to do something similar, only in a more brutal version, instead of these white things I wanted bolts with washers. Thanks for the option, interesting solution))
buy Kalinovsky hedgehogs and 2-sided soft tape
pistons for sheathing from viburnum
the price is a ruble more expensive, but I felt the effect: they climb with the characteristic sound of “kryyyynk”
These Kalinovsky mega-hedgehogs are a must try!
Screw it on with self-tapping screws.
The self-tapping screws held up poorly too
The self-tapping screws held up poorly too
Which ones did you use? With a drill tip or just sharp? Metallic or black? What kind of hat is it, wide or narrow? How long? Thread pitch?
Which ones did you use? With a drill tip or just sharp? Metallic or black? What kind of hat is it, wide or narrow? How long? Thread pitch?
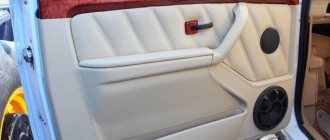
Doesn't the upholstery mounting kit for the Samara, which is sold in any store, work? Why bother with collective farms? There are plastic dowels, screws and plugs, and an installation diagram.
Just the other day I bought: “Door trim fastener kit for VAZ2109-99” Included: 1) Plugs for the holes in the door, where the standard barbed tips of the piston go, now we twist self-tapping screws into the plugs 2) Plastic cylinders that need to be pushed into the drilled holes 12 holes in the upholstery. The cylinder has holes for self-tapping screws and a rim for holding it on the upholstery. 3) The screws themselves with double-start threads are black. 4) It’s better not to install plugs for these cylinders, it seems to me, otherwise you’ll have to dig them out to get to the self-tapping screw.
I bought it in Veshnyaki on the circle. I think the last one was given away from the display case, I haven’t installed it yet, but I really want to. True, I don’t know, maybe it’s better to just install black self-tapping screws, why the hell with these cylinders? Moreover, you can tear up a 12mm hole, if something goes wrong, you won’t be able to close it with anything... For self-tapping screws, by the way, you can buy furniture plugs of any color (they are attached to the slot, but it is not always good to hold on)
How to replace the door trim on a VAZ 2108-VAZ 21099?
Removing the window handle:
1) First, insert a screwdriver between the socket and the handle trim, and after threading, slightly bend the “blue arrow” handle trim from the “red arrow” socket, bend it until the protrusion of the trim comes out. (See below for where the trim lip is located!)
Note! The protrusion that is present on the cladding is indicated by a red arrow, and it is due to this protrusion that the cladding is kept in place!
2) After bending the facing, remove it from the handle.
3) And after removing the cladding, remove the handle together with the socket.
Removing the door handle:
1) First, use a screwdriver to pry off the upper and lower plugs of the door handle.
2) Next, unscrew one screw of the upper fastening of the handle, and one screw of the lower fastening.
3) Now take the door handle with your hand and remove it from the car.
Removing the door handle trim:
1) First, use a screwdriver or hand to pry off the door handle trim.
2) And then, bending the door opening handle, remove the trim.
Removing the door trim:
1) First, remove the few screws that secure the bottom shelf to the door.
2) Next, unscrew the top door lock button.
3) And then remove it from the car door.
4) Next, use a screwdriver to bend all the pistons that secure the edges of the casing.
Note! The door trim is attached to eight pistons; in order to bend the top pistons, pry off the edges of the seal with a screwdriver, and only then bend all the top pistons that secure the trim!
5) After bending all the pistons, remove the trim from the door.
Note! When bending the caps, they may be damaged, so if they are damaged, replace them with new ones!
Installation: 1) First install the door trim in its place.
2) Next, in the same way as you removed, install the upper door lock button on the metal pin, and then screw it in with a screwdriver or by hand until it stops.
3) Now tighten the two screws securing the bottom shelf to the door.
4) Then install the door handle in place, and then tighten all the screws that secure it until it stops.
Note! After tightening the screws, insert the plugs into the holes!
5) Next, reinstall the door handle trim.
6) And to complete the operation, install the window lifter handle in the reverse order of removal.
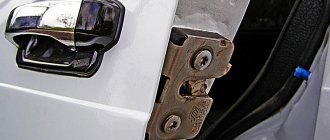
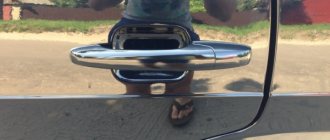
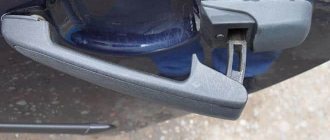
Replacing the outer handle
Using a flat-head screwdriver, disconnect the plastic ends of the outer handle rods from the lock mechanism. Unscrew the two nuts securing the handle to the door, then carefully remove the handle along with the rods.
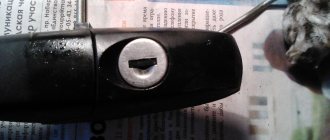
Using pliers, remove the pin from the end of the rod placed on the lock cylinder. Remove the locking spring, then insert the key and remove the lock cylinder from the handle. Install the lock into the new handle. After this, install a new handle, adjust the length of the rods if necessary by rotating the plastic tip. After adjustment, snap the rod end into place using pliers.
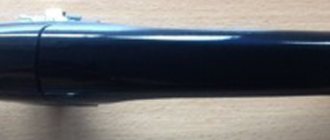
Hello. Are you tired of that annoying sound when you open the door? Are you tired of the handle sticking when open? Then feel free to exchange your stock pen for a new euro pen! With Euro handles, the appearance of the car will also improve! I will tell you how to install Euro handles on a VAZ 2109, 2114 in this article.
Door clip VAZ 2109
Reinforced piston clips for interior door trims (40 pcs) VAZ 2108, 2109, 21099, 2110, 2111, 2112, 2113, 2114, 2115
This spare part is called by different names, including rivets and clips, as well as door trim hedgehogs. No matter what you call it, these pistons are used to attach door trims at the factory, a simple and inexpensive part, but they will definitely be needed when replacing door cards. These hedgehogs are reinforced, which will avoid rattling of the door trim.
Set contains 40 pieces. Enough for all upholstery.
Applicability: VAZ 2108, 2109, 21099 VAZ 2113, 2114, 2115 VAZ 2110, 2111, 2112
For your convenience, we have various methods of delivery and payment for goods:
Order of shipment to regions of the Russian Federation.
- Place an order through the website or by phone.
- The manager contacts you by phone and clarifies the order details and payment method.
- You pay the bill through the bank, after the money arrives in our bank account (usually 1-3 days after payment for the goods), when paying through electronic money systems (funds are credited within a day), we deliver the goods to the transport company.
1. Payment via SberBank Visa card. 2. Payment via Yandex.Money
1.Russian Post
2. Russian Post courier service EMS Calculation of delivery costs (city of departure Togliatti) Tracking the parcel by track number
Removing the front door trim
For most work on repairing door locks on a VAZ 2109-2108, the window lift mechanism or glass replacement, it will be necessary to remove the door trim.
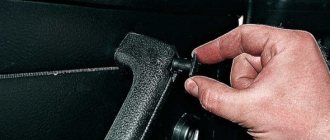
This procedure is very simple and to perform it you only need a Phillips and a pair of flathead screwdrivers. First, you need to use a thin screwdriver to pry two plastic decorative inserts from the door handle, as shown in the photo below:
Then use a Phillips screwdriver to unscrew the two bolts securing the handle:
And you can remove the handle without any problems:
Next, use your hand to pry up the insert under the door opening handle, which is clearly shown below, and take it out:
Here is the end result of removing this lock:
After which the handle is easily removed from the slots along with the washers:
Now we unscrew the two bolts from the lower door pocket, as is clearly shown below:
And don’t forget about the latch that blocks the lock; it also needs to be unscrewed:
But now you can carefully remove the trim by first prying it off from any angle, overcoming the resistance of the plastic clips with which it is attached to the door along the entire perimeter:
As a result, we get free access to all mechanisms and parts of the door:
This is what it all looks like after doing this procedure:
If it is necessary to replace it, then install it in the reverse order. As you can see, there should be no difficulties with this repair.
Where to begin
Starting with the doors is a good option; the work will take a minimum of time, will not require much effort and will give you the opportunity to practice:
- If you do the job well, you can reduce the noise level inside the cabin by 20-30 percent.
- The soundproofing door no longer allows sounds from outside to pass through and improves the sound of acoustics from the inside.
- In addition, the doors will begin to close much softer, unnecessary noise, rattling and vibration will disappear
- A big advantage of sound insulation for doors is the ability to significantly improve the sound quality of speakers installed inside the door trim
Soundproofing stages
Before we get started, let's first consider all the steps:
Schemes of different degrees of sound insulation of doors
- The first step is gluing vibration insulation, it is necessary to eliminate possible rattling when closing and opening doors, photo above
- If you plan to install good acoustics, this will improve the sound quality and remove unnecessary noise and overtones.
- The second stage is sound insulation on top of the vibration insulation; this stage of work allows you to prevent extraneous sounds from entering the cabin from outside.
- The third stage is the treatment of rubbing parts with anti-squeak (the purpose is clear in itself), here it is necessary to pay attention to decorative and other elements of the interior that are capable of squeaking (for example, upholstery and fixing clips, dashboard elements)
- When you complete all the steps in sequence, you will have a door that is soundproof, acoustic and without squeaks.
Door opening method
If the VAZ-2109 door does not open from any side, then the cause of the breakdown is difficult to determine, since there is absolutely no access to the lock mechanism.
A somewhat simplified version of the breakdown occurs when the door does not slam shut completely and gets stuck in that position. Then it is possible to reach the latch from the outside with a sharp object.
To open a jammed door, you must first perform the following steps:
When simple means do not produce results, the door will have to be opened from inside the cabin, which will require removing its trim.
In practice, this is not easy to do, because the casing is pressed by the sash and it is difficult to pull it out without damage. But there is still no other way out: it is better to damage the inner panel than to mutilate the door itself.
Step-by-step soundproofing of doors
We will consider the entire work process taking into account the stages mentioned above:
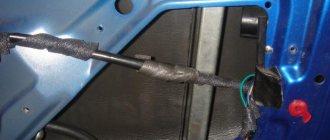
- First you need to prepare the doors for work - remove the trim and move all the interfering parts to the side (it is not recommended to remove the rods and window regulators, then it is very difficult to put them back in place), if there are wire connectors, disconnect them, mark them and move them to the sides
- Also remove the factory sound insulation and throw it away immediately, if any.
- Carefully inspect the “factory” work; the door speaker, as a rule, is installed directly on the trim, and you can forget about the sound quality
- You may have noticed that at high volumes the trim literally moves in “waves”, unnecessary squeaks and other sounds occur, and the output to the cabin decreases
- It turns out that the sound gets under the door trim, and not into the interior of the car; only after sound insulation has been completed, such effects disappear
- Sound insulation of a car door begins with vibration insulation (like any other) - it is installed on the outer wall of the door (it is located closer to the street), here Vibroplast Silver or Bimast Standard is used
Attention: Before starting work, be sure to degrease all surfaces (otherwise the vibration insulation will soon come off and will have no effect)
- It is worth considering that, for the best effect, it is advisable to cover the area as much as possible
- However, here you will immediately encounter difficulties - you won’t be able to glue a whole piece, so make blanks in advance so that they fit through the technological holes
- You will have to glue the pieces overlapping
- Warm up with a hairdryer to a temperature of 25-30 degrees, roll the glued pieces with a roller, simply with a sanded board where the roller does not pass
- In this case, there is no need to seal the stiffeners, it doesn’t seem to make things worse, but there is little benefit either (the stiffeners practically do not vibrate)
- Therefore, waste extra expensive material, after completing this work, you can move on to the next stage
- The next step is to glue the sound insulation - many car enthusiasts confuse the concepts - sound insulation and vibration insulation
- The materials are different and the tasks of these materials are also different.
- The purpose of the first is to reduce metal vibrations under the influence of sound waves, the second is to absorb these same waves and prevent their propagation
- In addition, sound insulation plays a second, also very useful function - thermal insulation, which becomes very important in cold weather.
- The instructions recommend gluing a sound insulator (for example, Accent, in the cabin Accent gives a better effect than Splen, splen is a sound reflector, it is better to use it outside the cabin)
- The ease of gluing is ensured by the mounting layer, remove the protective film and glue it on top of the vibration insulation, it is also better to glue the entire area as much as possible
- If it doesn’t come out in one piece, don’t worry, when everything is done efficiently, unnecessary sounds won’t “leak” into the cabin.
- Keep in mind for the future that over time you may be installing powerful speakers, so immediately close all technological holes, except for drainage ones, with vibration insulation
- It is better not to touch the drainage holes, otherwise condensation will begin to accumulate in the doors, which causes accelerated corrosion of the metal
- An additional plus is increased rigidity, it will allow both high and low bass to sound better, and much better.
- A closed space is created in the door, which is important for better speaker sound
- Let's move on to treating the door with anti-squeak, just use Bitolon or Madeline anti-squeak, then carefully inspect all the places where the metal of the doors meets their skin - these places are glued with anti-squeak
- The same work must be done for all plastic trim elements. Be sure to treat the clips (they are also sources of noise)
- Ideally, replace the clips with self-tapping screws with decorative caps, both durable and beautiful
- And the price is reasonable
- This forethought will make door closing virtually silent and improve the sound quality of the front speakers.
- Now you can put all the removed parts back in place and enjoy the resulting effect.
- Other doors are soundproofed in the same way
- Let us remind you once again that for maximum effect, you need comprehensive sound insulation of the entire machine
- All you have to do is prepare the necessary materials, tools, set aside half a day of free time and work on your car
- If you follow order and rules, then you will do no worse than in an elite salon
- And the overall result is a noticeable reduction in noise in the cabin, improved sound quality of acoustics and saved money
We repair “Nine” locks ourselves
Let's say the key in the VAZ-2109 lock does not turn or, conversely, turns and does not unlock the door. Repairing car locks involves one of the following actions: replacing the cylinder (cylinder), replacing or repairing the internal lock. In official manuals, by the way, it is recommended not to repair the internal lock mechanism, but to replace it. Be that as it may, you first need to get to it, for which you remove the door trim. Each of the actions required for dismantling is further illustrated in the photo. The entire sequence must be considered in order.
"Nine" and the door lock device
Theoretically, the lock mechanism can be divided into 3 parts: a handle with a cylinder and a button, the main mechanism, and the inner door handle. All nodes and connections between them are shown in the diagram.
The node labeled “2” looks like this.
4 rods fit to it, that is, to this node. Two of them are connected to the external handle, and in order to dismantle it, the rods are disconnected.
If there is no electrical wiring inside the door, you do not need to disconnect the battery before performing repairs.
In other cases, that is, when power windows or locks are installed, the battery must be disconnected. To do this, as many people know, it is enough to remove the “negative” terminal. This means that before repairing locks, the hood is opened first, not the doors. Anyone who violates such a requirement will, at best, have to change burnt fuses.
Replacing the door lock cylinder
To gain access to the locking mechanism, you need to remove the trim. On the “Nine” it is quite simple to remove it - the casing is held in place by plastic pistons. These pistons are located around the perimeter; they are simply pressed out and, if necessary, replaced with new ones.
First, as is easy to understand, you need to dismantle three elements: the side handle, the window lifter handle, the socket of the inner handle of the lock. The “dog” must be pulled up, but it is better to remove the seal that protects the glass during the dismantling of the casing.
Removing and disassembling the door handle
When the door trim is missing, you can freely disconnect the two rods that go from the door handle to the lock. The following shows exactly what elements we are talking about.
By squeezing the plastic tab with a screwdriver, the rod is disengaged. We will assume that all of the above actions have been completed. Then, you can move on to the next stage.
The outer handle is attached to the metal using two nuts. One of them is located under the trim, the second is on the back side of the door. Both nuts need to be unscrewed.
After dismantling the specified unit, it will be easy to remove the cylinder. This is done like this:
- Push out the pin holding the outer plastic cap;
- Dismantle the mounting spring (see figure);
- By installing the key and turning it, the cylinder is pulled out.
The appearance of the spring holding the cylinder and the handle together is shown below.
It is important to know that the knot itself, called the “larva,” needs careful handling.
Experience shows that it will be easy to lose the metal pins that ensure secrecy. The cylinder is secured inside the handle body and the pins remain in place. But if you pull the cylinder out, each pin is “free.”
Car fasteners for VAZ
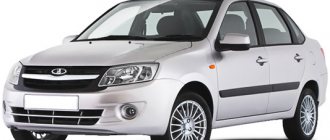
Ladas and Priors are increasingly appearing on Russian roads. The automotive community began to pay more attention to the products of the domestic automotive industry. The reason for this is not only their loyal price. The very quality of the Togliatti auto giant's cars is gradually improving, giving owners a feeling of safety and comfort.
VAZ: bolts nuts wholesale
Previously, after purchasing a VAZ model, it was recommended to immediately tighten the bolts and nuts on Kalina or Vesta
.
In current models, the trunk and doors open without annoying squeaks. Everything in the cabin is adjusted, thanks to steel and plastic car fasteners for Largus or Lada.
Auto clips, spacer pins
securely hold instruments and attachments in their grooves.
Connectors and clamps made of non-fragile plastic
ensure precise fit of cables under the casing and distribution of lighting elements.
The design of Lada also inspires involuntary respect for the developers. Today it is a modern car that can be extremely useful for an urban family.
In addition, all cars of Russian manufacturers are repairable. It will not be difficult for the car owner not only to purchase a car fastening kit for Vesta or Priora
, but also assemble a new motor at the nearest service station.
Finally, all VAZ models
liquid. They are always in demand on the secondary market.
Fasteners for VAZ: what to look for when purchasing
The structural strength of any car is achieved by a variety of technological methods. The quality of a conveyor assembly is determined not only by laser welding. Compact auto-latches are also of great importance for reliable installation of components and mechanisms.
Purchasing fasteners for VAZ 2101 or 2106
, the material of its manufacture should be taken into account.
Plastic snap-on clips and rivets
are required for interior fittings. They firmly fix mats, sound insulation, moldings, and seals.
They are used to attach:
- decorative elements;
- handles, levers and buttons;
- devices;
- central panel;
- glove box doors;
- mounted small-sized devices.
VAZ wheel bolts. Hub fastener.
A wheel mount
, connectors for the chassis, transmission, and brake system must be metal only.
Power auto fasteners for VAZ cars
are made of steel or various metal alloys. It is relevant for technical work due to its increased resistance to mechanical loads, as well as to external influences.
The highest performance characteristics should have:
- brackets;
- springs;
- bushings;
- hairpins;
- nuts;
- rivets;
- bolts;
- self-tapping screws;
- screws.
In salon work, metal connectors for Lada
It is not recommended to use it, as there remains a risk of increasing the overall weight
of the car .
Inexpensive clamps and screws for VAZ from KrepAuto
In the online store
“KrepAvto” or at
warehouse
in
St. Petersburg
you can buy
high-quality auto locks for any AvtoVAZ model at low prices
.
products on krepauto.ru
GOST
, ISO and
DIN
standards .
Order
any volume will be sent with
delivery
to the specified address to
any region of the Russian Federation.
Posts 1 to 20 of 43
1 Topic from Orlov 2008-12-05 18:46:34
- Orlov
- User
- Offline
- Registered: 2008-11-11
- Messages: 161
- Reputation: [ 0 | 0 ]
Topic: Reliable fastening of door cards
Guys, in winter I want to take care of the car interior. I tried to remove these cards, they can be removed, but even with new latches they don’t fit back in properly, not all the fasteners snap into place, some die right away before they even snap back into place. Question, has anyone improved this mount?
2 Reply from Rus-yaz 2008-12-05 19:08:09
- Rus-yaz
- User
- Offline
- Registered: 2008-11-08
- Messages: 447
- Reputation: [ 0 | 0 ]
Re: Reliable fastening of door cards
Personally, I have 3 black screws on each card in inconspicuous places, except for one!
3 Reply from Toha 2008-12-05 22:43:35
- tokha
- User
- Offline
- Registered: 2008-11-15
- Messages: 77
- Reputation: [ 0 | 0 ]
Re: Reliable fastening of door cards
Guys, in winter I want to take care of the car interior. I tried to remove these cards, they can be removed, but even with new latches they don’t fit back in properly, not all the fasteners snap into place, some die right away before they even snap back into place. Question, has anyone improved this mount?
I have more self-tapping screws, but they are closed with special plugs, they don’t look bad
4 Reply from Gamlet 2008-12-05 23:58:06
- Hamlet
- User
- Offline
- Registered: 2008-11-09
- Messages: 771
- Reputation: [ 0 | 0 ]
Re: Reliable fastening of door cards
looks terrible) it’s better to buy normal caps that don’t crack
5 Reply from dr-tim 2008-12-06 02:26:28
- dr-tim
- Moderator
- Offline
- Registered: 2008-11-07
- Messages: 877
- Reputation: [ 0 | 0 ]
Re: Reliable fastening of door cards
The pistons are bullshit.. I have 10 screws with 100mm. When actively listening to music, the pistons simply fall out over time + build-up from podiums and speakers. Vibrations due to the card not being tightly attached to the door are not good for sound quality.
6 Reply from XPum827 2008-12-06 04:51:40
- XPum827
- User
- Offline
- Registered: 2008-11-08
- Messages: 934
- Reputation: [ 1 | 0 ]
Re: Reliable fastening of door cards
I installed a mom-and-pop type piston and a special plug for the chisels with a self-tapping screw assembly.
There are photos, but the quality is not very good.
7 Reply from Tonic 2008-12-06 04:53:15
- Tonic
- User
- Offline
- Registered: 2008-11-12
- Messages: 34
- Reputation: [ 0 | 0 ]
Re: Reliable fastening of door cards
when I was sorting out a door from a BMW E-39, I discovered that the bugs from its door trim are very similar in size to eighths, but different in design, in short, maybe they will fit and will hold the trim better. It’s just that you can’t get to BMW officials to buy and check bedbugs.
8 Reply from alexeykamf 2008-12-06 05:30:49
- alexeykamf
- User
- Offline
- Registered: 2008-11-09
- Messages: 1,679
- Reputation: [ 0 | 0 ]
Re: Reliable fastening of door cards
Yesterday I removed all the door trims, today I went to get screws. Pistons are sold in full!
9 Reply from XPum827 2008-12-06 09:09:07
- XPum827
- User
- Offline
- Registered: 2008-11-08
- Messages: 934
- Reputation: [ 1 | 0 ]
Re: Reliable fastening of door cards
In general, the problem, by and large, is not in the pistons themselves, but in the map (skin) of the door, or rather its geometry, is not made accurately, and it changes over time.
And even if you use very good pistons, over time they weaken due to shaking and begin to “climb out”, hence additional creaking and rattling.
10 Reply from Valinog 2008-12-06 09:16:44
- Valinog
- User
- Offline
- Registered: 2008-11-12
- Messages: 885
- Reputation: [ 0 | 0 ]
Re: Reliable fastening of door cards
and the new door trims are absolutely amazing. You took it off once, you can’t put it on a second time. these brackets for the pistons just stupidly fall off the trim.
11 Reply from dr-tim 2008-12-06 10:00:40
- dr-tim
- Moderator
- Offline
- Registered: 2008-11-07
- Messages: 877
- Reputation: [ 0 | 0 ]
Re: Reliable fastening of door cards
when I was sorting out a door from a BMW E-39, I discovered that the bugs from its door trim are very similar in size to eighths, but different in design, in short, maybe they will fit and will hold the trim better. It’s just that you can’t get to BMW officials to buy and check bedbugs.
I think such caps will cost about 30-50 rubles apiece. not economically profitable.
12 Reply from Grigr 2008-12-06 14:20:31
- Grigr
- User
- Offline
- Registered: 2008-11-23
- Messages: 59
- Reputation: [ 0 | 0 ]
Preparation, tools, basic and auxiliary operations
Such a primitive change process requires the following tools:
- flat and Phillips screwdrivers;
- key to 8;
- awl.
When restoring the outer handle, you will additionally need a bushing for knocking out the axle (bits) and a hammer. Regardless of the type of handle being replaced, the upholstery with attachments mounted on the interior side must be dismantled. The process then develops according to the following scenario:
- unscrew the screws securing the elements;
- remove traction;
- remove the handles;
- install new parts.