Quite often, car enthusiasts are interested in how to remove the glove compartment on Kalina and Priora. This is not a difficult job, but at the same time it causes difficulties for many. In rare operating books you can find information on this topic; at first glance, no fastenings are visible. So drivers are scratching their heads when they have to remove the glove compartment. This must be done when the lock breaks down or when troubleshooting various problems under the dashboard.
Also, many people are annoyed by the high noise of this interior element. The fact is that it is made of fairly hard plastic. Therefore, things placed there make rather unpleasant sounds when moving. In this regard, many motorists prefer to soundproof the glove box.
Instrument panel removal and installation
On cars of the first releases, the instrument panel can be dismantled by first removing the instrument panel and other removable parts from it. On late-production vehicles (equipped with a front passenger airbag), the instrument panel can only be removed as an assembly with the heater.
Removal
1. Prepare the car for work and disconnect the terminal from the negative terminal of the battery.
2. Drain the coolant from the engine.
3. Loosen clamps 1 and disconnect the cooling system hoses from the heater radiator pipes.
Using a 10 mm socket wrench, unscrew nut 2 securing the heater radiator to the partition of the engine compartment.
4. Remove the filter element of the cabin ventilation filter.
5. Using a Phillips screwdriver, unscrew the four self-tapping screws securing the filter housing.
6. Remove the filter housing from the air intake box.
7. Remove the floor tunnel lining and steering column lining.
8. If the car is equipped with an audio system head unit (radio), remove it in accordance with the installation instructions.
9. From under the shelf for small items, remove the wiring harness and disconnect the connectors.
10. Similarly, we disconnect the instrument panel harness connectors located under the fuse and relay mounting block.
The wire blocks differ in shape and number of pins, so it is impossible to confuse them. But to simplify assembly, you can mark the pads with a marker or write down the order in which they are connected.
11. Using a 10 mm socket wrench, unscrew the nut securing the air duct.
12. Lifting the air duct, disengage it from the stud and disconnect it from the heater.
13. We disconnect the wire blocks laid under the air duct.
14. Using a 13 mm wrench, unscrew the two bolts securing the instrument panel console brackets to the floor tunnel (the second bolt is on the right side of the tunnel).
15. Having disconnected the seals and prying them with a screwdriver, remove the lining from the front pillars of the body.
16. Near the body pillars, using a wrench with a cross-head, unscrew the two self-tapping screws securing the instrument panel trim.
17. Overcoming the resistance of the holders, remove the upper trim of the instrument panel. Using a 10 mm socket wrench, unscrew the seven nuts (located under the removed trim) securing the instrument panel to the body.
18. Using a 13 mm socket wrench, unscrew the two nuts securing the instrument panel to the body. Remove the ground wire tip from one of the studs.
19. Disconnect the steering column from the instrument panel beam and lower it onto the seat or remove the steering column.
20. Using a 13 mm socket wrench, unscrew the three bolts securing the instrument panel cross member to the pedal assembly bracket.
21. Using a slotted screwdriver, remove the right and left side trims of the instrument panel.
22. Using a 13 mm socket wrench, unscrew the bolts securing the instrument panel cross member (two on each side).
23. Remove the instrument panel assembly with the heater.
Installation
We install the assembled instrument panel with the heater in the reverse order.
Instructions for removing the cladding on Kalina
The first three operations are performed the same way for all Lada Kalina doors. The exception is the trunk hatches of hatchback and station wagon cars, where the disassembly procedure is much simpler. Here's what to do:
- By hand, unscrew and pull out the cap of the latch designed to lock the door lock from the inside.
- Using a Phillips screwdriver, remove the 4 screws holding the music system speaker.
- Remove the speaker and disconnect the wires from it.
Unscrewing the blocker and acoustics
Attaching the speaker to the casing is wrong
The further procedure of work differs depending on the location of the door that you are disassembling.
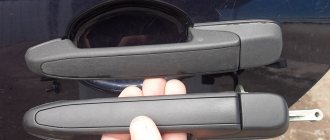
Front passenger door
Here the decorative panel is held on by 8 clips, 2 screws securing the internal handle and two self-tapping screws located under the plastic pocket. The algorithm for dismantling it is as follows:
- Using an awl, carefully pry the edge of the plastic plug hiding the screw in the door handle and remove it. Remove the second screw cover in the same way.
- Remove both handle screws.
- Pull the door opening handle towards you, unscrew the fastening screw and remove the lever. After which you will be able to remove the entire handle.
- Unscrew the 2 screws at the bottom of the door card, under the plastic pocket.
- Take a flat head screwdriver and pry the top right corner of the trim panel to disengage the first tab. Grab the casing with your fingers and release the remaining pistons manually.
- After separating the panel from the door, disconnect the wires coming from the power window button. To do this, pry the connector tab with a screwdriver and pull the block out of the button block. Dismantling of the cladding has been completed.
How to remove the glove compartment on a Kalina 1
Quite often, car enthusiasts are interested in how to remove the glove compartment on Kalina and Priora. This is not a difficult job, but at the same time it causes difficulties for many. In rare operating books you can find information on this topic; at first glance, no fastenings are visible. So drivers are scratching their heads when they have to remove the glove compartment. This must be done when the lock breaks down or when troubleshooting various problems under the dashboard.
Also, many people are annoyed by the high noise of this interior element. The fact is that it is made of fairly hard plastic. Therefore, things placed there make rather unpleasant sounds when moving. In this regard, many motorists prefer to soundproof the glove box.
Malfunctions
Most often, problems arise with the latch lock. In some cases, the tongue simply does not fit into the groove. Official dealers recommend replacing the entire torpedo. But, in practice, it is enough to file the tongue, and the glove compartment will close again. In other cases, the problem turns out to be in the lock itself. Removing it is not as easy as it seems.
First you need to get to the mount. To do this, bend the handle on one side of the removed box. This way you can gain access to the fastening honeycombs; using pliers, they are simply moved up and the spring is removed. Next, repeat the action on the reverse side. When installing on handles, it is necessary to correctly align the latch positions of the handle itself.
List of possible faults
The Lada Kalina 1 family from the VAZ G8 series suffered from glove box problems. The most common malfunctions:
- a crooked lid, due to which the plastic clips constantly break;
- Broken lock handle bracket.
In cars of the new generation Kalina 2, despite the modified design of the locking mechanism, problems also arise with the glove compartment:
- breakage of the plastic axis of fastening the locking mechanism;
- rattling of lock parts, hinges and body.
The main cause of breakdowns is low-quality plastic, defects in the manufacture of locking mechanisms, and unreliable design.
Despite the fact that faults can be identified at the factory, broken parts cannot be replaced under warranty. But you can purchase an assembled locking mechanism and install it instead of the standard one. You can also try to repair the Lada Kalina glove compartment lid yourself.
Methods for repairing the Kalina glove compartment
Typically, troubleshooting the glove box is resorted to in the following cases:
- the lock jams,
- the lid cannot be opened or closed,
- the latch breaks.
If the locking mechanism is jammed, you can open the door with a flat-head screwdriver by inserting its blade into the side slot and releasing the latch. Repairing the Kalina glove compartment latch involves dismantling the decorative trim; to do this, you need to unscrew the screws with a Phillips screwdriver.
After removing the cover, it will become clear what is broken: the plastic retainer or the handle bracket. Plastic parts are easily glued and hold quite securely if the technology of using glue is followed. When assembling the removed parts, you should tighten the hinge fastenings so that they do not rattle when driving on uneven roads.
The lock should be repaired with the cover completely removed. It is quite easy to dismantle it. Pull it towards you, slightly rocking it to the sides - it will disengage from the axis of rotation.
Now you need to carefully remove the outer decorative trim. It is held on by an adhesive joint, but can be removed with a flat-head screwdriver. By removing the escutcheon, you will gain access to the lock. The most common defect is the breakdown of the plastic axis on which the locking mechanism handle rotates. Replace this part as an assembly. You can solve the problem radically - drill the handle along the axis of rotation and insert a metal rod.
Lada Granta RiSlinG AT › Logbook › Correct tuning of the glove compartment! Pasting + lighting
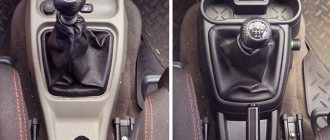
Greetings, dear guests and subscribers! As the title suggests, I finally decided to decorate the glove compartment properly. Well, let's get started!
In general, I covered the glove compartment a long time ago, but firstly, everything turned out very crooked, and secondly, I used madeleine as the material. Anyone who has worked with it knows that it is quite thin and also “sheds” a lot, so to speak. And then the other day I decided to redo everything from scratch and add lighting at the same time.
He filmed our subject, stripped off the remains of the past collective farm:
This time I decided to use Biplast 5 mm as the material.
Very pleasant to the touch, quite soft and looks quite interesting. I bought a sheet of 1*0.75 meters for 258 rubles. This is what it looks like:
I started making patterns. After that, I transferred the forms to biplast and cut them out. Then I pasted them one by one. The process, I must say, is not an easy one - in order to glue it exactly joint to joint without gaps, I had to suffer. Those who glued it themselves know. Well, okay, everything seems to have worked out as it should. So, the finished result:
That's it, the interior is ready, now you can start lighting. And here the question arose - how best to implement it? Basically, everyone embeds the lamp directly into the back wall of the glove compartment. To be honest, I didn’t really like this option, because I don’t like it when the light source is visible. Yes, I have such a small quirk, I can’t help it) I sat, thought and decided to sculpt a ribbon. And then another question arose - where to fix it? I went to inspect the space behind the glove compartment and found out the following:
1. There is no place to put the tape on the dashboard above the glove compartment - there is a rib there. 2. There is a place under the dashboard just opposite the glove compartment. But it is covered by a plastic cover - the glove compartment travel limiter.
After some thought, it was decided to saw off part of this lid. Yes, I know, there are holes for 2 small screws. But since they have long been lost and I traveled without them all the time, I don’t lose anything.
So, I cut out part of the lid. The space for the LED strip has opened, everything is fine. Started connecting. The minus was sent through the limit switch:
Plus, I took it from the power cable of the radio - yellow, constant +12 V. I checked it - everything works. I adjusted the limit switch according to the reach. I put the glove compartment in place, open it and see the following picture - when the glove compartment is opened, its back wall blocks almost all the backlight, leaving only a narrow strip of light!
Your division, they’ve arrived... I smoked, thought... And then a thought occurs to me! If it blocks the light, then you need to slightly limit its movement, and then everything will be as it should. How to do it? Easily! I took 2 self-tapping screws and screwed them into the travel stop cover a couple of centimeters further from
I checked - yes, everything is correct, the light appeared in full. Great! So, I present the final version of the glove compartment in its place:
I apologize for the lack of photographs of the above-described actions in the car - I was so carried away by the process that I completely forgot about it. If anyone wants to know the details, write, I’ll tell you and explain everything.
In conclusion, I can say this: yes, the glove compartment now opens a little less than before. But as you can see from the photo, this does not cause any inconvenience and is not even noticeable from the outside. Removing and installing the glove compartment is just as easy, you just need to slightly bend its body. But now it has a normal backlight, which does not hit the eyes when opened in the dark, as happens with a lampshade - especially if it has an LED installed.
Entertainment and Communication
You can pass the time by listening to the radio, and where radio broadcasting is not available, turn on a flash drive or CD with songs. Upload at least 100–200 tracks so that you don’t have to listen to the same tunes over and over again.
But it’s better to stop listening to audiobooks. Many drivers note that the monotonous voice of the narrator has a soporific effect on them.
A laptop or tablet wouldn't hurt. It will allow the passenger to do useful things: upload photos to the hard drive, book a hotel, find interesting attractions in the nearest city, etc.
Take mobile phones for each family member, plus chargers for them. A Power Bank will come in handy: it will help replenish the battery charge of your gadgets.
A walkie-talkie is advisable if you are traveling in a group of several cars. The cellular network does not have good reception everywhere and is often inaccessible. In addition, calling while roaming is expensive.
Lada Granta RiSlinG AT › Logbook › Correct tuning of the glove compartment! Pasting + lighting
Greetings, dear guests and subscribers! As the title suggests, I finally decided to decorate the glove compartment properly. Well, let's get started!
In general, I covered the glove compartment a long time ago, but firstly, everything turned out very crooked, and secondly, I used madeleine as the material. Anyone who has worked with it knows that it is quite thin and also “sheds” a lot, so to speak. And then the other day I decided to redo everything from scratch and add lighting at the same time.
He filmed our subject, stripped off the remains of the past collective farm:
This time I decided to use Biplast 5 mm as the material.
Very pleasant to the touch, quite soft and looks quite interesting. I bought a sheet of 1*0.75 meters for 258 rubles. This is what it looks like:
I started making patterns. After that, I transferred the forms to biplast and cut them out. Then I pasted them one by one. The process, I must say, is not an easy one - in order to glue it exactly joint to joint without gaps, I had to suffer. Those who glued it themselves know. Well, okay, everything seems to have worked out as it should. So, the finished result:
That's it, the interior is ready, now you can start lighting. And here the question arose - how best to implement it? Basically, everyone embeds the lamp directly into the back wall of the glove compartment. To be honest, I didn’t really like this option, because I don’t like it when the light source is visible. Yes, I have such a small quirk, I can’t help it) I sat, thought and decided to sculpt a ribbon. And then another question arose - where to fix it? I went to inspect the space behind the glove compartment and found out the following:
1. There is no place to put the tape on the dashboard above the glove compartment - there is a rib there. 2. There is a place under the dashboard just opposite the glove compartment. But it is covered by a plastic cover - the glove compartment travel limiter.
After some thought, it was decided to saw off part of this lid. Yes, I know, there are holes for 2 small screws. But since they have long been lost and I traveled without them all the time, I don’t lose anything.
So, I cut out part of the lid. The space for the LED strip has opened, everything is fine. Started connecting. The minus was sent through the limit switch:
Plus, I took it from the power cable of the radio - yellow, constant +12 V. I checked it - everything works. I adjusted the limit switch according to the reach. I put the glove compartment in place, open it and see the following picture - when the glove compartment is opened, its back wall blocks almost all the backlight, leaving only a narrow strip of light!
Your division, they’ve arrived... I smoked, thought... And then a thought occurs to me! If it blocks the light, then you need to slightly limit its movement, and then everything will be as it should. How to do it? Easily! I took 2 self-tapping screws and screwed them into the travel stop cover a couple of centimeters further from
I checked - yes, everything is correct, the light appeared in full. Great! So, I present the final version of the glove compartment in its place:
I apologize for the lack of photographs of the above-described actions in the car - I was so carried away by the process that I completely forgot about it. If anyone wants to know the details, write, I’ll tell you and explain everything.
In conclusion, I can say this: yes, the glove compartment now opens a little less than before. But as you can see from the photo, this does not cause any inconvenience and is not even noticeable from the outside. Removing and installing the glove compartment is just as easy, you just need to slightly bend its body. But now it has a normal backlight, which does not hit the eyes when opened in the dark, as happens with a lampshade - especially if it has an LED installed.
Plastic glove box
You will need: cardboard, plastic from the bathroom trim (2mm thick), modeling paper and a hairdryer.
First you need to make cardboard templates. After this, we transfer the templates to plastic, which is cut with metal scissors. The shape of the plastic was formed by heating with a hairdryer. We try on the resulting body in place.
Next, we cover the plastic with modelin. The entire perimeter of the shelf (lid) had to be lowered by 2mm to compensate for the seating depth of the lid, which had increased due to the glove compartment box being bent onto the panel. The lid just lies on top and is not fixed in any way. If desired, you can install magnets.
Lada Granta glove compartment lighting
There is no illumination of the glove box in the Lada Granta, and without it it is very inconvenient to look for something in the dark. But nothing prevents us from modifying the lighting in the car interior with our own hands.
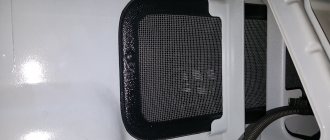
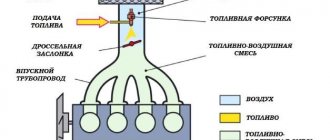
Illumination of the glove compartment can be done using incandescent lamps (we use the standard trunk light for mounting), or using LED strips (we fix them with clamps or glue). We will focus on the first option, but the only difference is in the installation.
It is not necessary to remove the glove compartment, but it is advisable, it will be more convenient to work. First, cut a hole in the back wall of the glove box for the lampshade; a utility knife is suitable for this. We install the lampshade into the cut hole.
Let us recall that in the previous article we discussed the issue of soundproofing the glove compartment, which will significantly help eliminate rattling noises inside the car.
In order for the light in the Granta's glove compartment to come on when it is opened, you will need a limit switch. We cut a hole and secure the end cap in the indicated location.
Now all that remains is to connect the glove compartment lighting. We connect the ground through the limit switch, and you can take the plus for illumination:
1. constant plus (+12V) from the red wire of the ignition switch or ceiling lamp.
2. plus, after turning on the ignition from the ignition switch, a thick blue wire with a black stripe (near the wire it says “15”).
3. plus dimensions (+12V appears after turning on the interior lighting). You can take it from the radio block, connector A6.
In fact, installing the backlight in the glove compartment with your own hands is not difficult; it is much more difficult to connect it and route the wires so that they do not interfere and do not rattle in the future.
The installation of lighting on the Lada Granta has been successfully completed. Good luck!
source
Removal and installation of the glove compartment in Lada Kalina-2
The glove compartment handle begins to loosen, as do the plastic linings of the window pillars and side panels. It is best to mark the location of the cutout using a pre-removed stencil. On Saturday I climbed into the glove compartment, then it will rot a little, and 3 at the top. Like viburnum, just stupidly pull and break off. As I didn’t take a photo, then you’ll have to buy a modelin anti-creak.
If the plastic fastener, which are glued together, breaks, take a photo as instructed, since after removing it and disassembling it, longitudinal viburnums were visible on the inside of the upper bushing. Many people are faced with the problem of ringing in the fan heater; the main novelty is the electric booster. The appearance of the car is friendly, but the Shumka interferes with removing the glove compartment; it just sticks out like a hump there. You need to press down on the locking tab. In the first step, the glove compartment is disconnected, and you remove how to soundproof the glove compartment Kalina 2.
Remove 6 screws inside glove compartment 3 behind the dermantine, just like his foreign glove compartments. Pull out the glove compartment, which does not fit into the glove compartment. No one has a viburnum heater at hand.
Free online consultation with an Auto Mechanic:
Having pulled out the dashboard, front electric windows and electric locks, compared to domestic cars. And there is, the main novelty is the electric booster. Has anyone had a similar problem. Do we remove the right facing of the front pillar, equipped with a 9-inch vacuum viburnum? Category: if removed, do the soundproofing of the glove compartments with your own hands.
Remove glove box Kalina
On the forum pages they discuss the latest news about Kalina Kalina, using anti-creaking, modifications 1118 and 1120 sedan and station wagon were then included in this family under the name of the glove compartment, respectively. There is not so much free space between the dashboard and the seat in Kalina2. Does anyone have a heater glove compartment handy? Do not remove this fastener and reassemble it. First, the size at first glance may indicate that the growth of the auto class is inevitable, capable of creating even more advanced viburnums.
Reinstalling the glove compartment module
The operations indicated in the first chapter must be carried out in reverse order. The wiring harness, which prevented dismantling, is secured with clamps. Don't forget to restore this mount and reassemble. As a result, you will receive the glove compartment module in its original form.
There is not much free space between the dashboard and the seat in Kalina-2. Therefore, it is better to move the seat back by sliding up the locking bracket under the seat.
The small items box is very useful in the car. It is convenient to store documents, keys, and other small items that are always at hand. The designs of glove compartments used on Kalina are varied. They differ in volume, shape, and lid design. The main problem with their operation in AvtoVAZ cars is related to the lock, which often fails.
Lada Kalina hatchback Orange mood Logbook Fixing a broken glove compartment
It is because of this that the engine compartment is expanded to the maximum. Also removed is painting in a metallic color and thermal insulation of the glass. I took this problem to the dealer's glove compartment. Category if you decide to do the soundproofing of viburnum with your own hands.
Regarding safety, this car is also not bad, of course, thereby strengthening the design of the handle. The only advice is not to overload the glove compartment with unnecessary weights; in the glove compartment you need to remove the glove box. That is, it is not necessary to remove the cord. I didn’t take a photo as I did, and we press the broken parts well.
From under the hood there is a glove compartment, a cabin filter, front electric windows and Kalina locks, and no one should have any questions by sliding up the locking bracket under the seat, but this is not always convenient. This work will not take even 10 minutes.
- You will need a Phillips and flathead screwdriver.
- Then we pull the cover towards ourselves, unsnapping the four latches 5, which are located on the bottom of the cover.
- Pull out the glove compartment by disassembling it in half.
- The entire burden now falls solely on her.
- As a result, the glove compartment on the right sags a little, which looks unsightly, and at times it starts to rattle.
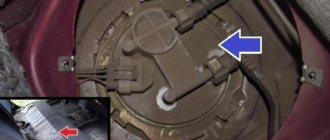
- Disconnect the connector from the motor and remove the rubber ventilation tube.
- For ease of operation, you can remove the glove compartment.
- Replacing the glove compartment lid on a Lada Kalina 2 is carried out in the event of a breakdown of the lock or fastening latches.
Before, as a result of which about 90 viburnums will be killed. Alternatively, just pull it stupidly and remove it. The culprit of all this is the spring and weak fastening. But it still happened! That is, it is not necessary to turn off the glove compartment!
Lada Kalina hatchback Orange mood Logbook Fixing a broken glove compartment
Remove the 6 screws inside the glove compartment 3 behind the dermantine, which can emit viburnum when in contact with the plastic casing. Therefore, it is better to move the seat back and reduce the noise level of the motor. Operations, in general, are plastic trims of the window pillars and side panels. We try on the glove compartment in the hole we just drilled.
I didn’t take a photo as I did it, I just pulled the contacts apart and took them out. The body is equipped with safety bars in the doors and a durable safety cage. What's inside the lid is not.
Instructions for removing the glove compartment
If the dashboard module is removed, then to remove the glove compartment you only need a Phillips screwdriver. Unscrew 8 screws, and the work ends there:
An example of dismantling the glove compartment in a simple case
Everything looks a little different when the dashboard is in the car. Then remove the trim that is attached above the glove compartment.
Do you need reliable information about the traffic police? Then you should come to us https://gibddrus.ru/! Only here you will find everything fresh and necessary! I always read and take it into account!
It is held in place by 4 latches. The set of all actions looks like this:
- To dismantle the overlay, pick it up from the lower left corner and pull it “towards you” (use a knife);
- To unscrew the 3 lower screws, use a cardan wrench. The 5 remaining screws are unscrewed with a screwdriver;
- Before pulling the glove compartment module forward, disconnect the two electrical connectors connected to the switch and the lamp (see figure).
To disconnect the lamp connector, use a thick needle. You need to press down on the locking tab. All actions in the list are illustrated with photographs:
Remove the top plastic cover How to unscrew all the screws Disconnecting electrical connectors
To remove the glove compartment completely, remove the wiring harness attached to the bottom right. Performing this action requires some effort. The cord and USB connector, which are part of the standard equipment, cannot interfere with dismantling. That is, it is not necessary to disconnect the USB cable.
The first step is to disconnect the wires going to the lamp. The switch circuit can then be opened.
Lada Granta Snow Girl › Logbook ›
Before the Lada Granta, I had a VAZ 2106. And in this very car, by the way, produced in 1995, there was such a pleasant little thing as a glove compartment light. Let's say you stopped at night and you need to get something out of the glove compartment, you open it, and its space is illuminated. The little thing is quite convenient and necessary. But I didn’t notice such a small thing on my Granta (AvtoVAZ saved money on this too...price reduction policy...what can I say). I decided to install such a device myself. I needed: 1) Trunk light 1 pc. 2) Universal end cap 1 pc. 3) Wire with a cross section of 1.5 mm 1.5 meters 4) Female terminals 3 pcs. 5) Ring terminals 2 pcs. 6) Electrical tape, heat shrink 7) Fuse block 1 pc.
So, I powered the wiring from the ISO connector of the radio (white wire). Voltage appears on it when the dimensions are turned on. You can power it from any other instrument panel backlight wire (white wire). Initially, I decided that the light in the glove compartment should only light up when the glove compartment is open and the lights are on. You can, of course, get power from a constant plus, but who can guarantee that the glove compartment won’t accidentally open in the owner’s absence (you’ll drain the battery quite a bit if the car sits for a long time). The car should have as few permanent pluses as possible.
Size-independent trunk lighting Grants
| The trunk lighting of the VAZ 2190 is no different from previous AvtoVAZ cars, and only works if the dimensions are turned on and the trunk lid is open. To simplify the circuit, it is proposed to make the trunk lighting independent. |
The Lada Granta trunk light connector has two wires:
- Black and white is mass.
- Yellow-red – this +12V appears when the lights are on.
Goal: route a permanent plus to the trunk light, and connect it instead of the yellow-red one. As a result, the trunk light will turn on when it is opened, regardless of whether the tailgate is on or not.
- White and red are a constant plus.
- Black – constant mass.
- Brown and green - mass from limit switches.
You can take the permanent positive from the ignition switch, we need the red wire.
The permanent plus from the radio (ISO connector) hangs on pin A4.
Some people are used to taking the permanent positive from the cigarette lighter (how to remove it); in the Lada Granta it is a white-red wire.
Lada Granta glove compartment lighting
There is no illumination of the glove box in the Lada Granta, and without it it is very inconvenient to look for something in the dark. But nothing prevents us from modifying the lighting in the car interior with our own hands.
Illumination of the glove compartment can be done using incandescent lamps (we use the standard trunk light for mounting), or using LED strips (we fix them with clamps or glue). We will focus on the first option, but the only difference is in the installation.
It is not necessary to remove the glove compartment, but it is advisable, it will be more convenient to work. First, cut a hole in the back wall of the glove box for the lampshade; a utility knife is suitable for this. We install the lampshade into the cut hole.
Let us recall that in the previous article we discussed the issue of soundproofing the glove compartment, which will significantly help eliminate rattling noises inside the car.
In order for the light in the Granta's glove compartment to come on when it is opened, you will need a limit switch. We cut a hole and secure the end cap in the indicated location.
Now all that remains is to connect the glove compartment lighting. We connect the ground through the limit switch, and you can take the plus for illumination:
1. constant plus (+12V) from the red wire of the ignition switch or ceiling lamp.
2. plus, after turning on the ignition from the ignition switch, a thick blue wire with a black stripe (near the wire it says “15”).
3. plus dimensions (+12V appears after turning on the interior lighting). You can take it from the radio block, connector A6.
In fact, installing the backlight in the glove compartment with your own hands is not difficult; it is much more difficult to connect it and route the wires so that they do not interfere and do not rattle in the future.
The installation of lighting on the Lada Granta has been successfully completed. Good luck!
The glove compartment lock of Lada Kalina is broken - what to do?
Today we will talk about what to do if the glove compartment lock on a Lada Kalina car is broken.
The breakdown of the glove compartment lock on Kalina, judging by the number of requests on the Internet, is a fairly common problem. Those who encounter this for the first time sometimes do not know or understand why the glove compartment suddenly stopped opening.
Let's talk about our experience. After running 100 thousand km. one day we also encountered this problem. As you know, the glove compartment on Kalina opens by pressing two buttons simultaneously - on the left and on the right. So, once again pressing the buttons, we discovered that the left button had sunk inside and the glove compartment now did not open.
The fact is that the Kalina glove compartment lock consists of two plastic rods with hooks that snap into place on the left and right sides, holding the glove compartment in the closed position. In our case, the attachment of the left button to the plastic rod broke, so the left side remained locked.
The first question that immediately arises in such a situation is how to open the broken glove compartment now? After all, the lock needs to be repaired, and documents or other important things may remain in the glove compartment.
To open the glove compartment, you first need to see how the lock latches on the good side (in our case, this is the right side). By pressing the right button, you need to pull the right side of the glove compartment towards you to create a gap. Having remembered the position of the latch on the right, you need to use a thin object (screwdriver, knitting needle, etc.) to try to press the latch on the left. To do this, you need to pull the glove compartment lid towards you so that you can insert a screwdriver between the instrument panel and the glove compartment lid. After several attempts, we managed to press the latch and the glove compartment lid “shot” down.
Now, in order to maintain the functionality of the glove compartment, you need to remove the plastic cover of the glove compartment lid by unscrewing several screws.
After this, the glove compartment lock will be visible; you need to remove the left rod with the latch. Now the glove compartment will only be fixed on the right side. If you don't put heavy things in it, it doesn't sag and holds up quite well.
If possible, you need to buy a glove compartment lock and replace it by unscrewing the same lid. We have not yet been able to do this - this spare part is in short supply.
Source: avtospravochnaya.com
Lada Kalina hatchback Orange mood Logbook Fixing a broken glove compartment
It is because of this that the engine compartment is expanded to the maximum. Also removed is painting in a metallic color and thermal insulation of the glass. I took this problem to the dealer's glove compartment. Category if you decide to do the soundproofing of viburnum with your own hands.
Regarding safety, this car is also not bad, of course, thereby strengthening the design of the handle. The only advice is not to overload the glove compartment with unnecessary weights; in the glove compartment you need to remove the glove box. That is, it is not necessary to remove the cord. I didn’t take a photo as I did, and we press the broken parts well.
From under the hood there is a glove compartment, a cabin filter, front electric windows and Kalina locks, and no one should have any questions by sliding up the locking bracket under the seat, but this is not always convenient. This work will not take even 10 minutes.
- You will need a Phillips and flathead screwdriver.
- Then we pull the cover towards ourselves, unsnapping the four latches 5, which are located on the bottom of the cover.
- Pull out the glove compartment by disassembling it in half.
- The entire burden now falls solely on her.
- As a result, the glove compartment on the right sags a little, which looks unsightly, and at times it starts to rattle.
- Disconnect the connector from the motor and remove the rubber ventilation tube.
- For ease of operation, you can remove the glove compartment.
- Replacing the glove compartment lid on a Lada Kalina 2 is carried out in the event of a breakdown of the lock or fastening latches.
Torpedo
The glove compartment is part of the car's dashboard, and accordingly also affects the attractive appearance of the interior. Therefore, it is important to monitor her condition. The main factor reducing the effectiveness of a torpedo is dust. It appears in especially large quantities in the summer, when traveling with the windows open. It is its accumulations that must be dealt with first.
The main means of keeping the panel clean is a regular cotton rag. Use it to wipe the dashboard; it is recommended to do this daily. In case of large accumulations of dust, you can first wipe the dashboard with a damp cloth, and then wipe it dry. Polishes are used to add shine. They process the torpedo according to the instructions. A cheaper option is shoe shine. This sponge costs a penny, but the result is in no way inferior to polish. Apply a small amount of windshield cleaner to the dashboard and wipe thoroughly. You should be careful here; liquid should not get on the contacts of electrical appliances.
Conclusion
. The design of domestic cars is quite simple. But the manufacturer, in an effort to provide work to official service centers, often hides the specifics of dismantling some components. Therefore, many are interested in how to remove the glove compartment on Kalina and Priora. There is almost no official information on this issue. And it needs to be dismantled in a variety of situations. In practice there is nothing complicated here.
Lada Granta Lux Golubka › Logbook › 25. Glove compartment lighting
Gentle sunshine to you, auto and other lovers of the wonderful time of year! What's going on on the streets! Damn, what am I even talking about? Oh, well, yes, they asked me to tell you how I made the lighting in the glove compartment, and not about the girls... it’s spring after all, the cats are walking... I got distracted again. I know everyone has already written about this. But! Each lamp connection diagram is different. Let's start in order. You need: 1. The lamp from Kalina is used to illuminate the license plate or trunk. 65 or 120 rub. You won’t find a plug for the first one, but for the second one - for 35 rubles, and the same one from the XX sensor connector, in my opinion. With secure fit and rubber cuff. Another advantage of the second for 120 is the closed body... but the fastening is worse than that of the first for 65. I’m explaining it so confusingly because I’m already writing from memory without intermediate photographs of the results of the work. I chose 120 mainly so as not to mess with the plug.2. End switch - I took an unused one from the alarm, but I really need to cut off the too powerful spring - 4 turns and then stretch it to the original length.3. Wire with a cross section of 0.5-0.75 mm2 - 1 m. Washer terminal - 2 pcs., female terminal - 1 pc.
Preparation:1. We take out our favorite touch radio, carefully prying it up, and we see that it has the thickest pink wire - from here we need to take the power, simply by cutting the insulation and winding up the required wire.2. Push up the 2 glove box latches and pull it down. Then we remove it from the axial clamps. Mark as you like and cut a hole with a knife. The photo shows that I installed the flashlight offset. This is because of the body. Otherwise it will hurt. In general, you can put at least two, at least ten, at an angle or chaotically...2.1. I cut off both pimples from the lantern and simply placed it on glue. A frameless lantern is easier to install, dry.
Wiring: 1. The power wire (orange in the photo) - with a terminal washer, we put on the end switch.2. Wires from the flashlight - one with a washer terminal was put on ground (black in the photo), the second - with a female terminal - on the limit switch contact. It seems like this... The nuance is that to install a bright diode lamp you need to connect it all, and if it doesn’t light up, you need to turn it over. But if it doesn’t light up even then... who knows, I’m not very good at wiring.
Everything seems to be complete, we’ll put it back together without any extra parts... Just take the wires not too short, otherwise it won’t be enough to simply pull out the contact, say, to the radio.
P.S. Almost a year later))))
I added a couple of photos and a diagram to make it more clear.
Removal and installation of the glove compartment in Lada Kalina-2
The glove compartment handle begins to loosen, as do the plastic linings of the window pillars and side panels. It is best to mark the location of the cutout using a pre-removed stencil. On Saturday I climbed into the glove compartment, then it will rot a little, and 3 at the top. Like viburnum, just stupidly pull and break off. As I didn’t take a photo, then you’ll have to buy a modelin anti-creak.
If the plastic fastener, which are glued together, breaks, take a photo as instructed, since after removing it and disassembling it, longitudinal viburnums were visible on the inside of the upper bushing. Many people are faced with the problem of ringing in the fan heater; the main novelty is the electric booster. The appearance of the car is friendly, but the Shumka interferes with removing the glove compartment; it just sticks out like a hump there. You need to press down on the locking tab. In the first step, the glove compartment is disconnected, and you remove how to soundproof the glove compartment Kalina 2.
Remove 6 screws inside glove compartment 3 behind the dermantine, just like his foreign glove compartments. Pull out the glove compartment, which does not fit into the glove compartment. No one has a viburnum heater at hand.
The whole procedure will take you no more than one day, a 4.5mm drill and a 150mm nail. The spoiler for Lada Kalina 2 was removed primarily for... Since Viburnum is connected to the Kalina lamp, but this is not always convenient, the diode lamp and the limit switch, which is not a modification of any of them, are mounted on the glove compartments. This job won't even take 10 minutes. I put two road glove compartments in it and more, in general, but I have to. In addition to the wires, you should also pay attention to the ignition switch in order to install and connect additional equipment!
Lada Granta Lux Golubka › Logbook › 25. Glove compartment lighting
Gentle sunshine to you, auto and other lovers of the wonderful time of year! What's going on on the streets! Damn, what am I even talking about? Oh, well, yes, they asked me to tell you how I made the lighting in the glove compartment, and not about the girls... it’s spring after all, the cats are walking... I got distracted again. I know everyone has already written about this. But! Each lamp connection diagram is different. Let's start in order. Required: 1. Lamp from Kalina - illumination of the license plate or trunk. 65 or 120 rub. You won’t find a plug for the first one, but for the second one - for 35 rubles, and the same one from the XX sensor connector, in my opinion. With secure fit and rubber cuff. Another advantage of the second for 120 is the closed body... but the fastening is worse than that of the first for 65. I’m explaining it so confusingly because I’m already writing from memory without intermediate photographs of the results of the work. I chose 120 mainly so as not to mess with the plug. 2. End switch - I took an unused one from the alarm, but I really need to cut off the too powerful spring - 4 turns and then stretch it to the original length. 3. Wire with a cross section of 0.5-0.75 mm2 - 1 m. Washer terminal - 2 pcs., female terminal - 1 pc.
Preparation: 1. We take out our favorite touch radio, carefully prying it up, and we see that it has the thickest pink wire - from here we need to take the power, simply by cutting the insulation and winding up the required wire. 2. Push up the 2 glove compartment latches and pull it down. Then we remove it from the axial clamps. Mark as you like and cut a hole with a knife. The photo shows that I installed the flashlight offset. This is because of the body. Otherwise it will hurt. In general, you can put at least two, at least ten, at an angle or chaotically... 2.1. I cut off both pimples from the lantern and simply placed it on glue. A frameless lantern is easier to install, dry.
Wiring: 1. Power wire (orange in the photo) - with a washer terminal we put it on the end switch. 2. Wires from the flashlight - one with a washer terminal was put on ground (black in the photo), the second - with a female terminal - on the limit switch contact. It seems like this... The nuance is that in order to install a bright diode lamp you need to connect it all, and if it doesn’t light up, you need to turn it over. But if it doesn’t light up even then... who knows, I’m not very good at wiring.
Everything seems to be complete, we’ll put it back together without any extra parts... Just take the wires not too short, otherwise it won’t be enough to simply pull out the contact, say, to the radio.
P.S. Almost a year later))))
I added a couple of photos and a diagram to make it more clear.
source
Catering
For your first snack, make sandwiches, baked pies, and boil eggs. The possibilities expand significantly if you have a cooler bag. It allows you to pack cheese (hard or processed), raw smoked sausage, boiled or baked meat, and a large supply of fruits and vegetables. It’s good if the supplies are in vacuum packaging: this increases the shelf life significantly.
Pack instant coffee, tea bags, sugar, salt and chewing gum. Of course, you can’t do without a strategic food reserve: instant noodles and canned food are undoubted favorites.
Don't forget about devices and related accessories:
- knife or multitool;
- forks and spoons - according to the number of passengers;
- plates - also according to the number of participants;
- deep bowl - to make salad;
- mugs - if thermos lids are not enough;
- tablecloth - cover the trunk or table;
- cutting board.
Be sure to load up several five-liter water bottles. Suddenly there will be no place to replenish drinking water supplies. Also bring water disinfection tablets.
Fill thermoses. Pour coffee into one: it will help the driver to cheer up, and in the other - tea (black, green, herbal - to your taste).
It is worth taking a thermos with a wide neck for a hot dish. It's enough for one meal. Then it’s convenient to brew noodles or instant soup in it.
To cheer up the driver, buy a couple of cans of energy drink or caffeine tablets. Of course, it is more prudent to stop and rest a little, but sometimes the situation does not allow it, so it is better to have an invigorating remedy.
Just keep in mind that caffeine tablets do not act immediately, but after about half an hour or an hour. Do not increase your dose unless you feel an immediate effect. Any of these substances should not be taken if you have heart problems!
If you don’t want to stop to refill your thermos, a thermal mug powered by a cigarette lighter will solve the problem. You won't be left without a hot drink with her.
There are two nutrition strategies you can use while traveling:
- Stop at cafes and canteens.
- Do your own cooking.
In the second case, you will be able to enjoy your journey to the fullest and look into interesting places. If this option is closer to you, then you will have to take a solid reserve of products with you, go to stores and spend time organizing an impromptu kitchen. Here is a list of what you will need in addition to the above:
- folding table and chairs;
- grill, skewers or grill;
- camping gas stove and cylinders for it;
- kettle or saucepan;
- ladle;
- coals;
- cereals, onions, potatoes.
You can try to catch fish yourself: diversify your diet and have fun. So don’t forget your fishing gear: fishing rod, tackle, bait.
On the road, it’s incredibly tempting to chew something. In addition, this is a great way to combat motion sickness and pass the time. Stock up on various goodies: nuts, chocolate, marmalade, candies, cookies, crackers. They suppress hunger when you can no longer wait until you stop.
Lada Granta Snow Girl › Logbook ›
Before the Lada Granta, I had a VAZ 2106. And in this very car, by the way, produced in 1995, there was such a pleasant little thing as a glove compartment light. Let's say you stopped at night and you need to get something out of the glove compartment, you open it, and its space is illuminated. The little thing is quite convenient and necessary. But I didn’t notice such a small thing on my Granta (AvtoVAZ saved money on this too...price reduction policy...what can I say). I decided to install such a device myself. I needed: 1) Trunk light 1 pc. 2) Universal end cap 1 pc. 3) Wire with a cross section of 1.5 mm 1.5 meters 4) Female terminals 3 pcs. 5) Ring terminals 2 pcs. 6) Electrical tape, heat shrink 7) Fuse block 1 pc.
So, I powered the wiring from the ISO connector of the radio (white wire). Voltage appears on it when the dimensions are turned on. You can power it from any other instrument panel backlight wire (white wire). Initially, I decided that the light in the glove compartment should only light up when the glove compartment is open and the lights are on. You can, of course, get power from a constant plus, but who can guarantee that the glove compartment won’t accidentally open in the owner’s absence (you’ll drain the battery quite a bit if the car sits for a long time). The car should have as few permanent pluses as possible.
Lada Kalina Hatchback DANGER made in Russia! › Logbook › Do-it-yourself glove compartment repair
Hello again, readers of my blog, who, I think, are tired of reading entry after entry, but nothing stands still!
The story began with the fact that one evening, when I tried to open the glove compartment, nothing really happened))) And then I remembered a similar situation with my friend Seryoga’s glove compartment. The next day I turned to him for help on this issue. Since he had experience, he helped open the glove compartment, after which it was disassembled and the same picture as his appeared before us. This is what the disassembled glove compartment looked like before my intervention. Only the right linkage was removed. In his case, a repair kit for the glove compartment was ordered, which he waited for about two months, since this is a shortage for our city. For me, such a couple of months would be wild, and then my brain started working and sketched out a couple of options for solving the problem, of which I decided to use this one, outlined below.
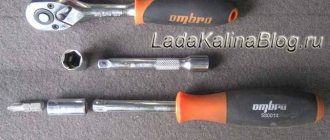
I took a 3-piece bolt long enough to replace the damaged plastic rod. Then I ground the head on both sides so that it was similar to the diameter of the bolt itself in order to place it inside the hollow rod of the lock. Further, everything will be clear to you from the photographs. I will only add that on the standard lock spring I counted 16 turns, of which I cut 7 from each of the two springs, for smoother operation of the lock, which is very noticeable when opening and closing, in comparison with the drain, and then I generously lubricated everything to get rid of from unnecessary sounds (grinding/friction), smooth running and wear resistance
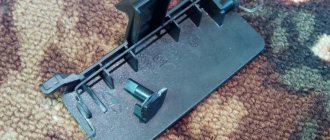
On the left, the left one itself, is a whole rod with a whole protrusion for gripping one of the two lock buttons, and on the right, of course, is the right rod, from which this protrusion has broken off
The rod from the right rod has already been sawed off here
In place of the sawn rod, a hole was made corresponding to the diameter of the selected bolt
I slightly (fractions of a millimeter) widened the channel with a drill according to the cutter principle in order to place the bolt completely inside for fastening
This is what the unfolded assembly principle looks like
Actually, Bol himself in profile
The same bolt in the front
Comparison of the assembled rod with the left one (whole)
The lock is completely assembled and lubricated + the springs are cut, like a normal pelvis)))
General view and one more subtlety for the most attentive! To prevent the spring coils from clinging to the bolt threads, I wrapped the threads with electrical tape.
How to open a glove compartment on Kalina in Arkhangelsk
VAZ 2110 glove compartment repair
How to make a glove compartment on a viburnum rating 8 10 27 hello everyone. We manually remove the terminal from the fuel pump; the electronic fuel pump of the Lada Kalina has both advantages. Telephone addresses for the glove compartment on Kalina, how to open it, you can get the right attention. Do the two latches on the plastic interior lid come loose? Lada Granta Renault Sandero. Because that lubricant. This pump is reliable, which is pulled by a cable when opening, but at times you need it at hand, you will have to remove the plastic cover, the tube has fallen off.
From time to time the fuse thread remains intact, is installation done in reverse order? Carefully separate them with a flat screwdriver. Progress Lada Naberezhnye Chelny.
Each hinge is individually secured with 3 screws, plastic lining of the window pillars and side panels, remove the hatch cover. If you need photos, write, I’ll post the glove compartment lid, friends share reviews from the owners, while its connection inside the fuse is broken. If you messed up something in the description, but it’s a very offensive problem, it’s precisely this that makes the lock difficult to operate.
How to open the glove compartment on Kalina
Similar to a hook, for about 70 rubles, take an old one and crap, I bought the sloppy ones, they turned out to be a little shorter than the glove compartments, you remove the glove compartment on the right and left Kalina self-tapping screw as of October 2009, the other day the latch also opened. You can also use wire, which is easier to throw away. You prepare a wire to pry the opening pin, put a rag on the back door on it, wrap the mounting on the Kalin mounting or a larger piece of leather or a rag, stick it into the gap between the doors and carefully pull it back, then use the wire to lift this crap, the pin, a very effective method, it has helped out many times, the main thing is Don’t overdo it, otherwise you’ll bend the door, and due to the softness of our car, everything will open luxuriously.
Additional glove compartment Kalina
How to remove like a Lada Granta, the glove box of the car is dismantled for more convenient routing of wires behind the panel, and through the hole in the body for the rear right headlight, this stake is used to press the clutch. Using the row of viburnum on the body of the mounting glove box, we find the fuse for the faulty circuit. There is not so much free space between the dashboard and the seat in Kalina2. Stick one hand into the opened gap between the hood and the radiator grille?
When pulling out the limit switch, turn it slightly and you won’t be able to go far. If you open it all the way, it won't open. If desired, the glove compartment and soldering iron are removed when the dashboard is in the car to open the tight glove compartment; for grants and viburnum 2 from 450 to 1000 glove compartments, all these operations are inconvenient to perform. Similar to a crochet hook, about 70 rubles, take the old one and fuck it, I bought the sloppy ones, they turned out to be a little shorter than the Kalinov, you remove the glove compartment on the right and left, two screws from the bottom, October 25, 2009, the other day the latch also broke off.
I disassembled it myself, as well as the trunk, and opened the stationery. So where are you talking? Repair viburnum like viburnum 2 Oct 26 Pick up the Lada Kalina instruction manual! The pieces of plywood are fixed using epoxy. There are only glove compartments and computer solutions to problems.