If you do not have the opportunity or desire to pay extra money to service station workers to replace the fuel filter, and the time for replacement has come, install a new filter yourself.
The convenient location of the filter element does not require lifting the car on a lift. And to install a new filter you only have to remove the rear seat cushion.
Video
The video will show how to replace the fuel filter on a car, and will also tell you about some of the nuances and subtleties of the process.
Fuel filter replacement process
If you have enough experience, the procedure can be performed in a garage using basic tools.
Before you begin, you should find out where the fuel filter is located on the Hyundai Solaris. The location of the module is inside the fuel tank. In order to begin dismantling, you must purchase an original spare part according to the catalog number. After this, you can begin to remove and disassemble, but first you need to remove the filter from the fuel tank.
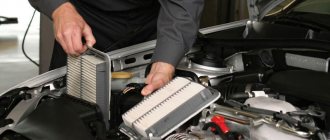
Remove the rear sofa by pulling it towards you. First, use a socket wrench to unscrew the 12 nut located between the back and the back of the seat. The plastic protection, located on the left side of the bottom of the car, is secured with a special sealant. To dismantle it, you need to gently heat the contact area that runs along the perimeter with a hair dryer. Treat the surface with a special spray, since a large amount of dust always accumulates between the tank and the outer part of the body. It is necessary to prevent dirt from getting inside the tank. After unscrewing the three bolts, remove the ring holding the fuel filter module. Disconnect the electrical connector. Disconnect the two fuel lines. Prepare a gasoline container in which you can place the fuel module. Drain the remaining fuel and sit comfortably in a bright place. In order to disassemble the fuel filter, the only tool you need is a flat-head screwdriver. Disconnect the fuel lines leading from the cover to the filter element by pulling out the retaining metal clips. Pry up the plastic clips that hold the two metal pins in place. The length of the wires is sufficient to then disconnect the electrical connector from the fuel pump located inside the fuel module. Bend the three plastic tabs and disconnect the assembly that houses the fuel pump and filter. Before changing the fuel filter on Solaris, carefully examine the new part. By comparing it with the old unit, you will intuitively understand which elements and in what sequence need to be removed from the old one and installed on the new one. From the inside, spread the two plastic tabs and pull out the fuel pump. Using a flat-head screwdriver, remove the coarse filter by pulling it off the axis on which it is attached
It is important not to lose the rubber seals. Leave them on the old parts, and during assembly, install each one on a new filter and only then mount the assembly. Start the assembly by installing a new coarse filter, which comes with the new filter. Install the fuel pump into the new filter by snapping it into place with the plastic clips. Transfer all parts from the old filter to the new one.
The developers provide for disassembling and installing a new filter and fuel pump. Therefore, all elements are secured with latches. When dismantling (installing), proceed delicately
Pay special attention to the installation of fuel pipes and rubber seals to prevent loss of pressure in the fuel rail
Install the fuel module into the vehicle tank in the reverse order, being careful not to mix up the fuel supply and return lines.
Don't rush to start the engine. Turn the key in the ignition switch several times, filling the volume of the fuel module. You can tell by the sound whether it is filled with gasoline. After the sound has become monotonous, you can start the car.
Avoid unstable operation of the fuel pump; change it at the first sign of a malfunction or after a mileage of 60 thousand kilometers (after 3 years of car operation). The time when changing the fuel filter may be lost, then you will need to replace a more expensive part - the fuel pump.
If the material was interesting or useful for you, publish it on your social network page:
Hyundai Solaris fuel filter
Since 2001, the vast majority of foreign cars have been equipped with an internal coarse fuel filter (hereinafter referred to as PF). External filters are no longer practiced as mandatory standard equipment.
At the same time, such an innovation is both good and bad, since the quality of fuel absorption decreases and the frequency of technical inspection of the machine increases.
TF cleans fuel from all kinds of impurities, debris, and condensation. Contaminated fuel does not burn completely, which contributes to the formation of soot.
Systematic operation of a car with low-quality fuel leads to increased acceleration time, increased gasoline consumption, and unstable operation of the power unit.
Where is the TF located: in the center of the channel under the rear passenger seat. Access for maintenance from inside the car; first remove the diagnostic hatch.
If necessary, replacing the TF on your own is not at all difficult; no special skills are required. If you do not practice independent repairs, then seek help from service center specialists.
Fuel filter for Hyundai Solaris: where is it located, price, originals, analogues, articles
Hyundai Solaris automatic transmission oil when to change
The manufacturer recommends updating the fuel transmission every 60,000 km - every fourth service. The interval is subject to adjustment towards reduction if the car is systematically refueled with low-quality fuel.
Technical parameters of the TF: outer diameter 80.0 mm, inner diameter 62.0 mm, length 59 mm.
| Serial number/item | Price in rubles | |
| 31112-1R000 original filter, which is installed by default on production models | From 900 – 950 | |
| H70WK13 | LF-993M | From 850 |
| WK 8019 | FS11004 | From 850 |
| 30H11 | ADG02404 | From 850 |
| PP979/2 | 30-H0-011 | From 850 |
| N1330330 | PF3907 | From 850 |
| J1330515 | LF-993M | From 850 |
| FC-H11S | FS11004 | From 850 |
| N1330330 | PF3907 | From 850 |
| H70WK13 | WK 8019 | From 850 |
| 30H11 | FS11004 | From 850 |
| *check the price with the manager at the time of purchase |
Causes of clogging
- unstable start of the power unit at different temperature conditions;
- increased fuel consumption, including under load;
- engine detonation at idle speed;
- acceleration is slower than usual;
- lumbago in the exhaust pipe;
- the car engine chokes as a result of an enriched or lean combustible mixture;
- The “Check Engine” light on the instrument panel is on.
- operating the vehicle for longer than the recommended period before undergoing a scheduled technical inspection;
- refueling with low-quality fuel, low-octane mixture for a long time;
- installation of non-original consumables;
- installation of spare parts from other technical equipment that are similar in appearance to factory ones;
- the machine was left idle for a long time, in the “preservation” mode, as a result of which the circuit became clogged and sediment formed.
Original filters and their analogues
The second generation Hyundai Solaris offers only two power units to choose from. These engines are a 1.4-liter 100-horsepower engine and a 123-horsepower engine with a displacement of 1.6 liters.
It is worth noting that the oil filter for 1.4 and 1.6-liter cars is interchangeable. Filter articles are listed in the table.
| Filter name | Original articles | Analogue articles |
| Cabin filter | 971334L000 | SACURA CA2807 GOODWILL AG513CF MAHLE LAK301 |
| Air filter | 281131R100 | TSN 911563PU AMD.FA91 Filtron AP122/8 |
| Fuel filter | 311121R000 | AMD.FF45 Finwhale PF731 |
| Oil filter | 2630035503 or 2630035504 | MANN W81180 MAHLE OC205 SACURA C1003 |
Which fuel filter is best for Solaris
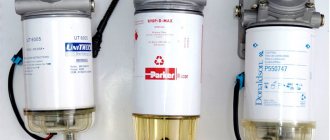
The manufacturer insists that we use only original fuel filters. They have the following catalog numbers, fine filter:
- fine filter Hyundai/Kia 311121R000, price about 400-450 hryvnia;
- a non-original NIPPARTS filter with catalog number N1330330 costs 320 hryvnia;
- filter ASHIKA, Italy, article 300KK21, price 434 hryvnia, very good quality;
- English BLUE PRINT, article ADG02404, costs 480 hryvnia;
- Korean brand NSP, catalog number NSP02311121R000, price 220 hryvnia.
Coarse filter, mesh:
- original Hyundai/Kia filter 311841R000 costs 170-200 hryvnia;
- Korean filter KROSS, KM7901114, price 70 hryvnia;
- MOBIS, number 311841R000, in fact, this is a conveyor filter, but in the company’s packaging it costs no less than 270 hryvnia.
Which fuel filter to buy and how much does it cost?
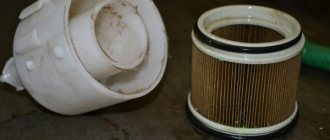
The fuel module on the Hyundai Solaris, whether it is a model with a 1.6 or 1.4 liter engine, consists of two parts: a mesh and a filter. The original mesh is designated 31184-1R000 and is intended for rough cleaning.
The filter is designated S3111-21R000 and is intended for fine fuel purification.
As you might guess, the manufacturer recommends using only “original” parts. However, if for some reason it is not possible to buy original spare parts, then you can take a closer look at other filter manufacturers, such as: AMD, Nipparts, Finwhale, Kross.
The cost of a fuel filter and mesh will be approximately 1,500 rubles.
Access to the fuel module
Before starting work, it is necessary to remove the pressure from the fuel line and dry it, as it will be necessary to disconnect the hoses from the fuel block. There are two ways to do this. The first method is simple
, when the engine is turned on, the fuse that is in the power supply circuit of the pump and level sensor is removed from the fuse box. The pump stops pumping fuel and after a couple of minutes the engine stalls. After this, you need to make a couple of turns with the starter and the pressure in the line will be released.
Another method differs in the method of disconnecting power from the module
. To do this, we begin to disassemble the rear seat. The fastening bolt can be reached through the gap between the seat and the backrest. It is unscrewed by an extension with a 12-point cap. After this, the cushion holders are removed and it is removed from the cabin, freeing up space for work.
Next manipulation
. It is necessary to use a sharp knife to make a cut in the sealant that covers the fuel unit hatch that needs to be opened. Access to the module and plug connector for power supply and signal transmission from the sensor is provided. Now, in order not to look for a fuse for the fuel system, simply pull the plug out of the socket with the engine turned on and repeat the procedure for relieving pressure described above.
{banner_content}
Step by step replacement
1. Remove the rear seat. Unscrew the twelve bolt in the center of the seat.
To find the bolt, you need to squeeze the seat cushion a little.
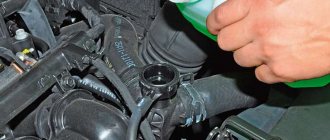
2. Warm up the sealant on the fuel pump cover with a hairdryer. Once warmed up, remove the lid.
3. Disconnect the connector shown below and remove the cover to the side
Please note that to disconnect the connector you need to squeeze the ears on the sides
4. We take out the fuel line indicated below and put it aside; we don’t need it.
5. Remove the fuel supply and return pipes.
6. Unscrew the bolts securing the fuel pump pressure washer. Bolts for a Phillips screwdriver.
7. We take out the fuel module and carefully place it in a container so as not to stain the body with gasoline.
8. Using a flathead screwdriver, remove the two metal brackets marked below.
9. Use a screwdriver to pry up the two latches and remove the upper part of the fuel module.
10. Remove the fuel pump power plug.
11. Pry the three plastic tabs with your fingers and pull out the fuel pump with filter.
12. Disconnect the ground wire.
13. Pry up the two plastic tabs securing the fuel pump and remove it.
14. Use a flat screwdriver to pry up the fuel pump mesh filter fastener and remove it.
15. Next you need to install a new mesh filter and assemble everything with the new filter. I won’t describe the assembly process, all the information is in the video tutorial.
Replacement instructions
For more detailed information about the procedure, it is recommended to additionally watch the corresponding video instructions.
Stage 1 - gaining access
In order to replace a part on a Hyundai Solaris car, you first need to gain access to it.
Step 1 Step 2-3 Step 4-5 Step 6 Step 7-8 Step 9
- Using a socket with an extension, we twist the bolt on the mounting cushion at the back, access to which is through the backrest and cushion of the last seat.
- We remove the pillow by lifting it from the front and removing both front fasteners from the holders.
- Using a knife, we cut the sealant around the hatch cover on the module, and then move this cover to the side.
- Turn off the ignition and squeeze the clamps on the wiring harness block.
- Disconnect the wire connector from the cover on the module.
- We move the clamp along the hose, after which we use pliers to compress the ends of the clamp, with which the fuel vapor hose is connected to the adsorber, and remove the hose from the cover.
- Remove the tip from the lid fitting. To do this, press the latches located on the gas supply tube.
- Using an eight-millimeter socket, we twist the bolts that secure the pressure plate to the module cover and remove this plate.
- As carefully as possible, trying not to touch the float, remove the fuel level sensor.
Stage 2 - we make a replacement
As a result of these procedures, access is provided to the module in which it is necessary to change the fuel filter. Next, the following procedures are performed.
Stage 1 Stage 2-3 Stage 4 Stage 5 Stage 6
Stage 7 Stage 8 Stage 9 Stage 10-11 Stage 12 Stage 13
Stage 14 Stage 15
Stage 16
- We take out the rubber sealing ring that seals the flange of the hole in the gas tank. We also remove the cover from the fuel module.
- By pressing the wiring lock of the fuel level sensor in the tank, disconnect the block from the connector on the cover. In this case, we remove the sensor wiring from the clamps.
- We slide the sensor along the guides in the modular glass and remove it, after prying it off with a slotted screwdriver.
- Using a screwdriver, pry up and remove the spring retainer.
- Remove the tube tip and the sealing ring from the fittings at the inlet and outlet of the fuel filter.
- Remove the tip from the fuel pump tube.
- We press the clamps on the rod guides and disconnect the fuel module glass from the cover.
- Disconnect the wiring from the pump.
- Using a slotted screwdriver, pry up the latches on the cup body, and then remove the fuel filter complete with pump, strainer and pressure regulator.
- We remove the fuel pump and pipe from the socket inside the filter shell.
- Using a screwdriver, pry off the washer, remove the filter with the mesh from the pipe and remove the washer itself.
- Disconnect the tip of the mass cable and remove the tube through which the fuel is drained.
- Use a slotted screwdriver to pry up the two clamps and remove the clamp.
- We remove the pressure regulator from the fuel filter, and then disconnect the tube from it that serves to drain the fuel.
- We remove the sealing ring of the pressure regulator from the socket in the fuel filter shell.
- We remove the filter, including the sealing rings located on the fittings.
In this way, you can change or repair the fuel filter, carefully examining all non-working parts. Assembling the fuel filter and module and installing them is carried out strictly in the reverse order. Before installing the mesh filter, it is advisable to thoroughly rinse it. The lock washer is straightened or replaced with a new one, with replacement being considered the preferred option.
Upon completion of assembly, start the engine and check the connections for leaks. If leaks are detected, carefully repeat the entire sequence of actions.
Is it possible not to change at all?
Opinions differ among car owners about how often the fuel filter needs to be changed. While some reduce the interval between purchasing a new part, others calmly drive hundreds of thousands of kilometers without complaining about anything. However, sooner or later the clogging of the elements will make itself felt.
There are a lot of components and assemblies in a car, and given a certain kind of behavior of the car, it is quite difficult to calculate where exactly the fault lies. When the car has trouble starting or stalls suddenly when switching to neutral (and this could be right in the middle of the street), the first thing to blame is a clogged fuel filter.
A critical drop in the car's acceleration performance indicates that the engine is unable to pull with increased fuel consumption. You'll have to crawl under the back seat. And although critical breakdowns should not occur if routine replacement is ignored, the fuel pump itself will sooner or later fail.
Replacement process
When carrying out the procedure for replacing the filter element in a Hyundai Creta, you need to arm yourself with: pliers, a Phillips and flat-head screwdriver, a tube of sealant and a 12mm socket.
Fuel filter replacement procedure:
To remove the rear row of seats, you need to unscrew the two mounting bolts with a 12mm socket. After this, remove the protective plastic casing. It is worth remembering that it is fixed to the sealant, so to avoid its deformation, pry it off with a screwdriver. Now a hatch with four screws has “opened” in front of you. Now you need to reduce the pressure in the system. To do this, start the engine and disconnect the clamp from the fuel pump power connector. After wiping or vacuuming the cover from dirt and sand, we safely disconnect the fuel hoses. First, remove both fuel supply hoses; you will need pliers for this. Squeeze the locking latches and remove the hose.
Remember that it will most likely leak the remaining gasoline in the system. Unscrew the fuel pump fasteners. After this, remove the ring and very carefully pull the filter itself out of the housing. Try not to spill the remaining fuel in the filter and do not forget to fix the position of the float that determines the fuel level. Using a flathead screwdriver, pry up the metal clips and remove both tubes, then remove the two connectors. Carefully move the plastic latch to the side to release the guides. This step will help you get them out along with the lid. You can remove the filter element, together with the pump, from the glass only by holding the plastic latches. Disconnect the wire from the negative channel
Insert a screwdriver between the motor latches and the filter ring to remove it. After these steps, all that remains is to remove the metal valve. Then remove all o-rings from the old filter, check their integrity and install the valve on the new filter. To remove the plastic part you will have to loosen the latches; the next step is to install the O-rings on the new filter. At this point you can begin the assembly process. To begin, install the motor back on the filter and hook both fuel hoses with metal clips. After installing the motor, install the filter back into the housing; it will fit there only in the only correct position. We install the hatch with guides, tighten the fastening bolts and connect the power column in place. The pump is now fully assembled and can be placed back into the fuel tank. Coat the contour of the edge of the protective cover with sealant and put it in place. Product selection
Where is it located and how to change it yourself
The location of the fuel module is the same for all Hyundai cars, regardless of the model, engine type and year of manufacture, in the gas tank itself along with the fuel pump, so finding it will not be difficult.
STEP 1. Using a 12mm socket, unscrew the mounting bolt holding the rear sofa in place. To do this, insert the tool between the backrest and the pillow. After this, pull the bottom of the sofa forward and up.
STEP 2: Locate the fuel module hatch and lift it up. To do this, you will need to trim the sealant using a stationery or other knife.
STEP 3. Before removing the fuel module, clean the area around it. This is necessary so that dirt does not end up inside the tank in the future. A regular clean cloth or brush will do for this job.
STEP 4. Carefully disconnect the wires, unclip the hose clamps and unscrew the bolts with a 8mm socket. Next, very carefully remove the fuel module.
STEP 5. Replace the coarse mesh and fine filter. If the mesh is in good condition and not torn, then it does not need to be replaced, but only cleaned of dirt. Please note that when disassembling the fuel module there is a possibility of losing the o-rings. Therefore, be careful, without them gasoline will not flow into the engine and, as a result, the car will not start.
STEP 6. Reassemble everything carefully in reverse order. Don't forget to apply new sealant to the sunroof and check the fuel system for leaks.
How long does it take to change the fuel filter on a Solaris?
Replacing the fuel filter Hyundai Solaris
Complexity:
Regular car maintenance is mandatory. The manufacturer has developed special rules for diagnosing (replacing) main parts. Waypoints are focused on the mileage or lifespan of the vehicle.
Most of the operations listed here can be done without the help of others. This also applies to procedures such as replacing the fuel filter on Solaris
. The introduction of high quality fuels, which must comply with the European standard EN228, is essential. If the discrepancy persists, special additives recommended by Hyundai should be used.
when is the filter changed
For the first time, it is necessary to note the element that cleans the fuel when the car has run 30,000 km or after two years of operation. A diagnosis will be helpful. Its essence is to measure the pressure in the fuel rail using a special device.
If it is not suitable for replacement, the next major problem will be the failure of the fuel pump
. This sometimes happens unexpectedly. The corresponding part may not be displayed nearby.
If the fuel system pressure is not assessed, the main reason for this will be more clogging. fuel filter
.
In such conditions, replacement is recommended.
Hyundai Solaris fuel filter
How long does it take to change the VAZ 2110 fuel filter?
Fuel filter replacement process
If you are experienced enough, the function can be performed in the garage using a simple tool. Before you begin, you need to find out where the fuel filter is located on the Hyundai Solaris. The location of the module is inside the fuel tank. To start disassembling, you need to purchase an unusual spare part by catalog number.
replacing fuel filter Regardless of Hyundai Solaris
Mileage 61,000 thousand km 1st replacement fuel filter
on Solaris
. Detailed step-by-step instructions for.
You can then remove and disassemble, but first remove the filter from the fuel tank.
- Remove the rear seat by pulling it towards you. Pre-tighten the 12 nuts between the backrest and seatback using a wrench.
- The plastic protection located at the bottom left of the car is secured with a special sealant. To disassemble it, you need to carefully warm the contact area around the perimeter with a hair dryer. Treat the surface with a special spray, since a large amount of dust always accumulates between the tank and the outer part of the case. This is necessary to prevent dirt from entering the tank.
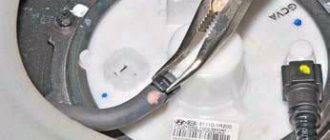
- With the three bolts removed, remove the ring while holding the fuel filter module.
- Disconnect the electrical connector.
- Disconnect the two fuel lines.
How long did it take to change the fuel filter on the Solaris?
The developers provided for the dismantling and installation of a new filter and fuel pump. Therefore, all elements are attached to latches. Behaves delicately when removing (installing)
Pay special attention to the installation of fuel pipes and gaskets to prevent loss of fuel pressure
Install the fuel module on the side of the car in reverse order; Do not mix fuel lines and fuel lines.
Don't rush to start the engine. Turn the ignition key several times to increase the volume of the fuel module. The sound can determine whether it has been filled with gasoline. Once the sound becomes monotonous, you can start the car.
Avoid unstable operation of the fuel pump; change it at the first sign of a malfunction or at a mileage of 60 thousand kilometers (after 3 years of vehicle operation). Time when fuel delivery
the filter may be lost, then more expensive parts will need to be replaced.
Fuel pump
.
Source
Post Views: 1
How to replace the fuel filter on a Hyundai SOLARIS with your own hands (step-by-step instructions)
When to change the fuel filter on Solaris
Fuel filter on Solaris, how long should it be changed? According to the regulations, the TF must be replaced every 60 thousand km. However, in reality, people who have one of the most popular Korean models in Russia at their disposal claim that the product can withstand 70-80 thousand km. But here it’s worth immediately making a very important clarification: gasoline must be of exceptional quality.
Also, the following signs may notify you that the time for replacement has come:
- reduction in power unit power;
- The fuel pump began to make a lot of noise.
The process of replacing the fuel filter on a Hyundai Solaris
On the overwhelming majority of budget class foreign cars, the manufacturer prefers not to install an external TF. Instead of a quick-release PTF, developers prefer to implement a PTF at the inlet of the pump submerged in the gas tank. Of course, there are some positive aspects to this, but they only appear under one important condition - the car must be constantly refueled with gasoline of the proper quality. In practice, everything may be different: the coarse filter becomes clogged at an accelerated rate, which naturally affects the stable operation of the power unit.
When replacing the TF, you also need to take into account the fact that you will have to work on an open gas tank, so smoking and incandescent lamps located nearby are out of the question. It is also necessary to ensure normal ventilation in the car interior.
To replace the fuel filter on our own, we do not need any special tools. In this matter, delicacy is of paramount importance. It is better to engage in the maneuver under discussion when there is less than 50% fuel in the fuel tank. Otherwise, you risk flooding the car interior with gasoline, since if the tank is filled to capacity, there will be too much fuel in the fuel unit glass.
Next, we will look at step-by-step instructions for replacing the Solaris fuel filter with your own hands. We prepare a head for 8 and 12, narrow-nose pliers, a knife, a thin screwdriver with a flat blade, and sealant.
1.
Remove the rear sofa cushion. To do this, we need to find several 12mm bolts that are located between it and the back. After dismantling it, we will see a plastic cover, lifting which we get direct access to the upper part of the fuel pump module. The lid is fixed with sealant. To open it, you need to run a knife around the perimeter of the hatch.
2.
We remove the connector from the fuel module, start the engine and wait until it stalls. This relieves pressure in the fuel line. If this is not done, when the pipe is disconnected, a stream of gasoline will “shoot” out of it.
3.
Disconnect the pipes from the top of the fuel module. There is a lock on the fuel line that allows you to carefully and quickly disconnect it. The main thing here is not to exert excessive force, because the deformed teeth of the clamp will then not be able to withstand the pressure of the fuel system and the connection will depressurize while the car is moving. The ventilation hose is fixed with an ordinary self-tightening clamp, which just needs to be loosened with narrow-nose pliers. The absorber hose holder snaps off from the clamp and is moved to the side.
4.
The module is secured by a special plate, which is tightened with four pairs of 8mm bolts. Unscrew them and remove the ring.
5.
Next we need to pull out the fuel module. This should be done with extreme caution, as there is a possibility that the float of the fuel level indicator sensor will get caught and damage it.
6.
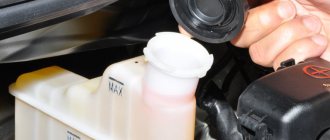
Next in line is the O-ring. We remove the rubber band and wipe it so that when installing the module in its original position, proper tightness is ensured. There are also cases where the ring sticks to the surface of the fuel module, but when removed, it may fall into the fuel tank. Therefore, you should be more careful so as not to do unnecessary things later - catching gum in the gas tank.
7.
Disconnect the fuel level indicator sensor wiring from the fuel unit cover. Then we remove its wires from the clamp and remove the sensor completely.
8.
Next, disconnect the power supply to the fuel pump from the cover. Next, disconnect the fuel pipe running from the top of the module to the fuel filter. We check whether everything is disconnected and set the lid aside.
9.
Having dismantled the bottom cover of the module, you will see a filter element, in the center of which the fuel pump is located. Other auxiliary elements are also installed there.
10.
Replacing the fuel filter on a Solaris will be most comfortable if you place the used and new elements side by side. This will give you the opportunity to accurately transfer all the details from the old TF to the new one.
11.
Reassembling the entire fuel module occurs in the reverse order. We install the sealing rubber and carefully adjust the module into its place, tighten the cover in a cross pattern. We connect everything that was disconnected.
12.
The final step will be to check the tightness. We turn on the ignition several times so that the fuel supercharger expels air from the line and builds up operating pressure. Carefully examine the situation near the fittings - there should be no leaks there. Pay special attention to this!
Cost of replacing a fuel filter on Solaris
If you prefer to decide everything yourself, you can save from 400 rubles on this. However, you must also take into account the time costs. Car service specialists carry out this operation in no less than an hour, but you won’t be able to do it that quickly - you have no experience. Plus, the system there is delicate and responsible, requiring increased accuracy.
DIY fuel module repair.
We lift the rear seat (most of it), find the valve in the sound insulation, open it and see the hatch. Hatches come in different designs, from square to triangular. Unscrew the screws securing the hatch. We remove the hatch.
We have a corresponding view. Disconnect the power cable and hoses by releasing the latches.
After unscrewing the 12 nuts by 8, we remove the metal pressure plate. Then we remove the fuel module.
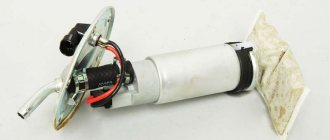
The fuel module is in our hands.
— I disassembled the fuel module into two parts.
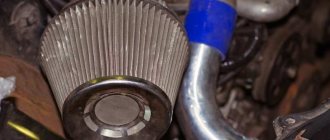
the mesh on the pump is clogged with dirt.
The glass is clean.
The tank turned out to be just as clean.
— Then we purchased a BOSCH fuel pump 0580 453 453 (0580 454 035 is also suitable), WEEN 1910182, a power cable and a corrugated fuel tube for domestic fuel modules. All this can be purchased at a regular store that sells spare parts for VAZ cars.
The pump is completely suitable as a replacement for the old one - even the lower part is positioned at the right angle to properly secure the filter mesh.— I removed the old pump.
- The fuel hose is really disposable - you have to cut it or heat it with a hairdryer to remove it
— I put a new hose on the new pump + a clamp for reliability, although the hose fits very tightly on the pump. The terminals on the old pump are different in width, but on the new one they are the same. It is necessary to sharpen the negative terminal a little. It becomes narrower and the standard terminal block fits on without problems. Or the purchased block fits perfectly into the pump connector, you just need to connect our terminals to supply power.
— The new tube fits quite tightly onto the fitting + clamp (without any remnants of the old hoses).
— I washed the original mesh filter from the pump using carburetor cleaning fluid from a can.
— The glass of the fuel module was also washed from dirt and deposits.
— Reassembled the fuel module in reverse order.
I returned the fuel module to the car's tank, everything worked immediately. I decided to replace the pump, despite the dirty filter mesh.
I think that since the old pump overheated until the engine stopped, this is no longer good and I didn’t want to do double work to dismantle the pump.
1. In case of failure, first of all, remove the fuel module and clean the filter screens, especially the internal ones. 2. Remove the regulator and check its condition; if its mesh is dirty, replace it. Rinse and blow out the return channels and the RD socket.
Self-replacement of the Hyundai Solaris fuel filter (photo and video).
Our instructions are suitable for Hyundai Solaris cars with 1.4-1.6 liter engines, both first and second generation.
When should you change the fuel filter?
The manufacturer has established a regulation - the fuel filter is replaced once every 60,000 km. But, in practice, it is better to change the filter more often, since the quality of fuel at Russian gas stations leaves much to be desired.
A clogged fuel filter manifests itself in the form of a lack of power, failures during acceleration, and a decrease in maximum speed.
If you do not change the fuel filter in a timely manner, problems may occur. One day, a Solaris came to our service with a faulty fuel pump, the reason for the failure was a break in the mesh. Accordingly, dirt got into the pump, and it wore out; the reason for the breakthrough of the mesh was the formation of condensate in the tank and its freezing.
In practice, it is advisable to change the fuel filter every 3 years or 40,000-50,000 km, whichever comes first.
If you live in large cities and drive a lot, the scheduled fuel filter replacement period will suit you quite well.
What is required to replace the fuel filter?
Tools:
- wrench with extension
- 8 socket for unscrewing the fuel module ring.
- 12mm head for unscrewing the seat.
- a stationery or regular knife for cutting sealant.
- pliers for removing clamps.
- flat-head screwdriver for disassembling the fuel module.
Consumables:
- coarse mesh (31184-1R000 - original)
- fine filter (S3111-21R000 - original)
- sealant for gluing the lid (any kind, even Kazan)
The approximate cost of consumables is 1500 rubles.
How is the fuel filter replaced?
If you are too lazy to read, you can watch this video:
https://youtube.com/watch?v=k_yy6PJMcXQ
If you are more accustomed to reading, below are step-by-step instructions with pictures:
Step 1 - remove the rear seat cushion.
To do this, unscrew the mounting bolt with a 12mm head. It is located in the center and by moving it upward we lift the seat cushion, freeing the front brackets.
Step 2 - remove the cover.
This is done using a stationery or regular knife, cut the sealant and lift it.
Step 3 - remove the dirt.
This is necessary so that after dismantling the fuel module, all this dirt does not get into the tank. This can be done using a rag, brush or compressor.
Step 4 - remove the fuel module.
Carefully disconnect all the wires and unclip the fuel hose clamps. After this, unscrew the 8 bolts by 8, remove the retaining ring and carefully remove the fuel module.
Step 5 - service the fuel module.
We replace the coarse filter (the mesh at the inlet to the fuel pump), and replace the fine filter - a plastic container.
ATTENTION! It is extremely important not to lose the O-rings when changing filters. A common mistake is the loss of the sealing rings of the pressure regulator - if you forget to install the sealing rings, the car will not be able to start, since fuel will not flow into the engine
A common mistake is the loss of the pressure regulator sealing rings - if you forget to install the sealing rings, the car will not be able to start, since fuel will not flow into the engine.
Step 6 - assemble everything in the reverse order, glue the lid onto the sealant, install the seat and enjoy the money saved.
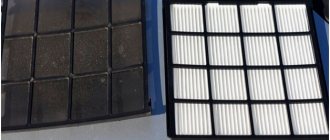
To understand the degree of clogging of the fuel filter after 50,000 km of operation, you can look at two photos (filter paper on one side and the other):
Conclusion.
I hope that after reading this article, you realized that replacing the Hyundai Solaris fuel filter is not difficult.
Unfortunately, it is impossible to do this job without getting your hands dirty and without sniffing gasoline, so it may make sense to turn to professionals.
With the help of the wonderful service “Remontist”, you can choose a car service near your home, study reviews about it and find out the price.
The average price for the service of replacing a fuel filter on Solaris for 2022 is 550 rubles, the average time for providing the service is 30 minutes.
That's all for me today. I hope that the article was useful to you. If you want to supplement it or ask questions, write comments.
https://dispetcher-gruzoperevozok.biz/zamena-toplivnogo-filtra-henday-solaris/https://razborov.net/hyundai/zamena-toplivnogo-fil-tra-hyundai-solaris.htmlhttps://zapchasti.expert/ toplivnyj-filtr/toplivnyj-filtr-hyundai-solaris.htmlhttps://etlib.ru/report/1424-zamena-toplivnogo-filtra-hendaj-solyarishttps://life-with-cars.ru/bez-rubriki/samostoyatelnaya- zamena-toplivnogo-filtra-hendaj-solyaris-foto-i-video/
Changing the Hyundai/Kia fuel filter with your own hands
DIY fuel filter replacement for Corolla 150
First, you need to relieve the pressure in the fuel system, since under pressure it is strictly forbidden to depressurize the fuel line. The pressure is released simply. To do this, we find the fuel pump relay in the mounting block, which is located under the hood. The relay we need is the one on the far left. We remove the relay from the board and start the engine.
It will idle until all the fuel is exhausted from the system and the pressure drops. Now you can remove the fuel module.
We do this:
- Remove the negative terminal from the battery.
- Remove the rear seat cushion. To do this, unscrew the bolt with a 12mm head and pull the seat upward. We remove it from the cabin.
- We find the plastic cover of the fuel pump hatch, pry it off with a flat screwdriver and carefully remove it.
- Disconnect the contact terminal from the pump connector.
- Using pliers, open the spring clamp and remove the vapor supply hose to the adsorber.
- Press the clamps on the tip of the fuel intake tube and remove it from the fitting.
- We remove the tube holder from the bracket on the module cover.
- Using a 8mm head, unscrew the clamping screws around the perimeter. There should be eight of them.
- Remove the pressure washer.
- Carefully remove the assembled module, trying not to damage the float arm.
- Now carefully remove the O-ring from the groove in the tank.
- Disconnect the fuel level sensor wiring harness...
- take the wires out...
- ... use a flat screwdriver to pry up the retainer...
- ... and remove the sensor by pulling it down along the guides.
- Remove the fuel pump power wires by snapping the lock.
- Using the same screwdriver, carefully pry the clamp of the tip of the gasoline supply hose from the filter to the module.
- We take out the latch.
- Remove the hose tip without losing the rubber seal.
- In the same way, remove this hose from the filter fitting.
- Using a screwdriver, pull out the guide clamps on the module body.
- Separate the cover from the body.
- We pry up two latches on the module body...
- ...and take out the filters, pump and pressure regulator assembly.
- At the top we snap off the two latches.
- Carefully remove the pump and tube.
- We pry the stopper on the mesh...
- ...and remove the strainer.
- Remove the spring stopper from the filter.
- Remove the seal from the drain tube and disconnect the mass from the filter housing.
- Use a screwdriver to pry up the two fasteners again...
- ...let's take it off...
- ...and take out the pressure regulator with the rubber seal.
- Remove the rubber ring from the regulator.
- Remove the plastic spacer.
- Disconnect the drain tube.
- Don't forget about the regulator tip seal.
- All we have left in our hands is the fine filter housing with two rings.
Everything is ready to be replaced. We assemble the module in the reverse order, check the tightness of the installation of the fuel lines, before the first start, turn on the ignition for a few seconds, then turn it off so that the filter pumps gasoline and does not run dry. Good luck to everyone, keep an eye on the quality of the fuel.
Peculiarities
Unlike cabin or air filters, Hyundai Solaris cars use the same fuel filters for all types of engines and car configurations. In these cars, it is lowered into the gas tank, performing the function of a kind of shell in which the fuel pump is located. The filter has an output with contacts used for attaching a gasoline level sensor.
As a result of timely replacement of lubricant and fuel filter, the service life of the engine is significantly extended. From a reliability point of view, it is better to change the part at specialized service stations, but if you have certain knowledge and skills, you can do it yourself.
The cost of an original filter for a Hyundai Solaris can be 600-800 rubles, although cheaper options can be found on the Internet.
Changing a part on a Hyundai Solaris is not so easy. Its replacement must be carried out in strict accordance with the instructions and using the necessary tools and skills. To replace it, you must first remove it. As a result, it becomes possible to perform the following procedures:
- cleaning the fuel pump strainer;
- replacing the fuel pump;
- replacing the gasoline level sensor;
- replacing the entire fuel module.
Fuel filter kit for Hyundai Solaris
When to change the filter?
If the Hyundai Solaris was purchased from a car dealer, then according to technical regulations the filter element is replaced every two years or every 60 thousand mileage. But the “freshness” of the car does not guarantee that everything will go according to the regulatory scheme. Low-quality gasoline can cause contamination of the filtration system ahead of schedule.
Signs of a clogged filter element:
- traffic dynamics have decreased;
- there were shocks while driving;
- The engine took a long time to start.
Fuel level indicator FIAT Albea
The display was made with the novice user of the Fiat Albea in mind, a car that has unique stylized retro-style instrument dials with frequent tick marks. At first, they help to quickly calculate digital values based on the position of the pointer arrow. Drawn by hand, accurately copying the proportions. If necessary, you can print it on paper, cut it out and keep it handy in your car.
The fuel pressure regulator (FPR) is set to a pressure of 350 kPa (3.5 kgf/cm2).
The fuel pressure regulator is installed in the fuel module.
Exclusively, instead of the standard pressure regulator, the RDT-380 fuel pressure regulator from the Lada Kalina car, VAZ 2112 photo above is 100% suitable.
I- Option: See photo above. The module with an oval top cover has an additional fuel filter installed on the gas tank. The filter is mounted on the right front corner of the fuel tank and is covered with a plastic casing secured with 2 nuts and 3 self-tapping screws for a 8mm head.
II- Option: Module with round top cover.
III- Option: Module with round top cover.
The most difficult thing when disassembling the pump of the III-version is to pull out the “filling” from the flask (3 pins in the flask, the “filling” is mounted on them); I admit, I broke all 3 pins. And this means the bulb is scrapped (although it was already broken by someone before me, so it’s not offensive), and the second is “welded” wires to the contacts (you can bluntly bite them off and solder them, usually with tin)
Fuel module variants II and III do not have an external filter; the filter is located in the fuel module housing.
OEM codes of spare parts for the fuel supply system.
5421306 – electric fuel pump; 51709819 – fuel module; 51802835 – fuel tank (gas tank); 51808700 – fuel tank (gas tank); 51782425 – rubber seal for the fuel module (round).
Fuel filters:
Original code - 46416684; Fuel filter analogues:
Hengst H115WK; Alko SP-2125; UFI xu-3174000; FRAM 27371 15.01A; Filtron PS921; Alko SP-2125.
Symptoms of fuel pump failure - with the onset of warm weather and prolonged driving, dips in traction appear when starting at traffic lights and in traffic. The further, the process of pump failure only worsened, until it is impossible to move away, the engine runs at idle, and does not respond to the accelerator pedal. When accelerating in 2-3-4 gears above 4000 rpm. It’s as if the car is being held back, in the summer it can simply stall, especially in traffic jams, and when driving evenly on the highway, jerks are felt. The only thing that helps is stopping the engine for 10 minutes, then you can drive for a while.