VAZ 2109 | Crankshaft
2.2.1.13. Crankshaft
| GENERAL INFORMATION |
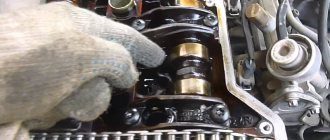
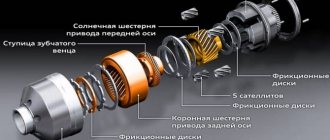
Crankshaft and cylinder block
| 1 – cylinder block; 2 – upper main bearing shell; 3 – upper thrust half-ring; 4 – front crankshaft oil seal; 5 – oil pump; 6 – oil pump gasket; | 7 – lower main bearing shell; 8 – bolt securing the main bearing cover; 9 – main bearing cover; 10 – lower thrust half-ring; 11 – crankshaft |
Removal
| EXECUTION ORDER |
| Examination Inspect the crankshaft. The working surfaces should not have chips, nicks, scratches, etc. Small scratches can be sanded and polished. Measure the journals of the main and connecting rod bearings. If they are smaller than the nominal dimensions (main journal - 53.958-53.978 mm, connecting rod - 41.955-41.970 mm), they need to be ground to the repair size. If the crankshaft has cracks, it must be replaced. Using a micrometer, check the ovality of the connecting rod journals. If the ovality exceeds 0.017 mm, grind the journals to the repair size. Check the crankshaft runout along the middle journal. Permissible runout 0.03 mm; if the runout is greater, replace the crankshaft. Measure the gap between the main bearings and the crankshaft journals. To do this, install the main bearing shells in place, placing the crankshaft on them. Place pieces of plastic calibrated wire “Plastigage” on the crankshaft journals, install the main bearing caps with the liners installed in them and tighten to a torque of 65 N·m (6.5 kgf·m). At the same time, turn the crankshaft. Remove the main bearing caps and, based on the amount of flattening of the wire, use the scale on the package to determine the size of the gap. Nominal gap 0.03–0.08 mm. The maximum permissible gap is 0.17 mm. Similarly, measure the gap between the connecting rod bearings and the crankshaft journals. Tighten the connecting rod cap nuts to a torque of 30 Nm (3.0 kgfm). Nominal clearance 0.03–0.076 mm. The maximum permissible gap is 0.095 mm. Installation |
The final stage
To secure, apply light blows with the handle of a hammer to the bottom of the piston, thereby pushing it into the cylinder. Screw on the second to fifth main bearing caps so as not to create a significant tightening. After this, purchase an odorless sealant from the store and apply a thin layer of it to the surface of the cylinder block in the place where it will come into contact with the first bearing cap.
After this, install a new sealing ring on the crankshaft and, after checking the location of the chain on the crankshaft sprocket, install the oil pump and pan. Also screw the removed cylinder head back into place, because only after this the structure can be completely assembled and the crankshaft considered replaced.
How to replace an engine crankshaft
by Dan Ferrell
Replacing the crankshaft is usually part of an engine overhaul. However, unlike many other components you can simply remove around the engine block, removing, machining and installing the crankshaft requires a special procedure. Since you are replacing or rebuilding the crankshaft, plan to install a new set of bearings as well. With the engine out of the car and the remaining components off the block, you are ready to work on the crankshaft.
Removing the crankshaft
Step 1
Place the engine block on the engine mount for support or mount it on a workbench.
Check the main bearing caps. They must be numbered sequentially, starting from the front of the engine. The arrows on the covers should also point towards the front of the engine. If necessary, use a stamp set to identify each cap so you can replace them in their exact location and position.
Step 3
Turn each bearing cap bolt 1/4 turn counterclockwise one at a time, starting at the center of the block and moving back and forth until you can remove the bolts by hand. Use a jumper and a short socket and keep the bolts in order so you can replace them at their original location during the assembly process.
Step 4
Remove the main bearing caps from the block. If necessary, gently tap each cap with the wooden handle of a hammer to dislodge them from the block. When removing them, hold each main bearing on the inside of the caps.
Lift the crankshaft from the cylinder block with the help of an assistant and install the crankshaft in a safe place while standing upright. This will prevent the crankshaft from becoming heavy on the centerline of the unit.
Place the bearing caps in their original position on the cylinder block and tighten the bolts by hand until they stop.
Do-it-yourself repair and installation of the crankshaft in a VAZ 2106 car
Step 1
Take the cylinder block and crankshaft to a workshop for cleaning, inspection and, if necessary, repair. Have them check the crankshaft play and size the bearings correctly. And be sure to store the crankshaft upright until you're ready to reassemble it.
Step 3
Install the new bearings onto the cylinder block so that the small bearing shell is properly seated in the recess provided on the block seat. Make sure the small oil hole in each bearing is aligned with the oil hole in the corresponding seat. Remember that the center bearing is built with flanges on each side to control end clearance.
Step 4
Apply a thin coat of molybdenum-based grease to the surfaces of the new main bearings installed on the engine. Also coat the crankshaft journals. The magazines are the area of the crankshaft where the bearings will rest.
Step 6
Install the other half of the new bearings onto the main bearing caps. Also, align the bearing tabs with the notch on the cap seat and coat the bearing surfaces with a thin layer of molybdenum-based lubricant.
Step 7
Install the bearing caps to the correct locations on the cylinder block. Make sure the numbers on the covers are sequential from the front to the rear of the engine and the arrows on the covers point to the front of the engine.
Step 8
Install the bearing cap mounting bolts by hand. Tighten the bolts securely using the jumper and short socket. Finally, tighten the bolts alternately in three stages, starting from the center and working towards the front and rear of the engine. Use a torque wrench and a short socket. Refer to your specific vehicle's service manual for the correct torque to apply to the main bearing caps. Or you can ask a technician at your machine shop for this number.
Step 9
Tap the ends of the crankshaft back and forth 10 times with a brass hammer and tighten the main bearing caps with a torque wrench and a short socket.
Install the crankshaft pulley bolt at the front of the crankshaft by hand and rotate the crankshaft several times to check for binding. Use a switch and socket.
Things you'll need
- Engine stand (optional)
- Stamp set (optional)
- Barbell
- Short socket
- Hammer with wooden handle
- Assistant Help
- New main bearings
- Molybdenum based grease
- Torque wrench
- Brass hammer
- Socket
Reasons for element wear
It happens for the following reasons:
How to select, repair and install a crankshaft on a VAZ 2106
- natural wear and tear during long-term use;
- incorrect installation of this oil seal;
- excess pressure in the engine crankcase;
- play of the crankshaft itself.
A previously incorrectly installed seal will not last long and will soon fail. As a result, the crankcase ventilation system will become clogged or the breather hoses will break. This leads to excess oil pressure in the engine crankcase, which forcefully squeezes out and distorts the oil seal. Because of this, it wears out faster and leaks lubrication. The same symptoms occur with increased play in the crankshaft, which squeezes out the element. This is caused by wear of the main bearing half rings. During normal operation, they eliminate crankshaft play. When the half rings wear out, the shaft begins to move from side to side, causing the half ring to fall into the crankcase. The crankshaft itself begins to grind the main bearings and connecting rod caps.
In case of late replacement of half rings, the element may not be installed in its seat. This will threaten the driver with replacing the entire cylinder block. It is worth keeping all these reasons in mind, always checking the correct operation of the engine and if a problem is detected, be sure to fix it. Otherwise, the new oil seal will last very little time and will have to be changed again. In order not to lead the engine to oil starvation, you should replace the crankshaft oil seal in a timely manner (including on a VAZ 2109 car). Below we will look at how to do this.
Why do you need to twist the crankshaft pulley?
Removing the crankshaft pulley is performed for various reasons.
Crankshaft pulley
Most often it has to be removed when replacing the timing belt or replacing crankshaft seals. Usually the belt is changed either according to the regulations, or when defects are identified that require its replacement. Oil seals are replaced when oil leaks occur due to product wear.
On a VAZ 2114, the crankshaft pulley is secured with a bolt. During removal, a problem arises when unscrewing the mounting bolt. Firstly, it is inconvenient to get to. Secondly, at the factory they always tighten it very tightly so that it does not unscrew on the road. If a fastener comes loose while driving, it can result in costly repairs. During operation, thanks to the right-hand thread, the tightening is enhanced. In addition, coking and sticking of the part occurs. Thus, sometimes the bolt is very difficult to remove.
Tools
To successfully dismantle the VAZ 2114 crankshaft pulley and replace consumables, you should prepare the following tools:
- standard set of keys;
- jack;
- support or stump;
- socket head;
- extension;
- pulley puller;
- pry bar, screwdrivers.
It is more convenient to carry out work on a lift or ditch for inspection.
Stages of work
In order to remove the crankshaft pulley on a VAZ 2114, you need to dismantle some parts and components. The entire process of removing the crankshaft disc consists of the following steps:
- First, to dismantle the generator belt, you need to unscrew the locking bolt and loosen the tension bolt.
- Next, you need to lift the front of the car and remove the right front wheel.
- In the upper part of the engine compartment of the VAZ 2114, remove the air filter and the engine mud shield.
- Next, remove the alternator belt.
- To secure the flywheel from turning, you need to open the plug on the side of the VAZ 2114 clutch. Then insert a screwdriver or pry bar into the opened opening between the flywheel teeth.
Fix the flywheel and unscrew the bolt
Next we move on to unscrewing the fastener. To make it easier to unscrew, you need to apply special liquids to the threaded connection that corrode corrosion. For this purpose, special WD lubricant, brake fluid, and vinegar essence are suitable. Then the head of the key is put on and, using a lever, it is turned counterclockwise so as to tear the bolt from its original position.
We put the head on the bolt
If you are unable to unscrew the fastening element by hand, you can use the starter.
Unscrew the fastening bolt
Place the lever coming from the head against the spar or the floor in the direction of the shaft movement, and then turn the starter several times, giving the crankshaft a rotational impulse. After unscrewing the fastening element, you need to remove the crankshaft pulley. It is held in place by a key and is difficult to remove easily. You can use a special device with paws that cover the edges of the disk. If you don’t have a puller, you can use pry bars or screwdrivers by inserting them between the crankshaft and the pulley on each side, gradually moving the part to be removed away from the shaft. The touch point should be chosen closer to the crankshaft. Before removing the disk, it is advisable to tap it with a wooden hammer to avoid possible distortion. The part should be dismantled carefully so as not to damage the key and groove.
After completing the necessary replacement, when reinstalling the crankshaft pulley, the seats should be treated with grease so that the parts fit without effort. In this way, distortions can be avoided.
>Video “Replacing the crankshaft oil seal on a VAZ car”
In this video you can see how to unscrew the fastening nut and dismantle the crankshaft pulley.
Installing the connecting rod and piston group
The connecting rod and piston group (CPG) must be installed as an assembly. It is not recommended to press the piston pin into the connecting rod head without special tools. This procedure is best left to professionals.
To install the ShPG, you need a steel mandrel in the shape of a ring. The height of the ring is 2-3 cm, the diameter of the hole is slightly larger than the diameter of the cylinder. The pistons must be mounted in such a way that the arrow on their bottom (the part adjacent to the valves) is turned towards the oil pump. The number of the connecting rod and piston must correspond to the number of the cylinder. Before installation, you need to separate the locks of the oil scraper and compression rings at an angle of 120 degrees.
- Turn the block over.
- We wipe the cylinder walls and crankpins with a dry cloth.
- Thoroughly lubricate the cylinder walls, the side surfaces of the pistons and the inside of the mandrel with oil.
- We place the mandrel on the cylinder and insert the piston and connecting rod assembly through it. We push the piston into the cylinder using a round wooden stick (hammer handle).
- Place the liner in the connecting rod cover and lubricate it with oil.
- We lay the block on its side and install the connecting rod cap so that the cylinder number on it and on the connecting rod are on the same side. We secure the cover with nuts.
- In the same way we mount the remaining pistons and connecting rods. After this, turn the cylinder block upside down and tighten all 8 nuts securing the connecting rod caps.
How to remove a VAZ 21083 engine
Preparation for replacing bearings and direct installation of the crankshaft
In addition, disconnect parts such as the generator, starter, coolant pump, upper nuts that secure the engine mount, and bolts that secure the clutch housing to the engine. The order in which disconnection is made must be strictly observed. During operation, the lifting device cables must be secured to the block and carefully lifted.
Using a 10mm wrench, you need to unscrew all the bolts that secure the oil pan to the cylinder block and remove it along with the seal gasket. Disconnect the oil pump. Using a 14mm socket, unscrew the nuts that secure the connecting rod cover, and then remove it. Then take a hammer, press the handle against the connecting rod, and push the pistons out of the cylinders. Next, take a 17mm socket and unscrew the bolts that attach the crankshaft to the cover. Counting from the crankshaft toe, according to the number marks, we disconnect all subsequent covers. Keep in mind that on cover 5 there are two marks on both sides.
Second method
Replacing the VAZ 2109 crankshaft oil seal with the second method involves removing the entire oil pump. Changing the seal in this case is very convenient, but you will have to spend more time. Having completed all of the above, unscrew the 3 bolts of the engine sump, directly under the pump cover. Then the cover fastening elements are unscrewed. The oil pump is carefully removed. Having removed the old one and pressed in the new oil seal, lubricate its working surface with oil, and everything is installed in the reverse order of removal. The difficulty lies in installing the oil pump in place.
It must be properly centered so that the element does its job correctly and does not squeeze out. As you can see, on a VAZ 2109 car, replacing the crankshaft oil seal, done with your own hands, is a completely understandable and not very difficult job. If it turns out that the axial free play of the shaft is higher than normal, then this indicates wear of its half rings. They should be replaced immediately to avoid complications.
Replacing the crankshaft oil seal
In particular, a signal that an urgent replacement of the front oil seal liners is necessary is the direct contact of oil on the pulley and its further splashing in the front part of the engine. If oil leaks in the rear oil seal, splashing occurs on the flywheel in the clutch housing. Reasons for replacement:
You can replace crankshaft oil seals yourself; this will not only significantly save time and money spent on repairs in the workshop, but also gain invaluable experience. Replacing the crankshaft oil seal is a standard procedure to ensure optimal engine performance.
According to statistics, the installation of a new oil seal should be done at least once every 3 years. However, oil seal bearings may need to be replaced much sooner. It all depends on the general condition of the parts and the conditions under which the car is used.
In what cases is replacement necessary?
Half rings are consumable material. When worn out they need to be replaced. Otherwise, the gradually increasing horizontal play of the connecting rod support will further accelerate the breakdown. The parts will finally wear out and stop performing their functions. And this already threatens breakdowns in the piston group. It also happens that the cylinder block breaks due to strong play in the cranked part. Therefore, replacement of the crankshaft half rings should be carried out on time as soon as the symptom appears.
The second danger of wear is that without lock washers, the shaft will begin to grind the support cover, which is cast together with the BC. Noticeable damage to the block or cover is an additional but mandatory repair
Therefore, it is so important to promptly repair damage, or rather wear, of locking parts. For example, when grinding adjacent zones of the BC, the installation of crankshaft half rings will end with their rapid abrasion
Crankshaft assembly
It’s good that not very noticeable damage to the necks can be eliminated by boring, and the seat can be removed by cleaning with a scraper. The large axial gap can be compensated for by repair washers, the thickness of which is 0.127 mm greater than the standard ones.
How to select and replace crankshaft half rings?
Over time, the thrust half rings, like any plain bearings, wear out, resulting in an increase in the axial play of the crankshaft. The working play (clearance) of the crankshaft lies in the range of 0.06-0.26 mm, the maximum, as a rule, should not exceed 0.35-0.4 mm. Large backlash can cause intense wear of crankshaft parts, squeezing out the crankshaft oil seal, increased oil consumption and a drop in engine power characteristics. This parameter is measured using a special indicator mounted on the end of the crankshaft. If the play exceeds the maximum permissible, the thrust half-rings must be replaced.
When choosing half rings, it is necessary to take into account an important nuance: not only the half rings are subject to wear, but also the thrust surfaces of the crankshaft. Therefore, in new engines, when the crankshaft clearance increases, it is usually necessary to change only the worn half rings - in this case, it is necessary to purchase parts of the nominal size. And in engines with high mileage, wear on the crankshaft thrust surfaces becomes noticeable - in this case, it is necessary to purchase thrust rings of a repair size.
It is necessary to select new half rings of the same types and catalog numbers as the old ones
It is important that they fully comply with the installation dimensions and have an appropriate anti-friction coating. The latter circumstance is especially important for motors in which semi-rings with different antifriction coatings are initially installed.
For example, on many VAZ engines, the rear semi-ring is cermet, and the front half-ring is steel-aluminium, and they are not interchangeable.
Replacement of half rings should be carried out in accordance with the instructions for vehicle maintenance and repair. On some engines, this requires removing the pan and dismantling the lower thrust bearing cover; on other engines, more serious disassembly will have to be performed. When installing new rings, their orientation must be observed - the anti-friction coating (which usually has grooves) must be installed towards the crankshaft cheeks.
With the correct selection and installation of half rings, thrust bearings will ensure normal crankshaft play and reliable operation of the entire engine.
Types and design of crankshaft support half-rings
To reduce crankshaft play, two types of parts are used:
Washers are one-piece rings that are mounted in the support of the rear journal of the crankshaft. Half rings are half rings that are mounted on the support of the rear or one of the middle journals of the crankshaft. Today, half rings are most used, since they provide the best fit to the thrust surfaces of the crankshaft and wear more evenly, and are convenient for installation/disassembly. In addition, washers can only be installed on the rear journal of the shaft, while half rings can be installed on any journal.
Structurally, the half rings and washers are very simple. They are based on a solid bronze or stamped steel half-ring/ring, onto which an anti-friction coating is applied, which reduces friction against the thrust surface on the shaft cheek. The antifriction layer has two or more vertical (in some cases radial) grooves for free passage of oil. Also, the ring/semi-ring may have holes and fixing pins of various shapes to prevent rotation of the part.
Why is a crankshaft needed in a VAZ 2106 engine?
The crankshaft (crankshaft) is an important part of the crank mechanism of any engine. The operation of the unit is aimed at converting the energy of combustion gases into mechanical energy.
Description of the VAZ 2106 crankshaft
The crankshaft has a rather complex design, with connecting rod journals located on the same axis, which are connected through special cheeks. The number of connecting rod journals on the VAZ 2106 engine is four, which corresponds to the number of cylinders. Connecting rods provide connection between the journals on the shaft and the pistons, resulting in reciprocating movements.
Let's look at the main elements of the crankshaft:
- Main journals are the supporting part of the shaft and are installed on main bearings (located in the engine crankcase).
- Crankpins. This part is designed to connect the crankshaft to the connecting rods. The connecting rod journals, unlike the main ones, have a constant displacement to the sides.
- Cheeks are a part that provides connection between two types of shaft journals.
- Counterweights are an element that balances the weight of connecting rods and pistons.
- The front part of the shaft is the part on which the pulley and timing gear are mounted.
- Rear end. The flywheel is attached to it.
Seals are installed in front and behind the crankshaft - oil seals, which prevent oil from escaping out. The entire crankshaft mechanism rotates thanks to special plain bearings (liners). This part is a thin steel plate that is coated with a low-friction material. To prevent the shaft from moving along the axis, a thrust bearing is used. The material used in the manufacture of the crankshaft is carbon or alloy steel, as well as modified cast iron, and the production process itself is carried out by casting or stamping.
The crankshaft of the power unit has a complex structure, but the principle of its operation is quite simple. In the engine cylinders, the fuel-air mixture ignites and burns, resulting in the release of gases. During expansion, the gases exert an impact on the pistons, which leads to translational movements. Mechanical energy from the piston elements is transferred to the connecting rods, which are connected to them through the bushing and piston pin.
An element such as a connecting rod is connected to the crankshaft journal using a liner. As a result, the translational movement of the piston is converted into rotation of the crankshaft. When the shaft makes a half revolution (turns 180˚), the connecting rod journal moves back, thereby ensuring the return of the piston. Subsequently, the cycles are repeated.
No less important in the operation of the crankshaft is the process of lubrication of rubbing surfaces, which include the connecting rod and main journals.
It is important to know and remember that lubricant is supplied to the shaft under pressure created by the oil pump. Oil is supplied to each main journal separately from the general lubrication system
Lubricant is supplied to the connecting rod journals through special channels located in the main journals.
Symptoms of a problem
If you repair the crankshaft yourself, you can save a lot on car service costs. Therefore, it is worth understanding its diagnosis, repair and installation. If repairs are not carried out in a timely manner, the engine may seize, and this can lead to more serious repairs. The following are signs that serve to identify malfunctions:
- when the engine is running, the oil level control light does not go out, which indicates a decrease in oil pressure in the system;
- at medium and high speeds a metallic knock is heard in the engine, which increases with increasing speed;
- engine jams.
The cause of the first two malfunctions is the wear of the main and connecting rod journals. In this case, the distance between the neck and the liner increases, which leads to a decrease in oil pressure. If the distance is too large, the shaft may run out, causing metallic sounds in the engine. If the engine jams, it is better to replace the crankshaft. To diagnose the serviceability of the crankshaft, it should be dismantled and cleaned. It is better to remove the part together with the engine.
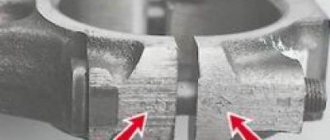
After removal, you need to perform a visual inspection of the necks and cheeks, according to which a decision is made on the need for grinding or replacement. No special instruments are needed for inspection; you can tell by touch. If scratches and burrs are found on the journals, the part is sent for boring. Boring can be done 4 times. Each boring increases the dimensions of the liners by 0.25 mm. After dismantling the crankshaft, you need to evaluate the size of the liners and whether they will allow boring. If grinding has never been performed, then the liners have an icon without any numbers.
If cracks are found, the crankshaft must be replaced. You can send it for welding, but usually restored parts last no more than 50 thousand kilometers. After boring, you need to polish the journals. Then the journals and crankshaft need to be washed with gasoline. The oil passages should also be thoroughly cleaned to prevent contamination from entering the bearings. After washing with gasoline, you need to blow out the oil channels using compressed air.
Best answers
Sergey:
Once the engine starts knocking, the crankshaft should be thoroughly checked. The connecting rod journals can be measured without removing the shaft from the engine, but the main journals can only be inspected visually and even run your finger over them (feel for wear). That's all the "diagnosis" is. It could stop starting due to over-enrichment of the mixture (gasoline vapor from the crankcase leaked into the space above the piston). “What will have to be done to make everything work? » — Eliminate gasoline from getting into the oil. — Change the inserts. — What to do with the crankshaft depends on its condition. Maybe nothing, if you're lucky. — Thrust half rings are sold in various thicknesses. I even have 4mm ones in stock. It is necessary to select such that the axial play of the crankshaft is minimal (the maximum allowed according to the book is 0.35 mm, but when overhauling the engine I never left it more than 0.15).
…..:
to carry out a thorough overhaul of the internal combustion engine, but on the subject, it started when the internal combustion engine started knocking, perhaps it would have been possible to simply replace the liners, but now I ended up like I wrote above on the capital
ldsk65:
This is already interesting, what kind of half ring did you find there?
liners cannot be in a tray. a mystery though
RW9UNK:
First of all, you need to find the reason for gasoline getting into the engine crankcase. Next, purchase new half rings and install them in place. The old half rings could simply be turned and thrown into the crankcase, thereby damaging them. Even though one half ring has fallen, both need to be replaced. Good luck with the repair.
Bo:
major repairs are not necessary... it is necessary to measure all the journals of the crankshaft, vibration could easily break them, the gloss on the journals should be the same everywhere, without visible roughness, burrs, etc. measure the ellipses on the connecting rods, the pistons do not need to be removed, although since you have to disassemble the clutch, it is better to check everything what is possible...
UPS:
The service center will tell you this after disassembling the engine. Replace the knee or grind the necks.
Alex Koren:
Engine repair for sure! And a full autopsy will tell everything...
Talnishnikh Sergey:
Half rings? You probably mean “liners.” If the crankshaft itself is not damaged, then replace the bearings, possibly of a repair size, and look for the reason for their falling out.
vasya brovko:
It could even tear the thrust surface on the shaft, but this is worse, then the new ones will break in an instant, then only grinding and selecting repair half-rings or soldering them with Babbitt 88.
Oleg Shevchenko:
I solved this problem by removing only the pan, the car drove for another two years
no repairs were required, it is important to understand the essence of the issue...
Which half rings are better, types
Parts of different materials are usually installed standardly - on the timing side there is a steel-aluminum or bronze ring, and on the flywheel side - metal-ceramic (yellow), bronze, copper. As a rule, the metal-ceramic version is more common on sale. If the product is original production, then one thrust washer is covered with an anti-friction layer.
Experts recommend installing bronze products. But the choice depends solely on the preferences of the owner himself.
The main thing is to pay attention to the slots that should be on the parts. They are designed for free flow of oil to the crankshaft
And here is some more information on the material of manufacture:
- solid bronze ones - do not need a protective coating;
- steel-aluminium, coated with aluminum alloy;
- metal-ceramic with bronze-graphite coating.
The choice of product should also imply an obligatory nuance - not only the thrust element, but also the crankshaft surface is subject to wear during engine operation
Therefore, it is extremely important to be able to select the correct stopper size, type and serial number. It is imperative that the parts fully meet the standard requirements and are covered with a special protective layer
As a rule, the exact size is determined before the actual replacement process. However, this can only be done by a specialist who has been able, based on indirect evidence, to create a picture of what reigns inside the block. In other words, how worn are the mounting sockets, and what size washers should be installed. Therefore, under normal conditions, when the installation is done by hand, you have to determine this during the work. If, after installing the half-rings, a measurement with a flat feeler gauge shows a play value higher than the standard - 0.06-0.26 mm or 0.35 mm, the locking elements must be changed one size higher.
Required tools + consumables
Mandatory tools that will be needed during the work:
- set of wrenches and sockets;
- set of screwdrivers;
- torque wrench for proper tightening of bolts;
- a flat feeler gauge for measuring axial play, or even better, a special indicator with a scale;
- clean rag.
- new half rings;
- pan gasket;
- sealant.
Replacing the support half-rings is usually accompanied by updating the engine oil, installing a new oil pan gasket and other related operations.
There are three sizes of thrust washers available on the market. Standard at 2.31, first repair and second repair (2.437 and 2.56, respectively). Therefore, you must first clarify which dimensions are suitable for your car’s engine. Typically, parts of standard or nominal sizes are installed on new or slightly worn motors. And repair ones, with increased thickness - to compensate for worn parts of the support and shaft, that is, for old and fairly worn-out internal combustion engines.
Crankshaft half rings ZMZ 406, methods of struggle
Initially, I tried to look for some sets of upper and lower half rings. But the quality was just perfect. Or different thicknesses, or different unknown materials. Rescued, producing inserts of all types and sizes. I have been working directly with the plant for a long time on VAZ issues, so I had no questions about quality. But still, it was not without pitfalls. The lower half rings turned out to be made on a “steel base”, and the upper ones – “aluminium”. In my experience, "aluminum" half-rings are relatively short-lived. The mileage is about 50 thousand km, after which they begin to deform.
Now the operating algorithm is as follows. Take the 4 lower half rings. Very carefully and gently, the protrusions are cut off from 2 pieces, and thus they turn into the upper half rings. The main “advantage” of this action is that using parts from the same batch, we are guaranteed to get the same thickness. This means that our crankshaft will now be located in the very center.
Crankshaft repair
The crankshaft removed from the vehicle is thoroughly cleaned and inspected. The presence of cracks on the main and connecting rod journals, as well as on the cheeks, is not allowed. If they are found, the crankshaft can be submitted for welding, but it would be better to replace it. Typically, restored crankshafts do not last more than 50 thousand km. They also check for the presence of deep grooves, burrs, scratches and nicks at the contact point of the VAZ 2106 crankshaft oil seal.
To determine the runout, as well as the displacement of the axes of the connecting rod journals, the crank is mounted on prisms. The values of radial runout, axial displacement and non-perpendicularity of the flange end to the crankshaft axis are measured. If the permissible parameters are exceeded, a decision is made to replace the part or edit it using a hydraulic press. Let us immediately note that the VAZ 2106 crankshafts are made of cast iron, so attempts to correct its geometry with a press often end in part failure.
Preparatory work
In order to start replacing the crankshaft oil seal, you need to collect the appropriate set of tools, including:
- Spanners of different solutions;
- Screwdrivers of different diameters;
- Rags;
- Bucket to drain engine oil;
- Hammer;
- The diameter of the mandrels coincides with the diameter of the oil seals.
Before starting the main work, you need to do the following:
- De-energize the car, or rather the engine compartment, separating the wires from the battery;
- After this, it is necessary to loosen the bolts that are attached to the generator compartment, then remove the belt; The field drains the oil into a bucket;
- The engine protective cover and oil pan are removed;
- The toothed belt driving the camshaft is dismantled.
Upon completion of the preparatory work, you can begin the main work, that is, replacing the front and rear crankshaft oil seals.