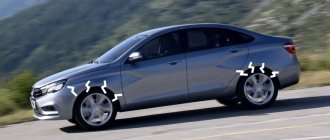
The front and rear suspension of Vesta differs significantly from the one that AVTOVAZ used on Grant, Priora, Kalina, etc. All the reviews tell us that the new chassis design is better than before. However, during the first months of operation, the owners began to notice extraneous noises (knocks, creaks, rattles, crunches) in the front and rear suspensions of Vesta, which occur when driving over speed bumps or other road irregularities...
How to get rid of creaking stabilizer bushings on Lada Vesta
There are two ways to eliminate the squeak:
- contacting a service station if the car is under factory warranty;
- Do-it-yourself repairs, regardless of whether there is a warranty.
Both methods do not guarantee the disappearance of the annoying sound. The reason lies in the material from which the bushing is made.
In most service stations with a defect using a metal-rubber aerosol. In the best case, they use a Litol type lubricant with the addition of a graphite base.
This “potion” lasts for several thousand miles, after which the sound returns.
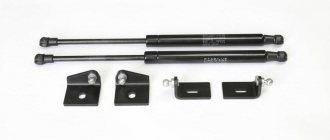
The most effective and efficient way is to install non-standard seals from other car brands. It is advisable that the elastic bands are made of polyurethane.
In terms of dimensions and parameters, bushings from:
| Name/items | Price in rubles |
| Chevrolet Niva: articles 2123-2906046, 2123-2906040 | the average cost is from 160 – 170 rubles per piece. Polyurethane ones are 120 – 140 rubles more expensive than analogues |
| Kia Rio: part numbers: KSBSOULF 54813-2K100, 54814-1G000 | cost per set from 800 rubles |
*price indicated as of 03/06/2019.
What they tried to do
Since the squeaking situation bothered everyone who encountered it, AvtoVAZ took corrective measures to eliminate it. The first attempt to get rid of the squeak was to apply a film with heat shrinkage to the stabilizer bar in the area of the pillows. Then other pillows with a modified cut profile were supplied. But these actions did not give the desired effect, and the creaking appeared again.
The next step from the manufacturer was the supply of new stabilizer pads. They were made from a different material - polyurethane, not rubber. The color of the pillows was green. This technique turned out to be more effective than previous ones. But after a certain mileage, car owners again encountered creaking suspension.
In these cases, factory engineers ordered that the cushions be removed and a special silicone lubricant applied to them. But this did not lead to a final elimination of the problem, since the lubricant was washed out when water entered.
Many of those who wanted to solve this problem on their own installed stabilizer cushions from Chevrolet Niva, Kia Rio, Soul, Toyota. But in most cases, after some mileage, the hated creak appeared again. Many people wondered how to solve this problem?
The principle of operation of stabilizer bushings
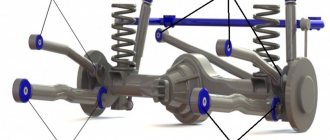
The main purpose of the stabilizer, bushings, struts (bones) is to evenly distribute the load along the entire perimeter of the suspension.
The stabilizer is activated when the car enters turns to minimize roll. The bushing is compressed and unclenched in a metal bracket under the influence of pressure from the torsion rod.
Where the body “sags” on its side, the rack raises the frame, and lowers it on the opposite side. The greater the angle of inclination, the stronger the drag force of the suspension.
The main element of the suspension is a torsion bar with sealing bushings at the edges. It is fixed to the suspension, and its edges are connected to the levers.
Conclusion
Despite numerous tips and recommendations, replacing the stabilizer bushings with new ones made of polyurethane remains an effective way. Preferably from a Kia Rio or Chevrolet Niva.
In the first case, additionally buy “native” Korean metal brackets, since the Lada Vesta brackets are not compatible along the external contour. How effective and efficient it is to buy non-original components is up to you to decide, but the quality of the latter has been approved by more than one thousand car enthusiasts.
Alternatives to standard bushings - which ones to replace with
During the repair, you can supply standard spare parts, their catalog number is 8450006748.
Stub bushings are installed on Vesta:
- length dimensions 40 mm;
- width 39 mm;
- height 45 mm;
- hole diameter 22 mm.
You can look for polyurethane ones on sale. This will turn out to be the simplest solution to the problem. The size of the front stabilizer bushing in terms of internal diameter coincides with the dimensions of the Chevrolet Niva, and the dimensions are as follows:
- length 39 mm;
- width 42 mm;
- height 43.5 mm.
The side is a little narrower, but the inner diameter fits perfectly. You will need article number 2123-2906040. This is the most common option. It is necessary to make slots on Chevrolet spare parts, like Vesta. All that remains is to grind down the sides to standard sizes and you can install them. The second option is less common among car enthusiasts. This is a replacement for consumables according to catalog 2123-2906046. The most difficult replacement option is installing analogue Lada Vesta bushings. In this case, spare parts from Kia will be suitable. Catalog number KSBSOULF-21.5 mm. (54813-2K100) Other brackets 54814-1G000 are required for them. Remember, if you use spare parts from other models, this may change the driving characteristics. The car may become a little stiffer while driving and cornering. By price, bushings can be divided into the following limits:
- Staba from 450-700 rubles;
- Niva from 150-300 rub. pair;
- Cue from 150-600 rub. thing.
Reviews
| № | Positive |
| 1. | Vasily , 34 years old (drive2.ru) Sverdlovsk: for the first time the seals creaked at 20,000 km, I went to the service station under warranty, the guys lubricated it with a metal-rubber aerosol. A year has passed - silence. |
| 2. | Petrovich , 44 years old (prom.ua), Krasnodar: the car is in its third year, no complaints, the suspension is working as normal. I've heard drivers complain about the crunching noise, but I didn't have that problem. |
| 3. | Alexander , 35 years old (autotoday.com), Omsk: I’m happy with the purchase of the Lada Vesta, I regularly visit the service station, I drive carefully, the speed limit is medium. |
| 4. | Ivanovich , 45 years old (rozetka.ua), Rostov-on-Don: my positive review of the Lada Vesta car in general. Good build quality, relatively cheap spare parts, developed network of car services. |
| 5. | Vyacheslavovich , 43 years old, Kursk (avtoflit.com): my first car was a Lada Priora, after which I bought a Vesta. The difference is noticeable in quality, assembly, and service life. Undoubtedly Lada Vesta is better. |
| 6. | Valery , 33 years old, Voronezh (autotoday.com): in three years of using the car, I visited a service station once to replace stabilizer bushings, not counting scheduled technical inspections. |
| 7. | Vasilievich , 46 years old, Ufa (drive2.ru): I take care of the equipment, periodically go to the inspection pit, check the fastenings and components. Over the course of three years, I lubricated the stabilizer bushings several times. I didn't do any more work on the suspension. |
| 8. | Semenych , 38 years old, Bashkortostan (drive2.ru): The Lada Vesta is well assembled, I’m pleased with the quality. I fix minor damage myself. Even when operating on rough terrain, the suspension absorbs bumps perfectly. |
| Negative | |
| 9. | Dmitrievich , 49 years old (prom.ua), Saratov: Vesta disappointed me, after 30,000 km the stabilizer seals creaked. I visited a service station, the guys lubricated it with an aerosol, and after 5000 km the situation with the “sound” repeated itself again. |
| 10. | Alexey , 46 years old, Moscow (avtoflit.com): in two years of using the car, I went to the workshop three times for suspension maintenance. Constant squeaks and crunches. The quality is raw, the machine has shortcomings that the manufacturer must eliminate. |
| 11. | Filippovich , 39 years old, Voronezh (drive2.ru): my opinion is that the Lada Priora was made with better quality than the Vesta. I bought it a year ago and now I regret it. There are a lot of shortcomings, defects, and expensive spare parts. |
| 12. | Valentin , 37 years old, Pskov (autotoday.com): if you are choosing a car between Lada Vesta and Renault Logan, then consider buying a French brand. |
Video - Stabilizer bushings solution to the problem
The first signal that a Lada Vesta requires replacement of the stabilizer bushings may be: extraneous sounds or creaks in the area of the front suspension when driving on uneven roads, poor handling at speeds over 60 km/h. Even if these symptoms are not significantly expressed, it is worth visiting a service station as soon as possible, or purchasing everything you need and repairing the car yourself.
Stabilizers consist of a rod, a clamp, a bushing, a stand and fasteners. It is important that the unit is always operational, otherwise the car may become unstable in turns, lose traction and tip over. One of the important elements of the unit is the bushing, which allows the rod to twist under load.
Contacting the dealer and AvtoVAZ’s position
If you have decided to contact a Lada dealership, you will most likely be unpleasantly surprised. The fact is that the Russian automaker, although it recognized the problem, took the simplest path to solving the issue.
At the dealership, the bushings are lubricated with grease.
The craftsmen do not replace the bushings, but simply lubricate them with PMS 400 grease. To carry out lubrication work, the unit is disassembled and then reassembled. PMS 400 is an emulsion-based lubricant with adhesive properties. It is widely used in defoamers and in plastic-to-metal contact areas. It has hydraulic, shock-absorbing, cooling and damping properties.
Required Tools
To work you need to prepare the following tools:
- head 10;
- spanner 16;
- hex open-end wrench 16;
- spanner 13;
- two jacks, if there is no inspection hole or overpass;
- Silicone Grease;
- rags.
Replacing the Lada Vesta stabilizer bushings with your own hands is quite advisable, since work in a car service center will cost at least 450 rubles as of 05/31/2019. In addition, you will save personal time and independently audit adjacent components and systems. Faulty bushings are indicated by:
- extraneous noise in the front suspension;
- deterioration in vehicle controllability at speeds of 60 km/h or more;
- the appearance of squeaking when driving through puddles or on roads with uneven surfaces.
AvtoVAZ official opinion
To answer thousands of questions from car owners about stabilization problems, AvtoVAZ has the following opinion; These are design features of the model caused by the long working strokes of the struts when driving on uneven roads.
- bushing lubrication;
- installation of rubber-metal hinges, [under development].
Point one is reminiscent of servicing the Volga GAZ-21 [fifties]. It recommended lubricating ten lubrication points under the car body, after rain and once a week. True, no one suggested doing interesting things like lubrication of bushings. The most unclear thing is how to smear them. Whether it is worth disassembling the stabilization unit or not is still unknown. Although old cars can still be found on the roads and nothing creaks or breaks for years.
Regarding the short operation of the stabilizer struts: They promise to bring them to normal condition. Now the problem is caused by the liner, which creates play inside the ball joint. Replacement of stabilization struts can be done free of charge at the dealer, it does not cause problems, they know about the problem with the stabilization unit and are ready to make repairs. But in this case, it’s much more profitable to learn how to change yourself. The reason for this is quite obvious. Replacing standard spare parts at a dealer does not imply the installation of spare parts or consumables from other brands of cars.
How to change the stabilizer struts yourself in 5 simple steps Replacing the stabilization struts on a Lada Vesta car comes down to a simple algorithm, but there is also preparatory work: It is necessary to hang the front wheels of the car. Firstly, this is required by safety measures [the unit must be unloaded when removed from the vehicle]. Secondly, it’s much more convenient to work this way. Let's get started:
- The stabilizer link pin nuts are cleaned;
- The nut is turned out from the top of the part, keeping the ball joint pin from turning;
- The nut is turned out from the bottom using a similar tool;
- The anti-roll bar is removed, the ball joint pin is removed from the front suspension strut and from the anti-roll bar;
- To check the anti-roll bar link, you need to pull out the top pin of the ball joint, grab it firmly with your hand and swing it up and down. The presence of a knock indicates a faulty part. Installation of the node rack is performed in the reverse order. When starting a repair, you can watch the entire process in the video.
Any knocking noise in the car while driving is not only an irritating factor, but also a possible consequence of a malfunction that can have serious consequences. Especially the clatter of the front suspension, which includes the steering system, the most effective front brakes and is loaded with the weight of the engine.
The Lada Vesta is no exception, which also has front-wheel drive, which increases the importance of the front suspension serviceability factor. The VAZ sedan is no more susceptible to failure of front suspension elements than many other cars in this class, and maybe even less, but it still happens.
Therefore, we will consider common malfunctions of the front suspension of the Lada Vesta, which can cause knocking or squeaking when driving, methods for diagnosing and eliminating them.
We will build the review according to the principle “from simple to complex,” while simultaneously considering problems in the direction of reducing the degree of probability.
Order of Operations
Important! You can begin repairs if the stabilizer bar is not tense. To do this, the front wheels need to be suspended or the weight of the car is evenly distributed - on a viewing hole or overpass. The place where the work will be performed must be washed.
So, the car is lifted with two jacks or driven into a pit, now you can start working:
- Clean the stabilizer bar fasteners from dirt.
- Completely unscrew the stabilizer link fixing nut and move it to the side. The same procedure must be performed on the other side of the machine.
- There is a cover on the steering system casing that protects it from contamination. It needs to be removed. To do this, five bolts are removed.
Now you can unscrew the two bolts securing the brackets.
The bracket or clamp is removed from its place.
Now you can remove the bushing.
- The rod must be thoroughly wiped, and particles from the old bushing must be removed, especially at the fastening points. The operation is repeated for the second element.
- The rod needs to be rubbed with lubricant so that the new parts can easily fit on it and move easily.
- A new element is installed on the rack.
- The same procedure will be repeated with the second bushing.
- Next you need to do the assembly. It is performed in reverse order.
The bushing moves along the rod to the installation site.
On site, you need to accurately align the bushing along the axis of rotation and fit.
You can also watch the procedure for replacing stabilizer bushings on a Lada Vesta in this video:
Principle of operation
The stabilizer is a metal pipe that is attached to the front wheels using rubber cylinders, each of which is called a stabilizer bushing. It provides the ability to rotate the stabilizing unit itself relative to the vehicle. The suspension of the Lada Vesta car was taken by the developers from the famous Renault, which has proven itself quite well on our roads. Therefore, the Vesta suspension design does not represent some new and unknown mechanism.
After some time during the operation of a new car, the owner may hear extra noise from below the bottom. The fastening elements of the car's suspension began to gradually fail. This occurs either due to the quality of the material from which they are made, or due to constant lubrication of the suspension bushings with sand, water and dirt. This contact is detrimental to this node. The driver begins to hear the bushings creaking; they have simply gradually become unusable. It is very rare for the stabilizer itself to fail, but you need to try hard. The repair comes down to replacing worn bushings on the Lada Vesta. This type of repair is very important for the safe operation of the vehicle.
Let's summarize
As you can see, the work is simple and accessible even to a beginner; it is important to first understand the stabilizer circuit and understand how to fix the malfunction. Factory elements are made of rubber. To replace it, it is better to buy polyurethane elements; their service life is up to 4 times longer compared to rubber parts. Elements made of polyurethane are resistant to chemicals, water, and can withstand high loads. In addition, they maintain operational parameters at sub-zero temperatures, which ensures vehicle stability and controllability on the roads in winter.
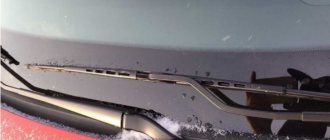
If you are not the owner of a newly-made Vesta, then you have probably already encountered the problem of a terrible squeak emanating from the suspension when driving over bumps, especially speed bumps. Let's try to figure out how and where the creaking comes from and how you can deal with it.
Like any new model, Lada Vesta is not without some design flaws, which, fortunately, can be quite easily eliminated with your own hands.
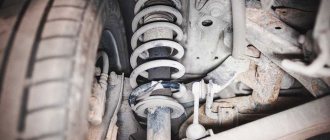
Front suspension device
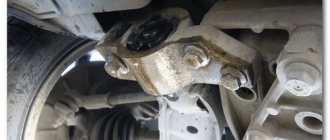
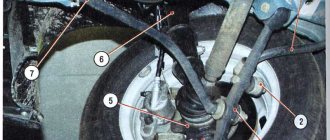
First, let's look at the suspension design and the role of the anti-roll bar in it. The front suspension on the car is independent, with double-acting gas-filled struts complete with barrel springs. Here, for the first time for AVTOVAZ, a subframe appeared, on which the lower wishbones, two engine mounting points and the sensational anti-roll bar were located. It is the latter that we will talk about in this article.
Number six (6) is the anti-roll bar, the purpose of which is to eliminate roll when cornering. It is attached using a rubber-metal structure, which is the culprit of our creaking. When the stabilizer rotates, friction and creaking are generated inside the rubber bushing, which we hear. Below is a photo of the bushing that is installed at the factory.
As practice has shown, such a design feature appears after 1000-1500 km in only 60% of all purchased cars. When applying for a warranty, the dealer simply disassembles the mechanism, fills the bushings with PMS 400 lubricant (emulsion-based) and puts the unit back together. This “rework” is enough for 100-200 km, depending on how often you drive in wet weather.
Wear of stabilizer link joints
When diagnosing stabilizer bushings, as a rule, all elements of the front suspension are inspected and, first of all, the vertical struts of the anti-roll bar (article no. 8450006750), which also often fail in Lada Vesta.
Lada Vesta produces standard stabilizer bars. These parts are of fairly high quality, but they also have their own resource, which depends on many factors. The degree of wear of the vertical struts is determined by the presence of play in their hinges - if the struts knock when the stabilizer is suddenly manually moved, they need to be replaced. Knowing the length of the struts (283 mm), you can select even better parts for replacement, for example, from Toyota or Hyundai.
- socket wrench “16” - unscrewing the nut;
- Torx key 30 – pin locking.
Production of replacement racks
The work is carried out on a car lift. Replacing parts with new ones is not difficult: fix the finger with one key, and unscrew the nut with the second.
How to solve the problem yourself
This issue has already been discussed quite a lot on the Internet in car forums about the Lada Vesta and quite a lot of solution options have been proposed. Let's talk about the most popular methods.
- Bushing lubrication. Here you can follow the path of dealers, but only use higher quality lubricating fluids for lubrication. The choice here is limited only by your imagination. From banal lithol to Japanese expensive lubricants. The disadvantage of this method lies in its fragility. Be prepared for the problem to return to you after the first good rain.
- Replacing bushings. If the problem needs to be solved once and for all, then we suggest taking the path of replacing the rubber bushings. Today, automakers from different countries are trying to follow the path of unification, so car owners are very lucky in that a low-quality part can be replaced with an analogue from another car brand. The same can be applied to the rubber bushings of the anti-roll bar on the Lada Vesta car.
What's the matter?
The reason for the dissatisfaction of many Newsmakers is the creaking. It is no secret that the stabilizer bushings of the domestic model very soon begin to creak, and sometimes this happens almost immediately after purchase. There have been cases when the car did not have time to travel even 1,500 km, and some manage to drive without making noise for less than 1,000 km. As for the frequency of squeaking, surveys show that this happens in approximately 60% of cars.
Creaking is typical for many Vestas
This creak can be clearly heard in the video.
It is also worth noting that such a squeak is rarely heard constantly. Usually it appears and then disappears. In this case, the problem is extremely clear - the quality of the material or the manufacturing of the components is not high enough.
In this case, there are two solutions:
- Contacting the dealer;
- Independent work.
In general, both options are working, however, both the first and second have certain disadvantages.
Replacing bushings
We offer you to look at several options for replacing bushings with analogues.
Independent work
In this case, there are several ways:
- Bushing lubrication;
- Replacement with analogues.
Bushing lubrication
If you choose this option, everything is done exactly the same as when contacting a dealership. However, car owners choose the lubricant themselves. Some people buy regular mastic, others use foreign lubricants, for example, Japanese ones.
Owners buy different lubricants
Be that as it may, these are only temporary measures, since mastic and other lubricants are still quickly washed out. It may last a little longer, but that doesn't solve the problem.
Replacement with analogues
According to reviews from owners, most often either bushings from Chevrolet Niva or components from KIA are used.
Bushings from Chevrolet Niva
Elements from this model are suitable for Lada Vesta, which can be bought at almost any car store. In addition, they can be ordered online using the following article numbers:
Stabilizer bushings from Chevrolet Niva
The second type of product has larger dimensions, so it is used more often. The price of bushings from Chevrolet Niva is about 150 rubles per pair. However, there are also polyurethane products on sale, which are often painted in bright colors (yellow, red, etc.). The price of polyurethane products reaches 250 rubles per piece.
You can purchase products from one of the resources below:
- https://www.autopiter.ru/goods/21232906046/rossiya/ >However, Vest owners note that elements from the Chevy Niva also often creak, and it doesn’t make much difference what material they are made of - rubber or polyurethane.
Bushings from KIA
These are more expensive components, which can be purchased under article number KSBSOULF or 54813-2K100. The price for such products is significantly higher than for similar ones from ChevyNiva. Usually the cost varies between 400-650 rubles, but the price can reach 850 rubles per piece. Therefore, it is recommended to monitor offers from various suppliers before purchasing. In this case, you need to buy only original products. Purchasing a non-original one is fraught with the same creaking noise, which is extremely unpleasant, because bushings from a Korean manufacturer are not cheap.
You can purchase them on one of the following sites:
- https://koreanaparts.ru/product/548132K100/730
- https://www.autodoc.ru/part/hyundai-kia—647/548132k100/
- https://www.autopiter.ru/goods/548132k100/hyundai-kia/id11105217
- https://plentycar.ru/autopart/1981834
In addition, it is worth taking into account the configuration of parts from HYUNDAI-KIA, which differs significantly from that of the Lada Vesta. For this reason, along with the bushings, you need to buy brackets for them, which are sold under article number 54814-1G000. The price tag for them ranges from 300 to 500 rubles per piece.
Comparison of Russian and Korean elements
You can order brackets online at the following addresses:
- https://koreanaparts.ru/product/548141G000/730
- https://nomer52.ru/kronshtejn-vtulki-stabilizatora_hyundai_elantra-hd_548141g000_mobis_i126/
- https://www.autodoc.ru/part/hyundai-kia—647/548141g000/
- https://www.autopiter.ru/goods/548141g000/hyundai-kia/ >
Bracket for bushings from Kia
How to make a replacement
Replacing the bushings can quite realistically be done only by removing their brackets. To do this you will need a TORX T40 sprocket and a lot of patience.
- The purchased bushings must first be modified by making a slot in the side. In the photo below, the incision site is conventionally shown with an orange stripe.
- Gain access to the front of the vehicle from below. This could be a viewing hole or a lift.
- Unscrew the bolts securing the brackets. One should be unscrewed completely, and the second - all the way to the rail. This will be enough to completely replace the bushings. If you change the bushings to an analogue from KIA, then you can no longer do without removing the rack.
- Place the new bushings on the stabilizer (the cut you made will come in handy here), insert them into the brackets and tighten the bracket bolts.
- Enjoy the quiet and soft operation of the Lada Vesta car suspension.
We invite you to watch a video of one of the car enthusiasts who encountered a problem and solved it by replacing the bushings with analogue ones.
Installation
In general, the algorithm for replacing standard stabilizer bushings with an analogue one is simple and, by and large, the same for components from the Chevrolet Niva and for parts from KIA. The only difference is that, in the case of parts from KIA, you will have to install the purchased bracket.
As for the Chevy Niva, the bushings from it will need to be modified - it is necessary to make a slot on the side, and then grind the sides down to the same size as on Vesta.
The replacement process itself begins with installing the Lada Vesta on the overpass, after which you need to thoroughly clean the bolts that secure the stabilizer bar from dirt. Next, you need to arm yourself with a wrench and a Torx T40 bit, with which one bolt from the bracket is completely unscrewed (located further from the steering rack). The second bolt is also unscrewed, but not completely, but enough so that the mounting bracket can be moved to the side.