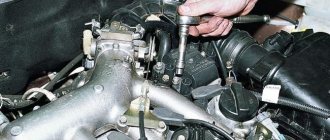
Main symptoms
The malfunction of these elements can be determined by the nature of the car’s behavior. The main symptoms are difficult ignition, unstable engine operation, floating engine speed at idle. One of the signs of a malfunction is increased fuel consumption. It does not burn in the cylinder because there is no spark. At the same time, the car’s power decreases, since it runs on three (if we consider modern passenger cars) cylinders. Difficulty starting is also the cause of failed spark plugs. The spark may disappear or be completely absent. As a result, the crankshaft rotates, but the ignition power in the remaining cylinders is not enough for its normal operation. Moreover, this occurs even on a warm engine. Sometimes the lack of a spark in one of the cylinders provokes breakdown of the catalyst. The mixture that was prepared and fed into the combustion chamber does not ignite and enters the catalyst, where its elements are oxidized.
Features of this tuning
The brake light in the spoiler has a number of advantages:
- It's stylish, that's why they buy spoilers. Without a spoiler, the VAZ looks like a simple classic car, even a kind of retro, but with a spoiler it looks quite original.
- The spoiler best conveys the stop signal, and you can come up with any animation that attracts attention, but you need to be careful with this.
- The spoiler has a low price, and almost every driver can install it independently.
- The spoiler is installed once for many years, so it is beautiful and profitable.
- The brake light on the spoiler is more visible, so even from a road safety standpoint, the spoiler wins.
Spark test
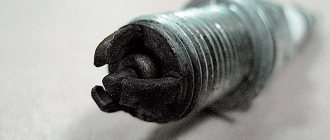
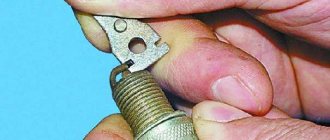
First you need to remove the high-voltage wires. Do this very carefully - sometimes they stick to the contacts. Do not forcefully pull the wire - this will break its insides, which will cause breakdowns. Next you will need a hex spark plug wrench. Depending on the make of the car, it can be of different diameters. When purchasing such a key, be sure to tell the seller the make and model of your car, as well as the size of the power unit. Without this tool, it is simply impossible to unscrew the spark plugs. Having taken the element out, we began to thoroughly clean it of carbon deposits. In general, it should not be on the surface. But before you check the spark plugs yourself, we clean them of all accumulated dirt. The first sign of a malfunction is a large gap between the electrodes. To determine it, you need a special measuring probe. The valve clearances on carburetor cars are measured in the same way. You can buy such a dipstick at any car market.
Popular myths
Varieties
Some people deliberately get rid of the catalyst, others deliberately ignore the clogged unit. All this caused the spread of myths.
- By removing it, the engine gains power. A misconception that arose for unknown reasons.
- The engine cannot “breathe” normally due to the catalyst. Absurd. It functions quite well if the cat itself is in working order.
- A clogged element ensures a more environmentally friendly ride. Another myth, the origin of which can only be guessed at. Rather, on the contrary, a clogged device harms nature and your car even more.
Therefore, monitor the condition of the catalyst on the VAZ 2114, check its functional condition, and if necessary, replace it with a new one or replace it with a flame arrester. Both options have shown their effectiveness.
Diagnostics without instruments
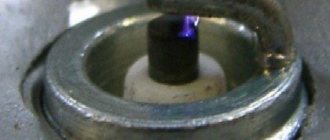
How to check the spark plugs yourself if you don’t have the necessary testers? Everyone can do this. There is a proven method. But you need an assistant. To do this, unscrew the spark plug and put the high-voltage wire back on it. An assistant turns the starter. At this time, we direct one part of the spark plug to ground - we lean it against any metal part of the engine. It is important that there is no paint on it, otherwise contact will not occur. The spark should be blue.
Starter or wiring problems
You can use a multimeter to test the wiring. The red wire is connected to the starter contact, the black wire to ground. In a normal situation, the device will show from 12.5 to 14.5 V. If the reading is less or even zero, then there is something wrong with the wiring.
The first step is to clean the contacts, check the integrity of the wires and fuses.
This is another popular problem when Kalina does not start. ECUs are the “brains” of the car; they themselves are quite reliable, and if you don’t touch them, then no problems will happen. However, most often the ECU is flooded.
This often happens when antifreeze leaks. This has already been discussed in the section on the immobilizer. When installing an alarm system or when pulling car wires, they forget to install the plugs - water gets into the ECU. Repairing an electronic unit is a futile task.
Can it be cleaned?
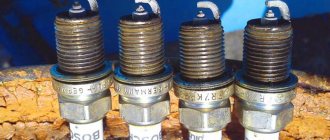
If there is a characteristic carbon deposit on the electrode and base, this is a sign of engine malfunction. If you simply clean the spark plug and put it back, the carbon deposits will reappear. The color of deposits can indicate many things. This is an incorrectly prepared mixture, the presence of oil in the combustion chamber, etc. By the way, lubricant gets into the cylinder due to existing scuffs or a worn oil scraper ring. Pay attention to this.
Lada Kalina does not start when cold
- If the crankshaft rotates slowly, the battery may be discharged or the engine oil may be frozen.
- The vehicle's fuel system is faulty. The water in the ramp may have frozen.
- The coolant temperature sensor (DTOZH) of the engine management system is faulty.
- Fuel injectors are leaking.
- Low compression in cylinders.
- The engine control system is faulty. Run diagnostics.
Let us remind you that regular vehicle maintenance will help eliminate engine starting problems.
Why the spark disappears: the main reasons
On different types of engines, there is a fairly wide list of reasons why there is no spark at the spark plugs. Among the main experts are:
- Problems with spark plugs (destruction of the spark plug body, defects in the electrodes, etc.). It is also worth noting that the spark plugs may be filled with fuel or oil, which indicates a breakdown of the engine itself.
- Malfunctions of high-voltage wires associated with insulation breakdown or lack of contact.
- Failure or errors in the operation of the crankshaft position sensor.
- Problems with the ignition module, ignition coil, switch;
- Malfunctions or malfunctions of the distributor.
- Deterioration or absence of ground contact.
- Errors related to the operation of the electronic engine control unit (ECU);
Fault localization
Understanding the operating principle allows you to determine exactly why the brake lights may not light up:
- The fuse has blown. In the diagram, the fuses are marked with the letter F (from English - Fuse) and the serial number of the seat in the fuse block, for example, F3;
- poor contact at connectors;
- the light bulbs have burned out, but since the lights are connected in parallel, the likelihood that 2 lamps will burn out at once is extremely low;
- poor contact on the negative terminal of the lights. In this case, problems may begin not only with the feet, but also with the lighting of the remaining lamps in the lanterns;
- Damage to the negative track in the lamp board. From the total mass directly to the brake light lamp, the minus goes along a special path on the board. The path may collapse from water or mechanical impact;
- malfunction of the brake light switch, the so-called frog;
- broken wiring, oxidation of contacts.
No spark on an injection engine or an engine with a carburetor: how to check
Checking the spark is possible using several methods: to ground, using a multimeter, or a special tester on a piezoelectric element. The first method is the simplest. The body of the unscrewed spark plug is brought to the metal (usually the engine cylinder block), after which the engine is cranked by the starter and the presence of a spark is analyzed.
Please note that this verification method cannot be used when diagnosing fuel-injected vehicles. The fact is that a car with an injector has an ECU and other electrical equipment that is quite sensitive and can be damaged.
The second method allows you to better assess the condition of the spark plug, identify breakdown, etc. The use of a special tester is a method of checking the spark on injector cars, reminiscent in its principle of checking by analyzing the spark breakdown to ground (the first method). In this case, the risk of burning the control unit is minimized. Now let's talk about how to check the spark on a fuel-injected engine.
A complete lack of sparking indicates possible problems with the controller, ignition module, coil or center wire. Diagnostics should begin by checking the fuses. Then you should evaluate the condition of the ground contact, and also check the high-voltage wires.
If there is no spark at the ignition coil, then the functionality of the high voltage wire should be checked. The specified wire must be checked for insulation integrity, have no breakdowns, burnt areas, etc. Detection of any defects is grounds for its replacement.
Also, in the process of diagnosing the ignition system, you should inspect the spark plugs. This must be done if electricity reaches the candles. On carburetor cars, it is enough to remove the spark plug wire, and then bring it closer to a metal surface (for example, a car body) by half a centimeter. Then you need to turn the starter and make sure that there is a spark running between the wire and the metal surface. The spark itself should also have a certain intensity, be white with a slight bluish tint. If no deviations are noticed, then the spark plugs are working. The reason that there is no spark at the spark plug may be the ignition coil.
If you notice problems with the spark plugs, then you need to pay attention to the spark plug contacts. These contacts must be free of contamination. Let us add that if deviations from the norm are noticed, it is optimal to immediately replace the spark plugs. Failure to do so will indicate the need to clean the contacts.
How does a brake light work?
In order to set up a brake light that lights up at the right time on the bumper, you must first understand how the system for supplying information from the brake pedal of the VAZ-2114 works. Without the necessary knowledge, you don’t even need to start doing everything manually, because most likely the driver won’t succeed.
When the driver presses the brake pedal, the brake light comes on. From it, voltage is supplied through all the necessary wiring to the device for dividing the same current, from where it is supplied to the analog input. After this, 14 digital pins are activated thanks to specially tuned pulses.
They are connected to the corresponding keys so that the glow power increases if the LED bulbs have 1 Watt, after which the load on the microcontroller is reduced. The output shows that the brake light LEDs of the VAZ-2114 spoiler are connected to a transistor circuit; after all operations they become active.
The power of the LEDs doesn't really matter. It is important to remember that in order for the brake light to be correctly displayed in the spoiler and visible to the driver driving behind, it is not necessary to install high power bulbs; 1 W will be quite enough.
Checking the ignition coil for spark
To diagnose the performance of the coil, remove the wire from the distributor-breaker. Next, the test is carried out similarly to testing high-voltage wires, that is, the wire is brought to a metal surface and turned with a starter. The presence of a spark will indicate in this case a problem with the ignition distributor; if there is no spark, then the problem lies in the coil.
First you need to check the distributor contacts. These contacts may oxidize, insulation damage is also possible, and the rotor itself may be faulty. Detecting problems with the rotor allows you to eliminate the problem by replacing it. When checking the ignition coil, you should identify possible defects in the integrity of the winding, burnouts and other signs that a short circuit is occurring inside. If such signs are found, the coil should be replaced or the ignition coil should be repaired.
Now let's take a closer look at ways to check the main elements of the ignition system. To do this, let's go back to the coil. As already mentioned, the most common cause of a malfunction is a damaged winding. Then an insulation breakdown occurs and a short circuit occurs. It is also important to understand that the coil can fail due to overload. Such increased loads occur as a result of problematic spark plugs or spark plug wires. For diagnosis you should:
- put the car in a dry parking, repair or other box. You can also use the garage. The main thing is that the humidity is not too high;
- Next, you will need to clean the distributor cover from dirt, after which the specified cover must be removed;
- then you need to turn the engine crankshaft so that the distributor contacts are closed;
- Now you can turn on the ignition and bring the high-voltage wire of the distributor 3-7 mm to ground;
Kalina won't start, the starter turns
| Possible malfunction | Diagnostics | Remedies |
| Fuel tank empty | The needle on the fuel gauge is at zero. | Pour gasoline |
| Battery is low | The voltage at the battery terminals with consumers turned off is less than 12V. When trying to start the car, a crashing sound is heard from under the hood. | Charge the battery or replace it with a new one |
| Oxidation of battery terminals or wire terminals, their fit is not tight | When you try to start the engine, the voltage in the on-board network drops much more than at the battery terminals. In this case, a crash may be heard under the hood. | Clean the contacts, lubricate them with petroleum jelly and tighten the terminals |
| Unreliable connection of electrical circuits of engine control and power supply systems | Check the connections of the connectors and the reliability of the contacts in the blocks. | Fix faulty wire connections |
| Increased resistance to rotation of the crankshaft (scores on the shafts, bearing shells, cylinder-piston parts, deformation of the shafts, frozen engine oil, jammed generator, jammed coolant pump) | The crankshaft turns slowly. If the engine is started in severe frost, and the engine was working properly the day before, then most likely the engine oil has frozen. If you hear extraneous noise when starting the engine, check the free rotation of the pump and generator pulleys. | Use the recommended engine oil. Repair the engine. Replace the pump and generator. |
| Malfunction in the ignition system | Check for spark. | Check the circuits and devices of the ignition system. Replace faulty system elements. |
| The high voltage wires are connected in the wrong order or the wire is disconnected | Inspect. | Connect the wires in the correct order |
| The timing belt is broken or the belt teeth are cut off | Open the front timing cover and check. | Replace timing belt |
| Disturbed valve timing | Check the marks on the crankshaft and camshaft pulleys. | Set the correct shaft position |
| Malfunction of the computer (brains), its circuits, crankshaft position sensor or coolant temperature | Check the supply of +12V to the ECU, the sensor circuit, and the absence of damage to the sensors themselves. | Replace ECU, sensors. |
| The idle speed controller or its circuit is faulty | Check the idle air control. When starting the engine, lightly press the gas pedal. If the engine starts and stalls when you release the gas pedal, the sensor is faulty. | Replace sensor |
| The fuse is blown or the main relay of the control system is faulty | Check fuse and relay. | Eliminate the cause of the blown fuse. Replace fuse and relay |
| Fuse blown, fuel pump relay. Circuit, relay or pump is faulty. | When the ignition is turned on, there is no sound of the pump running. Check the fuse. Apply voltage to the pump from the battery. | Clean contacts, replace faulty circuits, replace fuse, pump and relay. |
| The fuel filter is dirty, the water in the fuel line is frozen, the fuel line is damaged | Check the pressure in the fuel rail and the condition of the fuel lines. | Replace the filter, blow out or replace the fuel lines. |
| Insufficient pressure in the fuel rail | Check the pressure in the fuel rail, the pump strainer and the condition of the fuel lines. | Clean the filter. Replace pump, fuel pressure regulator |
| Faulty injectors or their power supply circuits | Check the injector windings with an ohmmeter. Check the chains for breaks. | Replace injectors, replace chains |
| Air leak into the intake tract | Inspect the joints and fittings of the hoses and clamps. During start-up, turn off the vacuum brake booster and plug the receiver fitting. | Eliminate air leaks, replace vacuum booster |
If there is no spark: ignition module
The following symptoms indicate possible problems with the operation of the ignition module:
- at idle speed the engine troits;
- power decreases, the car accelerates poorly;
Engine vibration is most pronounced in two nearby cylinders, and the drop in thrust is more strongly felt during attempts to sharply accelerate the vehicle, that is, when the accelerator is pressed hard and sharply. In such a situation, the “check” light usually lights up on the dashboard of most cars.
If checking the spark plugs and high-voltage wires does not reveal any problems, then the ignition module should be checked with a tester. The test consists of connecting one output of the tester to the module connector, and powering the other to ground. Then the engine can be started. A tester reading of 12 V is evidence that the module is OK. A deviation in the instrument readings from the norm may indicate either the need to replace the module itself or to check/replace the corresponding fuses.
Replacement process
The rear lights are attached to the body of a VAZ 21099, 2108 or 2109 car using 4 nuts. To dismantle the lighting system you will need:
The operating algorithm is as follows:
- To access the nuts, remove the 21099 luggage rack at the appropriate location (if the rack is installed).
- Disconnect the power plug that is attached to the board.
- Unscrew the 4 nuts using a wrench.
- When removing the last nut, hold the taillight outside to prevent it from falling and breaking.
- After removing all 4 nuts, remove the light.
When installing a new headlight on the rear of model 21099, do not forget to connect the wiring to ground, which is attached to one of the studs.
In such cases, the ride becomes quiet, calm and relaxed, but how everything changes when at least one light bulb burns out. This causes inconvenience and emergency situations, and you can also get a fine from a road service employee.
The dimensions on the VAZ 2109 do not light up, then look for the reason in the wiring. Even experienced drivers recommend carefully checking the functionality of all devices and components before leaving. The nine is no exception, in which optics can often fail for various reasons, including:
The rear lights (headlights) of the VAZ 2108, VAZ 2109, VAZ 21099 have the following bulbs: 1) Brake lights. 2) Dimensions. 3) Reverse. 4) Turns. 5) Fog lamp.
Rear light board for VAZ 2108, VAZ 2109, VAZ 21099
A wiring harness goes from the mounting block to the rear lights. The purpose of each individual wire in the harness can be understood by its color: 1) Brake lights - red 2) Dimensions - yellow 3) Reverse - green. 4) Turns - blue. 5) Fog light - orange-black.
We remove the connector from the rear light board of VAZ 2108, VAZ 2109, VAZ 21099
Naturally, you need to understand that if the car VAZ 2108, VAZ 2109, VAZ 21099 is old and there are a lot of people doing the wiring, then the color match of the wire to its purpose may be violated. That is, the red wire can be converted not to brake lights, but, for example, to dimensions. But in general this is a very important point: the developers of the VAZ 2108, VAZ 2109, VAZ 21099 specifically marked the functional purpose of the wires with a certain color to make it easier to use.
Flashlight board VAZ 2108, VAZ 2109, VAZ 21099
If some light signal in the taillight of a VAZ 2108, VAZ 2109, VAZ 21099 does not work, then before climbing into the mounting block and opening the electrical circuit, we check the following: 1) The reliability of fastening the mass of the taillight to the body of the VAZ 2108, VAZ 2109, VAZ 21099.2)
We check the reliability of fastening the wire connector to the headlight. 3) Integrity of the light bulb 4) Quality of contact between the light bulb and the flashlight board. It often happens that everything is intact, the light bulb and the mass are good, and 12 Volts come to the light bulb, but it does not light. The reason is poor contact between the light bulb and the board. In this case, you need to clean both the light bulb base and the area on the lantern with fine sandpaper.
As one smart person said: “Electrics is the science of contacts.” To disassemble the rear light of a VAZ 2108, VAZ 2109, VAZ 21099, first remove the protective plastic cover. Then disconnect the black wire of the flashlight from ground. Then we remove the connector from the flashlight board and remove the board itself with the bulbs from the headlight housing. If it is necessary to replace the headlight itself, then unscrew the remaining bolts securing the headlight to the car frame and remove it.
Flashlight housing VAZ 2108, VAZ 2109, VAZ 21099
There is one important point that many owners of VAZ 2108, VAZ 2109, VAZ 21099 do not know. This is the rear fog light. It is turned on by a button between the hazard warning button and the heated rear window. The rear fog light will only work if: 1) The ignition is turned on. 2) Low beam headlights are on. 3) The flashlight power button is pressed. The fog lamp lamp for VAZ 2108, VAZ 2109, VAZ 21099 is the only one that has a reflector inside the headlight. Thanks to this reflector, the glow of the lantern becomes brighter.
The clearance of VAZ 2108, VAZ 2109, VAZ 21099 is included
Rear fog light on VAZ 2108, VAZ 2109, VAZ 21099
Power of rear light bulbs VAZ 2108, VAZ 2109, VAZ 21099: Dimensions 5 Watt Fog light 21 Watt Reverse 21 Watt Stop light 21 Watt Turn signal 21 Watt
Useful tips
Experienced car enthusiasts are well aware that spark plugs can fail at the most inopportune moment. For this reason, it is recommended to carry a spare set with you. The same can be said about the spark plug wires.
When working on the ignition system, extreme caution should be exercised as you may receive a severe electric shock. Insulated tools must be used.
Since spark plugs fail more often than other elements of the ignition system, checking for a spark always begins with them. Diagnostics can be done one by one. The procedure is carried out by unscrewing the spark plug from the cylinder head, then putting a cap and a wire from the coil on the spark plug, after which it is grounded to ground. The main indicator when checking while the starter is rotating is the spark itself and its quality.
When removing the spark plug wires from the ignition module, it is advisable to mark each wire. This will allow you to check and subsequently connect in a strictly defined order without the risk of mixing up the wires.
Signs of malfunction and checking injection nozzles without dismantling. Diagnostics of injector power supply, performance analysis. Tips and tricks.
Why does the starter turn normally, but the engine does not catch and does not start? Main causes of malfunction, checking fuel supply and ignition systems. Adviсe.
How to check engine performance using spark plugs. The main signs of engine malfunctions: the appearance of black, gray, red and white carbon deposits on the spark plugs.
Signs of malfunction or breakdown of the high-voltage spark plug wire of the ignition system. How to check car armored wires with your own hands.
Engine trouble: symptoms. Why does tripping occur and how to find the reason why the motor starts to trip. Checking power, ignition, compression, etc.
Modernization of rear lights VAZ 2108-2115, 2110-2112
And if owners of 2108-2114 and cars of the tenth family have an alternative in the form of domestic OSVAR rear optics, then for some reason the tags turned out to be completely deprived in this regard. I really don’t want to buy a Chinese product with problems during maintenance, and even without a guarantee for normal operation and cosmic appearance.
There are several treatment options available. I took the path of completely abandoning the conductive tape and using sockets for each lamp from the VAZ 2101. This option was described back in 2007 in the magazine “Behind the wheel”.
We take out the rear light board, use a screwdriver to pry up the plastic sockets and take out the tape.
on the board you can see where the contact was lost and because of this the lamps did not light up
The rear lights of tags use double lamps for the markers and stops, therefore, in stores you need to look for double sockets for markers and stops, and single sockets for the turn indicators. In VAZ 2108-2114 models all cartridges are single. The cost of such cartridges in the store is 15-30 rubles. In addition, you will need wires, lugs, connectors (you can also use computer connectors), and M3 bolts and nuts for attaching the cartridges.
Electrical diagram of the rear lights of the VAZ 2108-2115 from the book. Everything seems to be more than clear, the total weight and advantages for each cartridge.
This diagram for tags does not show the series connection of the side lights and brake lights. I quickly jotted down a cheat sheet for myself.
Now we need to arm ourselves with patience. We mark and drill holes for the cartridges in the same places where they were installed earlier. The metal part of the cartridge had to be slightly modified, namely, on the cartridges of clearance and brake lights, the terminals for the tips were moved 180 degrees with pliers, and on the cartridges of turn indicators, they were completely bitten out.
holes drilled and filed for cartridges
To attach the cartridges to the plastic base, I used small bolts with M3 nuts, it came out neatly. But all the work is quite painstaking and slow.
Since I couldn’t find single sockets for turn signals, I made a jumper in the center on the double one.
After all the cartridges are secured, the most pleasant and interesting part remains. Well, at least for me, electrical wiring.
First, I made the total mass by connecting all the cartridges in series, then the plus on the turn signal and connected the pluses in series on the terminals of the brake lights and dimensions.
I rang the resulting wiring and, making sure that I had not screwed up anywhere, extended the purchased connector block.
All that remains now in the car is to replace the stock pad with a newly purchased one.
Didn't find the information you are looking for? on our forum.
We recommend reading:
Replacement of IRR VAZ 2114 8 valves
Checking the functionality of the generator on VAZ cars
VAZ 21213 accelerates poorly
How to connect fog lights on a VAZ 2110
Wiring diagram VAZ 2110 injector 8 valves and with a carburetor engine
VAZ 2106 does not start, reasons, spark is gasoline too
How to disassemble a caliper on a VAZ 2107
Smells of gasoline in the interior of the VAZ 2107 injector reasons
What to do if the engine does not hold speed?
Another problem that often occurs in the VAZ 2114 is that the engine starts, but stalls at speed. The cause is most likely to be found in the battery. Maybe the spark plug is faulty. To check this, you need to remove the spark plug and carefully examine it for damage. Even if there are no visible defects, but there is scale and carbon deposits, the spark plug still needs to be replaced with a new one. This is a part that cannot be repaired, it can only be replaced.
1. Oil pan drain plug. 2. Engine oil pan. 3. Crankshaft. 4. Oil filter. 5. Coolant pump. 6. Exhaust manifold. 7. Piston. 8. Intake pipeline fastening rod. 9. Laying the intake pipe and exhaust manifold. 10. Inlet pipe. 11. Nozzle. 12. Fuel rail. 13. Receiver. 14. Bracket. 15. Cylinder head cover. 16. Camshaft bearing housing. 17. Camshaft. 18. Crankcase ventilation system hose. 19. Valve pusher. 20. Cylinder head. 21. Bolt securing the head to the cylinder block. 22. Valve. 23. Spark plug. 24. Cylinder head gasket. 25. Upper compression ring. 26. Lower compression ring. 27. Oil scraper ring. 28. Piston pin. 29. Fitting for installing the oil dipstick. 30. Connecting rod. 31. Flywheel. 32. Cylinder block. 33. Oil pan gasket. 34. Oil dipstick. 35. Oil intake
It is inexpensive; for the fourteenth model, the price of a set of candles is about 500 rubles. But how do you know if the spark plug is working? A good candle always has a slight brick tint. It must be dry. If the spark plug darkens, it means it has burned out and must be replaced. If it's wet, it means it's flooded. There is no need for replacement, just dry and blow out the part.
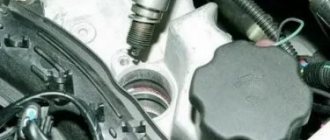
Purge occurs when the engine is idling with the spark plugs removed. If the Lada has an injector, then you will have to work longer, also inspecting the fuel system, which is directly related to the operation of the power unit. The injectors are also subject to careful inspection. In winter, there are times when the candle just freezes.
This is not scary, it can be warmed up, cleaned and put back in place, then the engine will start working again. In this matter, such a point as normal fuel supply is also important. If the fuel mixture becomes depleted or, conversely, enriched, this, in turn, causes a serious malfunction, which ultimately affects the operation of the engine.
Pressure also plays an important role. A faulty pressure sensor is involved here too. If its readings are incorrect, it transmits erroneous information to the fuel system, which, in turn, does not supply the required amount of fuel. This creates the problem of a “lean” or “rich” mixture.
https://youtube.com/watch?v=KaBtmIu9P9o
Sources
- https://zapchasti.expert/reshenie-problem/ne-zavoditsya/ne-zavoditsya-vaz-2114.html
- https://remontvazov.com/ne-zavoditsya-vaz-2114
- https://NaDomkrat.ru/ustroistvo-avtomobiley/dvigatel/ne-zavoditsya-vaz-2114
- https://fastmb.ru/autoremont/2257-pochemu-ne-zavoditsya-vaz-2114.html
- https://ladaautos.ru/vaz-2114/pochemu-vaz-2114-ne-zavoditsya-starter-krutit-i-chto-delat.html
- https://expertVAZ.ru/2114/zavoditsya-prichina.html