Many car enthusiasts, when problems arise with electrical wiring, immediately begin frantically looking for a familiar auto electrician to solve the problem, citing the fact that they do not understand electricity. In fact, there is nothing difficult about carrying out electrical diagnostics yourself. To do this, you will need a multimeter and a little knowledge, which we will try to outline for you in this article. Read the information below and you will not have any questions about how to find a short circuit in a car or, conversely, how to find a broken wire in a car.
Signs of faulty wiring
Before diagnosing the car's electrical system, you need to make sure that the problem is with the wiring. We list the main types of electrical wiring faults and their symptoms:
- Short circuit. One of the most dangerous problems with wiring, which can cause hazardous smoke and even fire - these are actually signs of a short circuit in the car. It is important to immediately stop using the car, since overheated wires from a short circuit can melt the insulation of adjacent wires and only worsen the situation. Most often, such problems end with a blown fuse or relay.
- Broken wiring. This is a safer malfunction, the consequences (and, at the same time, signs) of which can only be the failure of a certain electrical unit (in some cases, the entire electrical system).
Elimination of short circuit consequences
If the search for the short circuit was successful, then it’s time to exhale and start eliminating it. What to do next depends on the extent of the damage to the electrical wiring. Regardless of the situation, before starting any repair work, you should definitely turn off the power to the apartment and make sure there is no voltage.
It is necessary to assess how much the cable insulation was damaged at the time of the short circuit. If there are swelling, darkening or melting, the wire must be replaced. If possible, it is necessary to assess its condition along its entire length.
Connecting wires in the distribution box using terminal blocks
If the wire covering is in order, then the immediate location of the short circuit is removed. The surviving ends of the current-carrying conductors are stripped and connected using Wago terminal blocks, welding, soldering or crimping. In low-current circuits, you can use regular fast twisting at your own risk. However, the PUE (7th edition, clause 2.1.21) does not provide for and does not approve of this method of connecting cables.
Short circuit in the car
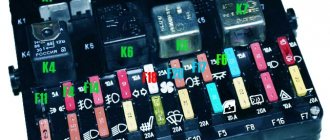
To answer the question of how to find a short circuit in a car, first check all the fuses and relays - as a rule, if there is a short circuit, one of them should fail. After finding such a fuse or relay, find out from the description (on the cover of the fuse box) which unit it belongs to. Next, start examining this unit - visually inspect all the wires running from it to the fuse box.
If external signs of a short circuit are not found in the car, then set the multimeter to resistance measurement mode, and then disconnect the “plus” of the unit being tested from the fuse box and from the device powered by it. Then connect one contact of the multimeter to the positive wire, the second contact to ground. If there is no short circuit, then the resistance on the multimeter will be equal to one. Otherwise, the “plus” somewhere touches the “minus”.
Possible reasons
The entire electrical system of a modern car can be divided into circuits of sensors, as well as actuators (drives), which include lighting devices and electric motors. In the first case, some sensor is connected by wiring to the electronic engine control unit (ECU). It is from here that a voltage of 5 Volts is sent to the sensor, which is analyzed and changes depending on the measured parameters.
The consumer circuit includes wiring from the battery, relay, switch, fuse, lamp or other consumer. Each of these circuits only works fully if it is intact.
During the operation of the car, the wires can be damaged due to the following reasons:
- damage from rodents;
- unprofessional installation of wiring;
- mechanical damage, moisture ingress;
- physical wear of wires.
Finding broken wiring in a car
In order to check a car for current leakage with a multimeter, you will need to perform the same steps. Measuring resistance is an indicator of the presence or absence of contact. In the absence of contact, the resistance tends to infinity (or the number “1” on the device). If there is contact, the resistance should ideally tend to zero (the lower the better). So, to check for a break in the wiring, you need to connect a multimeter to two contacts suspected of a break and measure the resistance; we repeat - a unit on the multimeter screen will indicate a break.
Thanks for subscribing!
To avoid a repeat break, do not twist the wires with your hands. Use only a soldering iron and special heat shrink. If there is a break in the terminal, be sure to clean it before repairing.
Where to begin?
Many drivers, finding themselves in an unpleasant situation, simply do not know where to start looking for a short circuit in the car. For a complete diagnosis, you will need special equipment, which is almost never at hand, so at the very beginning you should perform the simplest steps.
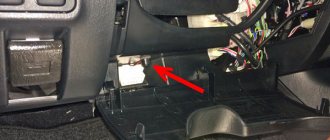
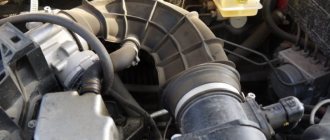
Before checking anything serious, you first need to open the hood and carefully examine the wiring sections located in the engine compartment. Since a short circuit occurs between wires or on the housing, the location of the accident can be easily calculated by visible damage, which serves as the main sign. The identified areas are the first to undergo extended diagnostics.
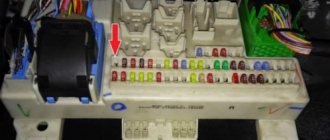
Next, all fuses are checked one by one. They are often the weak link in the chain. In the event of a short circuit, they immediately burn out, protecting the devices connected to this line. The fuses are compactly placed in a special block covered with a lid. Checking the serviceability of each of them is carried out using a multimeter, since visual inspection does not give accurate results.
Before starting to check the elements, the ignition must be turned off and the driver must know how to determine a short circuit with a multimeter. If a faulty fuse is detected, it cannot be categorically stated that the fault has been completely detected. Quite often, the cause of a short circuit is faulty wiring in some part of the circuit.
How to check a car battery with a multimeter
If you suspect that the battery is not working well, then again, a multimeter will help you. So, arm yourself with a multimeter configured to measure voltage (20V):
- Disconnect one terminal and connect the red contact to the positive and the black to the negative. Normal voltage should be between 12.4 - 12.8 Volts. It is important to take measurements at least an hour after stopping the engine.
- Measure the voltage under a load equal to twice the capacitance. For example, if the capacity is 75 Am/hour, then the load should be 150 Am. If the voltage drops below 9 Volts, it means something is wrong with your car’s battery (undercharging or failure). After disconnecting the load, the voltage should be restored within 5-10 seconds.
Another way
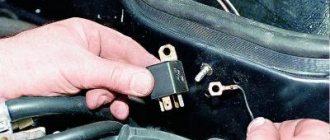
Also, when searching for a short circuit, auto electricians often use a regular incandescent lamp. In this case, instead of a blown fuse, we connect a lamp to the circuit, I usually use H4, there are a lot of them lying around with a burnt-out low beam filament.
For example, we have an MMC Pajero 4 with non-working reverse lights and a blown fuse. You can look for a fault as in the previous case, but it will be easier and faster to connect a lamp instead of a fuse, turn on the ignition, reverse gear, and this lamp flashes at full intensity, but there are no reverse lights. This means that there is a short circuit in the reverse lamp circuit. Our lamp limits the current in this circuit; it will not be more than what the lamp consumes and at the same time serves as an indicator that a short circuit is present.
At the same time, we immediately note that the lamp lights up only after we engage reverse gear, that is, there is definitely no short circuit in the area from the fuse to the gear selector (and by the way, there are two connectors and branches there, quite a few have already been cut off). Next we go and disconnect the connectors from the rear lights. The lamp continues to light, that is, the short circuit is not in the lamps. Next, working from simple to complex, we climb under the car and find the gear selector connector S-05 on the box (let’s say we have an automatic).
And we begin to actively move the wiring on the box, and at the same time we see that our lamp has started to blink, that is, the short circuit disappears, then everything is simple, we find the place of damage and repair it. It will look something like this
Of course, you will say, it’s easy to look for such short circuits, just try to find a short circuit that appears once a week, or even less often. It happens, in this case, we check the most likely places and if we find nothing, we separate the different circuits hanging on one fuse with our own fuses, as in this Lexus, by the way, that Lexus is still driving to this day, the short circuit no longer appears.
Successful repairs and no harmful clients to all. If you have interesting cases from practice, write in the comments.
Second hands
New cars are a separate category: all automakers, without exception, pay maximum attention to the cars they sell.
Therefore, their share in fire chronicles is negligible, because:
And it’s a completely different matter for cars that have been in use - who did what with them, how correctly they followed all the instructions, etc. no one can guarantee .
It is quite possible that the car's wiring was treated this way
But even without the “playful hands” of the previous owner, there are a lot of places in a used car that require control:
- High-voltage wiring of older cars often suffers from problems associated with violation of the integrity of its insulation. If in the evening under the open hood in the area of the wiring you notice bright flashes of electrical discharges, replace all high-voltage wires, including the tips, as quickly as possible.
Note! Simply replacing these wires will improve engine stability. Don't forget about the center wire. The instructions will tell you the order of execution and warn against erroneous actions.
Technological instructions of AVTOVAZ
Below are general methods for checking electrical continuity, checking for shorts using an ohmmeter and a voltmeter.
Electrical continuity check
Loss of electrical circuit integrity can be caused by the following reasons:
- disconnecting the harness block;
- weak connection of the harness block;
- contamination, oxidation, corrosion of contacts;
- deformation of contacts;
- wire damage.
Check the continuity of the circuit in the following sequence:
- Disconnect the earth wire terminal from the battery.
- Visually check that the harness connectors are connected on both sides of the electrical circuit and that the locking latches are latched.
- Disconnect the pads, visually check the contacts for dirt, corrosion, and deformation.
- By pulling the wires next to the block, make sure that the wire and the terminal are tightly pressed together and that the terminal is fixed inside the block.
- Using a probe of a given diameter and length corresponding to the size of the contact in the mating block, make sure that the terminals of the harness blocks provide a reliable connection (the terminals are not recessed in the block, the probe fits tightly into the terminal).
- Using an ohmmeter, measure the resistance of the circuit between the pads. The resistance of a working circuit should be less than 1 ohm. To avoid damage to the terminals, it is allowed to use probes of a given diameter for measurements that correspond to the size of the contacts in the mating blocks.
Checking the circuit for short to ground
Perform the check in the following sequence:
- Disconnect the connectors on both sides of the electrical circuit.
- Connect the probe, one end connected to the “+” of the battery, to the terminal of the circuit being tested. If the probe lights up, it means that the circuit being tested is shorted to ground.
To avoid damage to the terminal, the probe must be connected using a probe of a given diameter that matches the size of the contact in the mating block.
Checking the short circuit to the on-board network
Perform the check in the following sequence:
- Disconnect the connector on one side of the electrical circuit.
- Connect the probe, one end connected to ground, to the terminal of the circuit being tested. If the probe lights up, it means that the circuit being tested is closed to the on-board network.
- Reconnect the disconnected block.
- Disconnect the connector on the other side of the electrical circuit. Perform check 2.
To avoid damage to the terminal, the probe must be connected using a probe of a given diameter that matches the size of the contact in the mating block.
Measuring voltage at wiring harness contacts
Perform the check in the following sequence:
- Disconnect the connector on one side of the electrical circuit.
- Connect the positive cord of the voltmeter to the terminal of the circuit being tested, the negative terminal to the vehicle ground. Record the voltage value.
To avoid damage to the terminal, the positive cord of the voltmeter must have a probe of a given diameter that matches the size of the contact in the mating block.
Let us remind you that it is more convenient to carry out wiring diagnostics when you have the car’s electrical circuit diagrams at hand (for Lada XRAY, Vesta, Largus, Granta, Kalina, Priora, Niva 4×4).
Key words: universal article
History of development
The appearance of wires in cars is directly associated with three inventions:
- High power rechargeable battery;
- Electric starter;
- Battery ignition.
For reference: The battery and electric starter are a trial-and-error solution for easy engine starting. They simultaneously brought each other under the hood of the car, paving the way for battery ignition and other consumers of electric current.
The modern generation of car enthusiasts, who start the engines of their cars with a half-turn, are unfamiliar and incomprehensible to the problems of age-old motorization. And for the first car owners, the main difficulty was starting the engine.
Today's engine starts at the touch of a button
To say that these were temporary difficulties means to hide a century-old layer of history.
In particular:
- Starting the engine took longer than the trip itself;
- All proposed easy starting schemes - springs, flywheels, compressed air, etc. only made the structure heavier;
- A “crooked starter” caused more injuries to drivers than road accidents.
A popular automobile magazine in the 19th century covered all the more or less noteworthy inventions for starting an engine.
Note! The first component in a car that had wires in its design can be considered a magneto, which was installed on the internal combustion engines of the first cars.
Magneto-electric ignition (magneto in the photo below), discovered in 1864 by inventor Marcus, combined:
- Generator;
- Ignition coil;
- Relay interrupter.
Single spark magnetto
Moreover, in 1875, Marcus himself assembled a car with a gasoline engine and electromagnetic ignition. Today, its only surviving copy is considered the oldest car in Europe, having competed for this role with the car of Karl Benz, which was considered the first-born.
In general, the inventors of those years had to solve a lot of questions and problems. For example, Henry Leland, CEO, also needed to replace the wiring in the car with a more functional one.