VAZ 2109: power steering - how to install
The steering wheel is the main mechanism for controlling the movement of the car in the desired direction. Sometimes not only the convenience for the driver, but also the safety of his movement depends on how easy it is to operate. Power steering installed on a VAZ 2109 car will help reduce the force on it by almost half, do not create the need to acquire special driving skills, and do not make visible changes to the design of the car. In a word, these are pleasant changes at a low price. The article suggests that you familiarize yourself with the technology of installing the device yourself.
Usefulness of the system
This statement is especially true in large cities densely packed with cars. Parking in a cramped courtyard of a high-rise building late at night in the dark under the critical comments of your neighbors is quite difficult if you have not installed electric power steering on your VAZ 2109. Try to cope without power steering in a dead traffic jam, when a slightly more promising space has become available in the next row and you need to turn it out faster than your neighbor turn the steering wheel to the right all the way, turn it back 15 centimeters, turn the steering wheel all the way to the left, move it forward 20 centimeters, turn it again, turn it back again, turn it out again and drive into the vacant space under the competitor’s nose.
What is power steering VAZ 2109
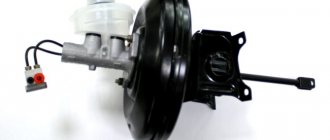
On the first models of VAZ 2109 cars, power steering was not installed. The driver has to mount the unit additionally. It consists of two parts:
- The source of energy, its role is played by a hydraulic pump.
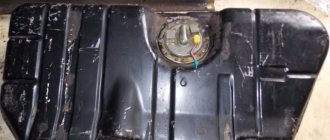
- An actuating mechanism that is usually combined with the steering rack. The general view of the device is shown in the photo.
Before mass use of the device, manufacturers tested the car, which showed:
- When moving the car with numerous turns in a limited space, the steering wheel rotated easily; it was necessary to turn it at a smaller angle than on a car without power steering.
- When driving around the city, after a little skill, the driver only gets pleasure from driving the car.
Tip: When turning the steering wheel at a larger angle than the driver expects, the power steering allows the steering wheel to be turned to the desired angle, the car will easily fit into a smaller radius.
- When driving on a free area, the number of steering wheel turns is three and a half from one stop to the other, with the hydraulic booster three and one third are enough.
- A change in the steering gear ratio led to more precise vehicle control.
- The steering works well at very low speeds in parking mode. Very little effort is applied to the steering wheel.
- Excellent results were obtained when moving at extreme conditions. Increasing speed resulted in a slight increase in steering effort, but feedback was good.
How to install power steering on a VAZ 2109
Instructions on how to install power steering on a VAZ 2109 indicate what is needed:
- Purchase a power steering kit, with all the components: a pump, a special steering gear, a pulley, a hydraulic cylinder, an expansion tank and hoses that can withstand high pressure.
- The pump fixation bracket is installed on the BC head. When installing it, the product needs to be modified: the engine mount is unscrewed, the ears for attaching it are sawed off, the far right mount is sawed off so that it does not interfere.
Installing a bracket to fix the pump
- Instead of the generator, the pump itself is mounted on a bracket.
- The crankshaft pulley is being replaced; the pump will be driven through it.
Advice: It is necessary to take into account that the drive should not go through the chain, but only through the belt.
- The steering gearbox is being replaced.
Tip: When installing a new gearbox, you will need to modify the place where it will be mounted. To do this: a hole is cut in the front end shield and the bipod is modified.
- A location is selected for the expansion tank so that it does not interfere with other parts of the engine.
- The hydraulic cylinder is installed according to the instructions included in the power steering kit. Each device manufacturer has its own installation features.
- The entire system is connected by high-pressure hoses and is well fixed.
Tip: It is necessary to ensure that the hoses cannot rub against other elements located under the hood.
- Special power steering oil is poured into the expansion tank.
- The system is being pumped. In this case, the steering wheel turns all the way left and right; if necessary, you need to add oil to the expansion tank.
- When the liquid stops leaving, you need to replenish the oil level to the top mark of the tank.
- On a VAZ 2109 car, the installation of the hydraulic booster ends with bleeding the system.
The advantages of the VAZ 2109 with hydraulic booster can be seen in the video.
Characteristics
The ESD serves to reduce the force applied to the steering wheel required for maneuvers.
It is optimal for the VAZ 2109 to install an electric amplifier borrowed from the Lada Priora. New AvtoVAZ models are produced on the basis of old ones, so the parts are perfect for nines that have not been produced for a long time.
When choosing an EUR for installation, make sure that it meets the following characteristics.
EUR from Priora
The choice in favor of just such an electric amplifier for the VAZ 2109 is due to its advantages:
What are the advantages of electric power steering on the VAZ 2109
- Easy to install. The unit is installed in one unit, there is no need to interfere with the engine compartment.
- Greater reliability, which increases due to the absence of a number of elements: pulleys, hoses, fluid.
- Environmental friendliness and energy saving. Power is consumed only when maneuvering, which reduces energy costs and saves fuel.
- Passive safety is ensured in the event of an impact; there is a self-diagnosis system.
- Information content. Increasing the speed of the car will ensure an increase in the force on the steering wheel.
The car owner decides what type of power steering to install. Any helps to reduce the effort applied to the steering wheel and ease of control.
Lada 2109 Kroshka › Logbook › Installing power steering 2110-2112 in a VAZ 2109 Part 1
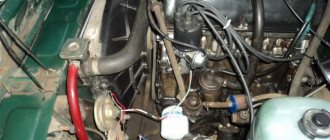
Hi all. Finally got my hands on the gur. Since I don’t have a lot of time, it was decided to split the installation into two parts, namely: installing the pump (and all the consequences) and installing the rack. Today we will talk about the pump. So let's go. First of all, we remove the old generator, its bracket and pulley (the pulley must be placed under the ridge belt).
We install a new pulley.
Let's move on to the pump, it already comes with a bracket from 2110
We need to modify it, namely, remove the support (we simply unscrew it) and saw off the ears to which the support was screwed (they rest against the lever), and in the end we get this product.
Having estimated the engine, it turns out that the third (rightmost mount) is also in the way for us; it gets on the bolt of the engine mount mounting. You can, of course, file it figuratively, take a longer bolt and leave it as is, but it seemed to me that there were two bolts to hold the pump behind the eyes, so we remove it too.
Then everything is simple: we put a pump in place of the former generator (our generator will move higher)
One bolt fit perfectly, the second one needed a short one; I didn’t have it (you can see it in the photo above), I screwed it on as best I could in order to continue the assembly and understand what else was needed.
Next we install a new generator bracket. I took the bracket from Viburnum for the tension roller; when assembled with the generator, the whole thing looks like this.
The grenade replacement process in detail
To begin with, before starting the replacement procedure itself, you need to decide on the tools. So, what will be needed when replacing the internal grenade: knobs and heads 13-17, as well as 30; keys 17 and 19; jack; lamp; pliers; CV joint lubrication; wheel wrench; and the spare part itself.
Go!
Now that everything is assembled, you can begin the replacement procedure:
- We remove the lower engine protection.
- Drain the oil from the gearbox.
- Using a wheel wrench, remove the wheel.
- Using a 30 mm socket, unscrew the nut securing the outer CV joint.
- We jack up the car.
- Disconnect the ball joint from the hub.
- We pull out the CV joint from the hub.
- Under the hood, using a pry bar, we pull out the inner CV joint from the gearbox.
- Now, you can pull the shaft drive out, complete with grants.
- For convenience, we clamp it in a vice.
- Using pliers, remove the boot clamp.
- We remove the boot.
- We take out the grenade.
- Installation is carried out in the reverse order, with all consumables replaced. It is necessary to place CV joint lubricant in the boot.
Grenade selection
The choice of the inner CV joint should be taken seriously and carefully, since it is one of the main drive parts of the car. As practice shows, this part quite often fails on cars of the VAZ 2113-2115 family. Therefore, it is worth carefully selecting a spare part not only by price, but also by quality.
Original
2108-2215056 - original catalog number of the internal grenade for the VAZ-2114. The average cost is 2000 rubles . Fitting the fasteners is easy and does not require any modifications.
Analogs
In addition to original spare parts, you can find quite a lot of analogues on the automotive market, which are in no way inferior to the original in quality and price. All of them are certified and recommended for installation on this vehicle. So, let's look at what analogues can be installed on the VAZ-2114:
Some VAZ-2114 owners recommend tripoid grenades for installation.
Lada 2109 Kroshka › Logbook › Installing power steering 2110-2112 in VAZ 2109 Part 2 (Final)
Hello everyone, as promised, the continuation of the epic with the installation of power steering. For those who missed it, the beginning can be found here. So let's go) First of all, we remove the old rail. In general, nothing complicated, we remove the steering tips, unscrew the bolt that connects the steering rack and the steering shaft (located in the pedals) and unscrew the rack itself, it is held on by 4 bolts. (I didn’t take a photo of this process, sorry)
We take a new rail. The number one problem is the tie rods. The entire Internet has confirmed that it is necessary to leave the relatives from the nine (or the collapse will not be done) They differ in silent blocks and their diameter.
On the left in the photo, the rod from the nine has a smaller internal diameter and the bolt from the ten will not fit into it, plus there is a bushing sticking out of the silent block, which we also don’t need. There are two options for solving this problem: First, cut off the bushing and drill a larger hole. The second is to take new silent blocks from dozens, grind them and press them into the first service that comes up. I went with option number 2 and it turned out like this.
Today I went to the alignment and they told me that it was all bullshit and the thrust could have been left at ten, but what can I do? Internet, such Internet)
That's it with the traction. Trouble number two is the size of the window in the engine panel. It’s small and a rail from ten won’t get there by any miracle.
That is, you need to cut. It’s difficult to explain in words correctly how to cut, the main thing is not in the photo below) I did a little borscht on top and it turned out to be a shel. about 1cm
Half of this hole is now covered by a casing that goes from above, but in any case there is a gap.
To prevent this from happening to you, do not cut too much upward. From the main hole, saw upward 1 cm further if necessary.
So, the rods are ready, the window is ready, let’s move on to the rail itself.
Photo from not mine, stolen from the Internet.
First of all, you need to unscrew all the tubes, in order to do this without problems and not tear off the splines (like me, for example), tap each bolt and they will unscrew without effort. After the tubes are unscrewed, you need to remove the mechanism itself, it can also be removed without problems (2 bolts), and in the end you will be left with a bare rail.
And now she will enter her place through the right window (near the wheel) without any problems. Next is the assembly (before you start installing the rack, practice inserting the mechanism into the rack, there is a certain principle, you need to rotate the shaft counterclockwise and press down) We push the rack. We find more or less free space under the hood and put it together in it. I did this somewhere between the vacuum and carb.
We screw it from the end of the tube through the same window as we inserted the rail
Once everything is screwed down, we put the rail in its rightful place and tighten it. I advise you to disassemble the high-pressure hose into pieces and screw it on when the rail is already in place. Next to the rack we put the rods in place.
That's all with the rack
The next (and last) problem is the steering shaft. it needs to be shortened. Measure 7 times, cut 1 time (extra)
We go to a turner, grind out a bushing (or find a piece of pipe of a suitable diameter) and weld the whole thing. I also drilled a couple of holes and drove bolts into them.
In general, everything is ready; all that remains is to connect the tubes, secure the tank and bleed the system. I won’t tell you how to lay the pipes, the only thing to keep in mind is that the metal tube (return) can be replaced with a hose, the main thing is to maintain the internal diameter and that it is designed for this. Any Volga and GAZ spare parts store will find such a hose for you without any problems. (the main thing is to say that it’s for the guru)
Mounting the tank, also based on taste and color, I did this: I took the standard bracket and sawed off the excess from it.
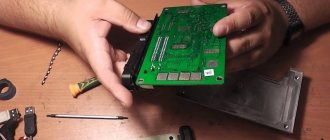
Disassembling the power steering pump
And so, first of all, we remove the pump, you need to drain all the liquid from it (I think everyone can figure out how to remove it and drain the liquid), and on the back cover of the power steering you need to unscrew the four bolts with a 14mm head.
After that, we begin to carefully remove the cover, try not to damage the gasket (this gasket has an internal rubber seal), in the power steering housing we leave the outer part of the “working ellipse cylinder” (hereinafter simply the cylinder). There is no need to be scared when the cover comes away from the body, it may seem that it is coming away due to the action of the spring, when reassembling it will seem to you that it does not fit into place, just continue to carefully and alternately tighten the bolts diagonally, then everything will fall into place .
| See all advertisements in the archive |
Installation of power steering on VAZ 21099, 2109, 2108
Many craftsmen in the vast expanses of our homeland have created tuning studios that can, with varying degrees of success, “twist” your car and make it unrecognizable. And not only the chassis, but also the engine and transmission, that is, what is called complete tuning. On some of them you will be offered to install hydraulic booster or electric power steering .
The meaning of the VAZ 2109 hydraulic booster is clear to everyone; its importance in the vehicle configuration can hardly be overestimated. The principle of its operation is not complicated either. Structurally, it consists of a hydraulic pump as a source of energy and a performance device to which this energy is transferred. This actuator must be combined with the steering mechanism. Today, none of the car manufacturers known to us produces power steering systems on their own, but purchases them from various companies. A well-known brand that produces this equipment is Zahnrad Fabrik, a German company distinguished by the high quality of its products.
Some domestic models and, in particular, the VAZ 21106 use power steering of this particular brand and it was developed by order of Opel, especially for cars of a similar class to the 21106. Therefore, the use of this equipment on 2110 has, in fact, already been certified.
Installing a hydraulic booster on a VAZ 2109 . it was decided to conduct a small test. This idea has been in the air for a long time and finally the time has come. To begin with, I had to go down from the third floor of a multi-level garage, along ramps, turning around in a very limited space; the ZF hydraulic booster passed this test perfectly; with frequent turns, the effort was minimal. In city mode, it also did not cause any complaints and brought a lot of pleasant sensations. If necessary, the power steering allows you to “tighten” the steering wheel to the desired angle, moving the car to a smaller radius. In addition to everything, they calculated the number of full rotations of the steering wheel made. With the standard three and a half on the “ten”, with hydraulic booster this figure became 3 and 1/3, which means a change in the gear ratio and, therefore, an increase in control accuracy.
Every driver understands how easy it is to park in tight urban conditions. Our amplifier performed excellently in this case as well. When operating at low speeds, no changes were felt with the application of effort.
The same impression comes from driving at high speeds, at maximum revs. As speed increases, the steering becomes a little tighter, continuing to provide decent feedback.
If we try to sum it up, then everyone certainly likes power steering. And by equipping your car with this function, you get a completely different car and a completely different driving experience.
Installing power steering on a VAZ 2109 video
- Rebuild the gearbox (gearbox) on a VAZ 21099,2109,2108 with your own hands
- Correctly running in the VAZ 21099, 2109, 2108 engine after major repairs
- Secrets of tuning the VAZ 2106 engine
- Make the most of the classics
- Tuning VAZ 2104
- Tuning the rear beam/suspension of VAZ 21099, 2109, 2108 with your own hands
- Tuning VAZ 2102 + engine from Skoda
- Tuning 2108. Making a short-stroke rocker
What is the difference between the old and new VAZ-2110 steering rack – Taxi Bolt
Long, hard and painful. This is how VAZ cars are usually modernized. This is clearly seen in our top ten. The VAZ-2110 received steering, engine and suspension from the first front-wheel drive Togliatti car, the VAZ-2108, and for almost 20 consecutive years adopted minor design changes . As a result, we have several options for one engine, one suspension, one steering. This is exactly what we will deal with today.
Features of the VAZ-2110 steering rack
Initially, the new tenth family was equipped with a figure-eight steering rack without any changes.
Original VAZ-2108 steering rack.
By the way, all modifications of the slats that we will consider below can be interchangeable. With the exception of racks designed for hydraulic booster. The eight-rack was developed back in the late 70s of the last century; it has a spur-tooth rack-and-pinion gear transmission, and the full rotation of the steering wheel is 3.7 turns.
Rack modernization
A few years later, the rack for the VAZ-2110 was improved. This was expressed in strengthening the steering gear housing and the use of a figure-eight gear-rack pair (“rasp,” as mechanics affectionately call it). The helmsman's catalog number is 2110-3400009-20.
These two racks can be interchanged without replacing any additional steering components. I took it off and installed it. Externally, these slats are exactly the same.
The only difference is the size of the tightening nut.
New VAZ-2110 rack
The rack without power steering of the new model is somewhat different from the old eight and old ten:
- reinforced body (similar);
- helical rack with variable pitch (catalog number) and helical drive gear;
- The intermediate steering shaft should be shorter than the old one.
New type rack without power steering.
Lada 2109 Kroshka › Logbook › Installing power steering 2110-2112 in a VAZ 2109 Part 1
Hi all. Finally got my hands on the gur. Since I don’t have a lot of time, it was decided to split the installation into two parts, namely: installing the pump (and all the consequences) and installing the rack. Today we will talk about the pump. So let's go. First of all, we remove the old generator, its bracket and pulley (the pulley must be placed under the ridge belt).
We install a new pulley.
Let's move on to the pump, it already comes with a bracket from 2110
We need to modify it, namely, remove the support (we simply unscrew it) and saw off the ears to which the support was screwed (they rest against the lever), and in the end we get this product.
Having estimated the engine, it turns out that the third (rightmost mount) is also in the way for us; it gets on the bolt of the engine mount mounting. You can, of course, file it figuratively, take a longer bolt and leave it as is, but it seemed to me that there were two bolts to hold the pump behind the eyes, so we remove it too.
Then everything is simple: we put a pump in place of the former generator (our generator will move higher)
One bolt fit perfectly, the second one needed a short one; I didn’t have it (you can see it in the photo above), I screwed it on as best I could in order to continue the assembly and understand what else was needed.
Next we install a new generator bracket. I took the bracket from Viburnum for the tension roller; when assembled with the generator, the whole thing looks like this.
By the way, a note to “Grant Drivers”: there is a very common disease on the grant, namely the death of generator bearings, and this happens to some after two or three thousand km. Under warranty, of course, the officials change the generator and replace it with a better one, but this does not solve the problem. They fly because there is no adjustment of the belt tension on the grant and it is constantly tightened, as a result the bearings cannot withstand it, as you already understood, in order to get rid of this ailment we install a bracket from the viburnum as in the picture above and enjoy life. PS On some sites it is indicated that before going to the T, O, it is better to return everything to its place, otherwise you may lose the warranty. (Although this is not a fact and this point can be clarified with the officials)
Let's return to our sheep. So we install the bracket, it stands up without any problems, 3 bolts and everything is in place
What remains is the final “gena” (by the way, the gene is also from 2110) and this is where problems arose. The TV suddenly stopped and said that it didn’t want any new generator and that I should go through the forest. We didn’t come to any peaceful solution, so I took metal scissors and a piece of excess flesh was removed. (I didn’t want to show off)