Spark plugs are special devices that ignite the air-fuel mixture in the combustion chamber. They are used today on all engines. Ignition occurs due to a spark from an electric charge that occurs between the electrodes of the spark plugs.
Standard spark plug VAZ
Design
If we take into account the design of the candles, then they consist of the following elements:
- Contact output. Serves to connect high-voltage wires from the ignition system;
- Insulator. Due to it, the candles do not overheat;
- Insulator ribs. Do not allow electrical breakdowns;
- Central and side electrode. Serves to form a spark between them, which ignites the fuel mixture;
- Seal. This element prevents hot gas from escaping from the combustion chamber.
An important point in the correct operation of spark plugs is the gap between the electrodes.
Fuel module
The fuel module is a single unit, which includes the pump itself, a fuel level indicator sensor assembled with a plastic float, an intake chamber, and a filter (mesh).
The fuel module for 1.5 and 1.6 liter engines is different.
Fuel module for engine 2111 (1.5I) – CODE 2112-1139009-12.
Fuel module for engine 11183 (1.6I) – CODE 21101-1139009-01.
Signs of a fuel pump malfunction
- The car won't start. A possible reason could be a non-working or semi-working fuel pump. The fuel pump must create a certain pressure in the fuel system for normal operation. But the cause of the malfunction can be not only the fuel pump; in any case, the first thing you need to do is measure the pressure in the fuel rail, check the spark and then draw the appropriate conclusions. More detailed information can be found here.
- The fuel pump does not “buzz” after turning the ignition key. Here, most likely, the issue lies in the wiring to the fuel pump. A separate article is devoted to this problem.
- Interruptions in engine operation.
- The car jerks at low speed. Again, the fuel pump itself may be fine; here the problem may be the low-purity filter (mesh) under the fuel pump.
What pressure should the fuel pump create?
The pressure created by the fuel pump must be at least 3.2 bar.
Operating pressure in the fuel rail for a 1.5 liter engine: from 285 to 326 kPa.
For a 1.6L engine: from 375 to 390 kPa.
If the pressure does not correspond to performance indicators, then the following elements may be possible causes of the malfunction:
How to replace the fuel pump?
The fuel pump must maintain constant pressure. If at 3000 rpm the pressure begins to gradually drop, then the fuel pump simply does not have time to pump. This fuel pump needs to be replaced. To replace the fuel pump, use the article.
Gap
When performing a preventive check of spark plugs or while searching for the causes of an unstable engine, it is recommended to check the gap between the electrodes.
- If the gap is larger than normal, the spark will form more than usual, the mixture will begin to ignite more strongly, and the flow rate will be more stable. In this case, failures in the operation of the motor may occur.
- If the gap is smaller than required, the spark will begin to appear earlier than required. The small spark energy is not capable of effectively igniting the fuel mixture. This increases fuel consumption, but reduces engine power and worsens dynamics.
The gap between the electrodes on the injection VAZ 2110, according to the manufacturer’s recommendations, ranges from 1 to 1.13 millimeters.
Gap measurement
Setting the gap
The first step is to check whether the gap really deviates from the norm, and then take appropriate action. So, let's begin.
- Get to the spark plugs, having first disconnected the high-voltage wires from them.
- Use a feeler gauge to measure the distance between the two electrodes of your spark plugs. Special probes are sold that look like a folding knife.
- Take a feeler gauge whose blade is exactly 1 mm thick.
- Insert the probe into the gap between the electrodes.
- Normally the blade should go in with a slight pinch, but you don't have to use much force to get it in.
- If the blade is too loose, then the gap is too high. You will need to lightly press the upper electrode against the lower one until the required distance is formed.
- If the blade is difficult to fit into the gap, then it was smaller than required. In this situation, you will have to do the opposite, bend the electrode slightly.
Adjusting the distance
When increasing or decreasing the gap, do not apply too much force, otherwise you risk breaking the element. In this situation, there is nothing left to do but change the spark plug.
Checking the wiring contacts and serviceability of the electric motor
The first thing that is checked after a fuel pump failure is the supply voltage to the unit. This procedure is carried out using a conventional 12-volt probe light bulb. The light bulb is connected to the positive (gray and black wires) and negative contacts of the pump, after which the ignition is turned on. The light coming on for 3 to 5 seconds at this moment indicates that the wiring is working properly.
The voltage at the fuel pump terminals is checked with a tester and should be more than 10 V. A drop below this value indicates oxidation of the contacts and an increase in resistance. The malfunction is eliminated by cleaning. Both contacts are checked.
Checking the fuel pump contacts
Then, using the same light bulb, the serviceability of the electric motor is checked. To do this, the contacts of the improvised probe are connected directly to its terminals. A burning light with the ignition on and the engine stopped clearly indicates a failed electric motor.
Symptoms of a problem
If the spark plugs fail, there will be no spark. Consequently, the fuel mixture will not be able to ignite, the engine will freeze and show no signs of life.
There are several telltale signs that may indicate poor spark plug performance.
- The engine starting procedure gets worse. The starter turns, but the motor itself does not respond;
- Fuel consumption increases;
- CO emissions increase;
- At idle and while driving, the engine begins to jerk the car;
- The dynamic performance of the car drops, it is not possible to raise the speed to the required maximum, the engine power noticeably decreases, etc.
Article on the topic: Why there is no light in the interior of the VAZ 2114: the secrets of an electrician
But all these are indirect reasons, since they do not directly indicate the failure of the spark plugs. You can verify their malfunction only by checking.
What to do if the VAZ-2114 fuel pump does not pump
Cars tend to break down periodically - for various reasons, one or another part may fail during operation. One of these types of situations that awaits a car enthusiast is a problem associated with the fact that the electric fuel pump on the VAZ-214 does not pump. It cannot be called too common, however, some drivers still have to deal with it. Then you basically have only 2 options for subsequent actions - either go to specialists and pay not only for spare parts or the unit itself, but also for the work, or fix the problem yourself. Financially, the second option is, of course, more profitable. At the same time, I would like to emphasize that there is nothing particularly complicated here. Therefore, you can completely spend a little time and try to solve the problem yourself.
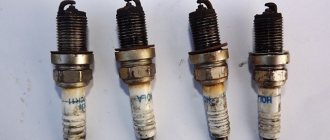
Pouring candles
How often do motorists come across the concept of “pouring candles”. Moreover, they can either become oily or filled with fuel. We'll talk about this later.
Fills with fuel
To check the spark plugs you will need to remove them and visually inspect them. Plus check the condition of other elements that are directly involved in starting the engine. Namely:
- Battery;
- Starter;
- Injectors;
- Candles.
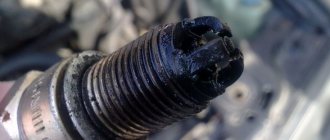
The spark plugs may become flooded, splashed with oil, and the spark may disappear due to contamination, oiling, and carbon deposits.
Why are the candles filled with gasoline?
- This usually happens in the cold season, when the compression in the engine is weak;
- There is a lot of oxygen in the air, so more fuel is used for combustion;
- The injectors begin to supply fuel;
- If the battery is poorly charged, the starter stops turning properly, the wires do not supply the required charge to the electrodes;
- All this leads to the fact that a large amount of fuel comes from the injectors, which the candles simply do not have time to burn. As a result, they are flooded.
Fills with oil
There are also cases when the culprit in the failure of the spark plugs is the oil that splashes them. To make sure of this, check the condition of the spark plug wells and oil scraper rings.
A small amount of oil can seep through these rings, so when you start the engine it immediately burns out and there is no trace left of it. But if the rings are worn out, it is better to replace them.
Please note that the spark plugs may also be filled with oil due to wear on the cylinder liners and valve seals. Do not confuse traces of oil with carbon deposits formed during the combustion of gasoline.
Diagnosis procedure
After you are convinced that the fuel pump has failed, you can proceed to the next stage. In particular, it is necessary to understand what exactly the problem is. There can be many options here. The easiest way is to check the integrity of the fuses. Let us remind you that the fuel pump itself in the “fourteenth” is located in the fuel tank. After the ignition is turned on, voltage is supplied to its terminals through fuse F3 and relay R2 - the latter are located in the cabin under the panel on the passenger side.
If the fuel pump fails, the first thing to do is remove the cover located under the panel on the right side of the console. This is not difficult to do - it is secured with two self-tapping screws. Under the cover you will see 3 fuses and 3 relays. The integrity of the above-mentioned F3 should be checked. Also, do not forget to inspect the contacts into which this fuse is inserted. If no problems are found here, move on to checking the fuel pump relay. The easiest way to do this is to borrow something that is known to work from someone you know and try how the car works with it.
If the fuse and relay are good, we move on. The next stage of diagnosis will be to inspect the terminals of the fuel pump itself. To get to them, you must first lift the rear seat cushion. Once you have access to the cover located on the bottom, unscrew the screws holding it. A hatch will open in front of you, in which there are 3 terminals. Please note that black and gray wires lead to the two positive ones. The third terminal is negative. Through them, power is supplied to the fuel pump itself. You will need to check whether there is voltage at the positive terminal, for example, using a test lamp. It should light up for 3-5 seconds after you turn on the ignition.
The light is on, but the fuel pump does not show any signs of life - which means we arm ourselves with a tester and check the voltage level. There should be at least 10 volts here. This is the minimum required value to start the fuel pump. Note that the reason why the voltage has decreased is quite often the oxidized contacts of the positive and negative wires. Accordingly, to fix the problem, you just need to wipe them. By the way, there is another verification option. Take long wires and apply voltage to the fuel pump terminals directly from the battery. In this case, everything will become immediately clear.
Don't forget to also check the ground of the fuel pump - it is attached near the parking brake lever, under the dashboard. This reason is quite common, this point also needs to be checked. With constant use of the handbrake, the mass may well be shifted slightly to the side. Just in case, remove the plastic casing covering the lever, disconnect the mass, clean the contacts and return it to its place.
These are all “external” reasons. If no problems are found here, then you will need to remove the fuel pump and look for the “internal” ones. One of the most common problems is worn or stuck brushes. Another fairly common cause is the motor. You can check it using the same test lamp, having first supplied power to the fuel pump.
Cleaning
If the spark plugs are dirty, then it is not at all necessary to immediately replace them with new elements of the ignition system, igniting the fuel mixture in the combustion chamber of the VAZ 2110. Regular cleaning will quickly remove the dirt and return the spark plugs to their previous functionality.
There are several common cleaning methods that can be used at service stations and in garages with your own hands.
Regardless of the chosen method, we recommend that you follow the general principles of operation when cleaning the elements of the ignition system.
- Protect the coating of the spark plugs from abrasion; do not use rough sandpaper or other similar abrasives.
- Do not expose the candle to high temperatures. It is not worth heating them over a fire for the purpose of cleaning. Some people do this for some reason.
- Check the spark plug for resistance using a megometer. If the second scale does not show + infinity, then the spark plug will have to be changed. Cleaning is useless. With a value of 1000 it is also better not to try to resuscitate the element.
Now let's talk directly about cleaning methods.
Cleaning before and after
The formation of carbon deposits and flooding will require not only removing and drying the spark plugs, but also thoroughly cleaning them.
- One popular method is to remove carbon deposits with a fine-bristled wire brush;
- Another option is treatment with kerosene, which removes carbon deposits quite effectively;
- Another method involves the use of sandblasting. The effectiveness of this approach is short-term, so you will soon have to remove the candles again and clean them;
- Many people have also gotten used to using chemical converters. To do this, candles are placed in a solution, allowed to sit for about an hour, after which they are cleaned with matches, toothpicks to remove carbon deposits, washed with water and dried;
- In order not to buy specialized products, you can use acetone using the same cleaning principle;
- Our grandfathers cleaned candles with vinegar. To do this, you will need to dip them in vinegar for an hour, then add literally 5 drops of electrolyte;
- There is an ultrasonic cleaning method, but this requires specialized equipment.
Article on the topic: How to check the speed/speedometer sensor on a VAZ 2110 and where it is located
If you do not get the desired result, you will have to change the candles. But first they need to be selected.
The engine knocks: what to do and how to determine the cause
The appearance of extraneous noises, creaks and knocks naturally occurs as the power unit and other components of the car wear out. One of the most alarming symptoms is a knocking sound in the engine, which can have a different tone (ringing, metallic, etc.), be obvious or muffled, appear only when cold or hot, be present constantly or disappear.
The engine starts knocking for various reasons. An internal combustion engine is a unit that is subject to severe mechanical and temperature loads. Moreover, these loads are not uniform, occur with a certain periodicity and depend on the frequency with which the crankshaft rotates at a certain moment. The engine often begins to knock in the following cases:
- natural wear and tear of the power unit has occurred;
- operating rules were grossly violated;
- unprofessional engine repairs were carried out or low-quality spare parts were installed;
We also recommend reading the article about why the engine may have difficulty starting when hot. From this article you will learn about the main malfunctions that cause difficulty starting a heated internal combustion engine with a carburetor and injector, as well as a diesel engine.
What is engine knocking?
The appearance of engine knocking in most cases indicates that in the area of mating of certain parts there has been a critical increase in the gaps between the elements.
Choice
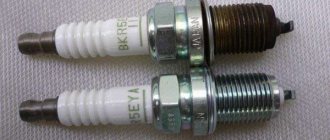
The choice of candles today is quite extensive. But we’ll talk about which ones are used for the VAZ 2110 and what can currently be considered the best choice for your car.
Candles differ from each other mainly in the material from which the electrodes are made.
| Candle type | Peculiarities |
| Copper | These are classic spark plugs for VAZ, installed by the factory. The operating life is up to 50 thousand kilometers. Some of them are coated with yttrium alloy to increase the reliability of the electrode. |
| Platinum | They are characterized by increased resistance to temperature fluctuations and corrosion, which has a positive effect on the service life of the elements. Such elements are capable of operating up to 90 thousand kilometers |
| Iridium | The characteristics are in many ways close to platinum candles; today they are considered the most durable and high-quality. Safety margin - about 90-100 thousand kilometers |
The service life may increase or decrease depending on the care, conditions of use of the vehicle, and the quality of the fuel being poured.
Platinum candle
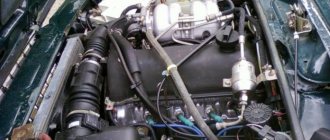
Access to the fuel pump and its dismantling
Before starting work, to eliminate the risk of a vapor explosion and a fire, you must first de-energize the vehicle by removing the negative terminal from the battery. Gasoline is completely drained from the tank. It is necessary to work with open doors to minimize the risk of poisoning by gasoline vapors.
To access the VAZ 2114 fuel unit module, you must completely remove or tilt forward the rear seat cushion, under which there is a square-shaped hatch on the bottom of the body that covers the fuel pump. The hatch cover is secured with two bolts and closes the unit itself.
The unit is dismantled with the electrical wires disconnected, then using two 17mm wrenches, the two fuel pipelines are removed and the eight fastening nuts are unscrewed with a 10mm wrench. After this, the fuel pump can be removed from the fuel tank.
When removing the pump from the tank and installing it in a standard workplace, care should be taken due to the low mechanical strength of the individual components of this unit.
Diagnosis
Piston knocking in an engine can occur for various reasons. Try to determine the nature of the knocking by the signs listed below and see what you can do:
- The first case is a knock when moving the piston. In this case, the sound comes from the area at the top of the engine block. The knock is dull and is best heard at idle when the engine is hot. Solution.
- Case two - knocking of the piston pin on the connecting rod. A sharp short knock from the engine block area. Solution.
- Case three - connecting rod knock. The knocking sound is low and comes from the bottom of the engine block. It is best heard when the car is on a lift or on an overpass. Solution.
What needs to be fixed?
“Piston reversal” is the point at which the piston stops moving up and starts moving down. At this moment, its speed in the longitudinal direction of the cylinder becomes zero, and the lateral load is significant. In a normal case, the shift occurs gently, the piston rests against the oil film and does not warp. The piston begins to knock in the following situations:
- Significant wear of the cylinder in the upper part. A gap appears that is not sealed by an oil film, and when the direction changes, the piston in this gap moves laterally and warps, hitting the cylinder wall.
- The piston pin mounting sockets in the piston have worn out. In this case, the piston begins to move relative to the pin and touches the cylinder walls.
- Curvature of the piston rod. In this case, the piston does not move strictly along the axis of the cylinder, and the symmetry of the mechanism is lost. An additional sign of a bent rod is increased vibration when the engine is running; it shakes noticeably.
How can I fix this?
In the last of the cases described, only repairs and replacement of the piston group will help.
If the problem is the knocking of the piston in the cylinder or the wear of the piston pin seats, the use of a tribotechnical composition of the “Active” series, which is added to the engine oil, will help. The composition cleans the friction surfaces, and then under its influence a protective metal layer is formed on them.
- The layer restores the geometry of the cylinder, optimizes clearances and prevents rocking and distortion of the piston.
- The layer restores the shape of the seats, preventing play of the piston pin.
Do you have a car with a non-boosted gasoline engine up to 1.6 liters?
Do you have a car with an engine larger than 1.6 liters?
Important!
The tribo composition will have an impact and restore worn surfaces. However, it is not capable of restoring parts due to mechanical damage.
The composition is safe for your car. It is chemically neutral and does not change the properties of motor oil. The composition works in engines of any design, since it is activated in friction zones of metal parts. The active particles of the composition are tens of times smaller than the cells of oil filters and are not capable of clogging it. The compound restores worn surfaces, allowing parts to operate within factory tolerances even after an oil change and removal of the compound from the engine.
Bonus!
The tribological composition optimizes friction clearances. This equalizes and raises compression, reduces energy loss, and ultimately leads to lower fuel consumption. The car will return the cost of the train to you after 15-18,000 kilometers.
What needs to be fixed?
In case of wear and tear of the connecting rod bushing, it is able to move relative to the piston pin, when the connecting rod goes up, at the highest point of the piston, a gap is formed between the bushing and the pin. When the connecting rod begins to move downwards, this gap is reduced, and the bushing hits the piston pin.
How can I fix this?
In the early stages, this problem can be solved with the help of a tribotechnical composition of the “Active” series, which is added to the engine oil. The composition cleans the friction surfaces, and then under its influence a protective metal layer is formed on them. This layer is able to compensate for increased clearances, soften the contacts between the bushing and pin and significantly slow down subsequent wear.
Do you have a car with a gasoline engine?
Do you have a car with a diesel engine?
With significant wear, and therefore with a louder and more pronounced sound of impacts, it is necessary to repair the piston.
What needs to be fixed?
Connecting rod knocking occurs for two reasons:
- Wear of crankshaft bearings. In this case, a gap appears and the piston begins to move out of sync with the crankshaft, hitting it when changing the direction of movement.
- Insufficient oil pressure in the system. This may occur due to contamination of the oil passages, filter, or wear of the oil pump. In this case, the oil does not form a continuous film between the liner and the crankshaft and allows them to move relative to each other.
How can I fix this?
If the wear of the liners is not critical and there is no surface damage, the tribotechnical composition “Active Plus” will help. The composition cleans all units that are lubricated with engine oil, in particular it cleans the crankshaft journals and oil pump parts. Then, under the influence of the composition, a protective metal layer is formed on the friction surfaces, which restores the shape of the parts and is able to more firmly hold a denser film of oil.
ENGINE KNOCKING IN FRONT WHEEL VAZ CARS
In front-wheel drive VAZ cars, the engines may have different digital indices, since the engines are installed on different car models. But basically all power units have the same circuit diagram, but they may differ:
- 8-valve or 16-valve cylinder head;
- Piston diameter;
- Carburetor or injection fuel system;
- Minor design features (different sensors, collector configuration, etc.).
In particular, the VAZ 2114 car is equipped with an 8-valve 4-cylinder engine with a volume of 1.5 liters of the VAZ 2111 model, with a fuel supply system of the “injector” type (distributed injection). Exactly the same internal combustion engine (ICE) is equipped with the VAZ 2115 and VAZ 2113.
Various knocking noises can occur in an internal combustion engine, and it is not necessarily the valves that are knocking. Knocks can occur:
- In the piston group,
- In the crank mechanism;
- In the gas distribution system;
- In attachments (water pump, generator, etc.).
Why does the engine knock, what could be causing the knocking:
- insufficient amount of oil in the oil system crankcase;
- wear of parts due to long-term use;
- manufacturing defects;
- engine overheating;
- operation of the motor at constant maximum loads.
Knocking in the VAZ 2114 engine has a different character; determining the cause is sometimes difficult even for technicians who have some experience in repairs. But there are characteristic sounds that are identified quite easily:
- a sharp “dry” metallic sound, clearly audible when you sharply press the gas pedal. This is how the crankpins (bearings) of the crankshaft knock. This is a serious knock, at a minimum, it requires crankshaft grinding;
- the sound is medium in tone; when the speed increases, it seems that something is rolling around inside the internal combustion engine. This is how the pistons usually knock;
- single clicking sound. As the speed increases, it seems to merge, and is similar to the sound of a working sewing machine. This is how parts of the gas distribution mechanism (camshaft, pusher) usually knock.
Timing belt (on belt)